Page 169 of 248
. Fire hazard!
● Do not apply wax underneath the vehicle
around the ar
ea of th")
Driving
exhaust can come into contact with flamma-
bl
e m
aterials under the car (e.g. on grass or
at the forest edge). Fire hazard!
● Do not apply wax underneath the vehicle
around the ar
ea of the exhaust system: Fire
hazard! Note
While the control lamps , , or r
e-
m ain lit, ther
e may be engine problems, fuel
consumption may increase and the engine
may lose power. Catalytic converter
To maintain the useful life of the catalytic
c
on
v
erter
– Use only unleaded petrol with petrol en-
gines, as
lead damages the catalytic con-
verter.
– Do not let the fuel get too low in the tank.
– For engine oil changes, do not replenish
with too muc
h engine oil ››› page 203, Top-
ping up engine oil.
– Never tow the vehicle to start it, use jump
lea
ds if necessary ›››
page 52.
If you notice misfiring, uneven running or
loss of power when the vehicle is moving, re-
duce speed immediately and have the vehi-
cle inspected at the nearest specialised workshop. In general, the exhaust warning
lamp wi
ll light up when any of the described
symptoms occur ››› page 98. If this happens,
unburnt fuel can enter the exhaust system
and escape into the environment. The cata-
lytic converter can also be damaged by over-
heating. CAUTION
Never run the fuel tank completely dry be-
cau se the irr
egularity of the fuel supply may
cause ignition problems. This allows unburnt
fuel to enter the exhaust system, which could
cause overheating and damage the catalytic
converter. For the sake of the environment
Even when the emission control system is
work in
g perfectly, there may be a smell of
sulphur from the exhaust gas under some
conditions. This depends on the sulphur con-
tent of the fuel used. Quite often the problem
can be solved by changing to another brand
of fuel. Diesel engine particulate filter*
Fig. 161
Vehicle data sticker on back cover of
the M aint
en
ance Programme. Your vehicle is fitted with a DPF (Diesel Partic-
u
l
at
e Filter) if the vehicle data sticker (back
cover of the “Maintenance Programme”) lists
the code PR 7GG ››› Fig. 161.
The diesel engine particulate filter eliminates
most of the soot from the exhaust gas sys-
tem. Under normal driving conditions, the fil-
ter cleans itself. If this is not possible (for ex-
ample, multiple short trips) the filter will be
obstructed by soot and the diesel engine
particulate filter warning lamp will light up.
This does not represent a fault, it is a warning
that indicates that the filter has not been
able to regenerate automatically and that you
must perform a cleaning cycle, as indicated
below. »
167
Technical data
Advice
Operation
Emergencies
Safety
Page 170 of 248

Operation
Accumulation of soot in the diesel engine
p ar
tic
ulate filter*
If the control lamp lights up you should
help the filter clean itself by driving in the ap-
propriate manner.
To do this, drive about 15 minutes in fourth
or fifth gear (automatic gearbox: S gear
range) at a minimum speed of 60 km/h
(37 mph), with the engine running at approxi-
mately 2,000 rpm. In this way, the soot build
up in the filter is burned. When cleaning is
successful, the control lamp turns off.
If the lamp does not turn off, or the three
lamps turn on (particulate filter , fault in
the emission control system and glow
plugs ), drive the vehicle to a specialised
workshop and have the fault repaired at the
earliest opportunity. WARNING
Always drive according to the road weather
condition s, the t
errain and traffic. Driving rec-
ommendations should never lead to illegal
manoeuvres in surrounding traffic. CAUTION
● Your v
ehicle is not designed to use biodie-
sel fuel. Never, under any circumstances re-
fuel with biodiesel. The use of biodiesel fuel
could damage the engine and the fuel sys-
tem. The addition of biodiesel to diesel by
the diesel producer in accordance with stand- ard EN 590 is authorised and will not cause
dam
ag
e to the engine or the fuel system.
● Using diesel fuel with a high sulphur con-
tent m
ay significantly reduce the useful life of
the diesel particulate filter. Your Technical
Service will be able to tell you which coun-
tries have diesel with a high sulphur content. Engine management*
This warning lamp monitors the engine man-
agement
sy
stem for petrol engines.
The warning lamp (Electronic Power Con-
trol) lights up when the ignition is switched
on while system operation is being verified. It
should go out once the engine is started.
If there is a fault in the electronic engine
management system while you are driving,
this warning lamp will light up. Take the vehi-
cle to a specialised workshop as soon as
possible and have the engine checked.
Emission control system* Control lamp
fla
she
s:
When there is misfiring that can damage the
catalytic converter. Reduce speed and drive
carefully to the nearest specialised workshop
to have the engine checked. The control lamp
lights up:
If
a fault has developed during driving which
has reduced the quality of the exhaust gas
(e.g. lambda probe fault). Reduce speed and
drive carefully to the nearest specialised
workshop to have the engine checked.
Engine pre-heating/fault system* The warning lamp lights up to show that the
glow p
lug
s are preheating the diesel engine.
The control lamp lights up
If the control lamp lights up when the en-
gine is started it means that the glow plugs
are preheating. The engine can be started
straight away when the lamp switches off.
Control lamp flashes
If a fault develops in the engine management
system while you are driving, the glow plug
system lamp will flash . Take the vehicle to
a specialised workshop as soon as possible
and have the engine checked.
168
Page 171 of 248

Driving
Driving tips Driv in
g abr
oadTo drive abroad, the following must be taken
into c
on
sideration:
● For vehicles fitted with a catalytic converter
ensur
e that unleaded petrol is available for
the journey. See the chapter “Refuelling”. Au-
tomobile organisations will have information
about service station networks selling unlea-
ded fuel.
● In some countries, it is possible that your
car model i
s not sold, and therefore some
spare parts are not available or the technical
services may only be able to carry out limited
repairs.
SEAT importers and distributors will gladly
provide information about the technical prep-
aration that your vehicle requires and also
about necessary maintenance and repair
possibilities.
Adhesive strips for headlights
In countries where vehicles drive on the other
side of the road to your home country, the
asymmetric dipped beam may dazzle drivers
of oncoming vehicles.
To prevent dazzling, you must apply stickers
to certain parts of the headlight lenses. Fur- ther information is available at any Technical
Servic
e.
In vehicles with adaptive headlights, the ro-
tation system must previously be disconnec-
ted. To do this, please go to a specialised
workshop.
Driving on flooded roads To prevent damage to the vehicle when driv-
ing thr
ough w
ater, for example, along a floo-
ded road, please observe the following:
● The water should never come above the
low er edg
e of the bodywork.
● Drive at pedestrian speed. WARNING
After driving through water, mud, sludge,
etc ., the br
aking effect can be delayed slight-
ly due to moisture build-up on the discs and
brake pads. Applying the brakes carefully
several times will remove the moisture and
restore the full braking effect. CAUTION
● Drivin g thr
ough flooded areas may severely
damage vehicle components such as the en-
gine, transmission, running gear or electrical
system. ●
Whenever driv in
g through water, the Start-
Stop system* must be switched off
››› page 170. Note
● Chec k the depth of
the water before enter-
ing the flooded zone.
● Do not stop in the water, drive in reverse, or
stop the en
gine in any situation.
● Note that vehicles travelling in the opposite
direction ma
y splash water that could exceed
the maximum permitted water height for your
vehicle.
● Avoid driving through salt water (corro-
sion). 169
Technical data
Advice
Operation
Emergencies
Safety
Page 172 of 248

Operation
Driver assistance systems
St ar
t
-Stop System*
Description and operation The Start-Stop function stops the engine
when the v
ehic
le is stopped and starts it au-
tomatically when required.
Vehicles with a manual gearbox
– When the vehicle is stopped, put it into
neutral and r
elease the clutch pedal. The
engine will switch off. The warning lamp
will appear on the instrument panel dis-
play.
– When the clutch pedal is pressed the en-
gine wil
l start up again. The warning lamp
will switch off.
Vehicles with an automatic gearbox
– Use the foot brake to bring the vehicle to a
stop and k
eep the brake pedal pressed
down with your foot. The engine will switch
off. The warning lamp will appear in the
display.
– When you take your foot off the brake pedal
the engine wi
ll start up again. The warning
lamp will switch off. Start-Stop function conditions
● The driver seat belt must be buckled.
● The bonnet must be closed.
● The engine must be at operating tempera-
ture.
● The s
teering wheel must be straight.
● The vehicle must be on flat ground.
● The vehicle must not be in reverse.
● A trailer must not be connected.
● The temperature of the interior must be
within the comf
ort limits (A/C button should
be sel ect
ed).
● The w
indscreen de-mist function must be
off.
● If in an inc
rease in airflow is not reques
ted.
● The temperature must not be set to HI or
LO .
● The driver door must be closed.
● The diesel particulate filter must not be in
reg
eneration mode, for diesel engines.
● The battery charge must not be low for the
next s
tart.
● Battery temperature must be between -1°C
(+30°F) and +55°C (+131°F).
Star
t-Stop function interruption
In the following situations, the Start-Stop
function will be interrupted and the engine
will automatically start: ●
The vehic
le starts moving.
● The brake pedal is pressed several times in
a row
.
● The battery has been discharged excessive-
ly.
● The St
art-Stop System is manually deacti-
vated.
● The w
indscreen de-mist function is turned
on.
● The temperature of the interior exceeds the
comfor
t limits ( A/C button).
● If the airflow is increased by more than 3
pr e
s
ses.
● Temperature setting HI or LO is sel
ected.
● The engine coolant temperature is insuffi-
cient.
● The alt
ernator is faulty, for example the V-
belt ha
s ruptured.
● If any of the conditions described in the
previou
s section are not fulfilled.
When the engine is turned off by the Start-
Stop function, this is displayed on the instru-
ment panel.
If the Start-Stop system is not switched on,
the warning lamp will appear on the instru-
ment panel.
170
Page 173 of 248

Driver assistance systems
WARNING
Never allow the vehicle to move with the en-
gine off f or an
y reason. You could lose control
of your vehicle. This could cause an accident
and serious injury.
● The brake servo does not work with the en-
gine off. Y
ou need more force to stop the vehi-
cle.
● Power steering does not work when the en-
gine is not
running. That is why it is much
more difficult to turn the steering wheel.
● Turn off the Start-Stop system when driving
through wat
er (fording streams, etc.). Note
● For v
ehicles with the Start-Stop function
and a manual gearbox, when the engine is
started, the clutch must be pressed.
● When the conditions for the Start-Stop
function ar
e not fulfilled, the instrument pan-
el displays the Start-Stop indicator dimmed.
● If the steering wheel is turned more than
270°, it wi
ll not be possible to start the vehi-
cle again. To start the vehicle, straighten the
steering wheel so that it is turned less than
270°.
● There are different versions of the dash
panel; the dis
play of indications on the
screen may differ. Activating and deactivating the Start-
St
op f
u
nction Fig. 162
The Start-Stop function button. Every time the ignition is switched on, the
St
ar
t
-Stop function is automatically activa-
ted.
Manually deactivating the Start-Stop func-
tion
– Press the
› ›
› Fig. 162
button located on
the centre console. When the Start-Stop
function is switched off, the warning lamp
comes on.
– If the Start-Stop function is operating then
the engine st
arts immediately. Switching the Start-Stop function on manual-
ly
– Press the
› ››
Fig. 162
b
utton located on
the centre console. The warning lamp will
switch off.
Fatigue detection (break rec-
ommendation)* Introduction
›› ›
table on page 2
The Fatigue detection informs the driver
when their driving behaviour shows signs of
fatigue. WARNING
Do not let the comfort afforded by the Fatigue
detection sy s
tem tempt you into taking any
risks when driving. Take regular breaks, suffi-
cient in length when making long journeys.
● The driver always assumes the responsibil-
ity of driv
ing to their full capacity.
● Never drive if you are tired.
● The system does not detect the tiredness of
the driver in al
l circumstances. Consult the in-
formation in the section ››› page 172, System
limitations. » 171
Technical data
Advice
Operation
Emergencies
Safety
Page 174 of 248

Operation
●
In some sit uation
s, the system may incor-
rectly interpret an intended driving manoeu-
vre as driver tiredness.
● No warning is given in the event of the ef-
fect c
alled microsleep!
● Please observe the indications on the in-
strument p
anel and act as is necessary. Note
● Fatigue det ection h
as been developed for
driving on motorways and well paved roads
only.
● If there is a fault in the system, have it
check
ed by a specialised workshop. Function and operation
Fig. 163
On the instrument panel display: fa-
tigue det ection symbo
l
.Fatigue detection determines the driving be-
h
av
iour of
the driver when starting a journey, making a calculation of tiredness. This is
cons
tantly compared with the current driving
behaviour. If the system detects that the driv-
er is tired, an audible warning is given with a
sound and an optic warning is shown with a
symbol and complementary message on the
instrument panel display ››› Fig. 163. The
message on the instrument panel display is
shown for approximately 5 seconds, and de-
pending on the case, is repeated. The system
stores the last message displayed.
The message on the instrument panel display
can be switched off by pressing the button on the windscreen wiper lever or the
b
utt
on on the multi function steering
wheel
›
›
› page 25.
The message can be recalled to the instru-
ment panel display using the multifunction
display ›››
page 25.
Conditions of operation
Driving behaviour is only calculated on
speeds above about 65 km/h (40 mph) up to
around 200 km/h (125 mph).
Switching on and off
Fatigue detection can be activated or deacti-
vated in the Easy Connect system with the
button and the function button
›››
pag e 99. A mark indicates that the adjust-
ment
has been activated. System limitations
The Fatigue det
ection h
as certain limitations
inherent to the system. The following condi-
tions can limit the Fatigue detection or pre-
vent it from functioning.
● At speeds below 65 km/h (40 mph)
● At speeds above 200 km/h (125 mph)
● When cornering
● On roads in poor condition
● In unfavourable weather conditions
● When a sporty driving style is employed
● In the event of a serious distraction to the
driver
Fatigue det
ection will be restored when the
vehicle is stopped for more than 15 minutes,
when the ignition is switched off or when the
driver has unbuckled their seat belt and
opened the door.
In the event of slow driving during a long pe-
riod of time (below 65 km/h, 40 mph) the
system automatically re-establishes the tired-
ness calculation. When driving at a faster
speed the driving behaviour will be recalcula-
ted.
172
Page 175 of 248

Driver assistance systems
Parking aid Gener a
l
informationVarious systems are available to help you
when park
in
g or manoeuvring in tight
spaces, depending on the equipment fitted
on your vehicle.
The rear parking aid is an audible assistant
that warns about obstacles located behind
the vehicle ››› page 174.
During parking, Parking System Plus assists
the driver by visually and audibly warning
them about obstacles detected in front and
behind the vehicle ››› page 174. WARNING
● Alw a
ys pay attention, also when looking
straight ahead, to traffic and the vehicle sur-
roundings. The assistance systems are not a
replacement for driver awareness. When in-
serting or removing the vehicle from a park-
ing space, or when performing similar ma-
noeuvres the driver always assumes the re-
sponsibility.
● Adapt your speed and driving style at all
times t
o suit visibility, weather, road and traf-
fic conditions.
● The ultrasound sensors have blind spots in
which ob
stacles and people are not regis-
tered. Pay special attention to children and
animals. ●
Alw a
ys keep visual control of the vehicle
surroundings: use the mirrors for additional
help. CAUTION
Parking Aid functions may be negatively af-
f ect ed b
y different factors that may lead to
damage to the vehicle or its immediate sur-
rounds:
● Under certain circumstances, the system
does not
detect or display certain objects:
– Objects such as chains, trailer draw bars,
fences, posts and thin trees.
– Objects that are located above the sen-
sors, such as protrusions in a wall.
– Objects with certain surfaces or struc-
tures, such as wire mesh fences or pow-
der snow.
● Certain surfaces of objects and garments
do not refl
ect the ultrasound sensors' sig-
nals. The system cannot detect, at least cor-
rectly, these objects or people wearing such
clothes.
● Ultrasound sensor signals may be affected
by e
xternal sound sources. In certain circum-
stances this may prevent them from detect-
ing people or objects.
● Please note that low obstacles detected by
the syst
em may no longer be registered by
the sensors as the car moves closer, so the
system will not give any further warning. In
certain circumstances, objects such as high kerbs that could damage the bottom of the
vehic
l
e are not detected either.
● If the first warning from the ParkPilot is ig-
nored, the v
ehicle could suffer considerable
damage.
● The knocks or damage on the radiator
grill
e, bumper, wheel arch and vehicle under-
body can adjust the orientation of the sen-
sors. This can affect the parking aid function.
Have the function checked by a specialised
workshop. Note
● In cer t
ain situations, the system can give a
warning even though there is no obstacle in
the detected area, e.g:
–with rough or cobbled floors or ground
with long grass;
– with external ultrasound sources, such as
cleaning vehicles or other vehicles;
– In downpours, intense snow or dense ex-
haust gases;
– if the registration plate (front or rear) is
not properly affixed to the bumper sur-
face;
– or in locations such as the brow of a hill.
● In order to guarantee good system opera-
tion, keep the ultr
asound sensors clean, free
of snow or ice, and do not cover them with
adhesives or other objects.
● If you use high-pressure or vapour equip-
ment to c
lean the ultrasound sensors, apply » 173
Technical data
Advice
Operation
Emergencies
Safety
Page 176 of 248

Operation
it directly only very briefly and always from a
dis
t
ance of more than 10 cm.
● Retrofitting of accessories to the vehicle,
such a
s a bicycle rack, may interfere with the
operation of the Parking Aid.
● In order to familiarise yourself with the sys-
tem, it i
s advised that you practice parking in
an area or car park that is free from traffic.
There must be good weather and light condi-
tions.
● The volume and tone of the warnings can
be modified, in addition t
o the indications
››› page 177.
● In vehicles without a driv
er information
system, these parameters can be modified in
a SEAT Official Service or in a specialised
workshop.
● Please observe information on towing a
trail
er ››› page 177.
● The display on the Easy Connect screen
shows
a slight time delay. Rear parking aid*
The rear Parking Aid assists the driver in
p
ark
in
g by means of audible warning
sounds.
Description
There are sensors integrated in the rear
bumper. When the sensors detect an obsta-
cle, you are alerted by audible warnings. Make particularly sure that the sensors are
not co
vered by adhesives, residues and the
like, as this could affect the system's opera-
tion. Cleaning instructions ››› page 191.
The approximate measurement range of the
rear sensors is:
side area0.60 m
central area1.60 m As you approach the obstacle, the time inter-
val
betw
een the audible warnings will be re-
duced. When you reach around 0.30 m the
warning will be constant: Do not continue to
move forward (or backward) ››› in General
inf orm
ation on p
age 173, ››› in General in-
f orm
ation on p
age 173 !
If you maintain separation from the obstacle,
the volume of the warning begins to reduce
after four seconds (does not affect the tone
of the constant warning).
Activating/Deactivating
When engaging reverse gear, the parking aid
is automatically switched on. This is con-
firmed with a short warning.
On disengaging reverse gear, the Parking Aid
system is disconnected immediately. Parking system plus*
Fig. 164
Represented area. Parking system plus assists you audibly and
v
i
s
ually when parking.
There are sensors integrated in the front and
rear bumpers. When they detect an obstacle,
you are alerted by audible warnings and visu-
ally on the Easy Connect system.
In the event of danger of a frontal collision,
the audible warnings come from the front of
the vehicle, and in the event of the danger of
a rear-end collision they come from the rear.
Make particularly sure that the sensors are
not covered by adhesives, residues and the
like, as this could affect the system's opera-
tion. Cleaning instructions ››› page 191.
The approximate measurement range of the
sensors is:
1.20 m
A 174
 1
1 2
2 3
3 4
4 5
5 6
6 7
7 8
8 9
9 10
10 11
11 12
12 13
13 14
14 15
15 16
16 17
17 18
18 19
19 20
20 21
21 22
22 23
23 24
24 25
25 26
26 27
27 28
28 29
29 30
30 31
31 32
32 33
33 34
34 35
35 36
36 37
37 38
38 39
39 40
40 41
41 42
42 43
43 44
44 45
45 46
46 47
47 48
48 49
49 50
50 51
51 52
52 53
53 54
54 55
55 56
56 57
57 58
58 59
59 60
60 61
61 62
62 63
63 64
64 65
65 66
66 67
67 68
68 69
69 70
70 71
71 72
72 73
73 74
74 75
75 76
76 77
77 78
78 79
79 80
80 81
81 82
82 83
83 84
84 85
85 86
86 87
87 88
88 89
89 90
90 91
91 92
92 93
93 94
94 95
95 96
96 97
97 98
98 99
99 100
100 101
101 102
102 103
103 104
104 105
105 106
106 107
107 108
108 109
109 110
110 111
111 112
112 113
113 114
114 115
115 116
116 117
117 118
118 119
119 120
120 121
121 122
122 123
123 124
124 125
125 126
126 127
127 128
128 129
129 130
130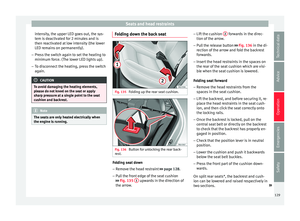 131
131 132
132 133
133 134
134 135
135 136
136 137
137 138
138 139
139 140
140 141
141 142
142 143
143 144
144 145
145 146
146 147
147 148
148 149
149 150
150 151
151 152
152 153
153 154
154 155
155 156
156 157
157 158
158 159
159 160
160 161
161 162
162 163
163 164
164 165
165 166
166 167
167 168
168 169
169 170
170 171
171 172
172 173
173 174
174 175
175 176
176 177
177 178
178 179
179 180
180 181
181 182
182 183
183 184
184 185
185 186
186 187
187 188
188 189
189 190
190 191
191 192
192 193
193 194
194 195
195 196
196 197
197 198
198 199
199 200
200 201
201 202
202 203
203 204
204 205
205 206
206 207
207 208
208 209
209 210
210 211
211 212
212 213
213 214
214 215
215 216
216 217
217 218
218 219
219 220
220 221
221 222
222 223
223 224
224 225
225 226
226 227
227 228
228 229
229 230
230 231
231 232
232 233
233 234
234 235
235 236
236 237
237 238
238 239
239 240
240 241
241 242
242 243
243 244
244 245
245 246
246 247
247