Page 1872 of 3641
FL-6
< REMOVAL AND INSTALLATION >
FUEL LEVEL SENSOR UNIT, FUEL FILTER AND FUEL PUMP ASSEMBLY
REMOVAL AND INSTALLATION
FUEL LEVEL SENSOR UNIT, FUEL FILTER AND FUEL PUMP ASSEMBLY
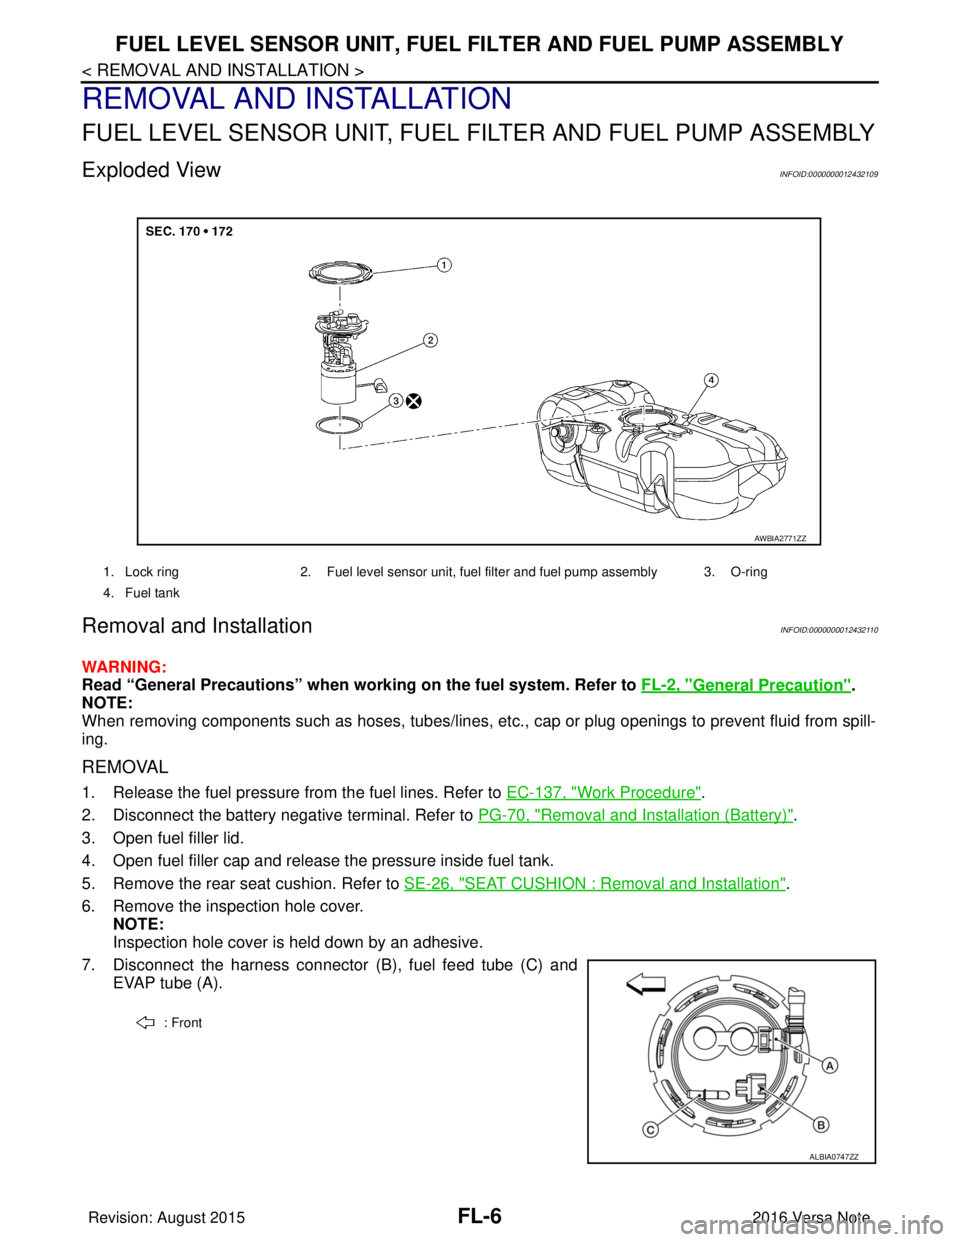
Exploded ViewINFOID:0000000012432109
Removal and InstallationINFOID:0000000012432110
WARNING:
Read “General Precautions” when wo rking on the fuel system. Refer to FL-2, "
General Precaution".
NOTE:
When removing components such as hoses, tubes/lines, etc. , cap or plug openings to prevent fluid from spill-
ing.
REMOVAL
1. Release the fuel pressure from the fuel lines. Refer to EC-137, "Work Procedure".
2. Disconnect the battery negative terminal. Refer to PG-70, "
Removal and Installation (Battery)".
3. Open fuel filler lid.
4. Open fuel filler cap and release the pressure inside fuel tank.
5. Remove the rear seat cushion. Refer to SE-26, "
SEAT CUSHION : Removal and Installation".
6. Remove the inspection hole cover. NOTE:
Inspection hole cover is held down by an adhesive.
7. Disconnect the harness connector (B), fuel feed tube (C) and EVAP tube (A).
1. Lock ring 2. Fuel level sensor unit, fuel filter and fuel pump assembly 3. O-ring
4. Fuel tank
AWBIA2771ZZ
: Front
ALBIA0747ZZ
Revision: August 2015 2016 Versa Note
cardiagn.com
Page 1873 of 3641

FUEL LEVEL SENSOR UNIT, FUEL FILTER AND FUEL PUMP ASSEMBLYFL-7
< REMOVAL AND INSTALLATION >
C
DE
F
G H
I
J
K L
M A
FL
NP
O
Remove the quick connector as follows:
• Hold the sides of the connector, push in tabs (B) and pull (A)
out the tube.
• If the connector and the tube are stuck together, push and pull several times until they start to move. Then disconnect them
by pulling.
CAUTION:
• Quick connector (1) can be disconnected when the tabs (F) are depressed completely. Do not twist it more than
necessary.
• Do not use any tools to disconnected quick connector.
• Keep resin tube (C) away from heat. Be especially careful when welding near the resin tube.
• Prevent acid liquid such as battery electrolyte, etc. from
getting on resin tube.
• Do not bend or twist resin tube during installation and dis- connection.
• Do not remove the remaining retainer (2) on hard tube (or
the equivalent) (A) except when resin tube or retainer is
replaced.
• When resin tube or hard tube (or the equivalent) is
replaced, also replace retainer with new one.
• To keep the connecting portio n clean and to avoid dam-
age and foreign materials, cover them completely with
plastic bags (A) or something similar.
JPBIA0134ZZ
(B) : Connection (cross-section)
(D) : To under floor fuel line
(E) : To fuel tank
(G) : Disconnection
JPBIA0130ZZ
JPBIA0135ZZ
Revision: August 2015 2016 Versa Note
cardiagn.com
Page 1874 of 3641
FL -8
< REMOVAL AND INSTALLATION >
FUEL LEVEL SENSOR UNIT, FUEL FILTER AND FUEL PUMP ASSEMBLY
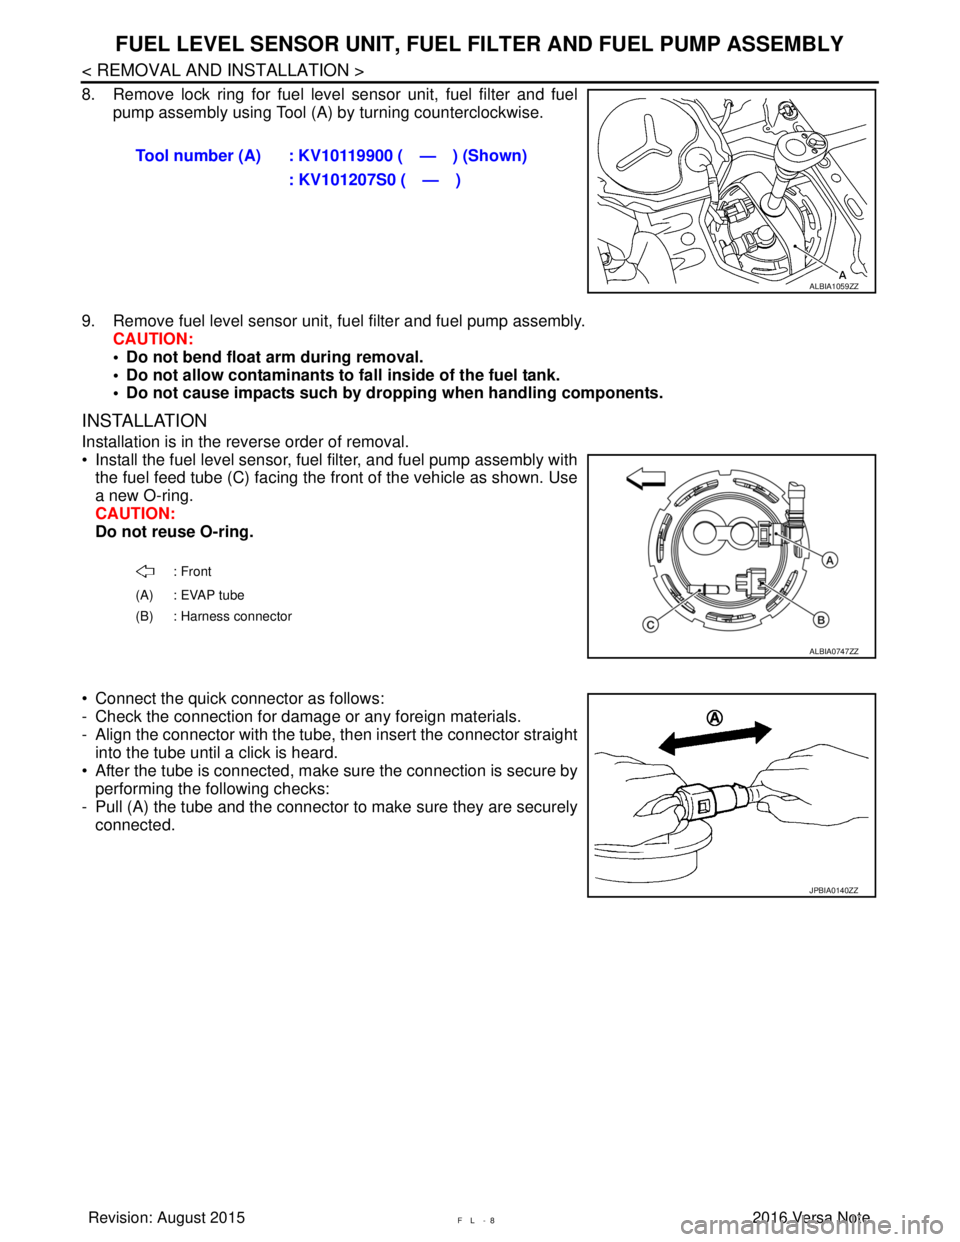
8. Remove lock ring for fuel level sensor unit, fuel filter and fuel
pump assembly using Tool (A) by turning counterclockwise.
9. Remove fuel level sensor unit, fuel filter and fuel pump assembly. CAUTION:
• Do not bend float arm during removal.
• Do not allow contaminants to fa ll inside of the fuel tank.
• Do not cause impacts such by dro pping when handling components.
INSTALLATION
Installation is in the reverse order of removal.
• Install the fuel level sensor, fuel filter, and fuel pump assembly with
the fuel feed tube (C) facing the front of the vehicle as shown. Use
a new O-ring.
CAUTION:
Do not reuse O-ring.
• Connect the quick connector as follows:
- Check the connection for damage or any foreign materials.
- Align the connector with the tube, then insert the connector straight into the tube until a click is heard.
• After the tube is connected, make sure the connection is secure by performing the following checks:
- Pull (A) the tube and the connector to make sure they are securely
connected. Tool number (A) : KV10119900 ( — ) (Shown)
: KV101207S0 ( — )
ALBIA1059ZZ
: Front
(A) : EVAP tube
(B) : Harness connector
ALBIA0747ZZ
JPBIA0140ZZ
Revision: August 2015 2016 Versa Note
cardiagn.com
Page 1875 of 3641
FUEL LEVEL SENSOR UNIT, FUEL FILTER AND FUEL PUMP ASSEMBLYFL-9
< REMOVAL AND INSTALLATION >
C
DE
F
G H
I
J
K L
M A
FL
NP
O
- Visually confirm that the two retainer tabs (F) are connected to the
quick connector (1).
• Perform inspection after installation. Refer to FL-9, "
Inspection".
InspectionINFOID:0000000012432111
INSPECTION AFTER INSTALLATION
Use the following procedure to check for fuel leaks.
1. Turn ignition switch “ON” (with engine stopped), then check fuel system connections for leaks by applying
fuel pressure to fuel piping.
2. Start engine and let it idle and check there are no fuel leaks at the fuel system connections.
(B) : Connection (cross-section)
(C) : Resin tube
(D) : To under floor fuel line
(E) : To fuel tank
(G) : Disconnection
JPBIA0130ZZ
Revision: August 2015 2016 Versa Note
cardiagn.com
Page 1879 of 3641
FUEL TANKFL-13
< REMOVAL AND INSTALLATION >
C
DE
F
G H
I
J
K L
M A
FL
NP
O
17. If replacing the fuel tank, remove the fuel level sensor unit, fuel filter and fuel pump assembly to transfer to
the new fuel tank.
CAUTION:
Do not reuse O-ring.
INSTALLATION
Installation is in the reverse order of removal.
Fuel Filler Hose
• Insert fuel filler hose to the length below.
• Be sure hose clamp is not placed on swelled area of fuel filler tube.
• Install fuel filler hose to fuel t ank, paying attention to install mark.
EVAP Hose
1. Check connections for damage or foreign material.
2. Align the matching side connection part with the center of shaft, and insert connector straight until a "click"
sound is heard.
InspectionINFOID:0000000012432114
INSPECTION AFTER INSTALLATION
Use the following procedure to check for fuel leaks.
1. Turn ignition switch “ON” (with engine stopped), then check fuel system connections for leaks by applying
fuel pressure to fuel piping.
2. Start engine and let it idle and check there are no fuel leaks at the fuel system connections.
Fuel filler hose : 35 mm (1.38 in)
Vent hose : 25 mm (0.98 in)
Revision: August 2015
2016 Versa Note
cardiagn.com
Page 1886 of 3641
FL-20
< DISASSEMBLY AND ASSEMBLY >
FUEL LEVEL SENSOR UNIT
DISASSEMBLY AND ASSEMBLY
FUEL LEVEL SENSOR UNIT
Exploded ViewINFOID:0000000012432124
Fuel Level Sensor Unit
Disassembly and AssemblyINFOID:0000000012432125
DISASSEMBLY
1. Disconnect fuel level sensor unit/fuel tank temperature sensorharness connectors (1).
NOTE:
Hold connector with your fingers, because there is no tab for
releasing stopper. Pull it out straight downward.
ALBIA1132ZZ
1. Fuel filter and pump assembly 2. Float arm assembly 3. Fuel tank temperature sensor
4. Fuel level sensor unit 5. Fuel level sensor unit/fuel tank temperature sensor harness connector
AWBIA1590ZZ
Revision: August 2015 2016 Versa Note
cardiagn.com
Page 1887 of 3641
FUEL LEVEL SENSOR UNITFL-21
< DISASSEMBLY AND ASSEMBLY >
C
DE
F
G H
I
J
K L
M A
FL
NP
O
2. Remove fuel tank temperature s
ensor (2) from fuel filter and fuel
pump assembly (1).
3. Using a suitable tool push tab (A) in the direction ( ) shown and remove fuel level sensor unit (2) from fuel filter and fuel
pump assembly (1).
CAUTION:
• Be careful not to damage the fuel level sensor unit.
• Do not disassemble fuel filter and fuel pump assembly.
ASSEMBLY
1. Check for damage of fuel level sensor unit installation position on the side of fuel filter and pump assem- bly.
2. Slide fuel level sensor unit until it aligns to installation groove, then insert it until it stops. • After inserting, apply force in reverse direction (removal direction) to ensure it cannot be pulled out.
3. Connect fuel level sensor unit/fuel t ank temperature sensor harness connector.
INSPECTION AFTER INSTALLATION
Use the following procedure to check for fuel leaks.
1. Turn ignition switch “ON” (with engine stopped), then check fuel system connections for leaks by applying
fuel pressure to fuel piping.
2. Start engine and let it idle and check there are no fuel leaks at the fuel system connections.
ALBIA1134ZZ
ALBIA1135ZZ
Revision: August 2015 2016 Versa Note
cardiagn.com
Page 1915 of 3641
PRECAUTIONSGI-27
< PRECAUTION >
C
DE
F
G H
I
J
K L
M B
GI
N
O P
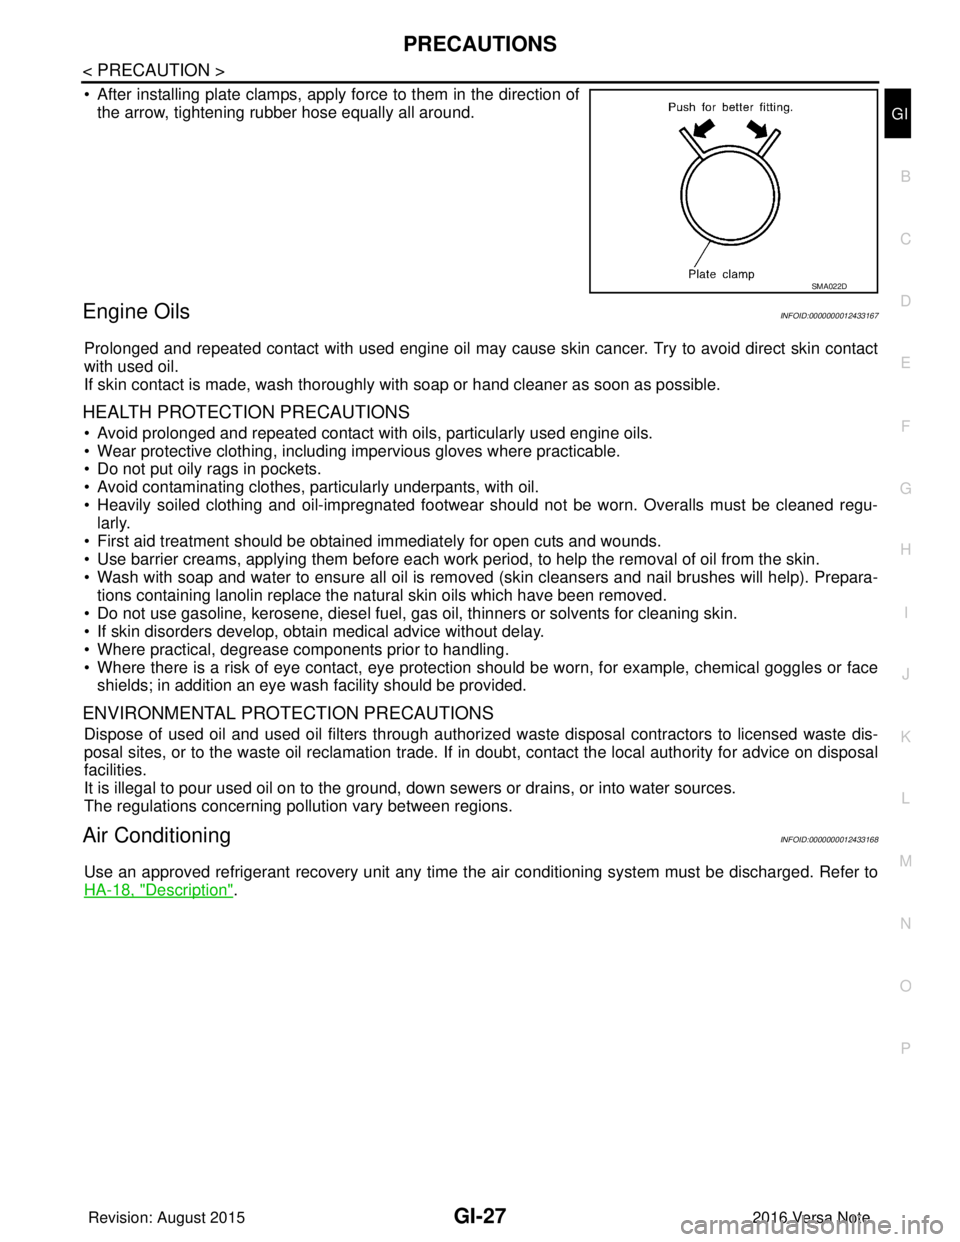
• After installing plate clamps, apply force to them in the direction of the arrow, tightening rubber hose equally all around.
Engine OilsINFOID:0000000012433167
Prolonged and repeated contact with used engine oil may cause skin cancer. Try to avoid direct skin contact
with used oil.
If skin contact is made, wash thoroughly with soap or hand cleaner as soon as possible.
HEALTH PROTECTION PRECAUTIONS
• Avoid prolonged and repeated contact with oils, particularly used engine oils.
• Wear protective clothing, including impervious gloves where practicable.
• Do not put oily rags in pockets.
• Avoid contaminating clothes, particularly underpants, with oil.
• Heavily soiled clothing and oil-impregnated footwear should not be worn. Overalls must be cleaned regu-
larly.
• First aid treatment should be obtained immediately for open cuts and wounds.
• Use barrier creams, applying them before each work period, to help the removal of oil from the skin.
• Wash with soap and water to ensure all oil is removed (skin cleansers and nail brushes will help). Prepara-
tions containing lanolin replace the natural skin oils which have been removed.
• Do not use gasoline, kerosene, diesel fuel, gas oil, thinners or solvents for cleaning skin.
• If skin disorders develop, obtain medical advice without delay.
• Where practical, degrease components prior to handling.
• Where there is a risk of eye contact, eye protection should be worn, for example, chemical goggles or face shields; in addition an eye wash facility should be provided.
ENVIRONMENTAL PROTECTION PRECAUTIONS
Dispose of used oil and used oil filters through authorized waste disposal contractors to licensed waste dis-
posal sites, or to the waste oil reclamation trade. If in doubt, contact the local authority for advice on disposal
facilities.
It is illegal to pour used oil on to the ground, down sewers or drains, or into water sources.
The regulations concerning po llution vary between regions.
Air ConditioningINFOID:0000000012433168
Use an approved refrigerant recovery unit any time t he air conditioning system must be discharged. Refer to
HA-18, "
Description".
SMA022D
Revision: August 2015 2016 Versa Note
cardiagn.com