2016 MERCEDES-BENZ SL ROADSTER boot
[x] Cancel search: bootPage 285 of 333
You could otherwise scratch or damage the
surfaces and protective film.
! Do not park up the vehicle for an extended
period straight after cleaning it, particularly
after having cleaned the wheels with wheel
cleaner. Wheel cleaners could cause
increased corrosion of the brake discs and
brake pads/linings. For this reason, you
should drive for a few minutes after cleaning. Braking heats the brake discs and the brake
pads/linings, thus drying them. The vehicle
can then be parked up.
Regular care of your vehicle is a condition for
retaining quality in the long term.
Use care products and cleaning agents recom-
mended and approved by Mercedes-Benz. Washing the vehicle and cleaning the
paintwork
Automatic car wash G
WARNING
Braking efficiency is reduced after the vehicle has been washed. There is a risk of an acci-
dent.
After washing the vehicle, brake carefully
while paying attention to the traffic conditions in order to restore full braking efficiency.
! When DISTRONIC PLUS or the HOLD func-
tion is activated, the vehicle brakes automat- ically in certain situations.
To avoid damage to the vehicle, deactivate
DISTRONIC PLUS and the HOLD function in
the following or similar situations:
R when towing away
R in a car wash
! It is preferable to use car washes with
adjustable high-pressure pre-cleaning that
corresponds to the specification for the Cab-
riolet programme. In car washes that use high
water pressures, there is a risk that a small
amount of water may leak into the vehicle. !
Vehicles with HANDS-FREE ACCESS: if a
key with KEYLESS-GO is within the detection
range of the KEYLESS-GO antenna, the fol-
lowing situations could lead to the uninten-
tional opening of the boot lid:
R using a car wash
R using a high-pressure cleaner
Make sure that the key is at least 2 m away
from the vehicle.
! Make sure that the automatic transmission
is in position Nwhen washing your vehicle in
a tow-through car wash. Other transmission
positions may lead to damage to the vehicle.
! Make sure that:
R the side windows and the roof are com-
pletely closed
R the climate control blower is switched off
R the windscreen wiper switch is at position
0
The vehicle could otherwise be damaged.
You can wash the vehicle in an automatic car
wash from the very start.
Wash off excess dirt before cleaning the vehicle
in an automatic car wash.
After using an automatic car wash, wipe wax off the windscreen and the wiper blades. This will
prevent smears and reduce wiping noises
caused by residue on the windscreen.
Washing by hand In some countries, washing by hand is only
allowed at specially equipped washing bays.
Observe the legal requirements for each indi-
vidual country.
X Do not use hot water and do not wash the
vehicle in direct sunlight.
X Use a soft sponge to clean.
X Use a mild cleaning agent, such as a car
shampoo approved by Mercedes-Benz.
X Thoroughly hose down the vehicle with a gen-
tle jet of water.
X Do not point the water jet directly towards the
air inlet.
X Use plenty of water and rinse out the sponge
frequently. 282
CareMaintenance and care
Page 286 of 333
X
Rinse the vehicle with clean water and dry
thoroughly with a chamois.
X Do not let the cleaning agent dry on the paint-
work.
When using the vehicle in winter, remove all
traces of road salt deposits carefully and as
soon as possible.
High-pressure cleaning equipment G
WARNING
The water jet of circular-jet nozzles (dirt grind- ers) can cause damage not visible from the
outside to tyres or chassis components. Com-
ponents damaged in this way can unexpect-
edly fail. There is a risk of an accident.
Do not use high-pressure cleaners with circu-
lar-jet nozzles to clean the vehicle. Have dam- aged tyres or chassis components replaced
immediately.
! Always maintain a distance of at least 30 cm
between the vehicle and the high-pressure
cleaner nozzle. Information about the correct
distance is available from the equipment
manufacturer.
Move the high-pressure cleaner nozzle
around when cleaning your vehicle.
Do not aim directly at any of the following:
R tyres
R door gaps, roof gaps, joints etc.
R soft top (Designo vario-roof)
R electrical components
R battery
R plug connectors
R lights
R seals
R trim elements
R ventilation slots
Damage to seals or electrical components
can lead to leaks or failures.
! Vehicles with HANDS-FREE ACCESS: if a
key with KEYLESS-GO is within the detection
range of the KEYLESS-GO antenna, the fol-
lowing situations could lead to the uninten-
tional opening of the boot lid:
R using a car wash
R using a high-pressure cleaner Make sure that the key is at least 2 m away
from the vehicle.
! Mille Miglia special model: parts of your
vehicle are covered with a decorative foil.
Maintain a distance of at least 70 cm between
the foil-wrapped parts of the vehicle and the
nozzle of the high pressure cleaner.
Information about the correct distance is
available from the equipment manufacturer.
Move the high-pressure cleaner nozzle
around when cleaning your vehicle.
Cleaning the paintwork !
Do not affix:
R stickers
R films
R magnetic plates or similar items
to painted surfaces. You could otherwise
damage the paintwork.
Scratches, corrosive deposits, areas affected by
corrosion and damage caused by inadequate
care cannot always be completely repaired. In
such cases, visit a qualified specialist workshop.
X Remove impurities immediately, where pos-
sible, whilst avoiding rubbing too hard.
X Soak insect remains with insect remover and
rinse off the treated areas afterwards.
X Soak bird droppings with water and rinse off
the treated areas afterwards.
X Remove coolant, brake fluid, tree resins, oils,
fuels and greases by rubbing gently with a
cloth soaked in petroleum ether or lighter
fluid.
X Use tar remover to remove tar stains.
X Use silicone remover to remove wax.
Care and treatment of matt paintwork !
Never polish the vehicle or the light alloy
wheels. Polishing makes the paintwork shiny.
! The following may cause the paint to
become shiny and thus reduce the matt
effect:
R vigorous rubbing with unsuitable materials
R frequent use of car washes
R washing the vehicle in direct sunlight
! Never use paint cleaner, buffing or polishing
products, or gloss preserver, e.g. wax. These Care
283Maintenance and care Z
Page 290 of 333
Where will I find...?
Warning triangle
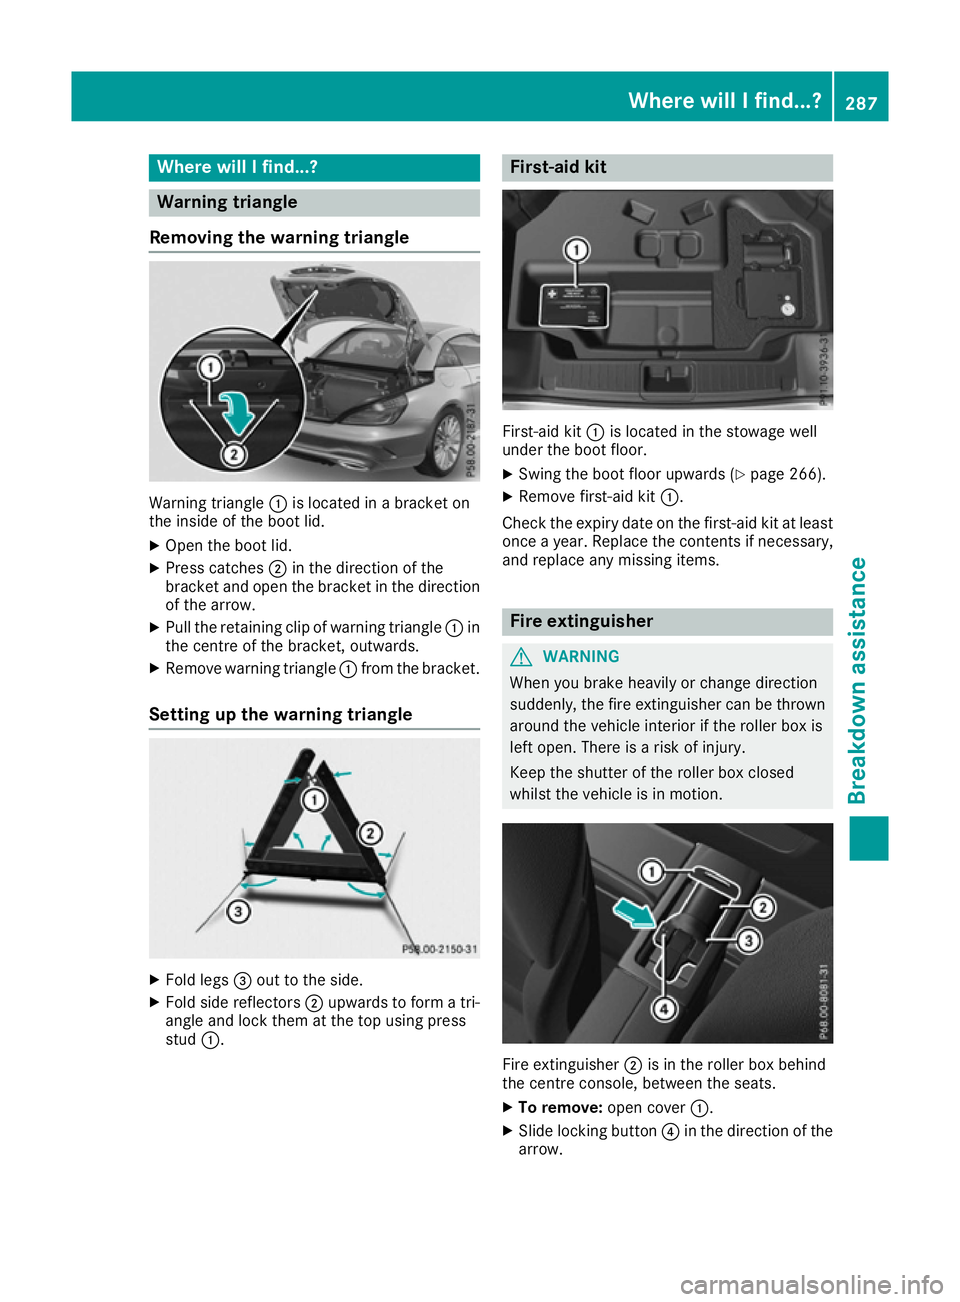
Removing the warning triangle Warning triangle
:is located in a bracket on
the inside of the boot lid.
X Open the boot lid.
X Press catches ;in the direction of the
bracket and open the bracket in the direction of the arrow.
X Pull the retaining clip of warning triangle :in
the centre of the bracket, outwards.
X Remove warning triangle :from the bracket.
Setting up the warning triangle X
Fold legs =out to the side.
X Fold side reflectors ;upwards to form a tri-
angle and lock them at the top using press
stud :. First-aid kit
First-aid kit
:is located in the stowage well
under the boot floor.
X Swing the boot floor upwards (Y page 266).
X Remove first-aid kit :.
Check the expiry date on the first-aid kit at least once a year. Replace the contents if necessary,and replace any missing items. Fire extinguisher
G
WARNING
When you brake heavily or change direction
suddenly, the fire extinguisher can be thrown around the vehicle interior if the roller box is
left open. There is a risk of injury.
Keep the shutter of the roller box closed
whilst the vehicle is in motion. Fire extinguisher
;is in the roller box behind
the centre console, between the seats.
X To remove: open cover:.
X Slide locking button ?in the direction of the
arrow. Where will I find...?
287Breakdown assistance Z
Page 291 of 333
X
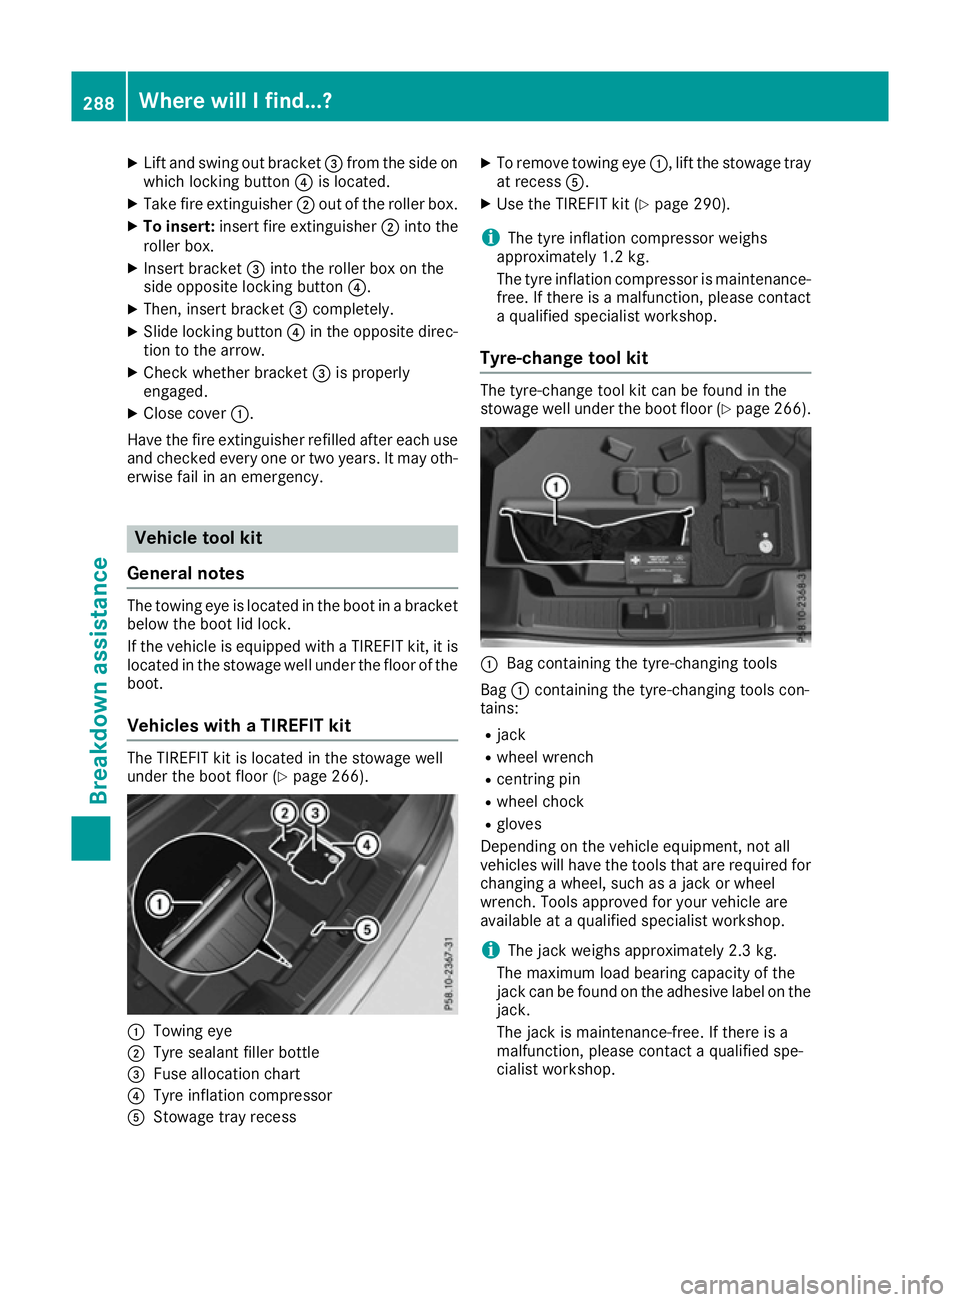
Lift and swing out bracket =from the side on
which locking button ?is located.
X Take fire extinguisher ;out of the roller box.
X To insert: insert fire extinguisher ;into the
roller box.
X Insert bracket =into the roller box on the
side opposite locking button ?.
X Then, insert bracket =completely.
X Slide locking button ?in the opposite direc-
tion to the arrow.
X Check whether bracket =is properly
engaged.
X Close cover :.
Have the fire extinguisher refilled after each use and checked every one or two years. It may oth-
erwise fail in an emergency. Vehicle tool kit
General notes The towing eye is located in the boot in a bracket
below the boot lid lock.
If the vehicle is equipped with a TIREFIT kit, it is located in the stowage well under the floor of the
boot.
Vehicles with a TIREFIT kit The TIREFIT kit is located in the stowage well
under the boot floor (Y page 266).:
Towing eye
; Tyre sealant filler bottle
= Fuse allocation chart
? Tyre inflation compressor
A Stowage tray recess X
To remove towing eye :, lift the stowage tray
at recess A.
X Use the TIREFIT kit (Y page 290).
i The tyre inflation compressor weighs
approximately 1.2 kg.
The tyre inflation compressor is maintenance-
free. If there is a malfunction, please contact a qualified specialist workshop.
Tyre-change tool kit The tyre-change tool kit can be found in the
stowage well under the boot floor (Y
page 266). :
Bag containing the tyre-changing tools
Bag :containing the tyre-changing tools con-
tains:
R jack
R wheel wrench
R centring pin
R wheel chock
R gloves
Depending on the vehicle equipment, not all
vehicles will have the tools that are required for
changing a wheel, such as a jack or wheel
wrench. Tools approved for your vehicle are
available at a qualified specialist workshop.
i The jack weighs approximately 2.3 kg.
The maximum load bearing capacity of the
jack can be found on the adhesive label on the jack.
The jack is maintenance-free. If there is a
malfunction, please contact a qualified spe-
cialist workshop. 288
Where will I find...?Breakdown assistance
Page 294 of 333
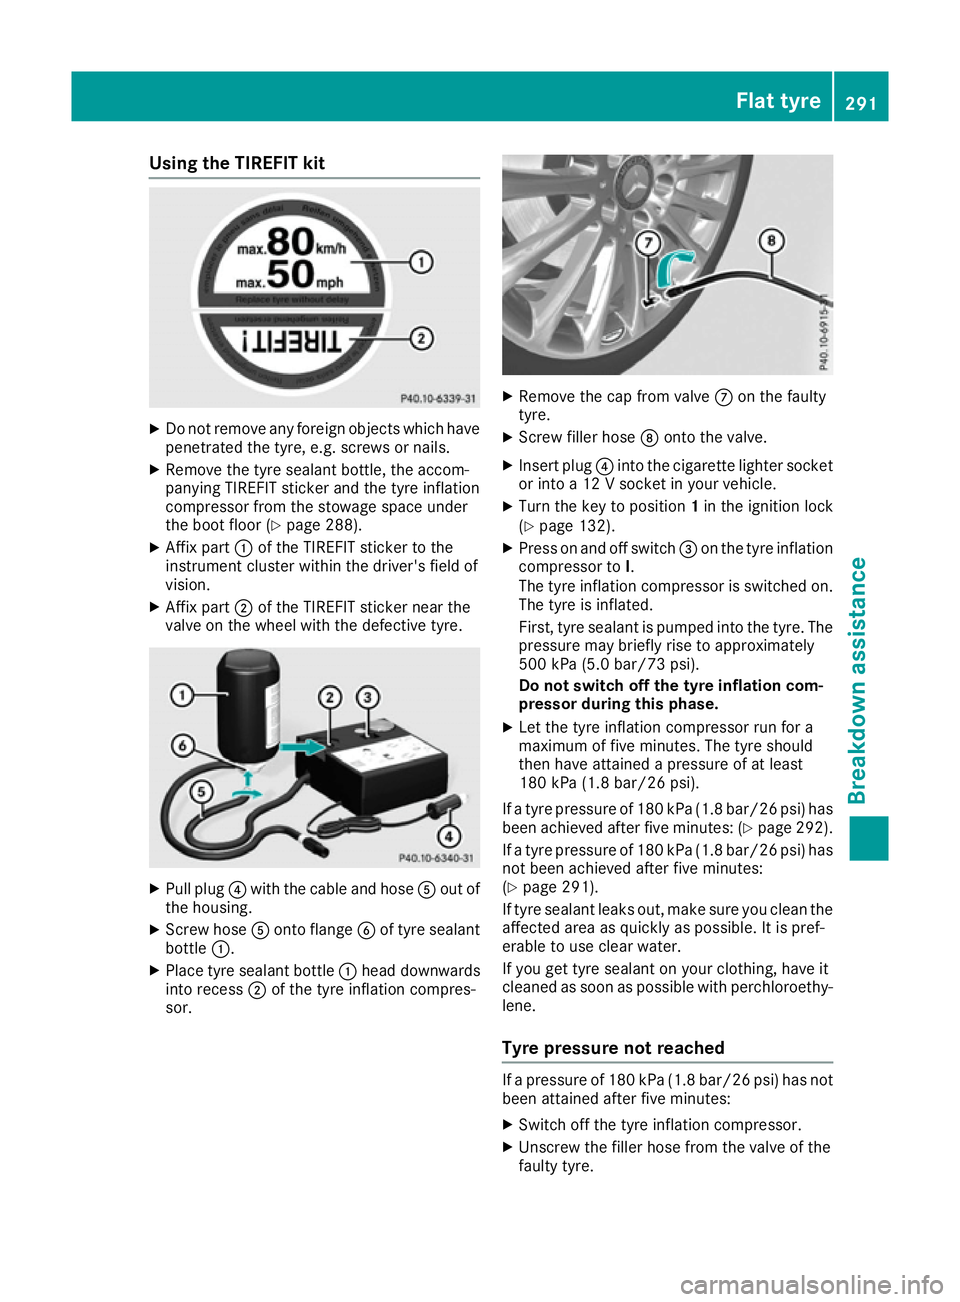
Using the TIREFIT kit
X
Do not remove any foreign objects which have
penetrated the tyre, e.g. screws or nails.
X Remove the tyre sealant bottle, the accom-
panying TIREFIT sticker and the tyre inflation
compressor from the stowage space under
the boot floor (Y page 288).
X Affix part :of the TIREFIT sticker to the
instrument cluster within the driver's field of
vision.
X Affix part ;of the TIREFIT sticker near the
valve on the wheel with the defective tyre. X
Pull plug ?with the cable and hose Aout of
the housing.
X Screw hose Aonto flange Bof tyre sealant
bottle :.
X Place tyre sealant bottle :head downwards
into recess ;of the tyre inflation compres-
sor. X
Remove the cap from valve Con the faulty
tyre.
X Screw filler hose Donto the valve.
X Insert plug ?into the cigarette lighter socket
or into a 12 V socket in your vehicle.
X Turn the key to position 1in the ignition lock
(Y page 132).
X Press on and off switch =on the tyre inflation
compressor to I.
The tyre inflation compressor is switched on.
The tyre is inflated.
First, tyre sealant is pumped into the tyre. The pressure may briefly rise to approximately
500 kPa (5.0 bar/73 psi).
Do not switch off the tyre inflation com-
pressor during this phase.
X Let the tyre inflation compressor run for a
maximum of five minutes. The tyre should
then have attained a pressure of at least
180 kPa (1.8 bar/26 psi).
If a tyre pressure of 180 kPa (1.8 bar/26 psi) has been achieved after five minutes: (Y page 292).
If a tyre pressure of 180 kPa (1.8 bar/26 psi) has not been achieved after five minutes:
(Y page 291).
If tyre sealant leaks out, make sure you clean the affected area as quickly as possible. It is pref-
erable to use clear water.
If you get tyre sealant on your clothing, have it
cleaned as soon as possible with perchloroethy-
lene.
Tyre pressure not reached If a pressure of 180 kPa (1.8 bar/26 psi) has not
been attained after five minutes:
X Switch off the tyre inflation compressor.
X Unscrew the filler hose from the valve of the
faulty tyre. Flat tyre
291Breakdown assistance Z
Page 304 of 333
Tow-starting (emergency engine
starting)
! Do not tow-start vehicles with automatic
transmission. You could otherwise damage
the automatic transmission.
You can find information on "Jump-starting"
under (Y page 296). Electrical fuses
Important safety notes
G
WARNING
If you manipulate, bridge or replace a faulty
fuse with a fuse of a higher amperage, the
electric cables could be overloaded. This may result in a fire. There is a risk of an accident
and injury.
Always replace faulty fuses with specified new fuses of the correct amperage.
Blown fuses must be replaced with fuses of the same rating, which you can recognise by the
colour and fuse rating. The fuse ratings are listed
in the fuse allocation chart.
The fuse allocation chart is located in the vehicle tool kit in the stowage compartment under the
boot floor (Y page 288).
If the newly inserted fuse also blows, have the
cause traced and rectified at a qualified special- ist workshop, e.g. a Mercedes-Benz Service
Centre.
! Only use fuses that have been approved for
Mercedes-Benz vehicles and which have the
correct fuse rating for the system concerned.
Otherwise, components or systems could be
damaged.
! Make sure that no moisture can enter the
fuse box when the cover is open.
! When closing the cover, make sure that it is
lying correctly on the fuse box. Moisture seep-
ing in or dirt could otherwise impair the oper- ation of the fuses.
The fuses in your vehicle disconnect faulty cir-
cuits. If a fuse blows, all the components on the
circuit and their functions will fail. Before replacing a fuse
X Switch off the engine.
X Switch off all electrical consumers.
X Make sure that the ignition is switched off
(Y page 132).
or X When using the key, turn the key to position 0
in the ignition lock and remove it
(Y page 132).
X Safeguard the vehicle against rolling away
(Y page 153).
All indicator lamps in the instrument cluster
must be off.
The fuses are located in various fuse boxes: R Fuse box in the engine compartment on the
right-hand side of the vehicle, when viewed in the direction of travel
R Dashboard fuse box
R Fuse box in the rear compartment on the
right-hand side of the vehicle, when viewed in
the direction of travel Dashboard fuse box
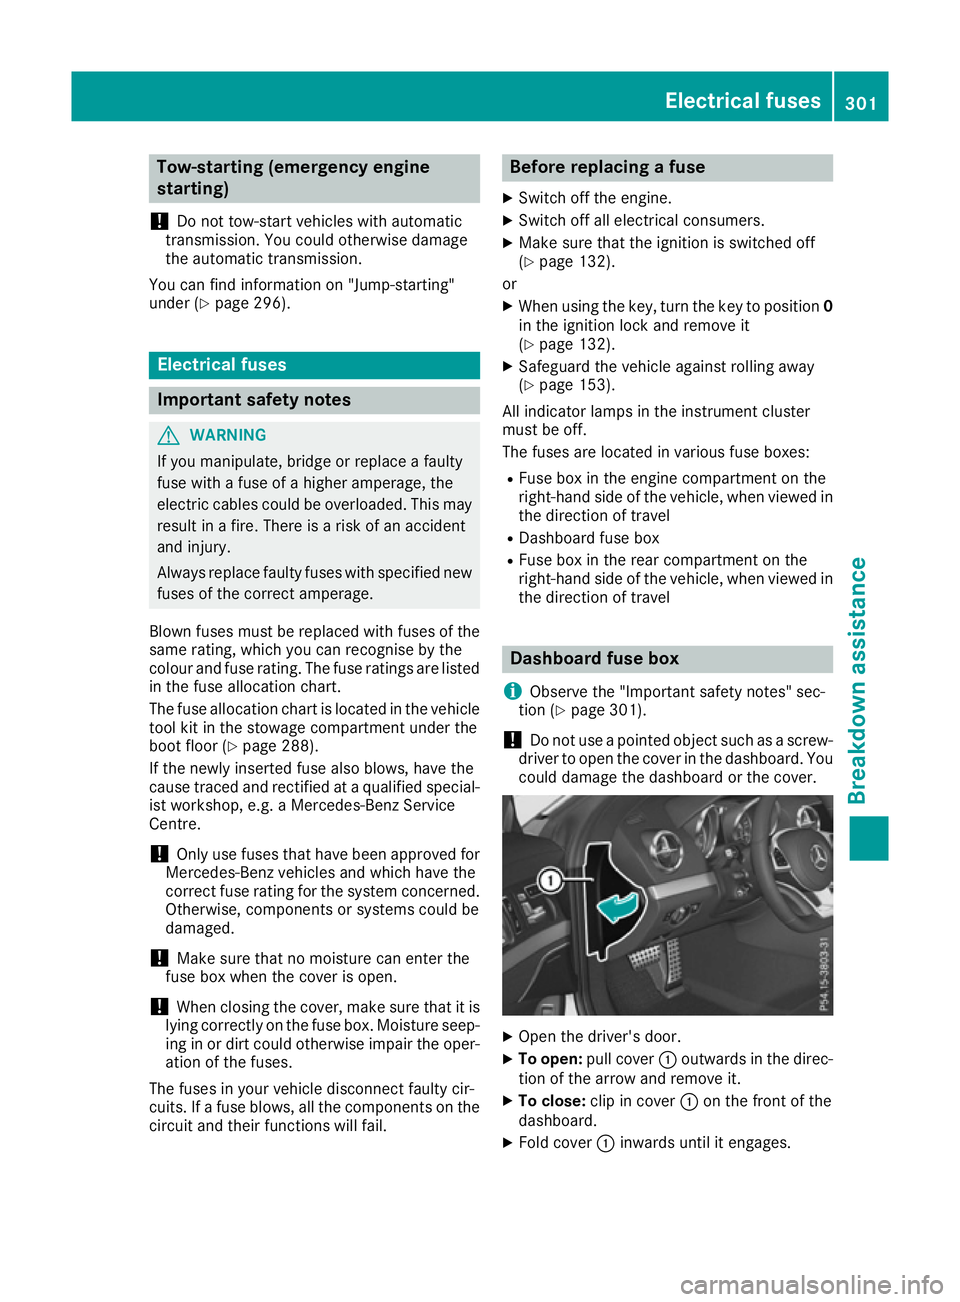
i Observe the "Important safety notes" sec-
tion (Y page 301).
! Do not use a pointed object such as a screw-
driver to open the cover in the dashboard. You could damage the dashboard or the cover. X
Open the driver's door.
X To open: pull cover :outwards in the direc-
tion of the arrow and remove it.
X To close: clip in cover :on the front of the
dashboard.
X Fold cover :inwards until it engages. Electrical fuses
301Breakdown assistance Z
Page 317 of 333
must be positioned vertically, directly under
the jacking point of the vehicle.
Observe the following when raising the vehicle:
R only use the vehicle-specific jack that has
been tested and approved by Mercedes-Benz
to raise the vehicle. If the jack is used incor-
rectly, it could tip over while the vehicle is
raised.
R the jack is designed only to raise and hold the
vehicle for a short time while a wheel is being
changed. It is not permissible to use it to per- form maintenance work under the vehicle.
R avoid changing the wheel on uphill and down-
hill slopes.
R before raising the vehicle, safeguard it from
rolling away by applying the parking brake and
positioning wheel chocks. Do not release the parking brake while the vehicle is raised.
R the jack must be placed on a firm, flat and
non-slip surface. On a loose surface, a large,
flat load-bearing underlay must be used. On a
slippery surface, a non-slip underlay must be
used, e.g. rubber mats.
R do not use wooden blocks or similar objects
as a jack underlay. Otherwise, the jack will not
be able to achieve its load-bearing capacity
due to the restricted height.
R make sure that the distance between the
underside of the tyres and the ground does
not exceed 3 cm.
R never place your hands or feet under the
raised vehicle.
R do not lie under the vehicle.
R do not start the engine when the vehicle is
raised.
R do not open or close a door or the boot lid
when the vehicle is raised.
R make sure that no persons are present in the
vehicle when the vehicle is raised.
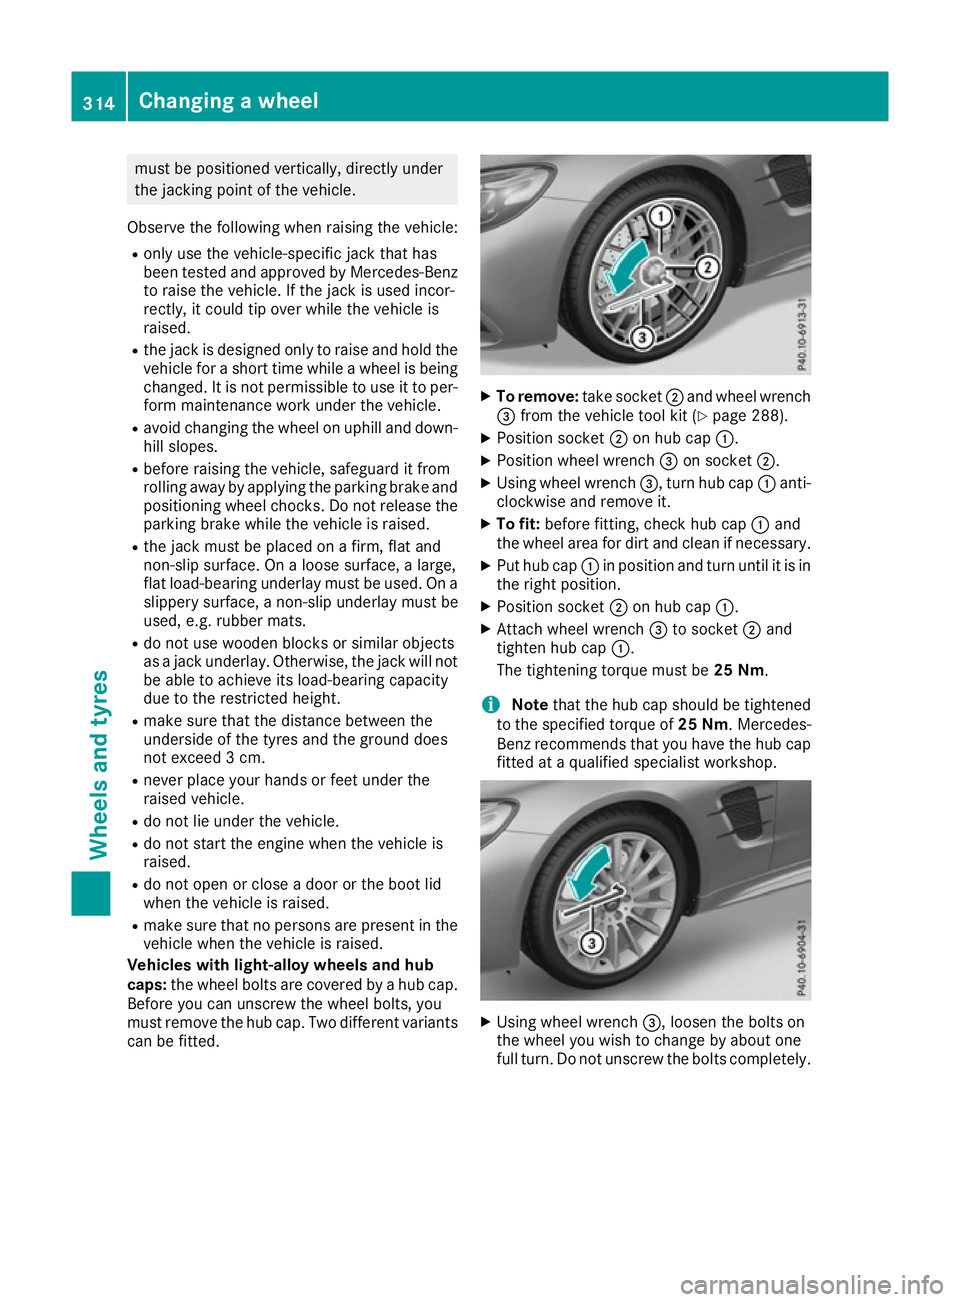
Vehicles with light-alloy wheels and hub
caps: the wheel bolts are covered by a hub cap.
Before you can unscrew the wheel bolts, you
must remove the hub cap. Two different variants
can be fitted. X
To remove: take socket;and wheel wrench
= from the vehicle tool kit (Y page 288).
X Position socket ;on hub cap :.
X Position wheel wrench =on socket ;.
X Using wheel wrench =, turn hub cap:anti-
clockwise and remove it.
X To fit: before fitting, check hub cap :and
the wheel area for dirt and clean if necessary.
X Put hub cap :in position and turn until it is in
the right position.
X Position socket ;on hub cap :.
X Attach wheel wrench =to socket ;and
tighten hub cap :.
The tightening torque must be 25 Nm.
i Note
that the hub cap should be tightened
to the specified torque of 25 Nm. Mercedes-
Benz recommends that you have the hub cap
fitted at a qualified specialist workshop. X
Using wheel wrench =, loosen the bolts on
the wheel you wish to change by about one
full turn. Do not unscrew the bolts completely. 314
Changing a wheelWheels and tyres
Page 320 of 333
X
Stow the jack and the rest of the tyre-change
tool kit in the boot again.
X Mercedes-AMG vehicles and vehicles
with AMG equipment:
insert the cover into
the outer sill.
X Check the air pressure of the newly fitted
wheel and adjust accordingly.
Observe the recommended tyre pressure
(Y page 307).
Vehicles with a tyre pressure monitor: all fit-
ted wheels must be equipped with functioning
sensors.
If you are driving with the emergency spare
wheel fitted, the tyre pressure loss warning sys- tem or the tyre pressure monitor cannot func-
tion reliably. Only restart the tyre pressure loss
warning system or tyre pressure monitor when
the defective wheel has been replaced with a
new wheel.
Vehicles with a tyre pressure monitor: all fit-
ted wheels must be equipped with functioning
sensors. Wheel and tyre combinations
You can ask for information regarding permitted wheel-tyre combinations at a Mercedes-Benz
Service Centre.
! For safety reasons, Mercedes-Benz recom-
mends that you only use tyres and wheels
which have been approved by Mercedes-Benz specifically for your vehicle.
These are specially adapted to the control
systems, such as ABS or ESP ®
and are
marked as follows:
R MO = Mercedes-Benz Original
R MOE = Mercedes-Benz Original Extended
(tyres featuring run-flat characteristics)
R MO1 = Mercedes-Benz Original (only cer-
tain AMG tyres)
Mercedes-Benz Original Extended tyres may
only be used on wheels that have been spe-
cifically approved by Mercedes-Benz.
Only use tyres, wheels or accessories tested
and approved by Mercedes-Benz. Certain
characteristics, e.g. handling, vehicle noise
emissions or fuel consumption, may other-
wise be adversely affected. In addition, when driving with a load, tyre dimension variations
could cause the tyres to come into contact with the bodywork and axle components. This
could result in damage to the tyres or the
vehicle.
Mercedes-Benz accepts no liability for dam-
age resulting from the use of tyres, wheels or accessories other than those tested and
approved.
Further information about wheels, tyres and
approved combinations can be obtained from
any qualified specialist workshop.
! Retreaded tyres are neither tested nor rec-
ommended by Mercedes-Benz, since previ-
ous damage cannot always be detected on
retreaded tyres. As a result, Mercedes-Benz
cannot guarantee vehicle safety if retreaded
tyres are fitted. Do not fit used tyres if you
have no information about their previous
usage.
! Large wheels: the lower the section width
for a certain wheel size, the lower the ride
comfort is on poor road surfaces. Roll comfort and suspension comfort are reduced and therisk of damage to the wheels and tyres as a
result of driving over obstacles increases.
The recommended tyre pressures can be found
in the tyre pressure table on the fuel filler flap.
For further information on tyre pressure, see
(Y page 307). Check tyre pressures regularly
and only when the tyres are cold.
Notes on the vehicle equipment – always fit the
vehicle:
R with tyres of the same size across an axle
(left/right)
R with the same type of tyres at a given time
(summer tyres, winter tyres, MOExtended
tyres)
Exception: it is permissible to fit a different
type or make in the event of a flat tyre.
Observe the "MOExtended tyres (tyres with
run-flat characteristics)" section
(Y page 289).
Vehicles with MOExtended tyres are not equip-
ped with a TIREFIT kit at the factory. It is there-
fore recommended that you additionally equip
your vehicle with a TIREFIT kit if you fit tyres that do not feature run-flat characteristics, e.g. win-
ter tyres. A TIREFIT kit can be obtained from a
qualified specialist workshop. Wheel and tyre combinations
317Wheels and tyres Z