2016 MERCEDES-BENZ SL ROADSTER wheel torque
[x] Cancel search: wheel torquePage 24 of 333
LIM (Distance Pilot DISTRONIC) .... 163
LIM (variable limiter) ...................... 170
Parking brake ................................ 248
PASSENGER AIR BAG ...................... 40
Reserve fuel ................................... 249
Seat belt ........................................ 244
Tyre pressure monitor ................... 252
Warning triangle ................................ 287
Washer fluid
Display messag e............................ 242
Wheel and tyre combinations
Tyres .............................................. 317
Wheel bolt tightening torque ........... 316
Wheel chock ...................................... 313
Wheels
Changing a whee l.......................... 312
Changing/replacing ....................... 312
Checking ........................................ 304
Cleaning ......................................... 284
Emergency spare wheel ................. 318
Fitting a new wheel ........................ 316
Fitting a wheel ............................... 313
Important safety notes .................. 304
Information on driving .................... 304
Overview ........................................ 304
Removing a whee l.......................... 315
Storing ........................................... 313
Tightening torque ........................... 316
Wheel size/tyre size ...................... 317
Windows
Cleaning ......................................... 284
see Side windows
Windscreen
Demisting ...................................... 126
Windscreen washer fluid
see Windscreen washer system
Windscreen washer system
Important safety notes .................. 326
Topping up ..................................... 280
Windscreen wipers
Display message ............................ 242
Problem (malfunction) ................... 121
Replacing the wiper blades ............ 119
Switching on/of f........................... 118
Winter operation
Important safety notes .................. 306
Overview ........................................ 306
Slippery road surfaces ................... 159 Snow chains .................................. 307
Winter tyres
Limiting the speed (on-board com-
puter) ............................................. 211
M+S tyres ...................................... 306
Wiper blades
Cleaning ......................................... 284
Important safety notes .................. 119
Replacing ....................................... 119
Workshop
see Qualified specialist workshop Z
ZONE function Switching on/of f........................... 126 Index
21
Page 70 of 333
Due to the nature of the system, particularly
complicated but non-critical driving conditions
may also cause Brake Assist to intervene.
If Adaptive Brake Assist is not available due to a malfunction in the radar sensor system, the
brake system remains available with full brake
boosting effect and BAS. Adaptive brake lights
i Observe the "Important safety notes" sec-
tion (Y page 62).
If you brake sharply from a speed of more than
50 km/h or if braking is assisted by BAS or
Brake Assist with Cross-Traffic Assist, the brake lamps flash rapidly. In this way, traffic travelling
behind you is warned in an even more noticeable
manner.
If you brake sharply from a speed of more than
70 km/h to a standstill, the hazard warning
lamps are activated automatically. If the brakes
are applied again, the brake lamps light up con- tinuously. The hazard warning lamps switch off
automatically if you travel faster than 10 km/h. You can also switch off the hazard warning
lamps using the hazard warning button
(Y page 115). ESP
®
(Electronic Stability Program)
General notes i
Observe the "Important safety notes" sec-
tion (Y page 62).
ESP ®
monitors driving stability and traction, i.e.
power transmission between the tyres and the
road surface.
If ESP ®
detects that the vehicle is deviating from
the direction desired by the driver, one or more wheels are braked to stabilise the vehicle. The
engine output is also modified to keep the vehi-cle on the desired course within physical limits.
ESP ®
assists the driver when pulling away on
wet or slippery roads. ESP ®
can also stabilise
the vehicle during braking.
ETS (Electronic Traction System) i
Observe the "Important safety notes" sec-
tion (Y page 62). ETS traction control is part of ESP
®
.
ETS brakes the drive wheels individually if they
spin. This enables you to pull away and acceler- ate on slippery surfaces, e.g. if the road surface
is slippery on one side. In addition, more drive
torque is transferred to the wheel or wheels with traction.
ETS remains active when you deactivate ESP ®
.
i Mercedes-AMG vehicles:
your vehicle may
be equipped with 20-inch tyres on the rear
axle. If replaced with 19-inch tyres, ETS may
intervene noticeably sooner for the first few
kilometres. After approximately 10 km ETS
will function as usual again. Information on
the dimensions and types of wheels and tyres
for your vehicle can be found under "Wheel/
tyre combinations" (Y page 317).
Important safety notes G
WARNING
If ESP ®
is malfunctioning, ESP ®
is unable to
stabilise the vehicle. In addition, other driving
safety systems are switched off. This increa-
ses the risk of skidding and an accident.
Drive on carefully. Have ESP ®
checked at a
qualified specialist workshop.
When towing away your vehicle with the rear
axle raised, observe the notes on ESP ®
(Y page 300).
If the å ESP®
OFF warning lamp lights up
continuously, then ESP ®
is deactivated.
If the ÷ ESP®
warning lamp and the å
ESP ®
OFF warning lamp are lit continuously,
ESP ®
is not available due to a malfunction.
Observe the information on warning lamps
(Y page 246) and display messages which may
be shown in the instrument cluster
(Y page 217).
i Only use wheels with the recommended tyre
sizes. Only then will ESP ®
function properly.
Characteristics of ESP ® General notes
If the ÷ ESP warning lamp goes out before
beginning the journey, ESP ®
is automatically
active. Driving safety systems
67Safety Z
Page 73 of 333
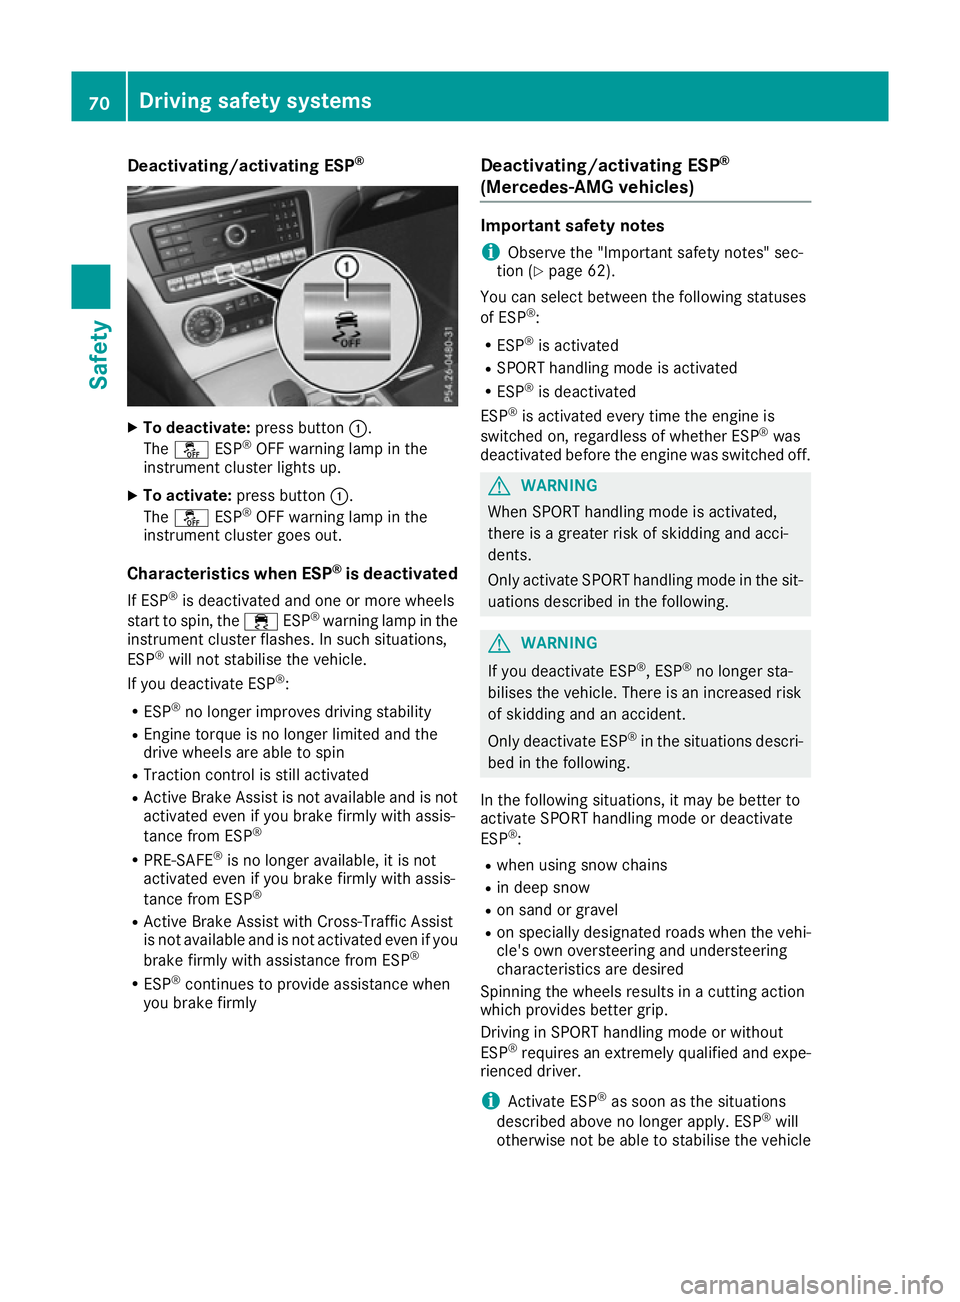
Deactivating/activating ESP
®X
To deactivate: press button:.
The å ESP®
OFF warning lamp in the
instrument cluster lights up.
X To activate: press button :.
The å ESP®
OFF warning lamp in the
instrument cluster goes out.
Characteristics when ESP ®
is deactivated
If ESP ®
is deactivated and one or more wheels
start to spin, the ÷ESP®
warning lamp in the
instrument cluster flashes. In such situations,
ESP ®
will not stabilise the vehicle.
If you deactivate ESP ®
:
R ESP ®
no longer improves driving stability
R Engine torque is no longer limited and the
drive wheels are able to spin
R Traction control is still activated
R Active Brake Assist is not available and is not
activated even if you brake firmly with assis-
tance from ESP ®
R PRE-SAFE ®
is no longer available, it is not
activated even if you brake firmly with assis-
tance from ESP ®
R Active Brake Assist with Cross-Traffic Assist
is not available and is not activated even if you
brake firmly with assistance from ESP ®
R ESP ®
continues to provide assistance when
you brake firmly Deactivating/activating ESP
®
(Mercedes ‑AMG vehicles) Important safety notes
i Observe the "Important safety notes" sec-
tion (Y page 62).
You can select between the following statuses
of ESP ®
:
R ESP ®
is activated
R SPORT handling mode is activated
R ESP ®
is deactivated
ESP ®
is activated every time the engine is
switched on, regardless of whether ESP ®
was
deactivated before the engine was switched off. G
WARNING
When SPORT handling mode is activated,
there is a greater risk of skidding and acci-
dents.
Only activate SPORT handling mode in the sit- uations described in the following. G
WARNING
If you deactivate ESP ®
, ESP ®
no longer sta-
bilises the vehicle. There is an increased risk
of skidding and an accident.
Only deactivate ESP ®
in the situations descri-
bed in the following.
In the following situations, it may be better to
activate SPORT handling mode or deactivate
ESP ®
:
R when using snow chains
R in deep snow
R on sand or gravel
R on specially designated roads when the vehi-
cle's own oversteering and understeering
characteristics are desired
Spinning the wheels results in a cutting action
which provides better grip.
Driving in SPORT handling mode or without
ESP ®
requires an extremely qualified and expe-
rienced driver.
i Activate ESP ®
as soon as the situations
described above no longer apply. ESP ®
will
otherwise not be able to stabilise the vehicle 70
Driving safety syste
msSafety
Page 74 of 333
if the vehicle starts to skid or a wheel starts to
spin.
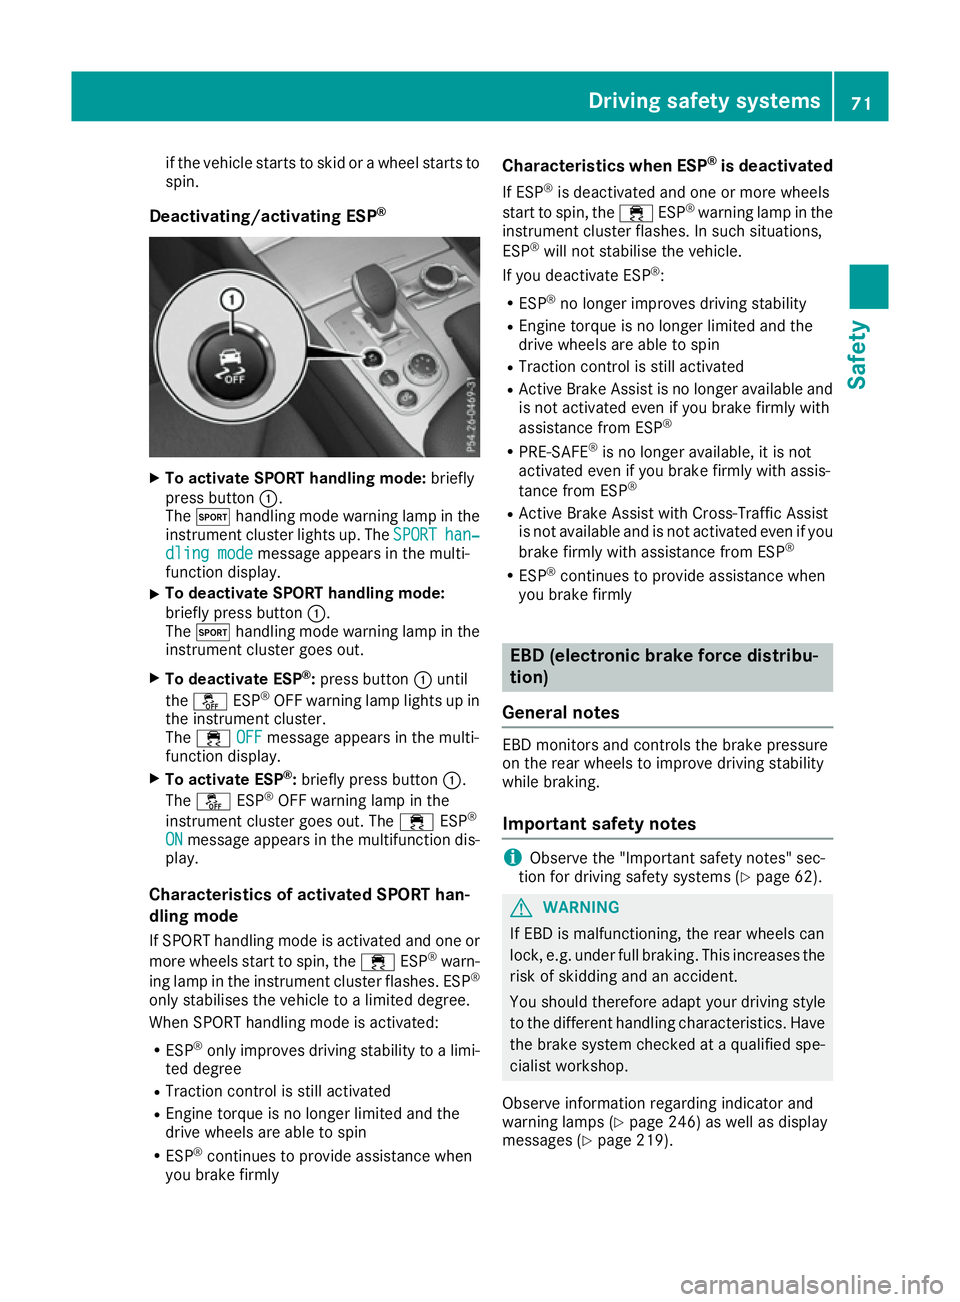
Deactivating/activating ESP ®X
To activate SPORT handling mode: briefly
press button :.
The M handling mode warning lamp in the
instrument cluster lights up. The SPORT
SPORT han‐
han‐
dling mode
dling mode message appears in the multi-
function display.
X To deactivate SPORT handling mode:
briefly press button
:.
The M handling mode warning lamp in the
instrument cluster goes out.
X To deactivate ESP ®
:press button :until
the å ESP®
OFF warning lamp lights up in
the instrument cluster.
The ÷ OFF
OFF message appears in the multi-
function display.
X To activate ESP ®
:briefly press button :.
The å ESP®
OFF warning lamp in the
instrument cluster goes out. The ÷ESP®
ON ON message appears in the multifunction dis-
play.
Characteristics of activated SPORT han-
dling mode
If SPORT handling mode is activated and one or
more wheels start to spin, the ÷ESP®
warn-
ing lamp in the instrument cluster flashes. ESP ®
only stabilises the vehicle to a limited degree.
When SPORT handling mode is activated:
R ESP ®
only improves driving stability to a limi-
ted degree
R Traction control is still activated
R Engine torque is no longer limited and the
drive wheels are able to spin
R ESP ®
continues to provide assistance when
you brake firmly Characteristics when ESP
®
is deactivated
If ESP ®
is deactivated and one or more wheels
start to spin, the ÷ESP®
warning lamp in the
instrument cluster flashes. In such situations,
ESP ®
will not stabilise the vehicle.
If you deactivate ESP ®
:
R ESP ®
no longer improves driving stability
R Engine torque is no longer limited and the
drive wheels are able to spin
R Traction control is still activated
R Active Brake Assist is no longer available and
is not activated even if you brake firmly with
assistance from ESP ®
R PRE-SAFE ®
is no longer available, it is not
activated even if you brake firmly with assis-
tance from ESP ®
R Active Brake Assist with Cross-Traffic Assist
is not available and is not activated even if you
brake firmly with assistance from ESP ®
R ESP ®
continues to provide assistance when
you brake firmly EBD (electronic brake force distribu-
tion)
General notes EBD monitors and controls the brake pressure
on the rear wheels to improve driving stability
while braking.
Important safety notes i
Observe the "Important safety notes" sec-
tion for driving safety systems (Y page 62). G
WARNING
If EBD is malfunctioning, the rear wheels can
lock, e.g. under full braking. This increases the risk of skidding and an accident.
You should therefore adapt your driving style
to the different handling characteristics. Have the brake system checked at a qualified spe-
cialist workshop.
Observe information regarding indicator and
warning lamps (Y page 246) as well as display
messages (Y page 219). Driving safety systems
71Safety Z
Page 149 of 333
Vehicles with adaptive adjustable damp-
ing: drive program E (Economy)
Drive program Eis characterised by the follow-
ing:
R the vehicle exhibits particularly economical
driving characteristics.
R the vehicle pulls away more gently in forward
and reverse gears unless the accelerator
pedal is depressed fully.
R optimal fuel consumption resulting from the
automatic transmission shifting up sooner.
The vehicle is driven in the low engine speed
range and the wheels are less likely to spin.
R the suspension exhibits comfortable damping
settings.
R the steering exhibits a comfortable steering
curve.
R during deceleration, the engine is disconnec-
ted from the drive train. The vehicle uses
kinetic energy and consumes less fuel (gliding
mode).
R ESP ®
provides the optimum compromise
between traction and stability. Further infor-
mation on ESP ®
(Y page 67).
Vehicles with Active Body Control: drive
program CURVE
Drive program CURVEis characterised by the
following:
R increased driving comfort on bends.
R the vehicle tilts actively into the bend. Further
information on the cornering function
(Y page 176).
R the vehicle exhibits particularly economical
driving characteristics.
R the vehicle pulls away more gently in forward
and reverse gears unless the accelerator
pedal is depressed fully.
R comfortable suspension setting.
R the steering exhibits a comfortable steering
curve.
R optimal fuel consumption resulting from the
automatic transmission shifting up sooner.
R the automatic transmission shifts up sooner.
This results in the vehicle being driven at
lower engine speeds and the wheels being
less likely to spin.
R during deceleration, the engine is disconnec-
ted from the drive train. The vehicle uses kinetic energy and consumes less fuel (gliding
mode).
R ESP ®
provides the optimum compromise
between traction and stability. Further infor-
mation on ESP ®
(Y page 67).
Mercedes-AMG vehicles Drive program RACE
Drive program RACEis characterised by the fol-
lowing:
R the vehicle exhibits driving characteristics
suitable for the racetrack.
R all vehicle systems are set for maximum
sportiness.
R the gearshift recommendation gives you
information for slowly warming up the drive
assemblies and for adopting a fuel-efficient
driving style (Y page 147). You can follow the
gearshift recommendations at all times and
change gear accordingly using the steering
wheel gearshift paddles. On the basis of the
gearshift recommendation, using the steering
wheel gearshift paddles, you can optimise the drive train and engine operating mode at any
time.
R if you have selected a gear manually, this will
be maintained until the vehicle speed signifi-
cantly increases or decreases.
R the vehicle pulls away in first gear.
R the automatic transmission shifts up later. As
a result of the later automatic transmission
shift points, the fuel consumption may be
higher.
R the suspension exhibits particularly firm
damping settings.
R gliding mode is not available.
R the ECO start/stop function is not available.
R ESP ®
switches to SPORT handling mode. The
M handling mode warning lamp in the
instrument cluster lights up. The SPORT SPORThan‐
han‐
dling mode
dling mode message appears in the multi-
function display. Observe the important
safety notes for the SPORT handling mode
(Y page 70).
R ESP ®
only improves driving stability to a limi-
ted degree. The engine's torque is only
restricted to a limited degree and the drive
wheels can spin. Further information on ESP ®
(Y page 70). 146
Automatic transmissionDriving and parking
Page 317 of 333
must be positioned vertically, directly under
the jacking point of the vehicle.
Observe the following when raising the vehicle:
R only use the vehicle-specific jack that has
been tested and approved by Mercedes-Benz
to raise the vehicle. If the jack is used incor-
rectly, it could tip over while the vehicle is
raised.
R the jack is designed only to raise and hold the
vehicle for a short time while a wheel is being
changed. It is not permissible to use it to per- form maintenance work under the vehicle.
R avoid changing the wheel on uphill and down-
hill slopes.
R before raising the vehicle, safeguard it from
rolling away by applying the parking brake and
positioning wheel chocks. Do not release the parking brake while the vehicle is raised.
R the jack must be placed on a firm, flat and
non-slip surface. On a loose surface, a large,
flat load-bearing underlay must be used. On a
slippery surface, a non-slip underlay must be
used, e.g. rubber mats.
R do not use wooden blocks or similar objects
as a jack underlay. Otherwise, the jack will not
be able to achieve its load-bearing capacity
due to the restricted height.
R make sure that the distance between the
underside of the tyres and the ground does
not exceed 3 cm.
R never place your hands or feet under the
raised vehicle.
R do not lie under the vehicle.
R do not start the engine when the vehicle is
raised.
R do not open or close a door or the boot lid
when the vehicle is raised.
R make sure that no persons are present in the
vehicle when the vehicle is raised.
Vehicles with light-alloy wheels and hub
caps: the wheel bolts are covered by a hub cap.
Before you can unscrew the wheel bolts, you
must remove the hub cap. Two different variants
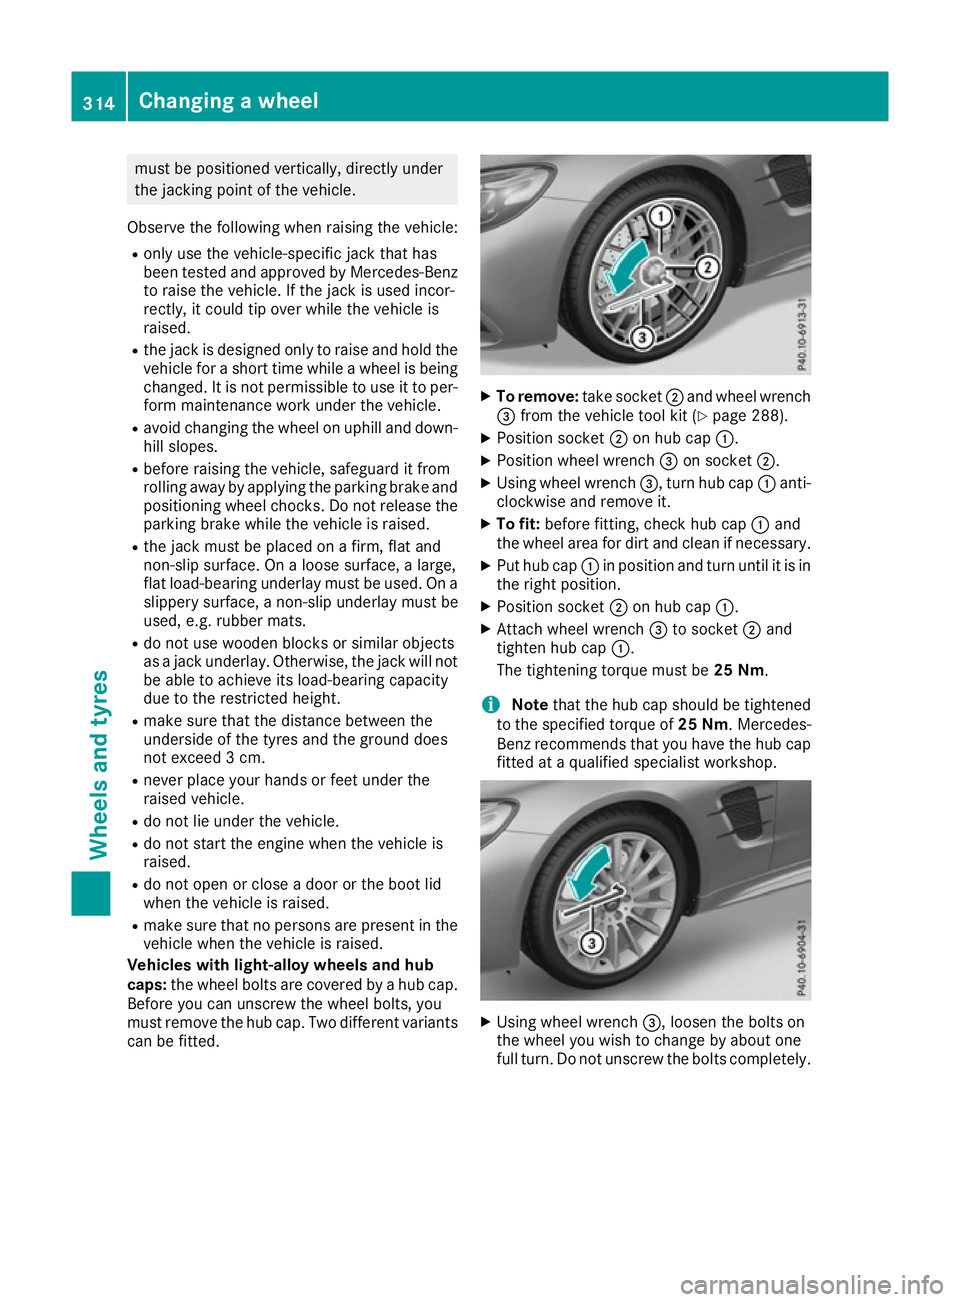
can be fitted. X
To remove: take socket;and wheel wrench
= from the vehicle tool kit (Y page 288).
X Position socket ;on hub cap :.
X Position wheel wrench =on socket ;.
X Using wheel wrench =, turn hub cap:anti-
clockwise and remove it.
X To fit: before fitting, check hub cap :and
the wheel area for dirt and clean if necessary.
X Put hub cap :in position and turn until it is in
the right position.
X Position socket ;on hub cap :.
X Attach wheel wrench =to socket ;and
tighten hub cap :.
The tightening torque must be 25 Nm.
i Note
that the hub cap should be tightened
to the specified torque of 25 Nm. Mercedes-
Benz recommends that you have the hub cap
fitted at a qualified specialist workshop. X
Using wheel wrench =, loosen the bolts on
the wheel you wish to change by about one
full turn. Do not unscrew the bolts completely. 314
Changing a wheelWheels and tyres
Page 319 of 333
Fitting a new wheel
G
WARNING
Oiled or greased wheel bolts or damaged
wheel bolts/hub threads can cause the wheel bolts to come loose. As a result, you could
lose a wheel while driving. There is a risk of
accident.
Never oil or grease wheel bolts. In the event ofdamage to the threads, contact a qualified
specialist workshop immediately. Have the
damaged wheel bolts or hub threads
replaced/renewed. Do not continue driving. G
WARNING
If you tighten the wheel bolts or wheel nuts
when the vehicle is raised, the jack could tip
over. There is a risk of injury.
Only tighten the wheel bolts or wheel nuts
when the vehicle is on the ground.
It is imperative to observe the instructions and
safety notes on "Changing a wheel"
(Y page 312).
Only use wheel bolts that have been designed
for the wheel and the vehicle. For safety rea-
sons, Mercedes-Benz recommends that you
only use wheel bolts which have been approved for Mercedes-Benz vehicles and the respective
wheel.
! Mercedes AMG vehicles:
when removing
and fitting a wheel, the wheel rim may strike
the ceramic brake disc and damage it. There-
fore, take precautions and have a second per- son assist you. Alternatively, you can use a
second centring pin. X
Clean the wheel and wheel hub contact sur-
faces.
X Slide the wheel to be mounted onto the cen-
tring pin and push it on.
X Tighten the wheel bolts until they are finger-
tight.
X Unscrew the centring pin.
X Tighten the last wheel bolt until it is finger-
tight.
X Vehicles with a collapsible emergency
spare wheel:
inflate the collapsible emer-
gency spare wheel (Y page 319).
Only then lower the vehicle.
Lowering the vehicle G
WARNING
The wheels could work loose if the wheel nuts and bolts are not tightened to the specified
tightening torque. There is a risk of accident.
Have the tightening torque immediately
checked at a qualified specialist workshop
after a wheel is changed.
! Vehicles with a collapsible emergency
spare wheel: Inflate the collapsible emer-
gency spare wheel using the tyre inflation
compressor before lowering the vehicle. The
rim could otherwise be damaged.
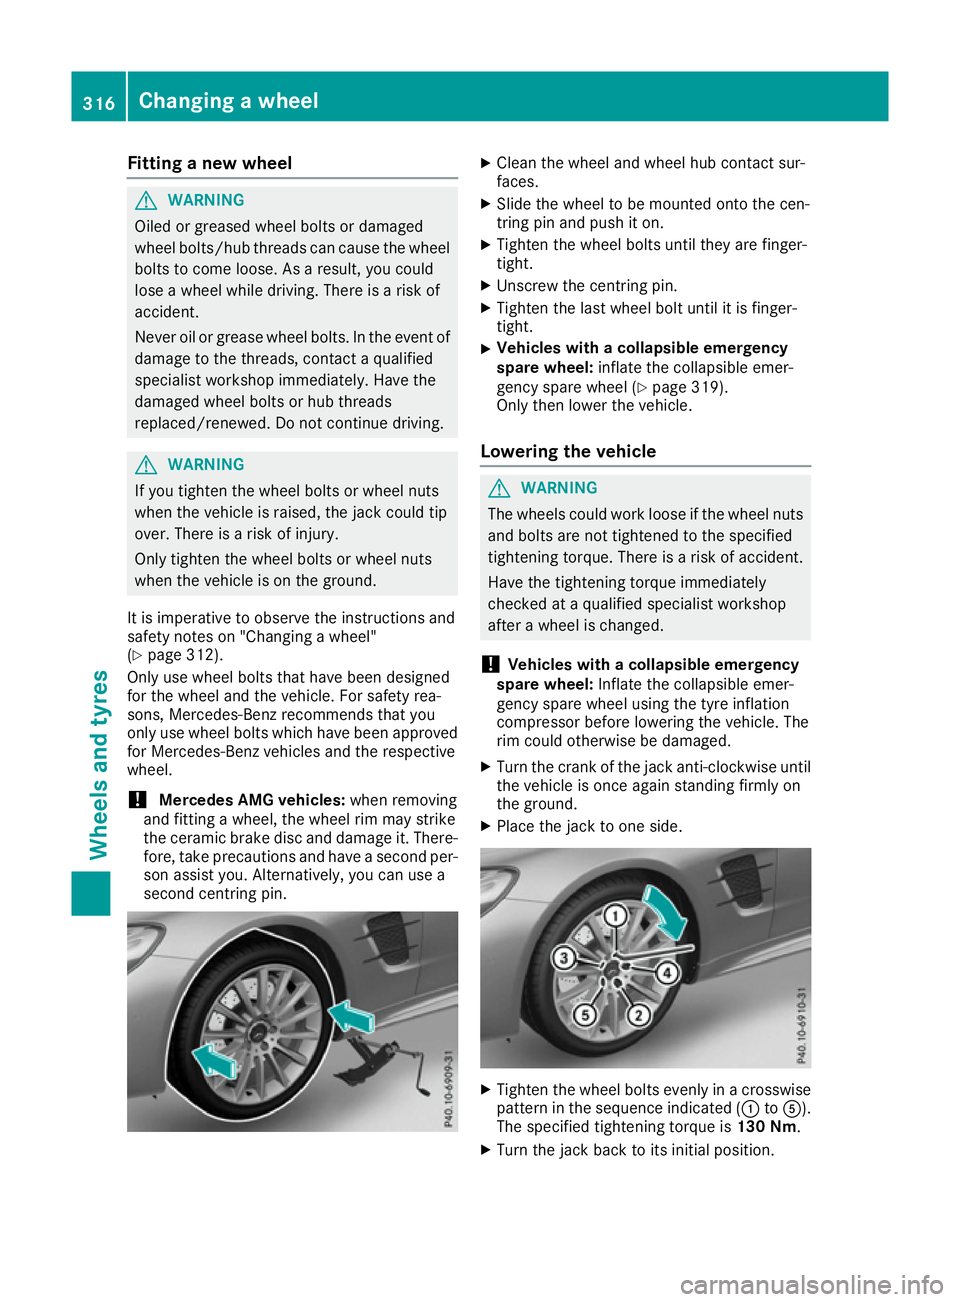
X Turn the crank of the jack anti-clockwise until
the vehicle is once again standing firmly on
the ground.
X Place the jack to one side. X
Tighten the wheel bolts evenly in a crosswise
pattern in the sequence indicated (: toA).
The specified tightening torque is 130 Nm.
X Turn the jack back to its initial position. 316
Changing a wheelWheels and ty
res