2016 MERCEDES-BENZ SL ROADSTER battery
[x] Cancel search: batteryPage 8 of 333
Automatic headlamp mode
.............. 113
Automatic transmission
Accelerator pedal position ............ .144
Changing gear ............................... 144
Display message ............................ 239
Drive program displa y.................... 142
Drive programs .............................. 145
Driving tips .................................... 144
DYNAMIC SELECT button (all vehi-
cles except Mercedes-AMG vehi-
cles) ............................................... 139
DYNAMIC SELECT controller
(Mercedes-AMG vehicles) .............. 140
Emergency running mod e.............. 151
Engaging drive position .................. 143
Engaging neutral ............................ 143
Engaging park position automati-
cally ............................................... 143
Engaging reverse gear ................... 143
Engaging the park position ............ 142
Gearshift recommendation ............ 149
Kickdown ....................................... 145
Manual shifting .............................. 147
Oil temperature (on-board com-
puter, Mercedes-AMG vehicles) ..... 213
Overview ........................................ 141
Problem (fault) ............................... 151
Pulling away ................................... 134
Selector lever ................................ 141
Starting the engine ........................ 134
Steering wheel gearshift paddle s... 147
Transmission position display ........ 142
Transmission positions .................. 144
Automatic transmission emer-
gency running mode ......................... 151B
Back button ....................................... 254
BAS (Brake Assist System) ................. 62
Battery (key)
Checking .......................................... 80
Important safety notes .................... 79
Replacing ......................................... 80
Battery (vehicle)
Charging ........................................ 295
Display message ............................ 230
Important safety notes .................. 293 Jump starting ................................. 296
Overview ........................................ 293
Belt
see Seat belts
Belt tensioner
Activation ......................................... 51
Blind Spot Assist
see Active Blind Spot Assist
Bluetooth ®
Connecting another mobile
phone ............................................ 257
Searching for a mobile phone ........ 256
See also Digital Owner's Manua l... 253
Telephony ...................................... 256
Bonnet
Active bonnet (pedestrian protec-tion) ............................................... 276
Closing ........................................... 277
Display message ............................ 241
Important safety notes .................. 276
Opening ......................................... 277
Boot
Emergency release .......................... 89
Important safety notes .................... 85
Locking separately ........................... 89
Opening/closing (automatically
from inside) ...................................... 88
Opening/closing (automatically
from outside) ................................... 86
Opening/closing (from the out-
side, HANDS-FREE ACCESS) ............ 87
Opening/closing (manually from
outside) ............................................ 85
Overview .......................................... 85
Power closing .................................. 84
Boot lid
Display message ............................ 240
Opening dimensions ...................... 327
Boot load (maximum) ........................ 327
Boot separator
Display message ............................ 241
Fitting .............................................. 96
General notes .................................. 95
Opening/closing .............................. 95
Removing ......................................... 96
Bottle holders .................................... 267 Index
5
Page 15 of 333

General notes ................................ 172
Home address
See also Digital Owner's Manual .. .253
Horn ...................................................... 30 I
Ignition lock see Key positions
Immobiliser .......................................... 74
Indicator and warning lamp
Restraint system ............................ 248
Indicator and warning lamps
Coolant .......................................... 249
Engine diagnostics ......................... 249
SPORT handling mode ................... 248
Indicator lamps
Display message ............................ 228
see Warning and indicator lamps
Indicators
see Turn signals
Instrument cluster
Overview .......................................... 32
Instrument cluster lighting .............. 199
Intelligent Light System
Activating/deactivating ................. 209
Display message ............................ 228
Overview ........................................ 115
Setting the dipped-beam head-
lamps for driving on the right/left .. 210
Interior lighting
Automatic control system .............. 118
Delayed switch-off (on-board
computer) ...................................... 211
Overview ........................................ 117
Reading lamp ................................. 117
Setting the ambient lighting
brightness (on-board computer) .... 210
Setting the ambient lighting col-
our (on-board computer) ................ 210
Interior motion sensor
Deactivating ..................................... 76
Function .......................................... .75
Priming ............................................ 75
Switching off .................................... 76
iPod ®
See also Digital Owner's Manual ... 253
ISOFIX child seat securing system ....56 J
Jack Storage location ............................2 88
Using ............................................. 313
Jump starting (engine) ......................296 K
Key Changing the battery ....................... 80
Checking the battery ....................... 80
Display message ............................ 243
Door central locking/unlocking ....... 77
Emergency key element ................... 79
Important safety notes .................... 77
Loss ................................................. 81
Modifying the programming ............. 78
Opening/closing the roof ................ 95
Overview .......................................... 77
Positions (ignition lock) ................. 132
Problem (malfunction) ..................... 81
Starting the engine ........................ 134
Key positions
Key ................................................ 132
KEYLESS GO .................................. 132
KEYLESS-GO
Activating ......................................... 78
Convenience closing ........................ 91
Deactivation ..................................... 78
Display message ............................ 243
Locking ............................................ 78
Removing the Start/Stop button ... 133
Start/Stop button .......................... 132
Starting the engine ........................ 134
Unlocking ......................................... 78
Kickdown
Driving tips ................................... .145
Manual gearshifting ....................... 150 L
Lamps see Warning and indicator lamps
Lane Keeping Assist
see Active Lane Keeping Assist
Lap time (RACETIMER) ......................213
Licence plate lamp (display mes-
sage) ................................................... 228 12
Index
Page 23 of 333
Radio type approval for the tyre
pressure monitor ..........................
.311
Restarting ...................................... 311
Warning lamp ................................. 252
Warning message .......................... 311
Tyres
Changing a wheel .......................... 312
Checking ........................................ 304
Direction of rotatio n...................... 312
Display message ............................ 237
Important safety notes .................. 304
Information on driving .................... 304
M+S tyres ...................................... 306
MOExtended tyre s......................... 306
Overview ........................................ 304
Replacing ....................................... 312
Service life ..................................... 305
Storing ........................................... 313
Summer tyres ................................ 306
Tyre size (data ).............................. 317
Tyre tread ...................................... 305
Wheel and tyre combinations ........ 317
see Flat tyre U
Umbrella holder ................................. 263
Unlocking
Emergency unlocking ....................... 84
From inside the vehicle (central
unlocking button) ............................. 83
Upshift indicator (on-board com-
puter, Mercedes-AMG vehicles) ....... 213
USB devices
Connecting to the Media Inter-
face ............................................... 261 V
Vehicle Correct use ...................................... 28
Data acquisition ............................... 28
Display message ............................ 239
Electronics ..................................... 320
Equipment ....................................... 24
Implied warranty .............................. 28
Individual settings .......................... 208
Leaving parked up ......................... 155
Locking (in an emergency) ............... 84 Locking (key) ................................... 77
Lowering ........................................ 316
Pulling away ................................... 134
Raising ........................................... 313
Registration ..................................... 27
Securing from rolling away ............ 313
Tow-starting ................................... 298
Towing away .................................. 298
Transporting .................................. 300
Unlocking (in an emergency) ........... 84
Unlocking (key) ................................ 77
Vehicle data ................................... 327
Vehicle battery
see Battery (vehicle)
Vehicle data ....................................... 327
Vehicle dimensions ........................... 327
Vehicle emergency locking ................ 84
Vehicle identification number
see VIN
Vehicle identification plate .............. 321
Vehicle level
Active Body Control (ABC) (exceptMercedes-AMG vehicles) ............... 175
Active Body Control (ABC)
(Mercedes-AMG vehicles) .............. 178
Display message ............................ 231
Vehicle tool kit .................................. 288
Video
Operating the DVD ......................... 205
See also Digital Owner's Manua l... 253
VIN
Seat ............................................... 322
Type plate ...................................... 321 W
Warning and indicator lamps ABS ................................................ 246
Active Brake Assist ........................ 251
Brake Assist ................................... 251
Brakes ........................................... 245
Distance Pilot DISTRONIC ............. 251
Distance warning signal ................. 251
ESP ®
.............................................. 246
ESP ®
OFF ....................................... 247
Fuel tank ........................................ 249
General notes ................................ 244
LIM (cruise control) ........................ 160 20
Index
Page 30 of 333
The operating instructions for the machinery/machine part are available
1 in the language of the user's country: German
In the eventuality of modifications made to the machinery/equipment after delivery which have not
been cleared with active Tools Europe GmbH, this declaration loses its validity.
Authorised representative(s) for the compilation of the technical documentation, CE commis-
sioner(s) 22.6.2015 [Name signatory] [Stamp]
Date Signatory and details of signatory Signature
Diagnostics connection
The diagnostics connection is only intended for
the connection of diagnostic equipment at a
qualified specialist workshop. G
WARNING
If you connect equipment to a diagnostics
connection in the vehicle, it may affect the
operation of vehicle systems. As a result, the operating safety of the vehicle could be affec-
ted. There is a risk of an accident.
Only connect equipment to a diagnostics con-
nection in the vehicle, which is approved for
your vehicle by Mercedes-Benz. G
WARNING
Objects in the driver's footwell may restrict
the clearance around the pedals or block a
depressed pedal. This jeopardises the oper-
ating and road safety of the vehicle. There is a risk of an accident.
Stow all objects securely in the vehicle so that
they do not get into the driver's footwell.
Always fit the floormats securely and as pre-
scribed in order to ensure that there is always sufficient room for the pedals. Do not use
loose floormats and do not place several floor- mats on top of one another.
! If the engine is switched off and equipment
on the diagnostics connection is used, the
starter battery may discharge.
Connecting equipment to the diagnostics con-
nection can lead to emissions monitoring infor-
mation being reset, for example. This may lead
to the vehicle failing to meet the requirements of the next emissions test during the main inspec-
tion. Qualified specialist workshop
A qualified specialist workshop has the neces-
sary special skills, tools and qualifications to
correctly carry out any necessary work on your
vehicle. This particularly applies to work rele-
vant to safety.
Observe the notes in the Service Booklet.
Always have the following work carried out at a
qualified specialist workshop:
R work relevant to safety
R service and maintenance work
R repair work
R modifications, installations and conversions
R work on electronic components
Mercedes-Benz recommends that you use a
Mercedes-Benz Service Centre. Vehicle registration
Mercedes-Benz may ask its Service Centres to
carry out technical inspections on certain vehi-
cles. The quality or safety of the vehicle is
improved as a result of the inspection.
Mercedes-Benz can only inform you about vehi-
cle checks if it has your registration data.
It is possible that your vehicle has not yet been
registered in your name in the following cases:
R if your vehicle was not purchased at an
authorised specialist dealer.
R if your vehicle has not yet been examined at a
Mercedes-Benz Service Centre.
It is advisable to register your vehicle with a
Mercedes-Benz Service Centre. Operating safety
27Introduction Z
Page 81 of 333
The key centrally locks/unlocks:
R the doors
R the boot lid
R the glove compartment
R the stowage compartment under the armrest
R the stowage compartment in the rear com-
partment
R the fuel filler flap
When unlocking, the turn signals flash once.
When locking, they flash three times.
You can also set an audible signal to confirm
that the vehicle has been locked. The audible
signal can be activated or deactivated using the
on-board computer (Y page 211).
When it is dark, the surround lighting also comes
on if it is activated in the on-board computer
(Y page 210). KEYLESS-GO
General notes Bear in mind that the engine can be started by
any of the vehicle occupants if there is a KEY-
LESS-GO key in the vehicle (Y page 134).
Locking and unlocking centrally You can start, lock or unlock the vehicle using
KEYLESS-GO. To do this, you need to carry the
key with you. You can combine the KEYLESS-GO
functions with the functions of a conventional
key. Unlock the vehicle by using KEYLESS-GO,
for instance, and lock it using the &button
on the key.
The driver's door and the door at which the han- dle is used must both be closed. The key must beoutside the vehicle. When locking or unlocking
with KEYLESS-GO, the distance between the keyand the corresponding door handle must not be
greater than 1 m.
A check which periodically establishes a radio
connection between the vehicle and the key
determines whether a valid key is in the vehicle. This occurs, for example:
R when starting the engine
R whilst driving
R when using HANDS-FREE ACCESS
R when the external door handles are touched X
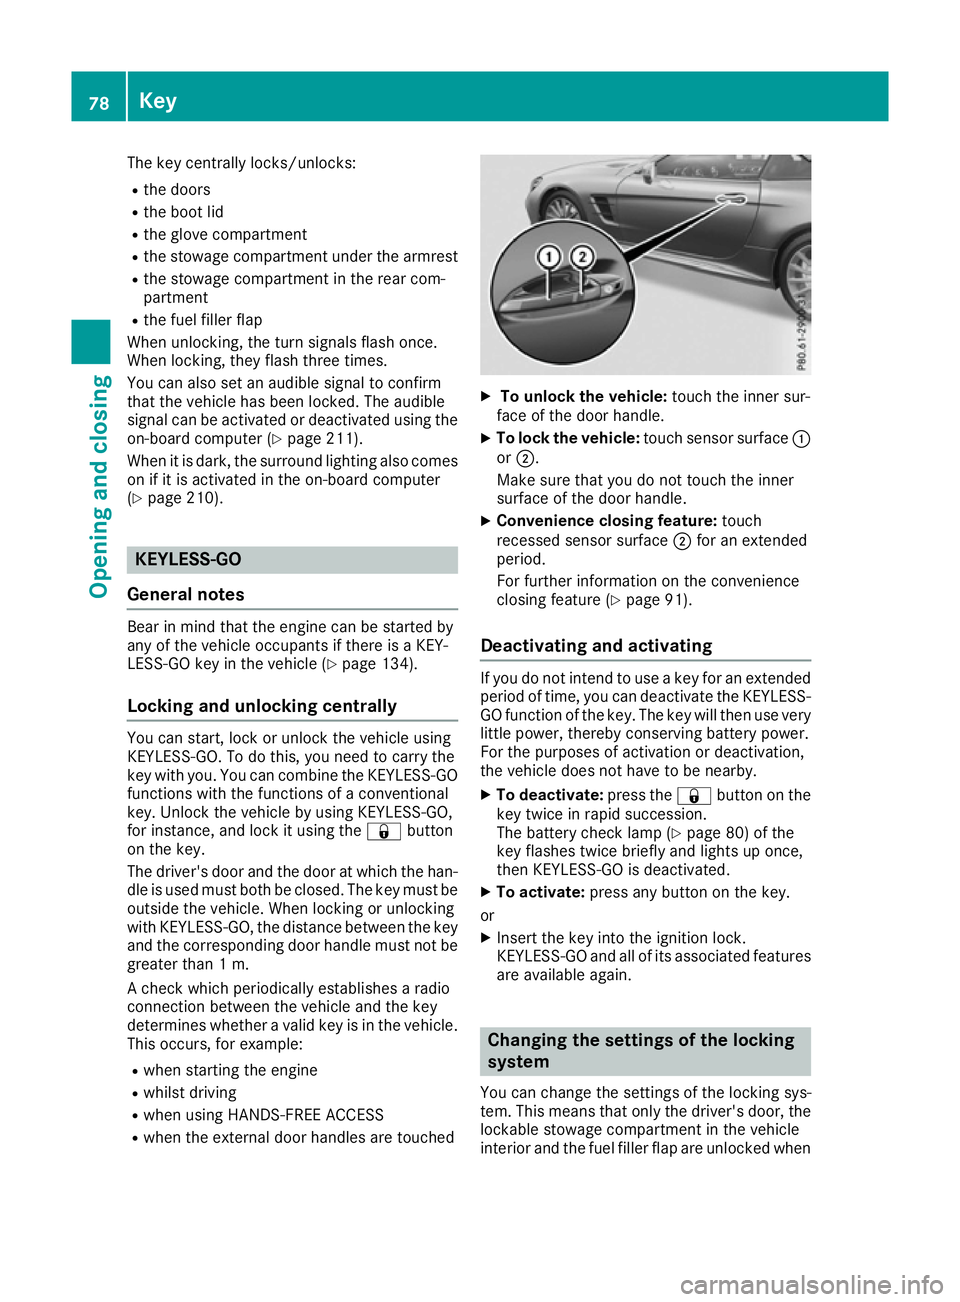
To unlock the vehicle: touch the inner sur-
face of the door handle.
X To lock the vehicle: touch sensor surface :
or ;.
Make sure that you do not touch the inner
surface of the door handle.
X Convenience closing feature: touch
recessed sensor surface ;for an extended
period.
For further information on the convenience
closing feature (Y page 91).
Deactivating and activating If you do not intend to use a key for an extended
period of time, you can deactivate the KEYLESS-
GO function of the key. The key will then use very
little power, thereby conserving battery power.
For the purposes of activation or deactivation,
the vehicle does not have to be nearby.
X To deactivate: press the&button on the
key twice in rapid succession.
The battery check lamp (Y page 80) of the
key flashes twice briefly and lights up once,
then KEYLESS-GO is deactivated.
X To activate: press any button on the key.
or
X Insert the key into the ignition lock.
KEYLESS-GO and all of its associated features
are available again. Changing the settings of the locking
system
You can change the settings of the locking sys-
tem. This means that only the driver's door, the
lockable stowage compartment in the vehicle
interior and the fuel filler flap are unlocked when 78
KeyOpening and closing
Page 82 of 333
the vehicle is unlocked. This is useful if you fre-
quently travel alone.
X To change the setting: press and hold down
the % and& buttons simultaneously
for about six seconds until the battery indica- tor lamp flashes twice (Y page 80).
If the setting of the locking system is changed
within the signal range of the vehicle, pressing
the & or% button:
R locks or
R unlocks the vehicle
The key now functions as follows:
X To unlock: press the%button once.
X To unlock centrally: press the%button
twice.
X To lock centrally: press the&button.
The KEYLESS-GO function is changed as fol-
lows:
X To unlock the driver's door: touch the inner
surface of the door handle on the driver's
door.
X To unlock centrally: touch the inner surface
of the driver or front-passenger door handle.
X To lock centrally: touch the outer sensor
surface on one of the door handles.
X To restore the factory settings: press and
hold down the %and& buttons simul-
taneously for approximately six seconds until
the battery check lamp flashes twice
(Y page 80). Emergency key element
General notes If the vehicle can no longer be locked or
unlocked with the key or with KEYLESS-GO, use the emergency key element.
If you use the emergency key element to unlock
and open the driver's door or the boot lid, the
anti-theft alarm system will be triggered. Switch
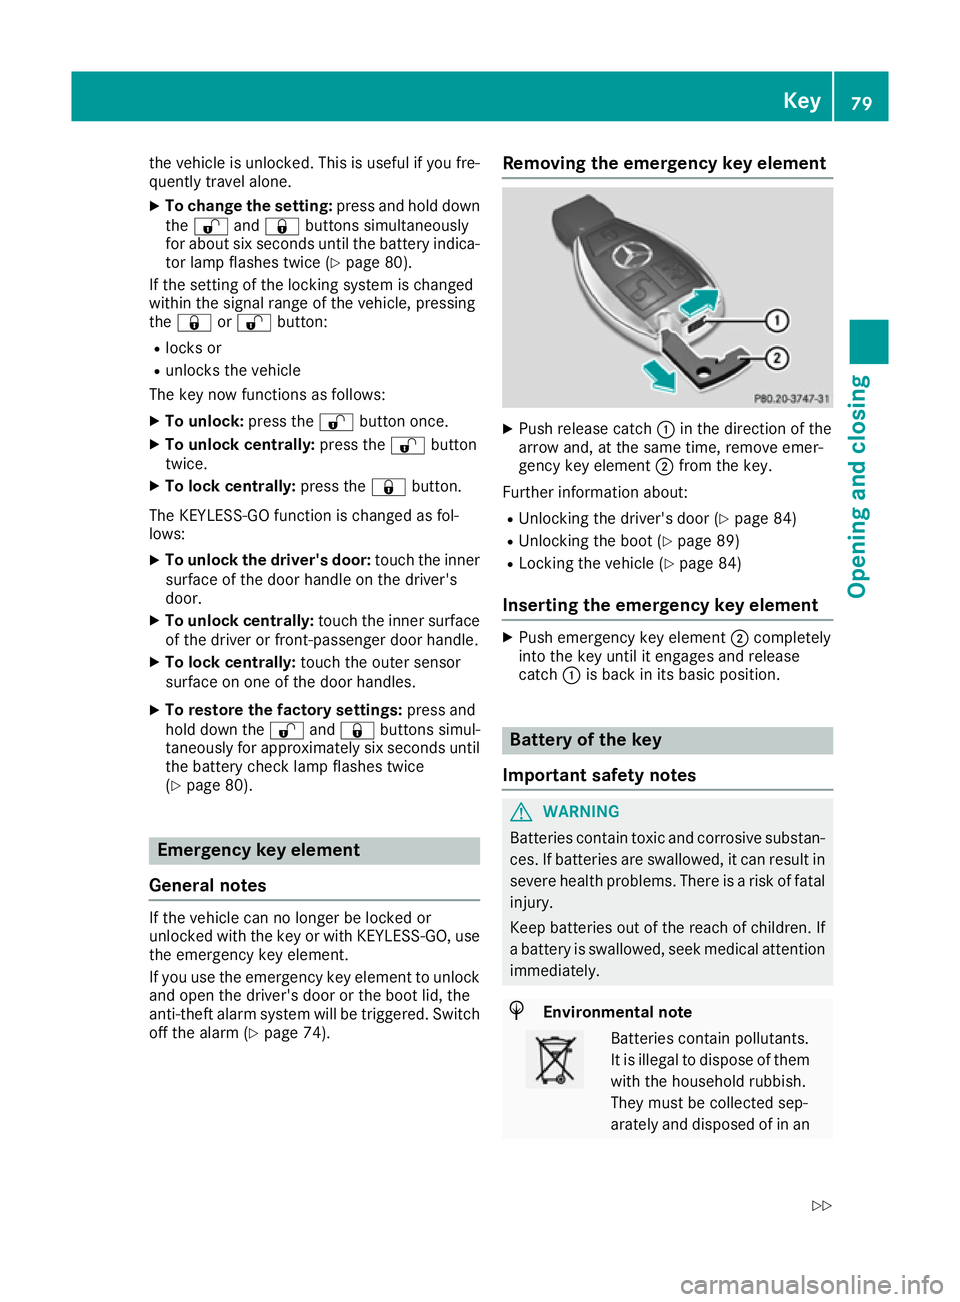
off the alarm (Y page 74). Removing the emergency key element X
Push release catch :in the direction of the
arrow and, at the same time, remove emer-
gency key element ;from the key.
Further information about: R Unlocking the driver's door (Y page 84)
R Unlocking the boot (Y page 89)
R Locking the vehicle (Y page 84)
Inserting the emergency key element X
Push emergency key element ;completely
into the key until it engages and release
catch :is back in its basic position. Battery of the key
Important safety notes G
WARNING
Batteries contain toxic and corrosive substan- ces. If batteries are swallowed, it can result in
severe health problems. There is a risk of fatal injury.
Keep batteries out of the reach of children. If
a battery is swallowed, seek medical attention immediately. H
Environmental note Batteries contain pollutants.
It is illegal to dispose of them
with the household rubbish.
They must be collected sep-
arately and disposed of in an Key
79Opening and closing
Z
Page 83 of 333
environmentally responsible
recycling system. Dispose of batteries in an
environmentally responsible
manner. Take discharged
batteries to a qualified spe-
cialist workshop or to a col-
lection point for used batter-
ies.
Mercedes-Benz recommends that you have the
batteries replaced at a qualified specialist work- shop.
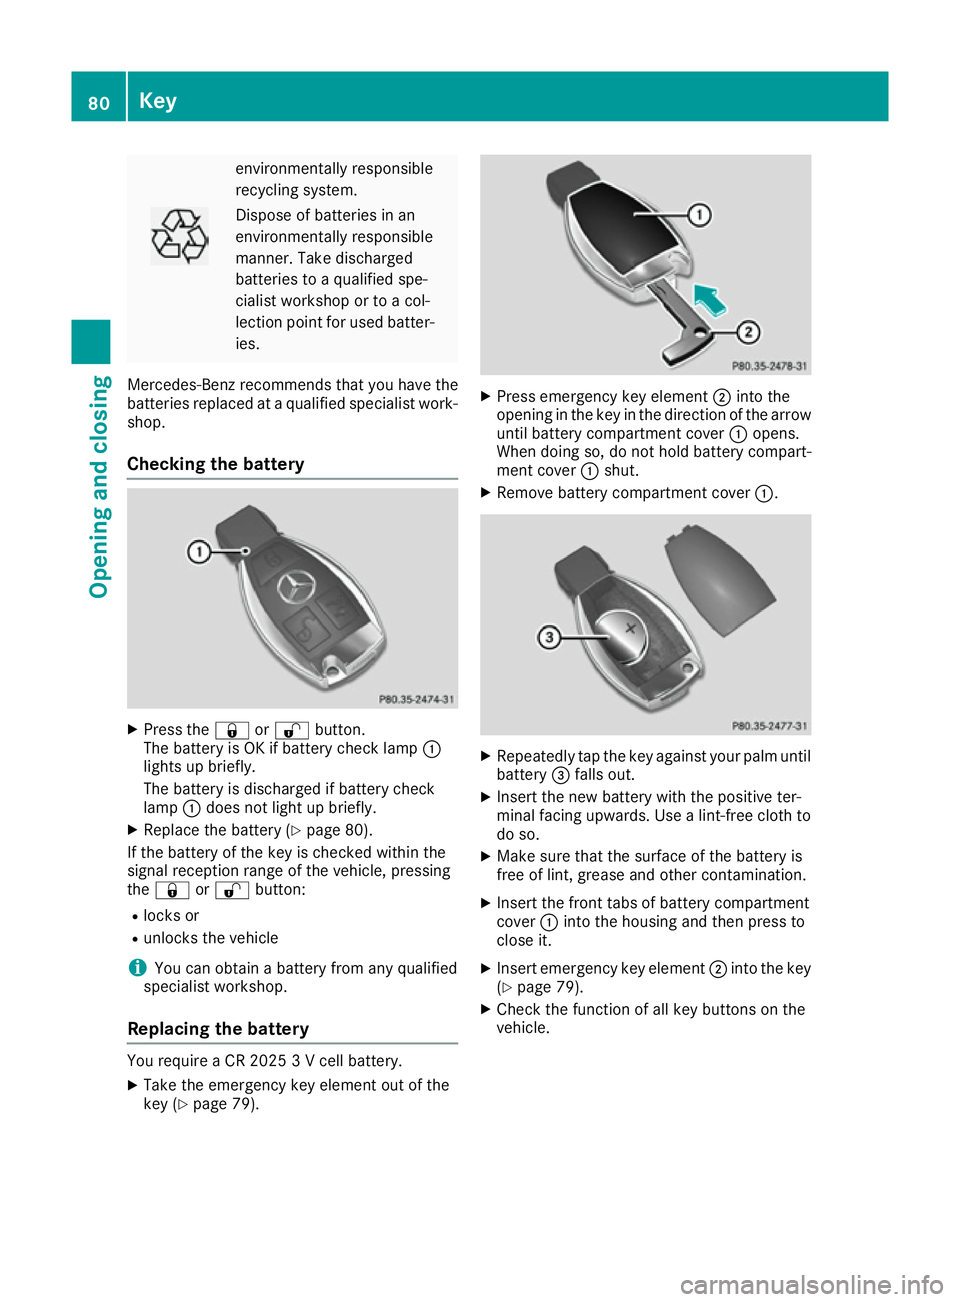
Checking the battery X
Press the &or% button.
The battery is OK if battery check lamp :
lights up briefly.
The battery is discharged if battery check
lamp :does not light up briefly.
X Replace the battery (Y page 80).
If the battery of the key is checked within the
signal reception range of the vehicle, pressing
the & or% button:
R locks or
R unlocks the vehicle
i You can obtain a battery from any qualified
specialist workshop.
Replacing the battery You require a CR 2025 3 V cell battery.
X Take the emergency key element out of the
key (Y page 79). X
Press emergency key element ;into the
opening in the key in the direction of the arrow
until battery compartment cover :opens.
When doing so, do not hold battery compart-
ment cover :shut.
X Remove battery compartment cover :. X
Repeatedly tap the key against your palm until
battery =falls out.
X Insert the new battery with the positive ter-
minal facing upwards. Use a lint-free cloth to
do so.
X Make sure that the surface of the battery is
free of lint, grease and other contamination.
X Insert the front tabs of battery compartment
cover :into the housing and then press to
close it.
X Insert emergency key element ;into the key
(Y page 79).
X Check the function of all key buttons on the
vehicle. 80
KeyOpening and closing
Page 84 of 333
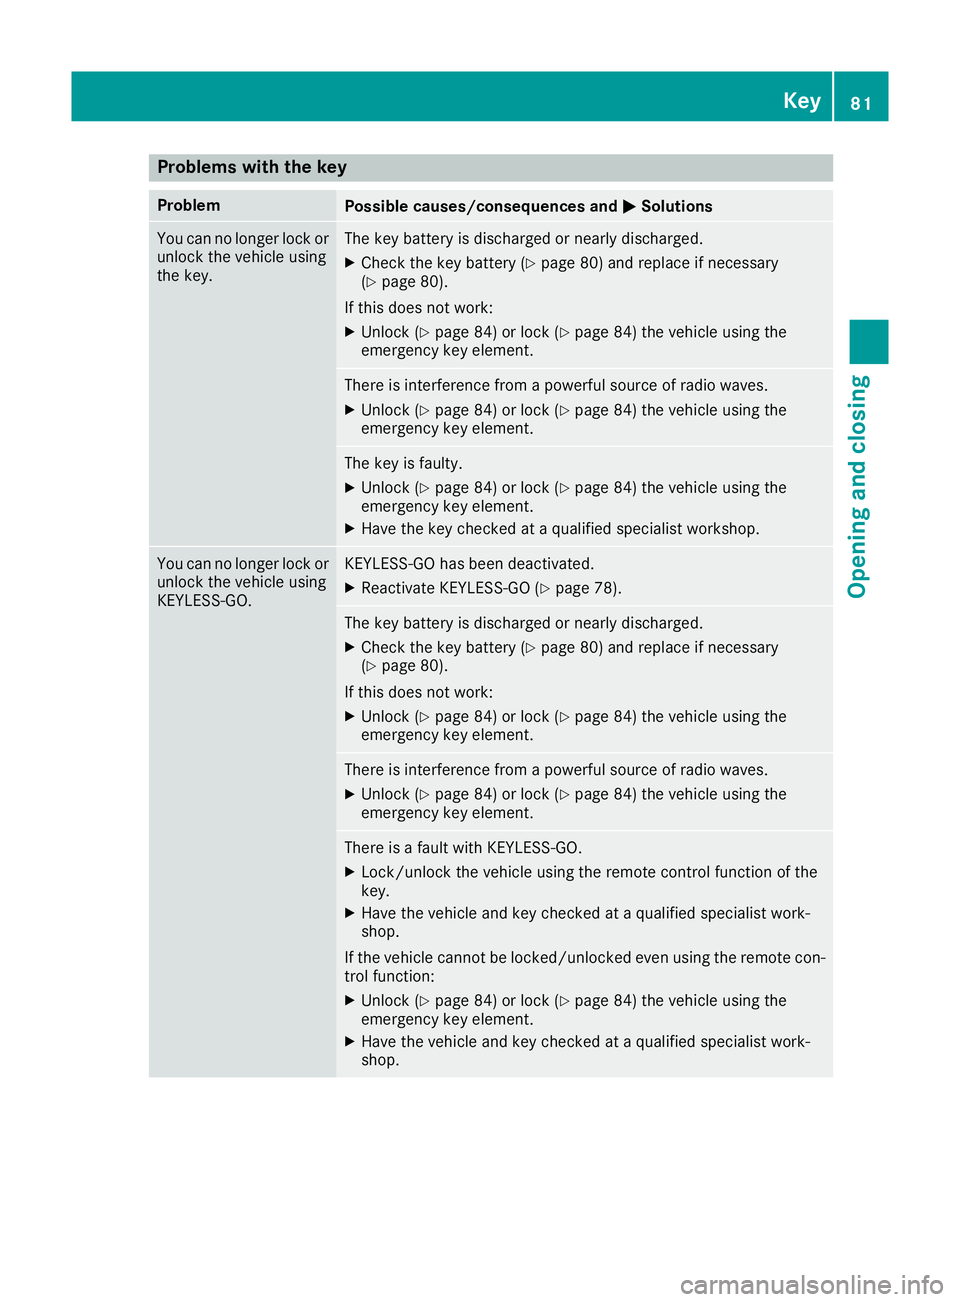
Problems with the key
Problem
Possible causes/consequences and
M
MSolutions You can no longer lock or
unlock the vehicle using
the key. The key battery is discharged or nearly discharged.
X Check the key battery (Y page 80) and replace if necessary
(Y page 80).
If this does not work: X Unlock (Y page 84) or lock (Y page 84) the vehicle using the
emergency key element. There is interference from a powerful source of radio waves.
X Unlock (Y page 84) or lock (Y page 84) the vehicle using the
emergency key element. The key is faulty.
X Unlock (Y page 84) or lock (Y page 84) the vehicle using the
emergency key element.
X Have the key checked at a qualified specialist workshop. You can no longer lock or
unlock the vehicle using
KEYLESS-GO. KEYLESS-GO has been deactivated.
X Reactivate KEYLESS-GO (Y page 78). The key battery is discharged or nearly discharged.
X Check the key battery (Y page 80) and replace if necessary
(Y page 80).
If this does not work: X Unlock (Y page 84) or lock (Y page 84) the vehicle using the
emergency key element. There is interference from a powerful source of radio waves.
X Unlock (Y page 84) or lock (Y page 84) the vehicle using the
emergency key element. There is a fault with KEYLESS-GO.
X Lock/unlock the vehicle using the remote control function of the
key.
X Have the vehicle and key checked at a qualified specialist work-
shop.
If the vehicle cannot be locked/unlocked even using the remote con-
trol function:
X Unlock (Y page 84) or lock (Y page 84) the vehicle using the
emergency key element.
X Have the vehicle and key checked at a qualified specialist work-
shop. Key
81Opening and closing Z