2016 MERCEDES-BENZ SL ROADSTER boot
[x] Cancel search: bootPage 190 of 333

When Active Parking Assist is cancelled, you
must steer again yourself. Reversing camera
General notes Reversing camera
:is an optical parking and
manoeuvring aid. It shows the area behind your vehicle with guide lines in the multimedia sys-
tem.
The area behind the vehicle is displayed as a
mirror image, as in the rear-view mirror.
i The text shown in the multimedia system
display depends on the language setting. The following are examples of reversing camera
messages in the multimedia system.
Important safety notes The reversing camera is only an aid. It is not a
substitute for your attention to the immediate
surroundings. The responsibility for safe
manoeuvring and parking remains with you.
Make sure that there are no persons, animals or objects in range while manoeuvring and parking.
Under the following circumstances, the revers-
ing camera will not function, or will function in a limited manner:
R if the boot lid is open
R in heavy rain, snow or fog
R at night or in very dark places
R if the camera is exposed to very bright light
R if the area is lit by fluorescent bulbs or LED
lighting (the display may flicker)
R if there is a sudden change in temperature,
e.g. when driving into a heated garage in win- ter R
if the camera lens is dirty or obstructed.
Observe the notes on cleaning
(Y page 285)
R if the rear of your vehicle is damaged. In this
case, have the camera position and setting
checked at a qualified specialist workshop.
The field of vision and other functions of the
reversing camera may be restricted due to addi-
tional accessories on the rear of the vehicle (e.g. licence plate holder, bicycle rack).
For technical reasons, leaving the standard
height can result in inaccuracies in the guide
lines on vehicles with a height-adjustable chas-
sis.
Activating/deactivating the reversing
camera X
To activate: make sure that the key is in
position 2in the ignition lock.
X Make sure that the Activation by R gear Activation by R gear
function is selected in the multimedia system; see the Digital Owner's Manual.
X Engage reverse gear.
The multimedia system shows the area
behind the vehicle with guide lines.
The image from the reversing camera is avail-
able throughout the manoeuvring process.
To deactivate: the reversing camera deacti-
vates if you shift the transmission to Por after
driving forwards a short distance.
Displays in the multimedia system The reversing camera may show a distorted view
of obstacles or show them incorrectly or not at
all. Obstacles are not shown by the reversing
camera in the following locations:
R very close to the rear bumper
R under the rear bumper
R in the area immediately above the handle on
the boot lid
! Objects not at ground level may appear to
be further away than they actually are, e.g.:
R the bumper of a parked vehicle
R the drawbar of a trailer
R the ball coupling of a trailer tow hitch
R the rear section of an HGV
R a slanted post Driving systems
187Driving and parking Z
Page 214 of 333
the doors and the boot lid, the exterior lighting
goes off after 15 second s.
Depending on your vehicle's equipment, when
the surround lighting and delayed switch-off
exterior lighting are on, the following light up:
R side lamps
R dipped-beam headlamps
R daytime driving lights
R surround lighting in the exterior mirrors
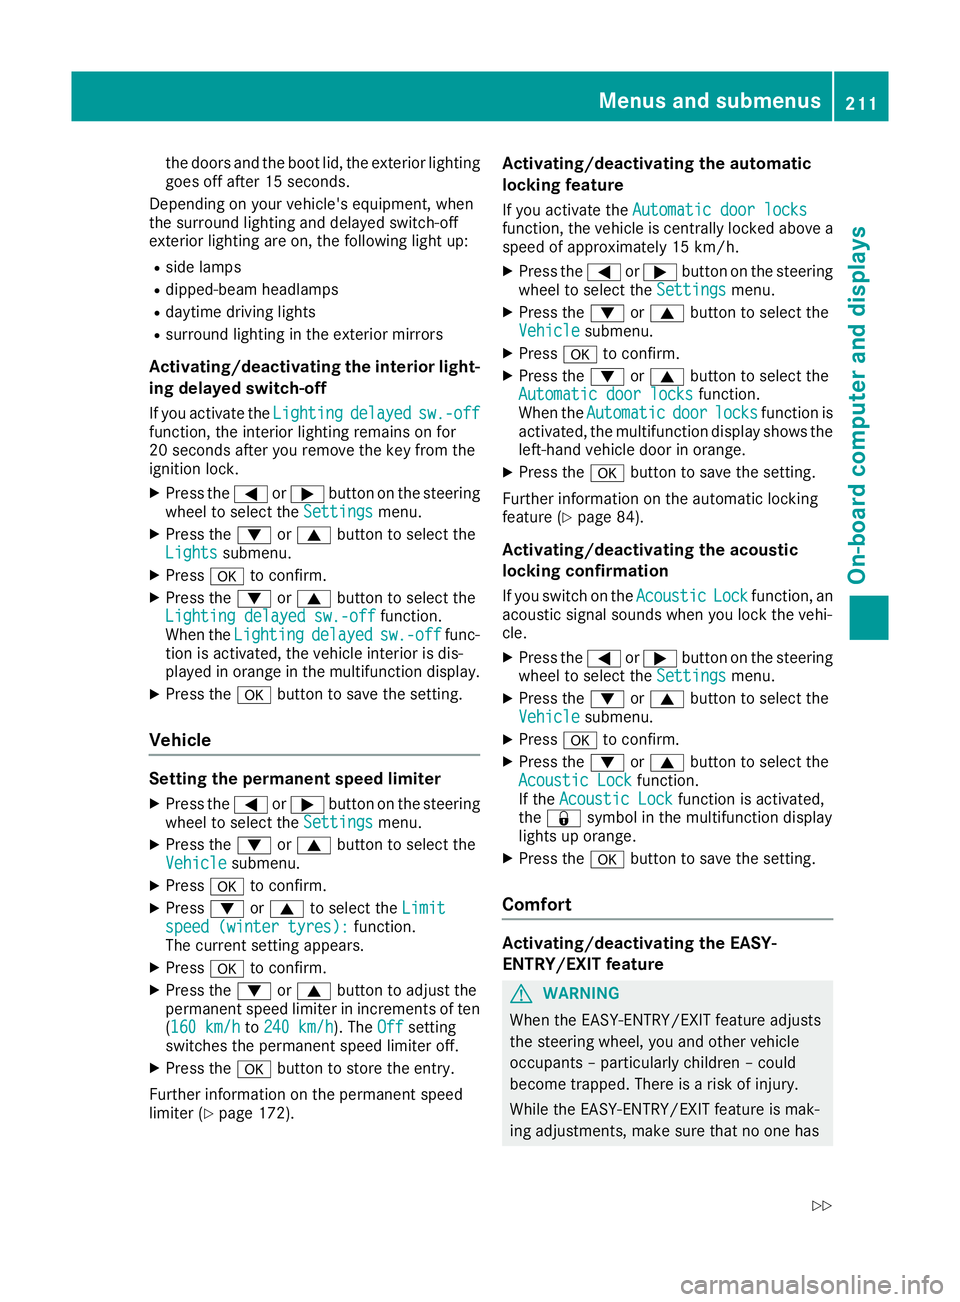
Activating/deactivating the interior light- ing delayed switch-off
If you activate the Lighting Lightingdelayed
delayedsw.-off
sw.-off
function, the interior lighting remains on for
20 seconds after you remove the key from the
ignition lock.
X Press the =or; button on the steering
wheel to select the Settings
Settingsmenu.
X Press the :or9 button to select the
Lights
Lights submenu.
X Press ato confirm.
X Press the :or9 button to select the
Lighting delayed sw.-off
Lighting delayed sw.-off function.
When the Lighting
Lighting delayed
delayedsw.-off
sw.-offfunc-
tion is activated, the vehicle interior is dis-
played in orange in the multifunction display.
X Press the abutton to save the setting.
Vehicle Setting the permanent speed limiter
X Press the =or; button on the steering
wheel to select the Settings
Settings menu.
X Press the :or9 button to select the
Vehicle Vehicle submenu.
X Press ato confirm.
X Press :or9 to select the Limit
Limit
speed (winter tyres):
speed (winter tyres): function.
The current setting appears.
X Press ato confirm.
X Press the :or9 button to adjust the
permanent speed limiter in increments of ten
(160 km/h 160 km/h to240 km/h
240 km/h). The Off
Offsetting
switches the permanent speed limiter off.
X Press the abutton to store the entry.
Further information on the permanent speed
limiter (Y page 172). Activating/deactivating the automatic
locking feature
If you activate the Automatic door locks Automatic door locks
function, the vehicle is centrally locked above a
speed of approximately 15 km/h.
X Press the =or; button on the steering
wheel to select the Settings Settingsmenu.
X Press the :or9 button to select the
Vehicle
Vehicle submenu.
X Press ato confirm.
X Press the :or9 button to select the
Automatic door locks
Automatic door locks function.
When the Automatic
Automatic door
doorlocks
locks function is
activated, the multifunction display shows the
left-hand vehicle door in orange.
X Press the abutton to save the setting.
Further information on the automatic locking
feature (Y page 84).
Activating/deactivating the acoustic
locking confirmation
If you switch on the Acoustic
Acoustic Lock Lockfunction, an
acoustic signal sounds when you lock the vehi-
cle.
X Press the =or; button on the steering
wheel to select the Settings
Settings menu.
X Press the :or9 button to select the
Vehicle Vehicle submenu.
X Press ato confirm.
X Press the :or9 button to select the
Acoustic Lock
Acoustic Lock function.
If the Acoustic Lock
Acoustic Lock function is activated,
the & symbol in the multifunction display
lights up orange.
X Press the abutton to save the setting.
Comfort Activating/deactivating the EASY-
ENTRY/EXIT feature
G
WARNING
When the EASY-ENTRY/EXIT feature adjusts
the steering wheel, you and other vehicle
occupants – particularly children – could
become trapped. There is a risk of injury.
While the EASY-ENTRY/EXIT feature is mak-
ing adjustments, make sure that no one has Menus and submenus
211On-board computer and displays
Z
Page 243 of 333
Display messages
Possible causes/consequences and
M
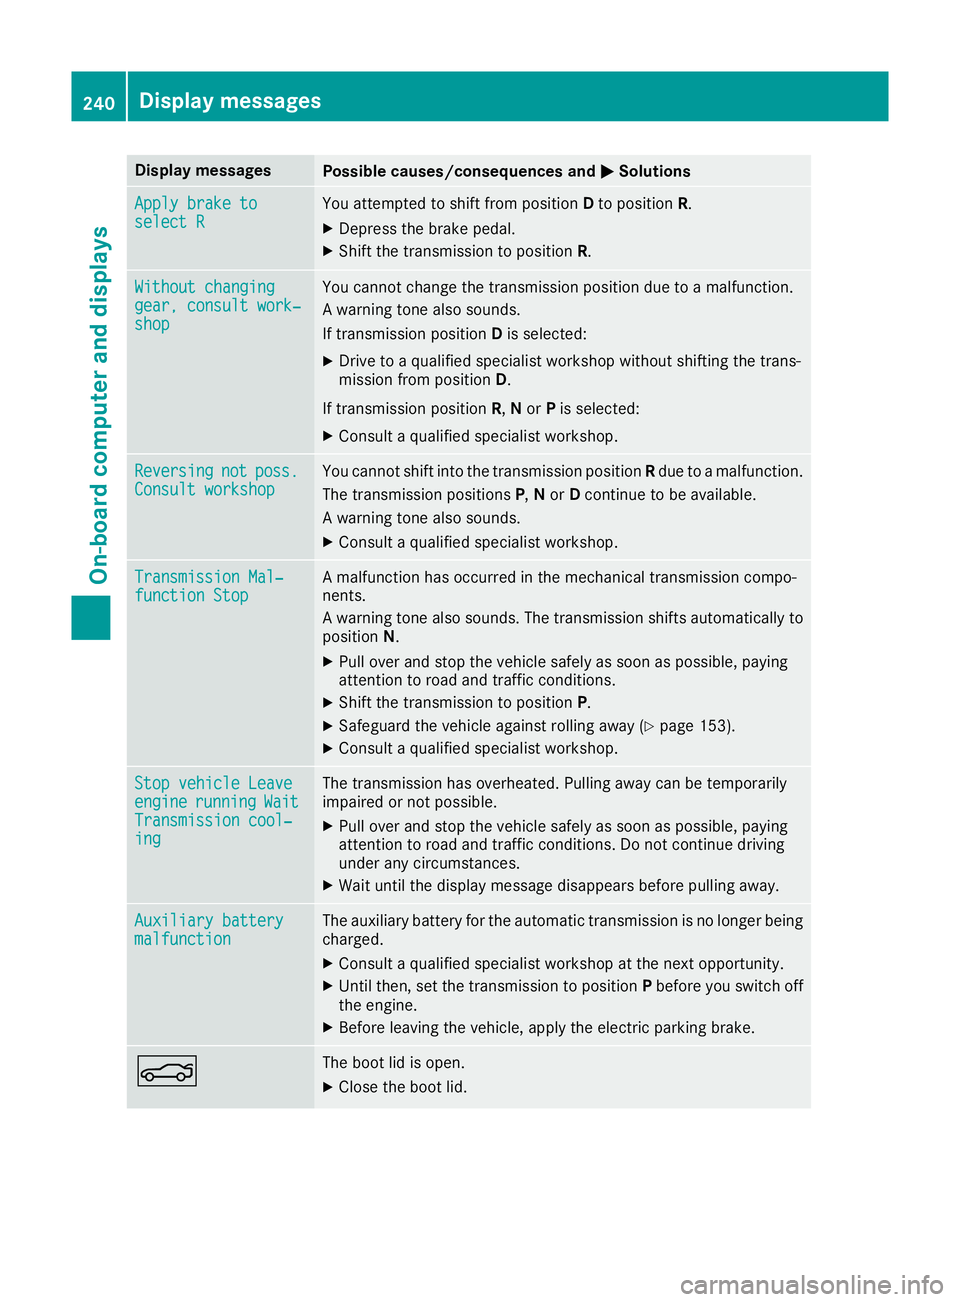
MSolutions Apply brake to
Apply brake to
select R select R You attempted to shift from position
Dto position R.
X Depress the brake pedal.
X Shift the transmission to position R.Without changing
Without changing
gear, consult work‐ gear, consult work‐
shop shop You cannot change the transmission position due to a malfunction.
A warning tone also sounds.
If transmission position
Dis selected:
X Drive to a qualified specialist workshop without shifting the trans-
mission from position D.
If transmission position R,Nor Pis selected:
X Consult a qualified specialist workshop. Reversing Reversing
not
not poss.
poss.
Consult workshop
Consult workshop You cannot shift into the transmission position
Rdue to a malfunction.
The transmission positions P,N or Dcontinue to be available.
A warning tone also sounds.
X Consult a qualified specialist workshop. Transmission Mal‐
Transmission Mal‐
function Stop function Stop A malfunction has occurred in the mechanical transmission compo-
nents.
A warning tone also sounds. The transmission shifts automatically to position N.
X Pull over and stop the vehicle safely as soon as possible, paying
attention to road and traffic conditions.
X Shift the transmission to position P.
X Safeguard the vehicle against rolling away (Y page 153).
X Consult a qualified specialist workshop. Stop vehicle Leave Stop vehicle Leave
engine engine
running
running Wait
Wait
Transmission cool‐
Transmission cool‐
ing ing The transmission has overheated. Pulling away can be temporarily
impaired or not possible.
X Pull over and stop the vehicle safely as soon as possible, paying
attention to road and traffic conditions. Do not continue driving
under any circumstances.
X Wait until the display message disappears before pulling away. Auxiliary battery Auxiliary battery
malfunction malfunction The auxiliary battery for the automatic transmission is no longer being
charged.
X Consult a qualified specialist workshop at the next opportunity.
X Until then, set the transmission to position Pbefore you switch off
the engine.
X Before leaving the vehicle, apply the electric parking brake. N The boot lid is open.
X Close the boot lid. 240
Display
messagesOn-board computer and displays
Page 244 of 333
Display messages
Possible causes/consequences and
M
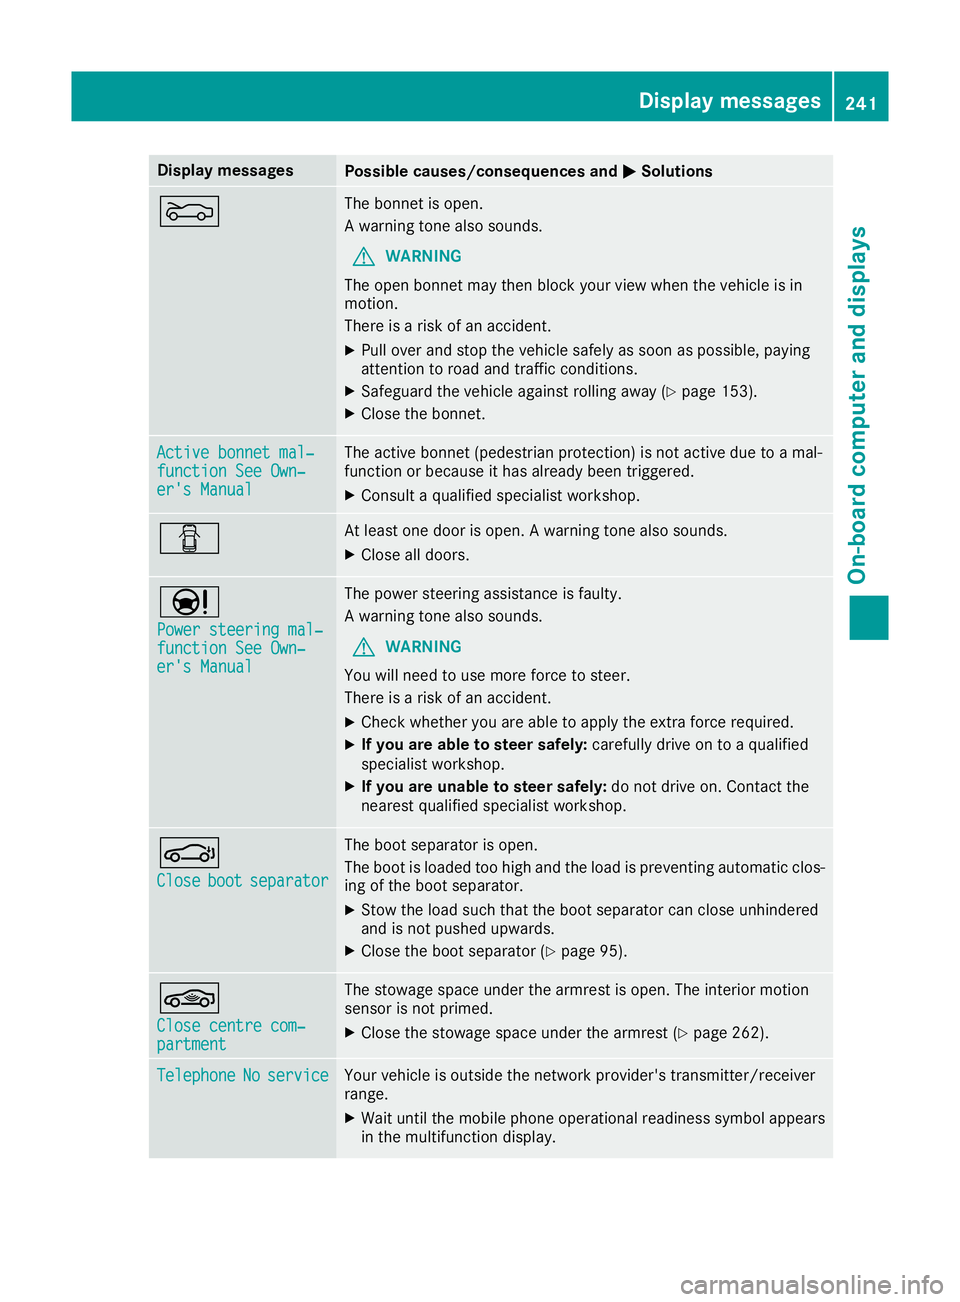
MSolutions M The bonnet is open.
A warning tone also sounds.
G WARNING
The open bonnet may then block your view when the vehicle is in
motion.
There is a risk of an accident.
X Pull over and stop the vehicle safely as soon as possible, paying
attention to road and traffic conditions.
X Safeguard the vehicle against rolling away (Y page 153).
X Close the bonnet. Active bonnet mal‐ Active bonnet mal‐
function See Own‐ function See Own‐
er's Manual er's Manual The active bonnet (pedestrian protection) is not active due to a mal-
function or because it has already been triggered.
X Consult a qualified specialist workshop. C At least one door is open. A warning tone also sounds.
X Close all doors. Ð
Power steering mal‐ Power steering mal‐
function See Own‐ function See Own‐
er's Manual er's Manual The power steering assistance is faulty.
A warning tone also sounds.
G WARNING
You will need to use more force to steer.
There is a risk of an accident.
X Check whether you are able to apply the extra force required.
X If you are able to steer safely: carefully drive on to a qualified
specialist workshop.
X If you are unable to steer safely: do not drive on. Contact the
nearest qualified specialist workshop. J
Close Close
boot
bootseparator
separator The boot separator is open.
The boot is loaded too high and the load is preventing automatic clos-
ing of the boot separator.
X Stow the load such that the boot separator can close unhindered
and is not pushed upwards.
X Close the boot separator (Y page 95).*
Close centre com‐ Close centre com‐
partment partment The stowage space under the armrest is open. The interior motion
sensor is not primed.
X Close the stowage space under the armrest (Y page 262).Telephone
Telephone
No
Noservice
service Your vehicle is outside the network provider's transmitter/receiver
range.
X Wait until the mobile phone operational readiness symbol appears
in the multifunction display. Display
messages
241On-board computer and displays Z
Page 265 of 333
Stowage areas
Stowage compartments
Important safety notes G
WARNING
If objects in the passenger compartment are
stowed incorrectly, they can slide or be
thrown around and hit vehicle occupants. In
addition, cupholders, open stowage spaces
and mobile phone brackets cannot always
retain all objects they contain. There is a risk of injury, particularly in the event of sudden
braking or a sudden change in direction.
R Always stow objects so that they cannot be
thrown around in such situations.
R Always make sure that objects do not pro-
trude from stowage spaces, parcel nets or
stowage nets.
R Close the lockable stowage spaces before
starting a journey.
R Always stow and secure heavy, hard, poin-
ted, sharp-edged, fragile or bulky objects in
the boot.
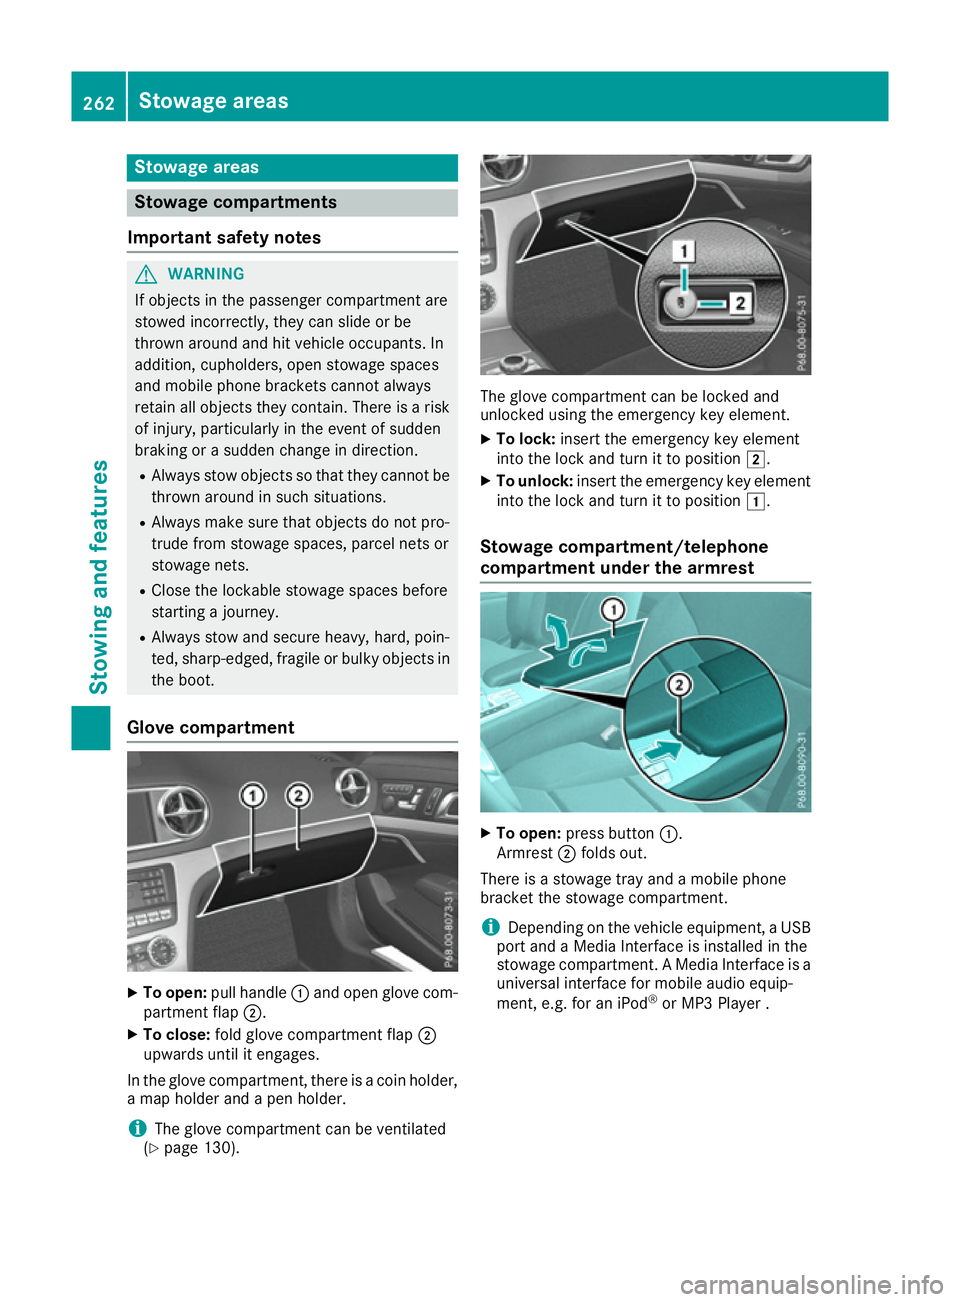
Glove compartment X
To open: pull handle :and open glove com-
partment flap ;.
X To close: fold glove compartment flap ;
upwards until it engages.
In the glove compartment, there is a coin holder, a map holder and a pen holder.
i The glove compartment can be ventilated
(Y page 130). The glove compartment can be locked and
unlocked using the emergency key element.
X To lock: insert the emergency key element
into the lock and turn it to position 2.
X To unlock: insert the emergency key element
into the lock and turn it to position 1.
Stowage compartment/telephone
compartment under the armrest X
To open: press button :.
Armrest ;folds out.
There is a stowage tray and a mobile phone
bracket the stowage compartment.
i Depending on the vehicle equipment, a USB
port and a Media Interface is installed in the
stowage compartment. A Media Interface is a universal interface for mobile audio equip-
ment, e.g. for an iPod ®
or MP3 Player . 262
Stowage areasStowing and features
Page 267 of 333
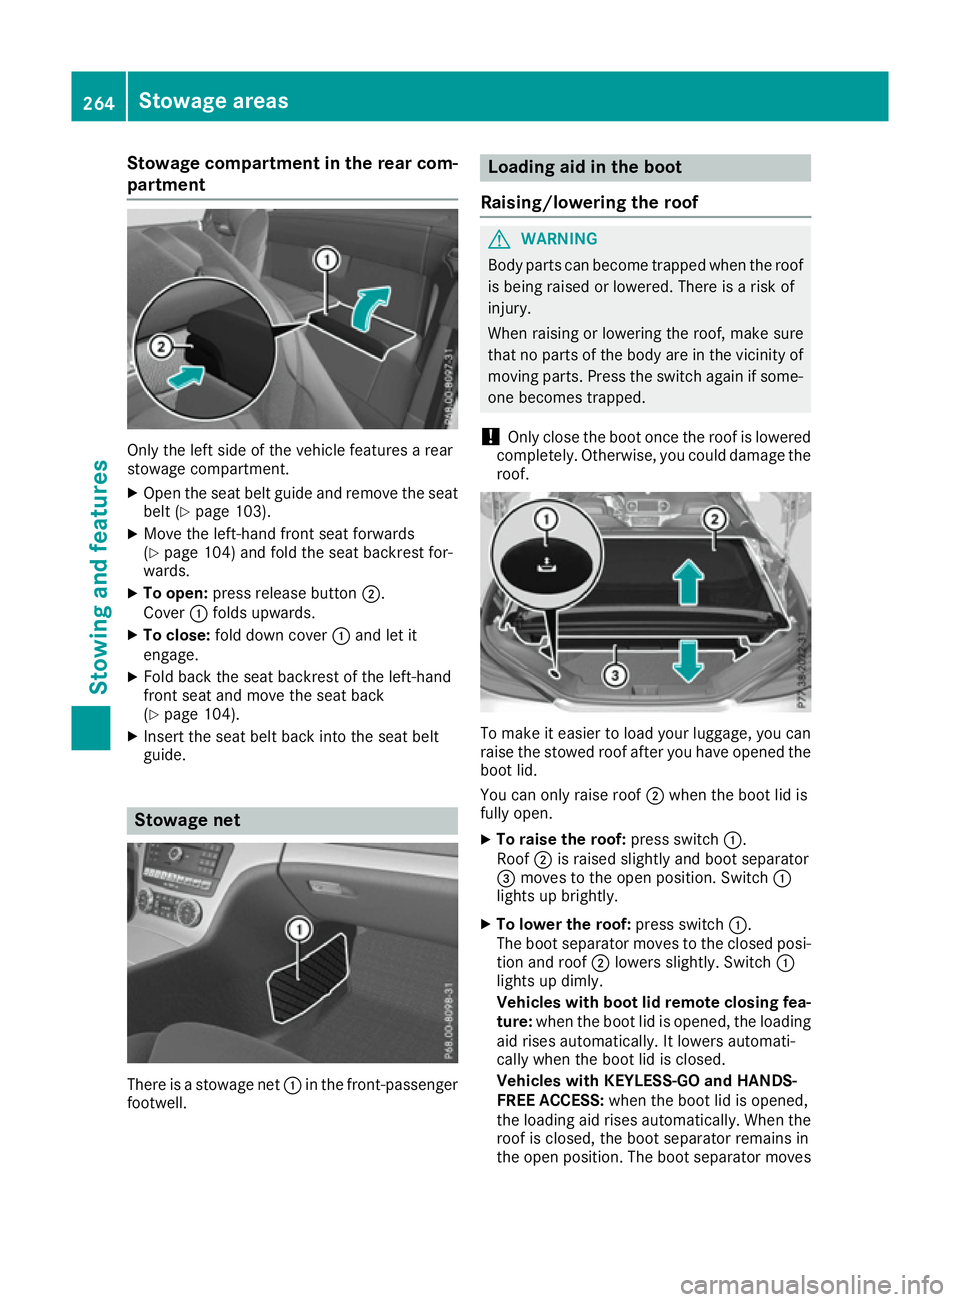
Stowage compartment in the rear com-
partment Only the left side of the vehicle features a rear
stowage compartment.
X Open the seat belt guide and remove the seat
belt (Y page 103).
X Move the left-hand front seat forwards
(Y page 104) and fold the seat backrest for-
wards.
X To open: press release button ;.
Cover :folds upwards.
X To close: fold down cover :and let it
engage.
X Fold back the seat backrest of the left-hand
front seat and move the seat back
(Y page 104).
X Insert the seat belt back into the seat belt
guide. Stowage net
There is a stowage net
:in the front-passenger
footwell. Loading aid in the boot
Raising/lowering the roof G
WARNING
Body parts can become trapped when the roof is being raised or lowered. There is a risk of
injury.
When raising or lowering the roof, make sure
that no parts of the body are in the vicinity of moving parts. Press the switch again if some-
one becomes trapped.
! Only close the boot once the roof is lowered
completely. Otherwise, you could damage the roof. To make it easier to load your luggage, you can
raise the stowed roof after you have opened the boot lid.
You can only raise roof ;when the boot lid is
fully open.
X To raise the roof: press switch:.
Roof ;is raised slightly and boot separator
= moves to the open position. Switch :
lights up brightly.
X To lower the roof: press switch:.
The boot separator moves to the closed posi- tion and roof ;lowers slightly. Switch :
lights up dimly.
Vehicles with boot lid remote closing fea-
ture: when the boot lid is opened, the loading
aid rises automatically. It lowers automati-
cally when the boot lid is closed.
Vehicles with KEYLESS-GO and HANDS-
FREE ACCESS: when the boot lid is opened,
the loading aid rises automatically. When the
roof is closed, the boot separator remains in
the open position. The boot separator moves 264
Stowage areasStowing and features
Page 269 of 333
Problems with the loading aid
Problem
Possible causes/consequences and
M
MSolutions It is no longer possible to
lower the stowed roof in
the boot using the load-
ing aid. You cannot close the boot any more.
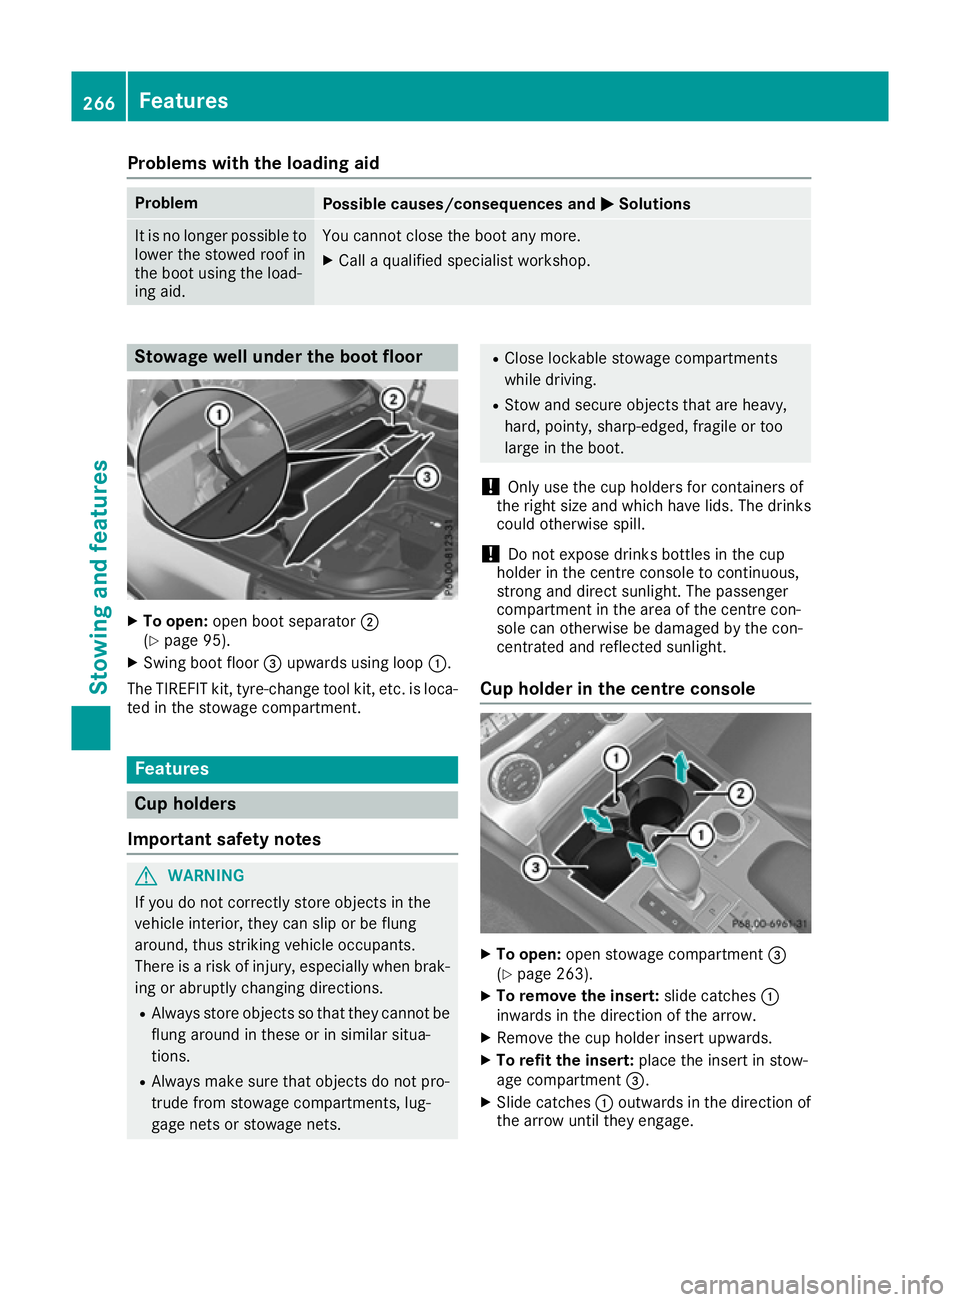
X Call a qualified specialist workshop. Stowage well under the boot floor
X
To open: open boot separator ;
(Y page 95).
X Swing boot floor =upwards using loop :.
The TIREFIT kit, tyre-change tool kit, etc. is loca-
ted in the stowage compartment. Features
Cup holders
Important safety notes G
WARNING
If you do not correctly store objects in the
vehicle interior, they can slip or be flung
around, thus striking vehicle occupants.
There is a risk of injury, especially when brak- ing or abruptly changing directions.
R Always store objects so that they cannot be
flung around in these or in similar situa-
tions.
R Always make sure that objects do not pro-
trude from stowage compartments, lug-
gage nets or stowage nets. R
Close lockable stowage compartments
while driving.
R Stow and secure objects that are heavy,
hard, pointy, sharp-edged, fragile or too
large in the boot.
! Only use the cup holders for containers of
the right size and which have lids. The drinks could otherwise spill.
! Do not expose drinks bottles in the cup
holder in the centre console to continuous,
strong and direct sunlight. The passenger
compartment in the area of the centre con-
sole can otherwise be damaged by the con-
centrated and reflected sunlight.
Cup holder in the centre console X
To open: open stowage compartment =
(Y page 263).
X To remove the insert: slide catches:
inwards in the direction of the arrow.
X Remove the cup holder insert upwards.
X To refit the insert: place the insert in stow-
age compartment =.
X Slide catches :outwards in the direction of
the arrow until they engage. 266
FeaturesStowing and features
Page 271 of 333
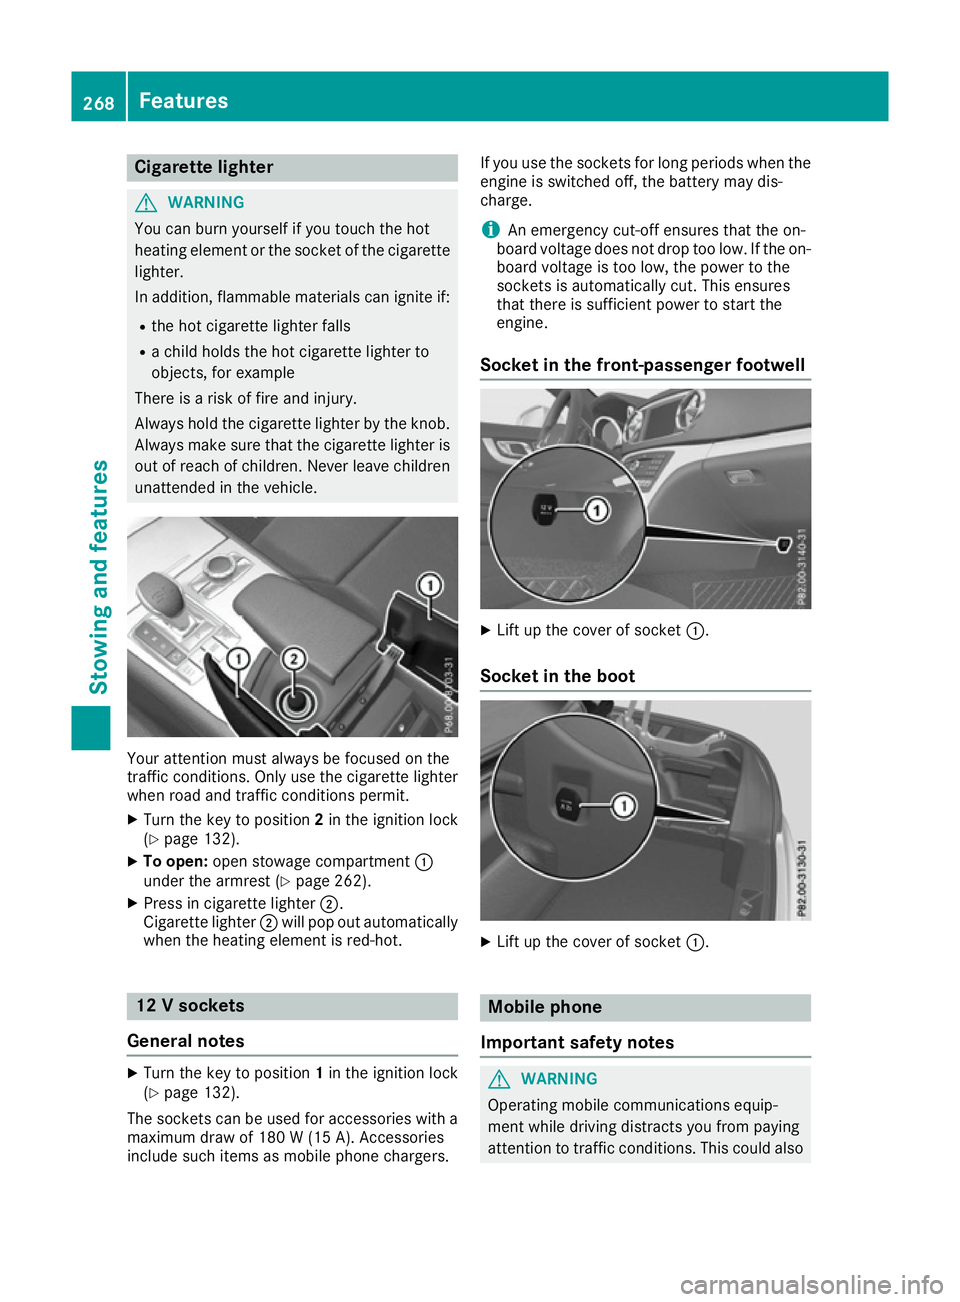
Cigarette lighter
G
WARNING
You can burn yourself if you touch the hot
heating element or the socket of the cigarette lighter.
In addition, flammable materials can ignite if:
R the hot cigarette lighter falls
R a child holds the hot cigarette lighter to
objects, for example
There is a risk of fire and injury.
Always hold the cigarette lighter by the knob.
Always make sure that the cigarette lighter is
out of reach of children. Never leave children unattended in the vehicle. Your attention must always be focused on the
traffic conditions. Only use the cigarette lighter
when road and traffic conditions permit.
X Turn the key to position 2in the ignition lock
(Y page 132).
X To open: open stowage compartment :
under the armrest (Y page 262).
X Press in cigarette lighter ;.
Cigarette lighter ;will pop out automatically
when the heating element is red-hot. 12 V sockets
General notes X
Turn the key to position 1in the ignition lock
(Y page 132).
The sockets can be used for accessories with a
maximum draw of 180 W (15A). Accessories
include such items as mobile phone chargers. If you use the sockets for long periods when the
engine is switched off, the battery may dis-
charge.
i An emergency cut-off ensures that the on-
board voltage does not drop too low. If the on-
board voltage is too low, the power to the
sockets is automatically cut. This ensures
that there is sufficient power to start the
engine.
Socket in the front-passenger footwell X
Lift up the cover of socket :.
Socket in the boot X
Lift up the cover of socket :. Mobile phone
Important safety notes G
WARNING
Operating mobile communications equip-
ment while driving distracts you from paying
attention to traffic conditions. This could also 268
FeaturesStowing and fea
tures