2016 MERCEDES-BENZ SL ROADSTER seats
[x] Cancel search: seatsPage 5 of 333
Index
....................................................... 3Digital Owner's Manual
......................22 Introduction
......................................... 23 At a glance
........................................... 30 Safety
................................................... 39 Opening and closing
...........................77 Seats, steering wheel and mirrors
..101 Lights and windscreen wipers
.........113 Climate control
................................. 122 Driving and parking
..........................131 On-board computer and displays
....199 Multimedia system
...........................253 Stowing and features
.......................262 Maintenance and care
......................276 Breakdown assistance
.....................287 Wheels and tyres
.............................. 304 Technical data
................................... 3202
Contents
Page 20 of 333
Switching belt adjustment on/off
(on-board computer) ...................... 212
Seat belts
Adjusting the driver's and front-
passenger seat belt ......................... 43
Fastening ......................................... 42
Important safety guidelines ............. 41
Introduction ..................................... 41
Releasing ......................................... 43
Warning lamp ................................. 244
Warning lamp (function) ................... 43
Seats
Adjusting (electrically) ................... 102
Adjusting the head restraint .......... 103
Belt guide ...................................... 103
Correct driver's seat position ........ 101
Important safety notes .................. 101
Overview ........................................ 101
Seat heating problem .................... 105
Seat ventilation problem ................ 105
Sliding forward/back ..................... 104
Storing settings (memory func-
tion) ............................................... 111
Switching AIRSCARF on/of f.......... 105
Switching seat heating on/of f....... 104
Switching the seat ventilation on/
off .................................................. 105
Selector lever
Positions ........................................ 141
Sensors (cleaning instructions) ....... 285
Service
see ASSYST PLUS
Service Centre
see Qualified specialist workshop
Service menu (on-board com-
puter) .................................................. 208
Service message
see ASSYST PLUS
Service products
Brake fluid ..................................... 325
Coolant (engine) ............................ 325
Engine oil ....................................... 324
Fuel ................................................ 322
Important safety notes .................. 322
Washer fluid ................................... 326
Setting the air distribution ............... 126
Setting the airflow ............................ 126 Setting the date/time format
See also Digital Owner's Manua l... 253
Setting the language
See also Digital Owner's Manua l... 253
Setting the time
See also Digital Owner's Manua l... 253
Settings
Factory (on-board computer) ......... 212
On-board compute r....................... 208
SETUP (on-board computer) ............. 213
Side lamps
Switching on/of f........................... 114
Side windows
Convenience closing ........................ 91
Important safety notes .................... 89
Opening/closing (front) ................... 90
Opening/closing (rear) .................... 91
Opening/closing all ......................... 91
Overview .......................................... 89
Problem (malfunction) ..................... 93
Resetting ......................................... 92
Reversing feature ............................. 90
Sidebag ................................................ 45
SIM card
Inserting ........................................ 258
SMS
See also Digital Owner's Manua l... 253
Snow chains ...................................... 307
Socket
Front-passenger footwell ............... 268
Sockets
General notes ................................ 268
Sound
Switching on/of f........................... 254
Specialist workshop ............................ 27
Spectacles compartment ................. 263
Speed limiter
Display message ............................ 235
Important safety notes .................. 170
Selecting ........................................ 171
Speed, controlling
see Cruise control
Speedometer
Digital ............................................ 203
In the Instrument cluster ................. 32
Segments ...................................... 199
Selecting a display uni t.................. 209 Index
17
Page 26 of 333
Protection of the environment
General notes
H
Environmental note
Daimler's declared policy is one of compre-
hensive environmental protection.
Our objectives are to use the natural resour-
ces which form the basis of our existence on
this planet sparingly and in a manner which
takes the requirements of both nature and
humanity into consideration.
You too can help to protect the environment
by operating your vehicle in an environmen-
tally-responsible manner.
Fuel consumption and the rate of engine,
transmission, brake and tyre wear depend on
the following factors:
R operating conditions of your vehicle
R your personal driving style
You can influence both factors. Therefore,
please bear the following in mind:
Operating conditions:
R avoid short trips, as these increase fuel
consumption.
R observe the correct tyre pressure.
R do not carry any unnecessary weight in the
vehicle.
R remove the roof rack once you no longer
need it.
R a regularly serviced vehicle will contribute
to environmental protection. You should
therefore adhere to the service intervals.
R all maintenance work should be carried out
at a qualified specialist workshop.
Personal driving style:
R do not depress the accelerator pedal when
starting the engine.
R do not warm up the engine when the vehicle
is stationary.
R drive carefully and maintain a safe distance
from the vehicle in front.
R avoid frequent, sudden acceleration and
braking. R
change gear in good time and use each gear
only up to Ôof its maximum engine speed.
R switch off the engine in stationary traffic.
R monitor the vehicle's fuel consumption. Returning an end-of-life vehicle
EU countries only:
Mercedes-Benz will take back your old vehicle to
dispose of it in an environmentally-responsible
manner in accordance with the European Union (EU) End of Life Vehicles Directive.
There is a network of return points and disas-
sembly plants available. You can return your
vehicle to these plants free of charge. This
makes a valuable contribution to the recycling
process and the conservation of resources.
For further information on recycling old vehi-
cles, recovery and the terms of the policy, visit
the Mercedes-Benz homepage. Genuine Mercedes-Benz parts
H
Environmental note
Daimler AG also supplies reconditioned
assemblies and parts which are of the same
quality as new parts. For these, the same war-
ranty applies as for new parts.
! Airbags and seat belt tensioners, as well as
control units and sensors for these restraint
systems, may be installed in the following
areas of your vehicle:
R doors
R door pillars
R door sills
R seats
R dashboard
R instrument cluster
R centre console
Do not install accessories such as audio sys-
tems in these areas. Do not carry out repairs
or welding. You could impair the operating
efficiency of the restraint systems.
Have accessories retrofitted at a qualified
specialist workshop. Genuine Mercedes-Benz parts
23Introduction Z
Page 41 of 333
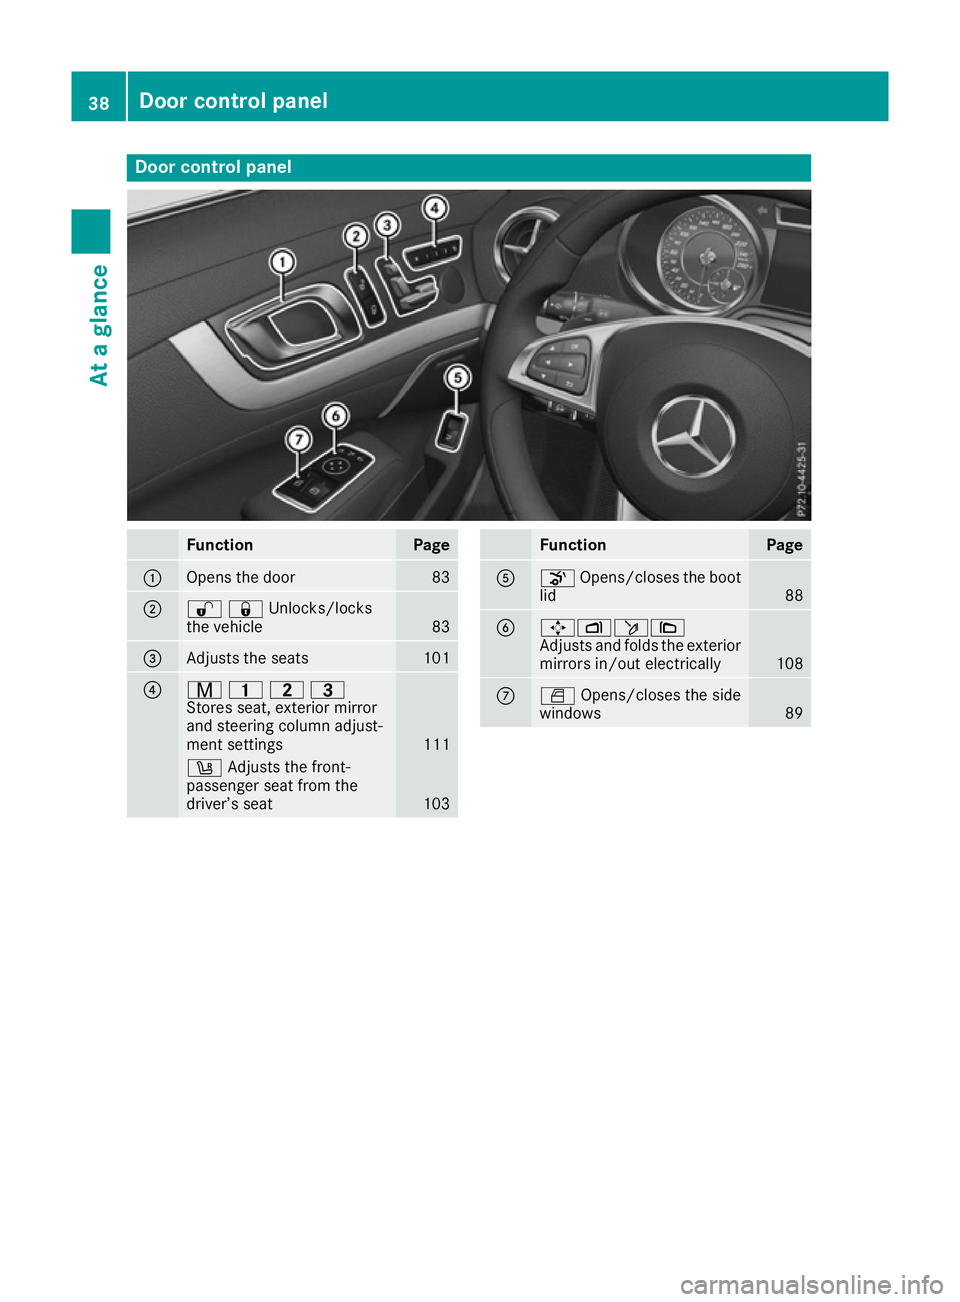
Door control panel
Function Page
:
Opens the door 83
;
%&Unlocks/locks
the vehicle
83
=
Adjusts the seats 101
?
r
45=
Stores seat, exterior mirror
and steering column adjust-
ment settings 111
w
Adjusts the front-
passenger seat from the
driver’s seat 103 Function Page
A
o
Opens/closes the boot
lid 88
B
7Zö\
Adjusts and folds the exterior
mirrors in/out electrically 108
C
W
Opens/closes the side
windows 8938
Door control panelAt a glance
Page 47 of 333
tional injuries when deployed. There is an
increased risk of serious or even fatal injuries.
In order to avoid such risks, always ensure
that all vehicle occupants:
R fasten their seatbelts correctly, including
pregnant women
R are seated correctly and maintain the fur-
thest possible distance from the airbags
R observe the following notes
Always ensure that there are no objects loca-
ted between the airbag and the vehicle occu-
pant.
R Adjust the seats properly before beginning
your journey. Always make sure that the seat is in an almost upright position. The centre of
the head restraint must support the head at
about eye level.
R Move the driver's and front-passenger seats
as far back as possible. The driver's seat posi- tion must allow the vehicle to be driven safely.
R Only hold the steering wheel on the outside.
This allows the airbag to be fully deployed.
R Always lean against the backrest while driv-
ing. Do not lean forwards or lean against the
door or side window. You may otherwise be in
the deployment area of the airbags.
R Always keep your feet in the footwell in front
of the seat. Do not put your feet on the dash-
board, for example. Your feet may otherwise
be in the deployment area of the airbag.
R Always secure persons less than 1.50 mtall in
suitable restraint systems. Up to this height,
the seat belt cannot be worn correctly.
If a child is travelling in your vehicle, also
observe the following notes:
R Always secure children under twelve years of
age and less than 1.50 mtall in suitable child
restraint systems.
R Only secure a child to the front-passenger
seat when the front-passenger front airbag is disabled, and only then in a rearward-facing
child restraint system. If the PASSENGER AIR BAG OFF indicator lamp is permanently lit, the
front-passenger front airbag is disabled
(Y page 40).
R Always observe the instructions and safety
notes on the "Automatic front-passenger
front airbag deactivation system"
(Y page 46) and on "Children in the vehicle" (Y
page 54) in addition to the manufactur-
er's operating and installation instructions for the child restraint system.
Objects in the vehicle interior may prevent
the airbag from functioning correctly. Before
starting your journey and to avoid risks resulting from the speed of the airbag as it deploys, make
sure that:
R there are no people, animals or objects
between the vehicle occupants and an airbag.
R there are no objects between the seat, door
and B-pillar.
R no hard objects, e.g. coat hangers, are hang-
ing on the grab handles or coat hooks.
R no accessories, such as cup holders, are
attached to the vehicle within the deployment
area of an airbag, e.g. to doors or side win-
dows.
R no heavy, sharp-edged or fragile objects are in
the pockets of your clothing. Store such
objects in a suitable place. G
WARNING
If you modify an airbag cover or affix objects
such as stickers to it, the airbag can no longer function correctly. There is an increased risk
of injury.
Never modify an airbag cover or affix objects
to it. G
WARNING
Sensors to control the airbags are located in
the doors. Modifications or work not per-
formed correctly to the doors or door panel-
ling, as well as damaged doors, can lead to the function of the sensors being impaired. The
airbags might therefore not function properly any more. Consequently, the airbags cannot
protect vehicle occupants as they are
designed to do. This poses an increased risk
of injury.
Never modify the doors or parts of the doors.
Always have work on the doors or door pan-
elling carried out at a qualified specialist
workshop. 44
Occupant safetySafety
Page 48 of 333

Front airbags
!
Do not place heavy objects on the front-
passenger seat. This could cause the system
to identify the seat as being occupied. In the
event of an accident, the restraint systems on the front-passenger side may be triggered
and have to be replaced. Driver's airbag
:deploys in front of the steer-
ing wheel. Front-passenger front airbag ;
deploys in front of and above the glove com-
partment.
When deployed, the front airbags offer addi-
tional head and thorax protection for the occu-
pants in the driver's and front-passenger seats.
The PASSENGER AIR BAG OFF and PASSENGER
AIR BAG ON indicator lamps inform you about
the status of the front-passenger front airbag
(Y page 40).
The front-passenger front airbag will only deploy if:
R the automatic front-passenger front airbag
deactivation system has detected that the
front-passenger seat is occupied
(Y page 46). The PASSENGER AIR BAG ON
indicator lamp is lit (Y page 46)
R the restraint system control unit predicts a
high accident severity
Sidebags G
WARNING
Unsuitable seat covers may obstruct or even
prevent deployment of the airbags integrated into the seats. The airbags may then fail to
protect the vehicle occupants as intended.
Operation of the automatic co-driver's front
airbag deactivation system may also be impaired. There is an increased risk of injury,
possibly even fatal.
Use only seat covers which have been specif-
ically approved for the respective seat by
Mercedes-Benz. Sidebags
:deploy next to the outer bolster of
the seat backrest.
When deployed, the sidebag offers additional
thorax protection. However, it does not protect
the:
R head
R neck
R arms
In the event of a side impact, the sidebag is
deployed on the side on which the impact
occurs.
The sidebag on the front-passenger side deploys under the following conditions:
R the automatic front-passenger airbag deacti-
vation system detects that the front-
passenger seat is occupied or
R the belt tongue is engaged in the belt buckle
of the front-passenger seat
If the belt tongue is engaged in the belt buckle,
the sidebag on the front-passenger side deploys if an appropriate accident situation occurs. In
this case, deployment is independent of
whether the front-passenger seat is occupied or not. Occupant safety
45Safety Z
Page 56 of 333
Operation
NECK-PRO head restraints reduce the likelihood
of head and chest injuries. The NECK-PRO head
restraints on the driver's and front-passenger
seats are moved forwards and upwards in the
event of a rear-end collision of a certain severity. This provides better head support.
If the NECK-PRO head restraints have been trig-
gered in an accident, you must reset the NECK-
PRO head restraints on the driver's and front-
passenger seat (Y page 53). Otherwise, the
additional protection will not be available in the event of another rear-end collision. You can rec-ognise when NECK-PRO head restraints have
been triggered by the fact that they have moved
forwards and can no longer be adjusted.
Mercedes-Benz recommends that you have the
NECK-PRO head restraints checked for func-
tionality at a qualified specialist workshop after a rear-end collision.
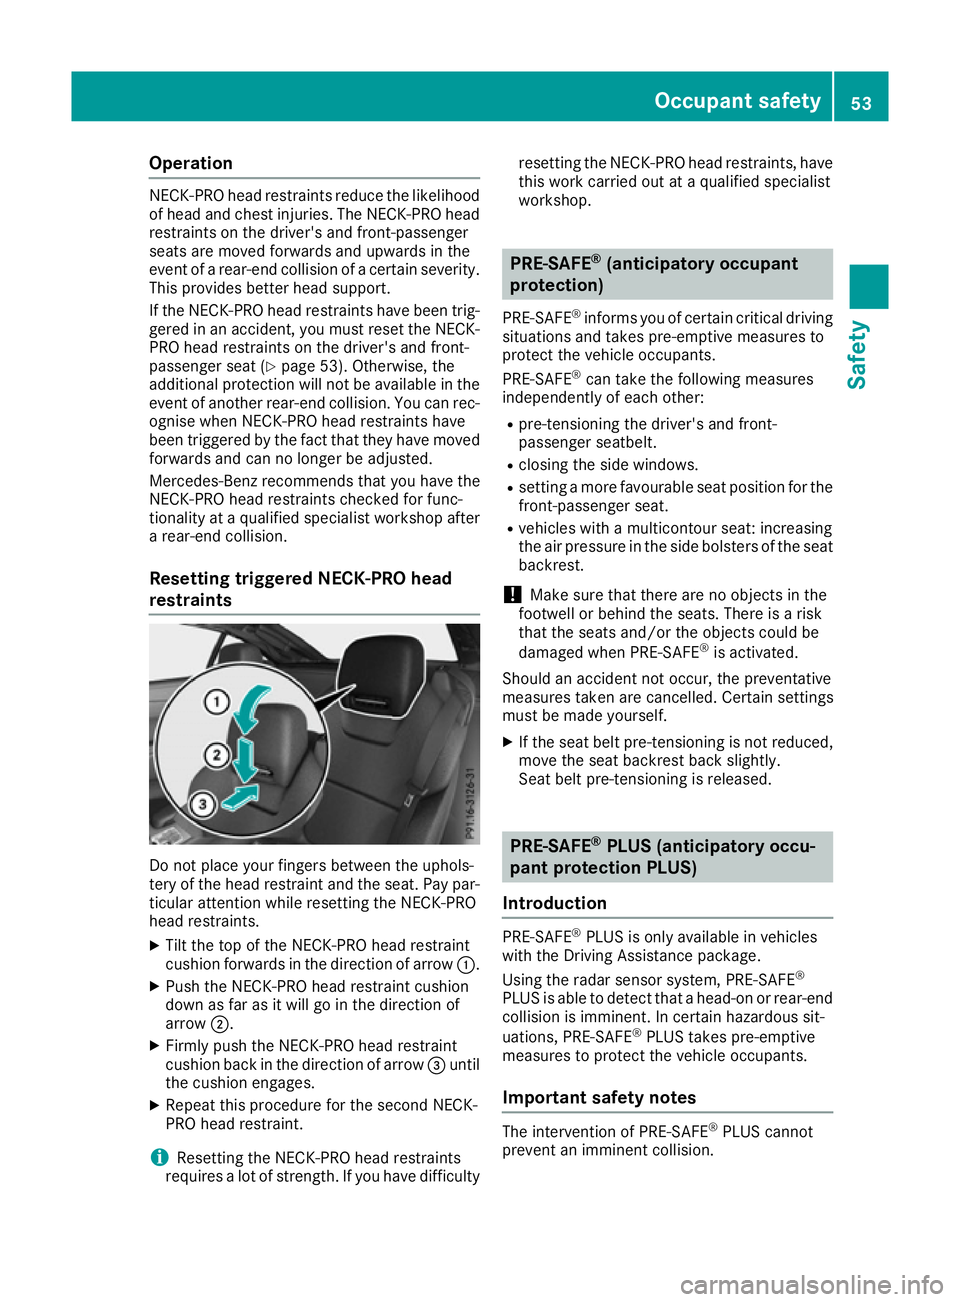
Resetting triggered NECK-PRO head
restraints Do not place your fingers between the uphols-
tery of the head restraint and the seat. Pay par-
ticular attention while resetting the NECK-PRO
head restraints.
X Tilt the top of the NECK-PRO head restraint
cushion forwards in the direction of arrow :.
X Push the NECK-PRO head restraint cushion
down as far as it will go in the direction of
arrow ;.
X Firmly push the NECK-PRO head restraint
cushion back in the direction of arrow =until
the cushion engages.
X Repeat this procedure for the second NECK-
PRO head restraint.
i Resetting the NECK-PRO head restraints
requires a lot of strength. If you have difficulty resetting the NECK-PRO head restraints, have
this work carried out at a qualified specialist
workshop. PRE-SAFE
®
(anticipatory occupant
protection)
PRE-SAFE ®
informs you of certain critical driving
situations and takes pre-emptive measures to
protect the vehicle occupants.
PRE-SAFE ®
can take the following measures
independently of each other:
R pre-tensioning the driver's and front-
passenger seatbelt.
R closing the side windows.
R setting a more favourable seat position for the
front-passenger seat.
R vehicles with a multicontour seat: increasing
the air pressure in the side bolsters of the seat
backrest.
! Make sure that there are no objects in the
footwell or behind the seats. There is a risk
that the seats and/or the objects could be
damaged when PRE-SAFE ®
is activated.
Should an accident not occur, the preventative
measures taken are cancelled. Certain settings
must be made yourself. X If the seat belt pre-tensioning is not reduced,
move the seat backrest back slightly.
Seat belt pre-tensioning is released. PRE-SAFE
®
PLUS (anticipatory occu-
pant protection PLUS)
Introduction PRE-SAFE
®
PLUS is only available in vehicles
with the Driving Assistance package.
Using the radar sensor system, PRE-SAFE ®
PLUS is able to detect that a head-on or rear-end collision is imminent. In certain hazardous sit-
uations, PRE-SAFE ®
PLUS takes pre-emptive
measures to protect the vehicle occupants.
Important safety notes The intervention of PRE-SAFE
®
PLUS cannot
prevent an imminent collision. Occupant safety
53Safety Z
Page 59 of 333
Observe the warning labels in the vehicle inte-
rior and on the child restraint system.
i It is advisable to use Mercedes-Benz care
products to clean child restraint systems rec- ommended by Mercedes-Benz. Information
can be obtained at a qualified specialist work-
shop. ISOFIX child seat securing system
G
WARNING
ISOFIX child restraint systems do not offer
sufficient protective effect for children whose weight is greater than 22 kg who are securedusing the safety belt integrated in the child
restraint system. The child could, for example,not be restrained correctly in the event of an
accident. This poses an increased risk of
injury or even fatal injury.
If the child weighs more than 22 kg, only use
ISOFIX child restraint systems with which the child is also secured with the vehicle seat belt. Also secure the child restraint system with the
Top Tether belt, if available.
When fitting a child restraint system, be sure to
observe the manufacturer's installation and
operating instructions and the instructions for
correct use of the child restraint system
(Y page 58).
Before every trip, make sure that the ISOFIX
child restraint system is engaged correctly in
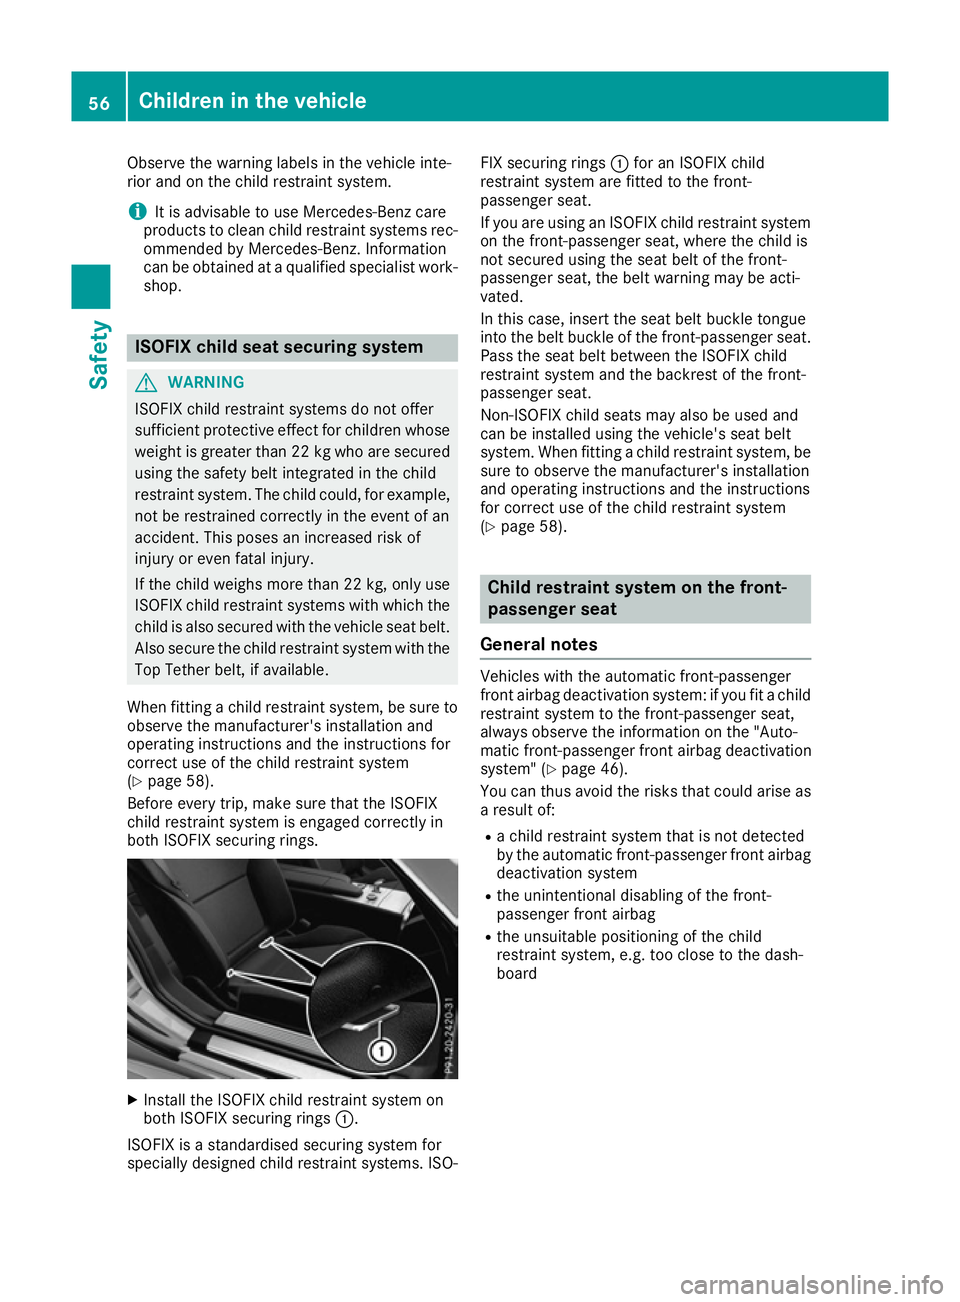
both ISOFIX securing rings. X
Install the ISOFIX child restraint system on
both ISOFIX securing rings :.
ISOFIX is a standardised securing system for
specially designed child restraint systems. ISO- FIX securing rings
:for an ISOFIX child
restraint system are fitted to the front-
passenger seat.
If you are using an ISOFIX child restraint system
on the front-passenger seat, where the child is
not secured using the seat belt of the front-
passenger seat, the belt warning may be acti-
vated.
In this case, insert the seat belt buckle tongue
into the belt buckle of the front-passenger seat. Pass the seat belt between the ISOFIX child
restraint system and the backrest of the front-
passenger seat.
Non-ISOFIX child seats may also be used and
can be installed using the vehicle's seat belt
system. When fitting a child restraint system, besure to observe the manufacturer's installation
and operating instructions and the instructions
for correct use of the child restraint system
(Y page 58). Child restraint system on the front-
passenger seat
General notes Vehicles with the automatic front-passenger
front airbag deactivation system: if you fit a child
restraint system to the front-passenger seat,
always observe the information on the "Auto-
matic front-passenger front airbag deactivation
system" (Y page 46).
You can thus avoid the risks that could arise as
a result of:
R a child restraint system that is not detected
by the automatic front-passenger front airbag
deactivation system
R the unintentional disabling of the front-
passenger front airbag
R the unsuitable positioning of the child
restraint system, e.g. too close to the dash-
board 56
Children in the vehicleSafety