2016 MERCEDES-BENZ SL ROADSTER oil pressure
[x] Cancel search: oil pressurePage 22 of 333

Introduction ................................... 257
Saving/deleting the PIN for the
SIM card ........................................ 259
Settings .........................................2 59
SIM card mode .............................. 258
Text messages ............................... 260
Transferring the phone book .......... 259
Temperature
Coolant .......................................... 200
Coolant (on-board computer,
Mercedes-AMG vehicles) .............. .213
Engine oil (on-board computer,
Mercedes-AMG vehicles) .............. .213
Outside temperature ..................... .199
Setting (climate control) ................ 125
Transmission oil (on-board com-
puter, Mercedes-AMG vehicles) ..... 213
TEMPOMAT
Function/notes ............................ .159
Text messages
Telephone module with Blue-
tooth ®
(SAP profile) ....................... 260
Timing (RACETIMER) ......................... 213
TIREFIT kit .......................................... 290
Declaration of conformity ................ 26
Important safety notes .................. 290
Storage location ............................ 288
Tyre pressure not reached ............. 291
Tyre pressure reached ................... 292
Total distance recorder .................... 202
Tow-away protection
Activating ......................................... 75
Deactivating ..................................... 75
Function .......................................... .75
Tow-starting
Emergency engine starting ............ 301
Important safety notes .................. 298
Towing
Important safety notes .................. 298
Transporting the vehicle ................ 300
With the rear axle raised ................ 300
Towing away
Fitting the towing ey e.................... 299
Removing the towing eye ............... 299
With both axles on the ground ....... 300 Traffic Sign Assist
Activating/deactivating the warn-ing function .................................... 207
Display message ............................ 232
Function/note s............................. 191
Important safety notes .................. 192
Instrument cluster display ............. 192
Transmission
Selector lever ................................ 141
see Automatic transmission
Transmission position display ......... 142
Transporting the vehicle .................. 300
Trip computer (on-board com-
puter) .................................................. 202
Trip meter
Calling up ....................................... 202
Resetting (on-board computer) ...... 203
Turn signals
Switching on/of f........................... 115
TV
Operating (on-board computer) ..... 205
see Separate operating instructions
Two-way radio
Frequencies ................................... 320
Installation ..................................... 320
Transmission output (maximum) .... 320
Type identification plate
see Vehicle identification plate
Tyre changing tool kit ....................... 288
Tyre inflation compressor
see TIREFIT kit
Tyre pressure
Calling up (on-board computer) ..... 309
Display message ............................ 237
Not reached (TIREFIT) .................... 291
Reached (TIREFIT) .......................... 292
Recommended ............................... 307
Tyre pressure loss warning
General notes ................................ 308
Important safety notes .................. 309
Restarting ...................................... 309
Tyre pressure monitor
Checking the tyre pressure elec-
tronically ........................................ 310
Function/note s............................. 309
General notes ................................ 309
Important safety notes .................. 310 Index
19
Page 282 of 333

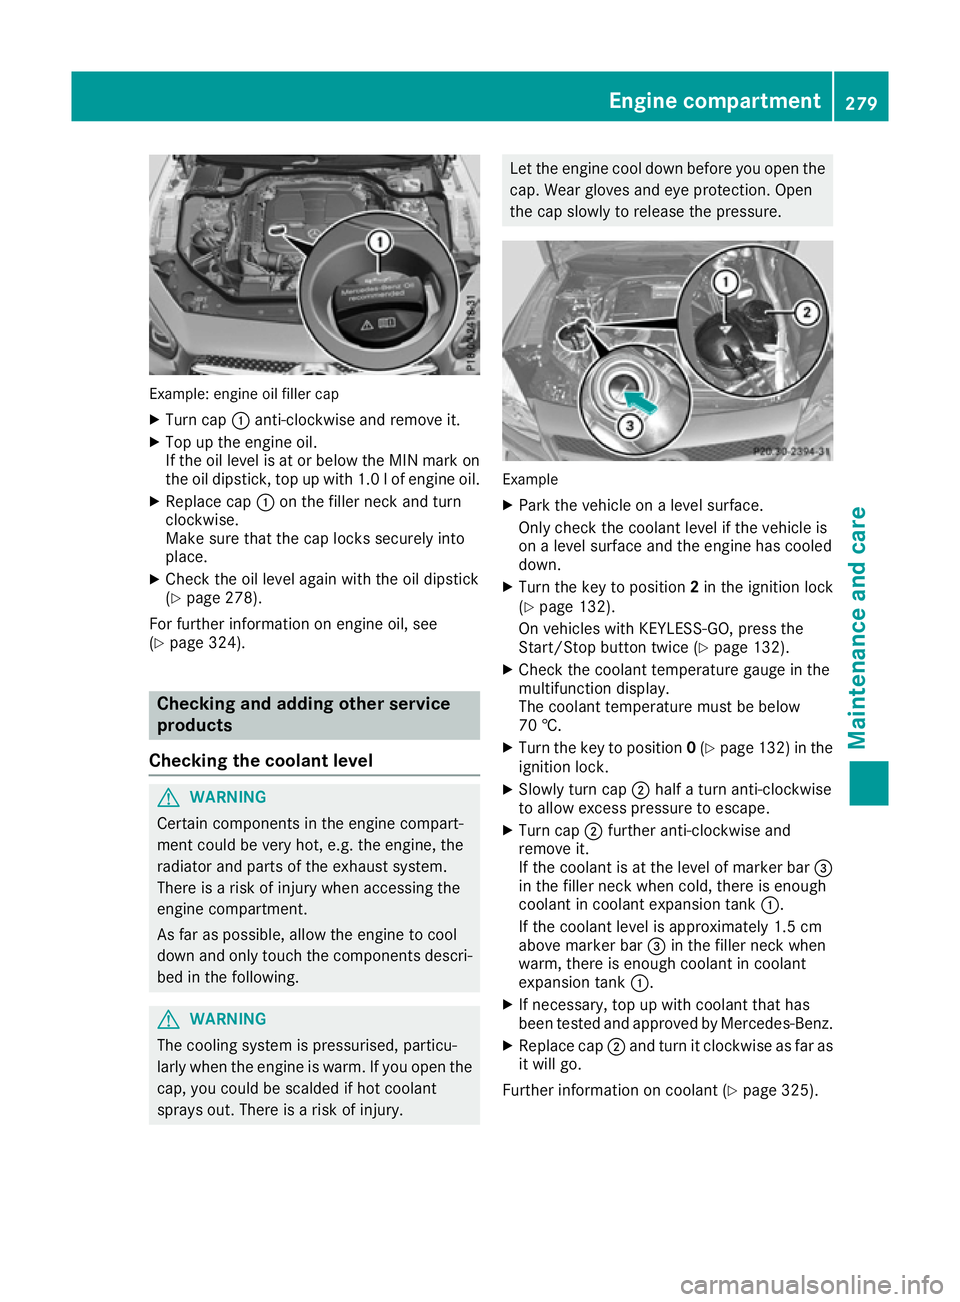
Example: engine oil filler cap
X Turn cap :anti-clockwise and remove it.
X Top up the engine oil.
If the oil level is at or below the MIN mark on
the oil dipstick, top up with 1.0 lof engine oil.
X Replace cap :on the filler neck and turn
clockwise.
Make sure that the cap locks securely into
place.
X Check the oil level again with the oil dipstick
(Y page 278).
For further information on engine oil, see
(Y page 324). Checking and adding other service
products
Checking the coolant level G
WARNING
Certain components in the engine compart-
ment could be very hot, e.g. the engine, the
radiator and parts of the exhaust system.
There is a risk of injury when accessing the
engine compartment.
As far as possible, allow the engine to cool
down and only touch the components descri- bed in the following. G
WARNING
The cooling system is pressurised, particu-
larly when the engine is warm. If you open the cap, you could be scalded if hot coolant
sprays out. There is a risk of injury. Let the engine cool down before you open the
cap. Wear gloves and eye protection. Open
the cap slowly to release the pressure. Example
X Park the vehicle on a level surface.
Only check the coolant level if the vehicle is
on a level surface and the engine has cooled
down.
X Turn the key to position 2in the ignition lock
(Y page 132).
On vehicles with KEYLESS-GO, press the
Start/Stop button twice (Y page 132).
X Check the coolant temperature gauge in the
multifunction display.
The coolant temperature must be below
70 †.
X Turn the key to position 0(Y page 132) in the
ignition lock.
X Slowly turn cap ;half a turn anti-clockwise
to allow excess pressure to escape.
X Turn cap ;further anti-clockwise and
remove it.
If the coolant is at the level of marker bar =
in the filler neck when cold, there is enough
coolant in coolant expansion tank :.
If the coolant level is approximately 1.5 cm
above marker bar =in the filler neck when
warm, there is enough coolant in coolant
expansion tank :.
X If necessary, top up with coolant that has
been tested and approved by Mercedes-Benz.
X Replace cap ;and turn it clockwise as far as
it will go.
Further information on coolant (Y page 325). Engine compartment
279Maintenance and care Z
Page 286 of 333

X
Rinse the vehicle with clean water and dry
thoroughly with a chamois.
X Do not let the cleaning agent dry on the paint-
work.
When using the vehicle in winter, remove all
traces of road salt deposits carefully and as
soon as possible.
High-pressure cleaning equipment G
WARNING
The water jet of circular-jet nozzles (dirt grind- ers) can cause damage not visible from the
outside to tyres or chassis components. Com-
ponents damaged in this way can unexpect-
edly fail. There is a risk of an accident.
Do not use high-pressure cleaners with circu-
lar-jet nozzles to clean the vehicle. Have dam- aged tyres or chassis components replaced
immediately.
! Always maintain a distance of at least 30 cm
between the vehicle and the high-pressure
cleaner nozzle. Information about the correct
distance is available from the equipment
manufacturer.
Move the high-pressure cleaner nozzle
around when cleaning your vehicle.
Do not aim directly at any of the following:
R tyres
R door gaps, roof gaps, joints etc.
R soft top (Designo vario-roof)
R electrical components
R battery
R plug connectors
R lights
R seals
R trim elements
R ventilation slots
Damage to seals or electrical components
can lead to leaks or failures.
! Vehicles with HANDS-FREE ACCESS: if a
key with KEYLESS-GO is within the detection
range of the KEYLESS-GO antenna, the fol-
lowing situations could lead to the uninten-
tional opening of the boot lid:
R using a car wash
R using a high-pressure cleaner Make sure that the key is at least 2 m away
from the vehicle.
! Mille Miglia special model: parts of your
vehicle are covered with a decorative foil.
Maintain a distance of at least 70 cm between
the foil-wrapped parts of the vehicle and the
nozzle of the high pressure cleaner.
Information about the correct distance is
available from the equipment manufacturer.
Move the high-pressure cleaner nozzle
around when cleaning your vehicle.
Cleaning the paintwork !
Do not affix:
R stickers
R films
R magnetic plates or similar items
to painted surfaces. You could otherwise
damage the paintwork.
Scratches, corrosive deposits, areas affected by
corrosion and damage caused by inadequate
care cannot always be completely repaired. In
such cases, visit a qualified specialist workshop.
X Remove impurities immediately, where pos-
sible, whilst avoiding rubbing too hard.
X Soak insect remains with insect remover and
rinse off the treated areas afterwards.
X Soak bird droppings with water and rinse off
the treated areas afterwards.
X Remove coolant, brake fluid, tree resins, oils,
fuels and greases by rubbing gently with a
cloth soaked in petroleum ether or lighter
fluid.
X Use tar remover to remove tar stains.
X Use silicone remover to remove wax.
Care and treatment of matt paintwork !
Never polish the vehicle or the light alloy
wheels. Polishing makes the paintwork shiny.
! The following may cause the paint to
become shiny and thus reduce the matt
effect:
R vigorous rubbing with unsuitable materials
R frequent use of car washes
R washing the vehicle in direct sunlight
! Never use paint cleaner, buffing or polishing
products, or gloss preserver, e.g. wax. These Care
283Maintenance and care Z