2016 MERCEDES-BENZ SL ROADSTER service indicator
[x] Cancel search: service indicatorPage 7 of 333

Adjusting volume
Audio 20 ........................................ 254
Air conditioning
General notes ................................ 122
AIR FLOW .......................................... .125
Air pressure
see Tyre pressure
Air vents
Glove compartment ....................... 130
Important safety notes .................. 129
Setting .......................................... .129
Setting the blower output of the
AIRSCARF vents ............................ .130
Setting the centre air vents ........... 129
Setting the side air vents .............. .130
Switching AIRSCARF on/off .......... 105
Air-conditioning system
see Climate control
Airbag
Automatic front-passenger front
airbag deactivatio n .......................... 46
Headbag .......................................... 46
Introduction ..................................... 43
PASSENGER AIR BAG indicator
lamps ............................................... 40
Airbags
Display message ............................ 226
Front airbag (driver, front
passenger) ....................................... 45
Important safety guidelines ............. 43
Sidebag ............................................ 45
Triggering ......................................... 51
AIRSCARF
Switching on/off ........................... 105
AIRSCARF vents
Setting the blower output .............. 130
Alarm
ATA (Anti-Theft Alarm system) ......... 74
Switching off (ATA) .......................... 74
Switching the function on/off
(ATA) ................................................ 74
Alarm system
see ATA (Anti-Theft Alarm system)
Ambient lighting
Setting the brightness (on-board
computer) ...................................... 210
Setting the colour (on-board com-
puter) ............................................. 210 AMG menu (on-board computer)
..... 213
Anti-glare film ................................... .275
Anti-lock braking system
see ABS (Anti-lock Braking System)
Anti-Theft Alarm system
see ATA (Anti-Theft Alarm system)
Aquaplaning ....................................... 158
Ashtray ............................................... 267
Assistance display (on-board com-
puter) ................................................. .207
Assistance menu (on-board com-
puter) ................................................. .207
ASSYST PLUS
Displaying a service message ....... .281
Hiding a service message .............. 281
Resetting the service interval dis-
play ................................................ 281
Service message ............................ 280
Special service requirements ......... 281
ATA (Anti-Theft Alarm system)
Activating/deactivating ................... 74
Function .......................................... .74
Switching off the alarm .................... 74
ATTENTION ASSIST
Activating/deactivating ................. 208
Display message ............................ 232
Function/note s............................. 190
Audio 20
Switching on/of f........................... 253
Audio menu (on-board computer) .... 204
Authorised workshop
see Qualified specialist workshop
AUTO lights
Display message ............................ 228
see Lights
Automatic engine start (ECO start/
stop function) .................................... 136
Automatic engine switch-off (ECO
start/stop function) .......................... 135
Automatic front-passenger front
airbag deactivation
Display message ............................ 226
Automatic front-passenger front
airbag deactivation system
Operation ......................................... 46
Problems ......................................... 50
System self-test ............................... 48 4
Index
Page 17 of 333
Reversing camera .......................... 187
Traffic Sign Assist .......................... 191
Mercedes-Benz Service Centre
see Qualified specialist workshop
Message memory (on-board com-
puter) .................................................. 216
Messages
see Display messages
Mirrors
see Exterior mirrors
see Rear-view mirror
Mobile phone
Connecting (Bluetooth ®
inter-
face) .............................................. 256
Connecting another mobile
phone ............................................ 257
Connecting the telephone module
with Bluetooth ®
(SAP profile ) ......... 259
Freq uencies .................................. .320
Installation ..................................... 320
Menu (on-board computer) ............ 205
Notes/placing in the bracket ......... 268
Transmission output (maximum) .... 320
Modifying the programming (key) ..... 78
MOExtended tyres .............................289
Motorway mode ................................ 116
MP3
Operating ....................................... 205
See also Digital Owner's Manual ... 253
Multifunction display
Function/notes ............................ .201
Permanent display ......................... 209
Multifunction steering wheel
Operating the on-board computer .. 200
Overview .......................................... 33
Music files
See also Digital Owner's Manual ... 253 N
Navigation Menu (on-board computer) ............ 203
See also Digital Owner's Manual ... 253
NECK-PRO head restraints
Important safety notes .................... 52
Operation ......................................... 53
Resetting triggered .......................... 53
Notes on running in a new vehicle .. 131 O
Occupant safety Airbags ............................................ 43
Automatic front-passenger front
airbag deactivatio n .......................... 46
Automatic measures after an acci-
dent ................................................. 54
Children in the vehicle ..................... 54
Important safety notes .................... 39
PASSENGER AIRBAG indicator
lamp ................................................. 40
Pets in the vehicle ........................... 61
PRE-SAFE ®
(anticipatory occu-
pant protection) ............................... 53
PRE-SAFE ®
PLUS (anticipatory
occupant protection PLUS) .............. 53
Restraint system introduction .......... 39
Restraint system warning lamp ....... .40
Odometer
see Total distance recorder
see Trip meter
Oil
see Engine oil
On-board computer
AMG menu .....................................2 13
Assistance menu ........................... 207
Audio menu ................................... 204
Convenience submenu .................. 211
Display messages .......................... 216
Displaying a service message ....... .281
Factory setting submenu .............. .212
Important safety notes .................. 199
Instrument cluster submenu .......... 209
Light submenu ............................... 209
Menu overview .............................. 202
Message memory .......................... 216
Navigation menu ............................ 203
Operating the TV ............................ 205
Operating video DVD ..................... 205
Operation ....................................... 200
RACETIMER ................................... 213
Service menu ................................. 208
Settings menu ............................... 208
Standard display ............................ 202
Telephone menu ............................ 205
Trip menu ...................................... 202
Vehicle submenu ........................... 211 14
Index
Page 23 of 333
Radio type approval for the tyre
pressure monitor ..........................
.311
Restarting ...................................... 311
Warning lamp ................................. 252
Warning message .......................... 311
Tyres
Changing a wheel .......................... 312
Checking ........................................ 304
Direction of rotatio n...................... 312
Display message ............................ 237
Important safety notes .................. 304
Information on driving .................... 304
M+S tyres ...................................... 306
MOExtended tyre s......................... 306
Overview ........................................ 304
Replacing ....................................... 312
Service life ..................................... 305
Storing ........................................... 313
Summer tyres ................................ 306
Tyre size (data ).............................. 317
Tyre tread ...................................... 305
Wheel and tyre combinations ........ 317
see Flat tyre U
Umbrella holder ................................. 263
Unlocking
Emergency unlocking ....................... 84
From inside the vehicle (central
unlocking button) ............................. 83
Upshift indicator (on-board com-
puter, Mercedes-AMG vehicles) ....... 213
USB devices
Connecting to the Media Inter-
face ............................................... 261 V
Vehicle Correct use ...................................... 28
Data acquisition ............................... 28
Display message ............................ 239
Electronics ..................................... 320
Equipment ....................................... 24
Implied warranty .............................. 28
Individual settings .......................... 208
Leaving parked up ......................... 155
Locking (in an emergency) ............... 84 Locking (key) ................................... 77
Lowering ........................................ 316
Pulling away ................................... 134
Raising ........................................... 313
Registration ..................................... 27
Securing from rolling away ............ 313
Tow-starting ................................... 298
Towing away .................................. 298
Transporting .................................. 300
Unlocking (in an emergency) ........... 84
Unlocking (key) ................................ 77
Vehicle data ................................... 327
Vehicle battery
see Battery (vehicle)
Vehicle data ....................................... 327
Vehicle dimensions ........................... 327
Vehicle emergency locking ................ 84
Vehicle identification number
see VIN
Vehicle identification plate .............. 321
Vehicle level
Active Body Control (ABC) (exceptMercedes-AMG vehicles) ............... 175
Active Body Control (ABC)
(Mercedes-AMG vehicles) .............. 178
Display message ............................ 231
Vehicle tool kit .................................. 288
Video
Operating the DVD ......................... 205
See also Digital Owner's Manua l... 253
VIN
Seat ............................................... 322
Type plate ...................................... 321 W
Warning and indicator lamps ABS ................................................ 246
Active Brake Assist ........................ 251
Brake Assist ................................... 251
Brakes ........................................... 245
Distance Pilot DISTRONIC ............. 251
Distance warning signal ................. 251
ESP ®
.............................................. 246
ESP ®
OFF ....................................... 247
Fuel tank ........................................ 249
General notes ................................ 244
LIM (cruise control) ........................ 160 20
Index
Page 43 of 333
Mercedes-Benz recommends that you use a
Mercedes-Benz Service Centre. Restraint system warning lamp
The functions of the restraint system are
checked after the ignition is switched on and at
regular intervals while the engine is running.
Therefore, malfunctions can be detected in
good time.
The 6 restraint system warning lamp in the
instrument cluster lights up when the ignition is switched on. It goes out no later than a few sec-
onds after the vehicle is started. The compo-
nents of the restraint system are in operational
readiness.
A malfunction has occurred if the 6restraint
system warning lamp:
R does not light up after the ignition is switched
on
R does not go out after a few seconds with the
engine running
R lights up again while the engine is running G
WARNING
If the restraint system is malfunctioning,
restraint system components may be trig-
gered unintentionally or may not deploy as
intended during an accident. This may affect
the seat belt tensioner or airbag, for example. This poses an increased risk of injury or even
fatal injury.
Have the restraint system checked and
repaired immediately at a qualified specialist
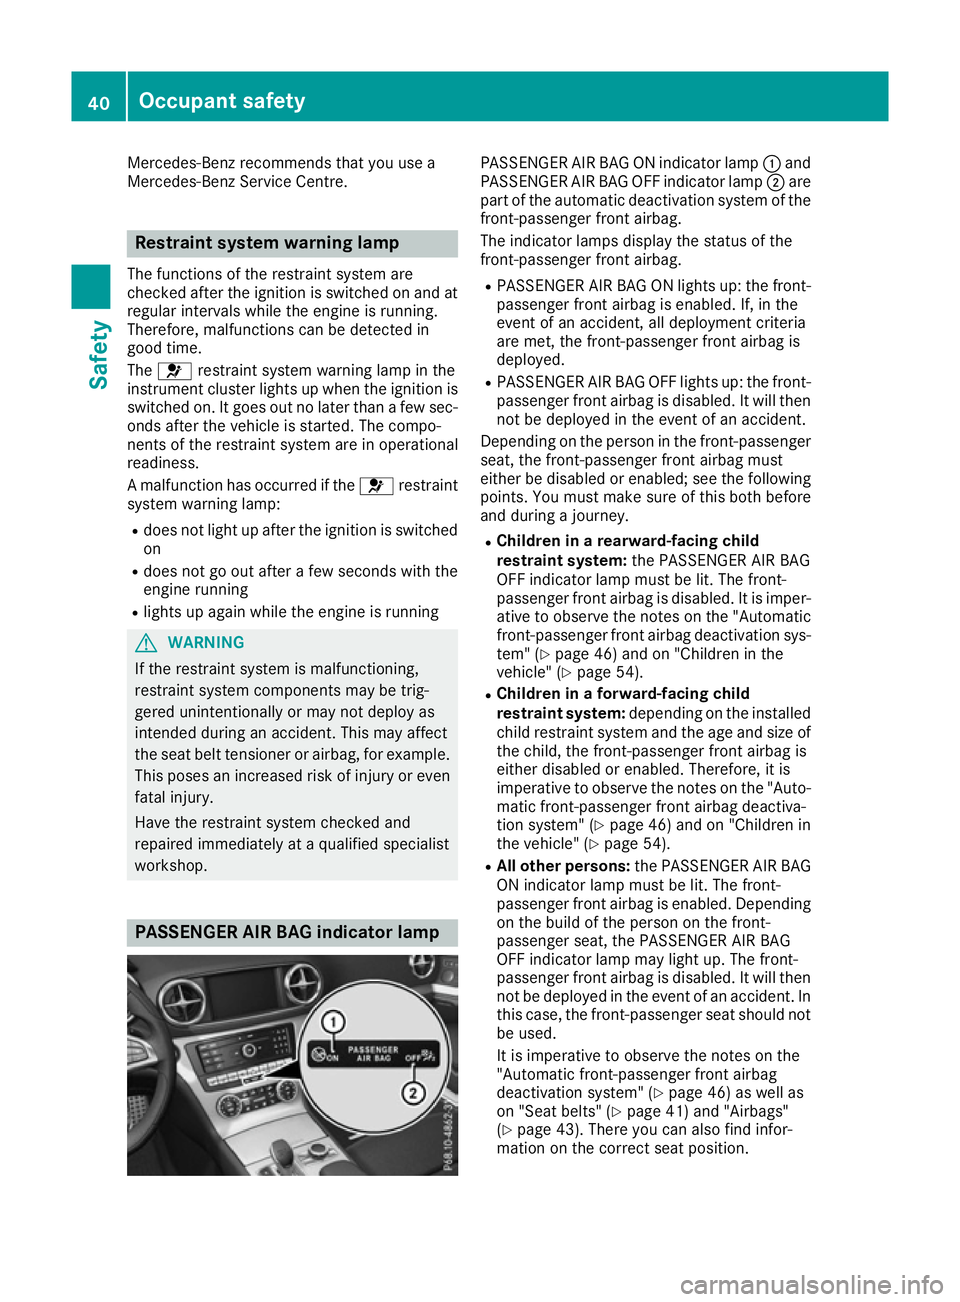
workshop. PASSENGER AIR BAG indicator lamp PASSENGER AIR BAG ON indicator lamp
:and
PASSENGER AIR BAG OFF indicator lamp ;are
part of the automatic deactivation system of the front-passenger front airbag.
The indicator lamps display the status of the
front-passenger front airbag.
R PASSENGER AIR BAG ON lights up: the front-
passenger front airbag is enabled. If, in the
event of an accident, all deployment criteria
are met, the front-passenger front airbag is
deployed.
R PASSENGER AIR BAG OFF lights up: the front-
passenger front airbag is disabled. It will then
not be deployed in the event of an accident.
Depending on the person in the front-passenger seat, the front-passenger front airbag must
either be disabled or enabled; see the following
points. You must make sure of this both before
and during a journey.
R Children in a rearward-facing child
restraint system: the PASSENGER AIR BAG
OFF indicator lamp must be lit. The front-
passenger front airbag is disabled. It is imper-
ative to observe the notes on the "Automatic front-passenger front airbag deactivation sys-
tem" (Y page 46) and on "Children in the
vehicle" (Y page 54).
R Children in a forward-facing child
restraint system: depending on the installed
child restraint system and the age and size of the child, the front-passenger front airbag is
either disabled or enabled. Therefore, it is
imperative to observe the notes on the "Auto-
matic front-passenger front airbag deactiva-
tion system" (Y page 46) and on "Children in
the vehicle" (Y page 54).
R All other persons: the PASSENGER AIR BAG
ON indicator lamp must be lit. The front-
passenger front airbag is enabled. Depending on the build of the person on the front-
passenger seat, the PASSENGER AIR BAG
OFF indicator lamp may light up. The front-
passenger front airbag is disabled. It will then
not be deployed in the event of an accident. In
this case, the front-passenger seat should not be used.
It is imperative to observe the notes on the
"Automatic front-passenger front airbag
deactivation system" (Y page 46) as well as
on "Seat belts" (Y page 41) and "Airbags"
(Y page 43). There you can also find infor-
mation on the correct seat position. 40
Occupant safetySafety
Page 51 of 333
shoulder belt strap is correctly routed from
the vehicle seat belt guide to the shoulder belt
guide on the child restraint system. The shoul- der belt strap must be routed forwards and
downwards from the belt guide. Always
observe the child restraint system manufac-
turer's installation instructions.
If the automatic front-passenger front airbag
deactivation system detects that: R the front-passenger seat is unoccupied, the
PASSENGER AIR BAG OFF indicator lamp
lights up after the system self-test and
remains lit. This indicates that the front-
passenger front airbag is disabled.
R the front-passenger seat is occupied by a
child in a rearward-facing child restraint sys-
tem, the PASSENGER AIR BAG OFF indicator
lamp lights up after the system self-test and
remains lit. This indicates that the front-
passenger front airbag is disabled.
But in the case of a child in a rearward-facing
child restraint, the PASSENGER AIR BAG ON
indicator lamp can light up after the system
self-test and remain lit. This indicates that the
front-passenger front airbag is enabled. The
result of the classification is dependent on,
among other factors, the child restraint sys-
tem and the child's build. Make sure that the
conditions for a correct classification are met. If the PASSENGER AIR BAG ON indicator lamp remains on, do not install a child restraint
system on the front-passenger seat.
R the front-passenger seat is occupied by a
child in a forward-facing child restraint sys-
tem, either the PASSENGER AIR BAG ON or
PASSENGER AIR BAG OFF indicator lamp
lights up and remains lit after the system self- test depending on the result of the classifica-
tion. The result of the classification is depend- ent on, among other factors, the child
restraint system and the child's build.
Move the front-passenger seat as far back as
possible. Always observe the information in
"Child restraint systems on the front-
passenger seat" (Y page 56) and in "Suita-
ble positioning of the child restraint system"
(Y page 58).
R the front-passenger seat is occupied by a per-
son with a smaller build (e.g. a teenager or
small adult), either the PASSENGER AIR BAG
ON or PASSENGER AIR BAG OFF indicator
lamp lights up and remains lit after the system self-test depending on the result of the clas-
sification.
- If the PASSENGER AIR BAG ON indicator
lamp lights up, move the front-passenger
seat as far back as possible.
- If the PASSENGER AIR BAG OFF indicator
lamp is lit, a person with a smaller build
should not use the front-passenger seat.
R the front-passenger seat is occupied by an
adult or a person with a build corresponding
to that of an adult, the PASSENGER AIR BAG
ON indicator lamp lights up after the system
self-test and remains lit. This indicates that
the front-passenger front airbag is enabled.
If children are travelling in the vehicle, be sure to
observe the notes on "Children in the vehicle"
(Y page 54).
If the automatic front-passenger front airbag
deactivation system is malfunctioning, the red
6 restraint system warning lamp in the
instrument cluster and the PASSENGER AIR
BAG OFF indicator lamp light up simultaneously.
The front-passenger front airbag is disabled in
this case and does not deploy during an acci-
dent. Have the system checked as soon as pos-
sible by qualified technicians. Consult a
Mercedes-Benz Service Centre. The front-
passenger seat should only be repaired at a
Mercedes-Benz Service Centre.
If the front-passenger seat, the seat cover or the seat cushion is damaged, have the necessary
repair work carried out at a Mercedes-Benz Ser-vice Centre.
For safety reasons, Mercedes-Benz recom-
mends that you only use a child restraint system
which has been tested and approved by
Mercedes-Benz in combination with the auto-
matic front-passenger front airbag deactivation
system.
System self-test G
DANGER
If both the PASSENGER AIR BAG OFF and
PASSENGER AIR BAG ON indicator lamps do
not light up during the system self-test, the
system is malfunctioning. The front-
passenger front airbag might be triggered
unintentionally or might not be triggered at all in the event of an accident with high deceler-
ation. This poses an increased risk of injury or even fatal injury. 48
Occupant safetySafety
Page 298 of 333
vehicle will then use very little energy, thus con-
serving battery power. Charging the battery
G
WARNING
During charging and jump-starting, explosive
gases can escape from the battery. There is a risk of an explosion.
Particularly avoid fire, naked flames, creating
sparks and smoking. Ensure there is sufficient
ventilation while charging and jump-starting.
Do not lean over a battery. G
WARNING
Battery acid is caustic. There is a risk of injury. Avoid contact with the skin, eyes or clothing.
Do not breathe in any battery gases. Do not
lean over the battery. Keep the batteries out
of the reach of children. Immediately rinse off
battery acid thoroughly with plenty of clean
water and seek medical attention at once. G
WARNING
A discharged battery can freeze at tempera-
tures below freezing point. When jump-start-
ing the vehicle or charging the battery, gases can escape from the battery. There is a risk of
an explosion.
Allow the frozen battery to thaw out before
charging it or jump-starting.
! Only charge the installed battery with a bat-
tery charger which has been tested and
approved by Mercedes-Benz. These battery
chargers allow the battery to be charged while still installed in the vehicle.
! Only use battery chargers with a maximum
charging voltage of 14.8 V.
! Only
charge the battery using the jump-start
connection point.
The jump-starting connection point is in the
engine compartment.
If the indicator/warning lamps do not light up at
low temperatures, it is very likely that the dis-
charged battery has frozen. In this case you may
neither jump-start the vehicle nor charge the battery. The service life of a battery that has
been thawed may be reduced. The starting char-
acteristics may be impaired, especially at low
temperatures. Have the thawed battery
checked at a qualified specialist workshop.
Read the battery charger's operating instruc-
tions before charging the battery.
X Open the bonnet.
X Connect the battery charger to the positive
terminal and earth point in the same order as
when connecting the donor battery in the
jump-starting procedure (Y page 296). Battery (vehicle)
295Breakdown assistance Z
Page 299 of 333
Jump-starting
For the jump-starting procedure, use only the jump-starting connection point, consisting of a pos- itive terminal and an earth point, in the engine compartment. G
WARNING
Battery acid is caustic. There is a risk of injury.
Avoid contact with the skin, eyes or clothing. Do not breathe in any battery gases. Do not lean over the battery. Keep the batteries out of the reach of children. Immediately rinse off battery acid
thoroughly with plenty of clean water and seek medical attention at once. G
WARNING
During charging and jump-starting, explosive gases can escape from the battery. There is a risk of an explosion.
Particularly avoid fire, naked flames, creating sparks and smoking. Ensure there is sufficient
ventilation while charging and jump-starting. Do not lean over a battery. G
WARNING
During the charging process, a battery produces hydrogen gas. If a short circuit occurs or sparks
are created, the hydrogen gas can ignite. There is a risk of an explosion.
R Make sure that the positive terminal of a connected battery does not come into contact with
vehicle parts.
R Never place metal objects or tools on a battery.
R It is important that you observe the described order of the battery terminals when connecting
and disconnecting a battery.
R When jump-starting, make sure that the battery poles with identical polarity are connected.
R It is particularly important to observe the described order when connecting and disconnecting
the jump leads.
R Never connect or disconnect the battery terminals while the engine is running. G
WARNING
A discharged battery can freeze at temperatures below freezing point. When jump-starting the
vehicle or charging the battery, gases can escape from the battery. There is a risk of an explosion.
Allow the frozen battery to thaw out before charging it or jump-starting.
! Avoid repeated and lengthy starting attempts. Otherwise, the catalytic converter could be
damaged by the non-combusted fuel.
If the indicator/warning lamps do not light up at low temperatures, it is very likely that the dis-
charged battery has frozen. In this case you may neither jump-start the vehicle nor charge the
battery. The service life of a battery that has been thawed may be reduced. The starting charac-
teristics may be impaired, especially at low temperatures. Have the thawed battery checked at a
qualified specialist workshop. 296
Jump-startingBreakdown assistance
Page 304 of 333
Tow-starting (emergency engine
starting)
! Do not tow-start vehicles with automatic
transmission. You could otherwise damage
the automatic transmission.
You can find information on "Jump-starting"
under (Y page 296). Electrical fuses
Important safety notes
G
WARNING
If you manipulate, bridge or replace a faulty
fuse with a fuse of a higher amperage, the
electric cables could be overloaded. This may result in a fire. There is a risk of an accident
and injury.
Always replace faulty fuses with specified new fuses of the correct amperage.
Blown fuses must be replaced with fuses of the same rating, which you can recognise by the
colour and fuse rating. The fuse ratings are listed
in the fuse allocation chart.
The fuse allocation chart is located in the vehicle tool kit in the stowage compartment under the
boot floor (Y page 288).
If the newly inserted fuse also blows, have the
cause traced and rectified at a qualified special- ist workshop, e.g. a Mercedes-Benz Service
Centre.
! Only use fuses that have been approved for
Mercedes-Benz vehicles and which have the
correct fuse rating for the system concerned.
Otherwise, components or systems could be
damaged.
! Make sure that no moisture can enter the
fuse box when the cover is open.
! When closing the cover, make sure that it is
lying correctly on the fuse box. Moisture seep-
ing in or dirt could otherwise impair the oper- ation of the fuses.
The fuses in your vehicle disconnect faulty cir-
cuits. If a fuse blows, all the components on the
circuit and their functions will fail. Before replacing a fuse
X Switch off the engine.
X Switch off all electrical consumers.
X Make sure that the ignition is switched off
(Y page 132).
or X When using the key, turn the key to position 0
in the ignition lock and remove it
(Y page 132).
X Safeguard the vehicle against rolling away
(Y page 153).
All indicator lamps in the instrument cluster
must be off.
The fuses are located in various fuse boxes: R Fuse box in the engine compartment on the
right-hand side of the vehicle, when viewed in the direction of travel
R Dashboard fuse box
R Fuse box in the rear compartment on the
right-hand side of the vehicle, when viewed in
the direction of travel Dashboard fuse box
i Observe the "Important safety notes" sec-
tion (Y page 301).
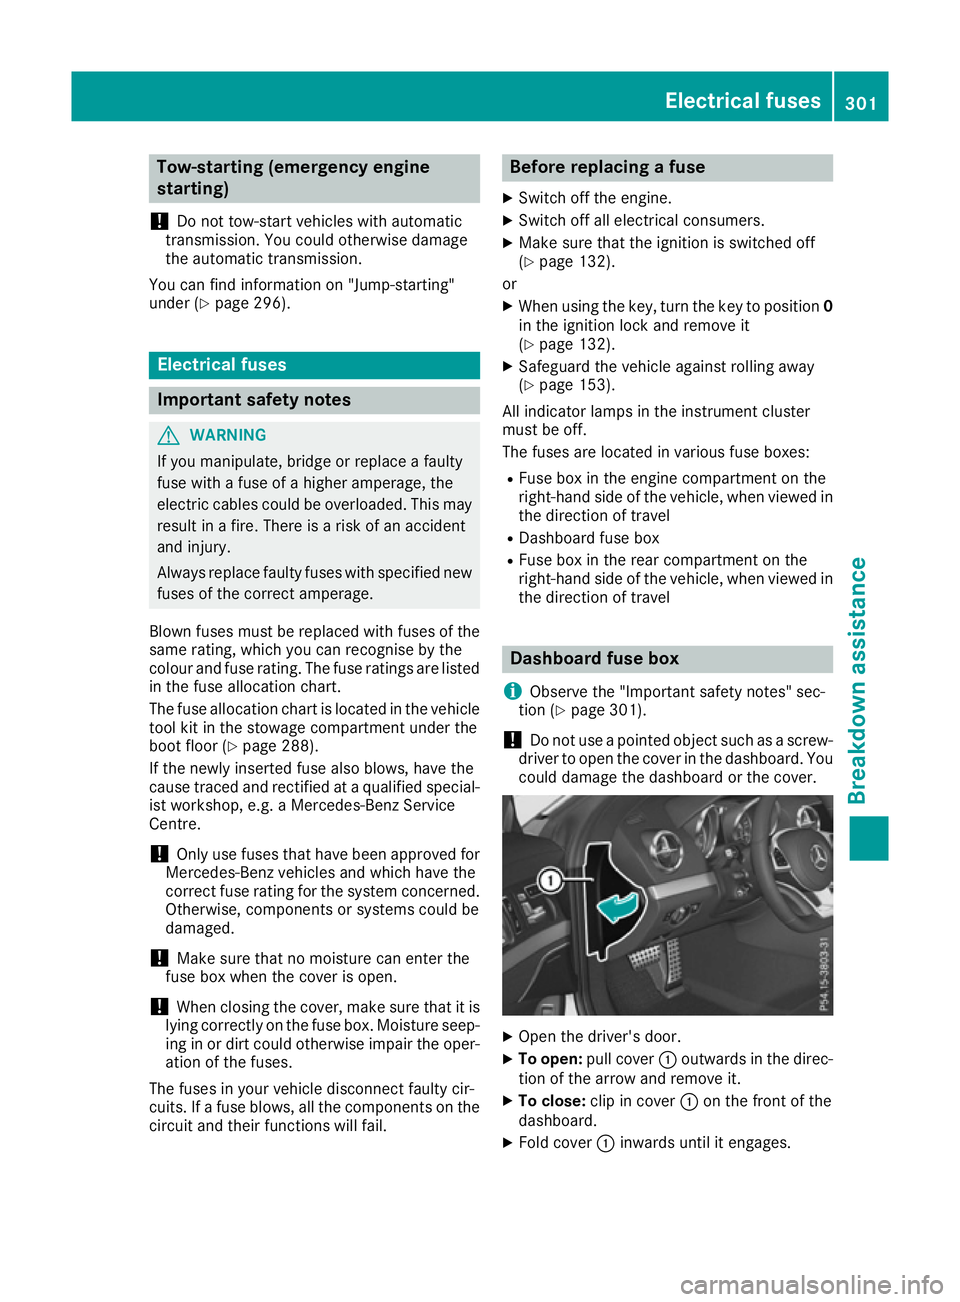
! Do not use a pointed object such as a screw-
driver to open the cover in the dashboard. You could damage the dashboard or the cover. X
Open the driver's door.
X To open: pull cover :outwards in the direc-
tion of the arrow and remove it.
X To close: clip in cover :on the front of the
dashboard.
X Fold cover :inwards until it engages. Electrical fuses
301Breakdown assistance Z