2016 MERCEDES-BENZ SL ROADSTER open bonnet
[x] Cancel search: open bonnetPage 8 of 333
Automatic headlamp mode
.............. 113
Automatic transmission
Accelerator pedal position ............ .144
Changing gear ............................... 144
Display message ............................ 239
Drive program displa y.................... 142
Drive programs .............................. 145
Driving tips .................................... 144
DYNAMIC SELECT button (all vehi-
cles except Mercedes-AMG vehi-
cles) ............................................... 139
DYNAMIC SELECT controller
(Mercedes-AMG vehicles) .............. 140
Emergency running mod e.............. 151
Engaging drive position .................. 143
Engaging neutral ............................ 143
Engaging park position automati-
cally ............................................... 143
Engaging reverse gear ................... 143
Engaging the park position ............ 142
Gearshift recommendation ............ 149
Kickdown ....................................... 145
Manual shifting .............................. 147
Oil temperature (on-board com-
puter, Mercedes-AMG vehicles) ..... 213
Overview ........................................ 141
Problem (fault) ............................... 151
Pulling away ................................... 134
Selector lever ................................ 141
Starting the engine ........................ 134
Steering wheel gearshift paddle s... 147
Transmission position display ........ 142
Transmission positions .................. 144
Automatic transmission emer-
gency running mode ......................... 151B
Back button ....................................... 254
BAS (Brake Assist System) ................. 62
Battery (key)
Checking .......................................... 80
Important safety notes .................... 79
Replacing ......................................... 80
Battery (vehicle)
Charging ........................................ 295
Display message ............................ 230
Important safety notes .................. 293 Jump starting ................................. 296
Overview ........................................ 293
Belt
see Seat belts
Belt tensioner
Activation ......................................... 51
Blind Spot Assist
see Active Blind Spot Assist
Bluetooth ®
Connecting another mobile
phone ............................................ 257
Searching for a mobile phone ........ 256
See also Digital Owner's Manua l... 253
Telephony ...................................... 256
Bonnet
Active bonnet (pedestrian protec-tion) ............................................... 276
Closing ........................................... 277
Display message ............................ 241
Important safety notes .................. 276
Opening ......................................... 277
Boot
Emergency release .......................... 89
Important safety notes .................... 85
Locking separately ........................... 89
Opening/closing (automatically
from inside) ...................................... 88
Opening/closing (automatically
from outside) ................................... 86
Opening/closing (from the out-
side, HANDS-FREE ACCESS) ............ 87
Opening/closing (manually from
outside) ............................................ 85
Overview .......................................... 85
Power closing .................................. 84
Boot lid
Display message ............................ 240
Opening dimensions ...................... 327
Boot load (maximum) ........................ 327
Boot separator
Display message ............................ 241
Fitting .............................................. 96
General notes .................................. 95
Opening/closing .............................. 95
Removing ......................................... 96
Bottle holders .................................... 267 Index
5
Page 33 of 333

Cockpit
Function Page
:
Steering wheel gearshift pad-
dles 147
;
Combination switch 115
=
To adjust the steering wheel
electrically
106
?
Horn
A
Instrument cluster 32
B
PARKTRONIC warning dis-
play
180
C
Overhead control panel 37 Function Page
D
Climate control systems 122
E
Ignition lock 132
Start/Stop button 132
F
Cruise control lever 160
G
Electric parking brake 154
H
Light switch 113
I
Diagnostics connection 27
J
To open the bonnet 27730
CockpitAt a glance
Page 34 of 333

Function Page
:
Overhead control panel 37
;
PARKTRONIC warning dis-
play
180
=
Combination switch 115
?
To adjust the steering wheel
electrically
106
A
Horn
B
Instrument cluster 32
C
Steering wheel gearshift pad-
dles 147 Function Page
D
To open the bonnet 277
E
Diagnostics connection 27
F
Light switch 113
G
Electric parking brake 154
H
Ignition lock 132
Start/Stop button 132
I
Cruise control lever 160
J
Climate control systems 122Cockpit
31At a glance
Page 77 of 333
If the risk of a collision with the vehicle in front
remains and you do not brake, take evasive
action or accelerate significantly, the vehicle
may perform automatic emergency braking up
to the point of full brake application. Automatic
emergency braking is not performed until imme- diately prior to an imminent accident.
You can prevent the intervention of Active Brake Assist with cross-traffic function at any time by:
R depressing the accelerator pedal further
R activating kickdown
R releasing the brake pedal
The braking application of Active Brake Assist
with cross-traffic function is ended automati-
cally if:
R you manoeuvre to avoid the obstacle
R there is no longer a risk of collision
R there is no longer an obstacle detected in
front of your vehicle STEER CONTROL
General notes STEER CONTROL helps you by transmitting a
noticeable steering force to the steering wheel
in the direction required for vehicle stabilisation.
This steering support is provided in particular if:
R both right wheels or both left wheels are on a
wet or slippery road surface when you brake
R the vehicle starts to skid
Important safety notes i
Observe the "Important safety notes" sec-
tion (Y page 62).
No steering support is provided from STEER
CONTROL, if:
R ESP ®
is deactivated
R ESP ®
is malfunctioning
R the steering is faulty
If ESP ®
is malfunctioning, you will be assisted
further by the electrical power steering. Protection against theft
Immobiliser
X To activate with the key: remove the key
from the ignition lock.
X To activate with KEYLESS-GO: switch the
ignition off and open the driver's door.
X To deactivate: switch on the ignition.
The immobiliser prevents your vehicle from
being started without the correct key.
When leaving the vehicle, always take the key
with you and lock the vehicle. The engine can be
started by anyone with a valid key that is left
inside the vehicle.
i The immobiliser is always deactivated when
you start the engine. ATA (Anti-Theft Alarm system)
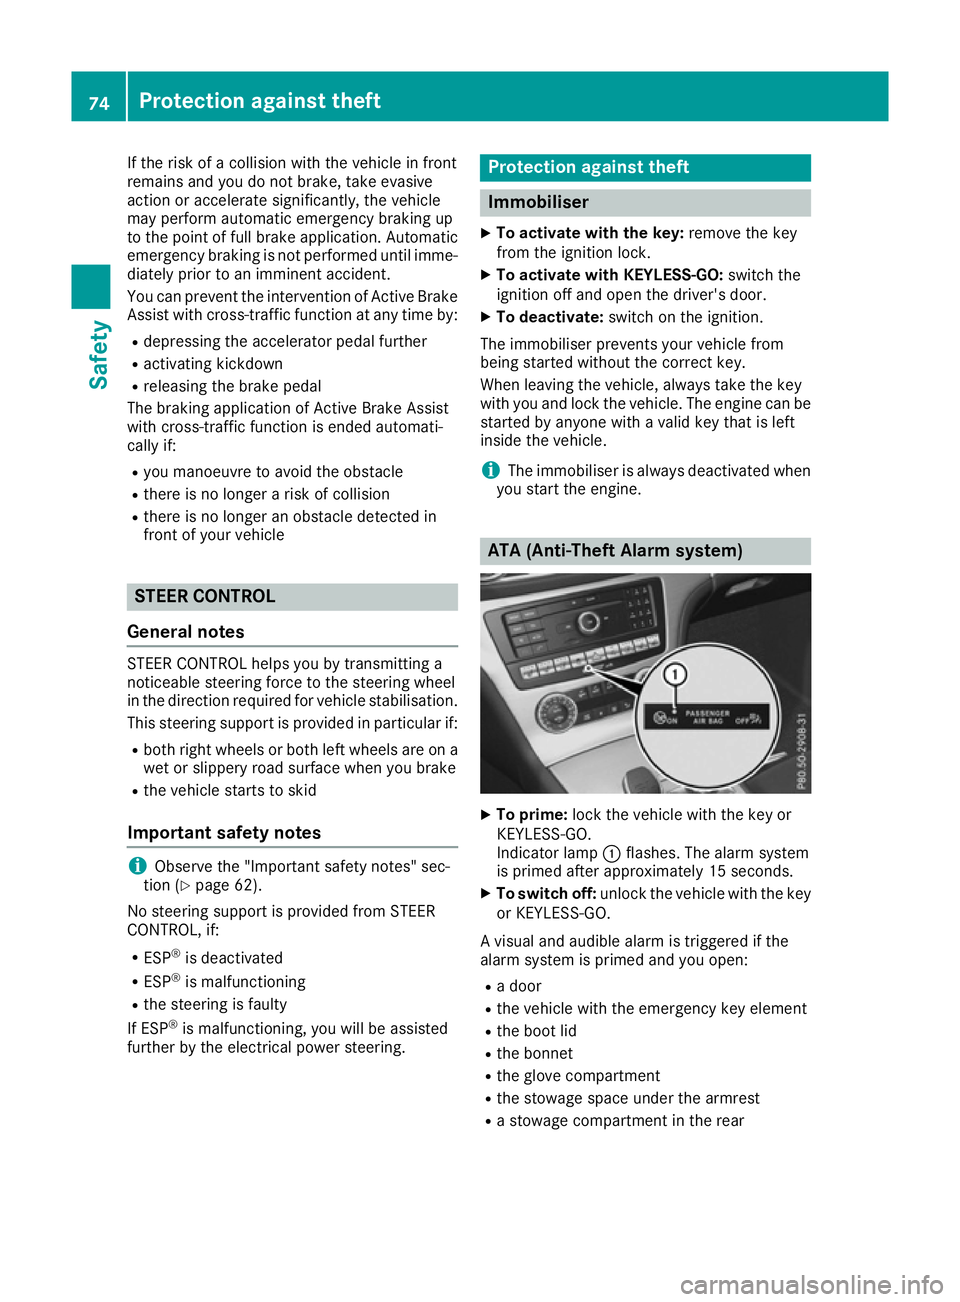
X
To prime: lock the vehicle with the key or
KEYLESS-GO.
Indicator lamp :flashes. The alarm system
is primed after approximately 15 seconds.
X To switch off: unlock the vehicle with the key
or KEYLESS-GO.
A visual and audible alarm is triggered if the
alarm system is primed and you open: R a door
R the vehicle with the emergency key element
R the boot lid
R the bonnet
R the glove compartment
R the stowage space under the armrest
R a stowage compartment in the rear 74
Protection against theftSafety
Page 122 of 333
Replacing the wiper blades
Important safety notes G
WARNING
If the windscreen wipers begin to move while
you are changing the wiper blades, you can be trapped by the wiper arm. There is a risk of
injury.
Always switch off the windscreen wipers and
ignition before changing the wiper blades.
! To avoid damaging the windscreen wiper
blades, make sure that you touch only the
wiper arm of the windscreen wiper.
! Never open the bonnet if a windscreen
wiper arm has been folded away from the
windscreen.
Never fold a windscreen wiper arm without a
wiper blade back onto the windscreen.
Hold the windscreen wiper arm firmly when
you change the wiper blade. If you release the
windscreen wiper arm without a wiper blade
and it falls onto the windscreen, the wind-
screen may be damaged by the force of the
impact.
Mercedes-Benz recommends that you have
the wiper blades changed at a qualified spe-
cialist workshop.
! Always position the windscreen wiper arms
vertically before folding them away from the
windscreen. By doing so, you will avoid dam-
age to the bonnet.
Replacing the windscreen wiper blades Moving the wiper blades to a vertical posi-
tion
On vehicles without KEYLESS-GO:
X Turn the key to position 1or 2in the ignition
lock.
X Set the windscreen wipers to position °.
X When the wiper arms have reached the verti-
cal position, turn the key to position 0and
remove it from the ignition lock.
X Fold the wiper arm away from the windscreen
until it engages. On vehicles with KEYLESS-GO:
X Switch off the engine.
X Remove your foot from the brake pedal.
X Set the windscreen wipers to the °posi-
tion.
X Press the Start/Stop button repeatedly until
the windscreen wipers start.
X When the wiper arms have reached the verti-
cal position, press the Start/Stop button.
X Fold the wiper arm away from the windscreen
until it engages.
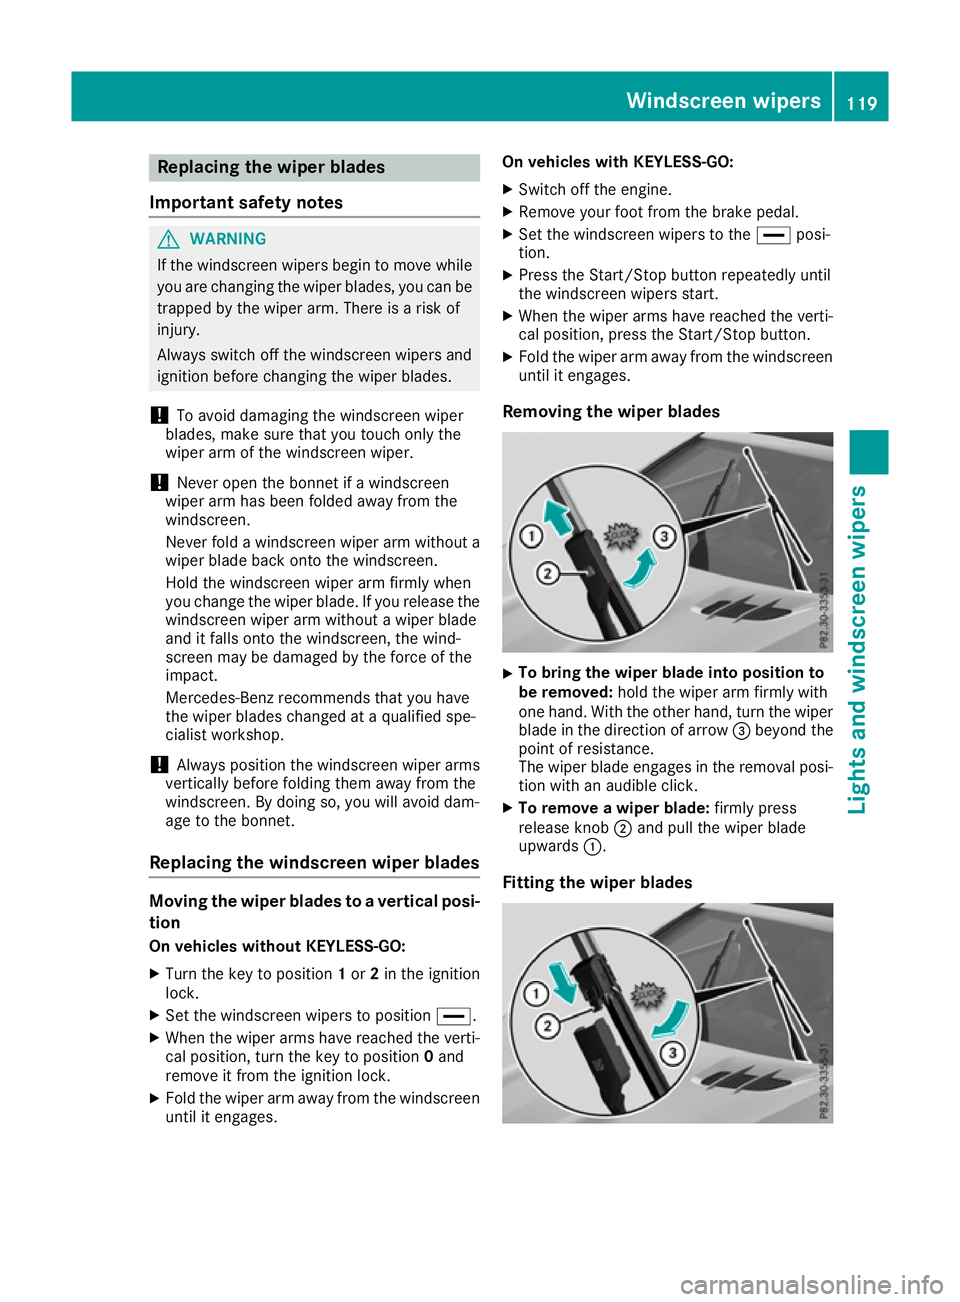
Removing the wiper blades X
To bring the wiper blade into position to
be removed:
hold the wiper arm firmly with
one hand. With the other hand, turn the wiper blade in the direction of arrow =beyond the
point of resistance.
The wiper blade engages in the removal posi-
tion with an audible click.
X To remove a wiper blade: firmly press
release knob ;and pull the wiper blade
upwards :.
Fitting the wiper blades Windscreen wipers
119Lights and windscreen wipers Z
Page 132 of 333
X
Convenience opening feature: press and
hold the gbutton until the side windows
are opened. The side windows move back to
their original positions.
The indicator lamp in the gbutton goes
out. Air-recirculation mode is deactivated.
i If you open the side windows manually after
closing them using the convenience closing
feature, they will remain in this position when
opened using the convenience opening fea-
ture. Switching the residual heat on/off
General notes It is possible to make use of the residual heat of
the engine to continue heating the stationary
vehicle for up to 30 minutesafter the engine has been switched off. The heating time depends on
the set interior temperature.
Switching on/off X
Turn the key to position 0in the ignition lock
or remove it (Y page 132).
X To switch on: press theÌbutton.
The indicator lamp in the Ìbutton lights
up.
i The blower will run at a low speed regardless
of the airflow setting.
i If you switch on the residual heat function at
high temperatures, only the ventilation will be
activated. The blower runs at medium speed.
X To switch off: press theÌbutton.
The indicator lamp in the Ìbutton goes
out.
Residual heat is switched off automatically: R after approximately 30 minutes
R when the ignition is switched on
R if the battery voltage drops Adjusting the air vents
Important safety notes
G
WARNING
Very hot or very cold air can flow from the air vents. This could result in burns or frostbite in the immediate vicinity of the air vents. There
is a risk of injury.
Make sure that all vehicle occupants always
maintain a sufficient distance to the air out-
lets. If necessary, redirect the airflow to
another area of the vehicle interior.
G
WARNING
When AIRSCARF is switched on, very hot air
can flow from the vents in the head restraints. This could result in burns in the immediate
vicinity of the air vents. There is a risk of injury.
Reduce the heater output before it becomes
too hot.
In order to ensure the direct flow of fresh air
through the air vents into the vehicle interior,
please observe the following notes: R keep the air inlet grille on the bonnet and in
the engine compartment on the front-
passenger side free of blockages, such as ice,
snow or leaves
R never cover the vents or ventilation grilles in
the vehicle interior
i You can move the adjusters for the air vents
vertically or horizontally to set the direction of the airflow.
i Optimal climate control function is achieved
by opening the air vents fully and setting the
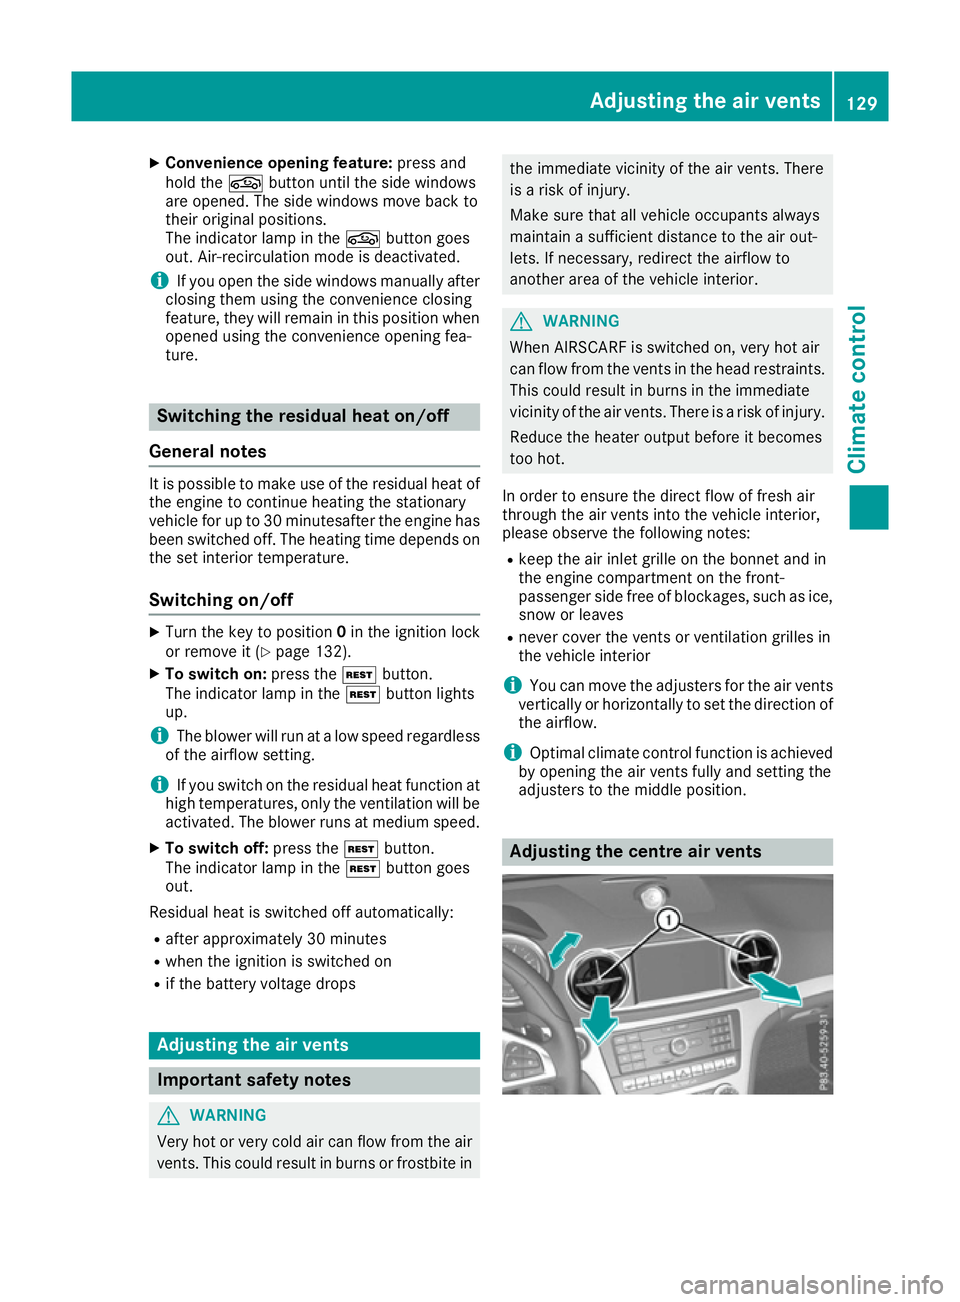
adjusters to the middle position. Adjusting the centre air vents Adjusting the air vents
129Climate control Z
Page 139 of 333
R
the bonnet is closed
R the driver's door is closed and the driver's
seat belt is fastened
If all conditions for automatic engine switch-off
are not fulfilled, the çECO symbol is shown.
All of the vehicle's systems remain active when the engine is switched off automatically.
All vehicles (except Mercedes-AMG vehi-
cles): the engine can be switched off automat-
ically a maximum of four times (initial stop, then
three subsequent stops) in succession. The
ç ECO symbol is shown in the multifunction
display after the engine has been started auto-
matically for the fourth time. When the è
ECO symbol is shown in the multifunction dis-
play, automatic engine switch-off is possible
again.
Mercedes-AMG vehicles: the number of times
that the engine can be switched off automati-
cally is unlimited.
The HOLD function can be activated if the
engine has been switched off automatically. It is
then not necessary to continue applying the
brakes during the automatic stop phase. When
you depress the accelerator pedal, the engine
starts automatically and the braking effect of
the HOLD function is deactivated.
Automatic engine start The engine is started automatically if:
R
you switch off the ECO start/stop function by
pressing the ECO button
R in transmission position Dor N, the brake
pedal is released and the HOLD function is not
active
R you depress the accelerator pedal
R you engage reverse gear R
R you move the transmission out of position P
R you switch to drive program S+
R you switch to drive program Sor M
(Mercedes-AMG vehicles)
R you unfasten your seat belt or open the driv-
er's door
R the vehicle starts to roll
R the brake system requires this
R the temperature in the vehicle interior devi-
ates from the set range R
the system detects moisture on the wind-
screen when the air-conditioning system is
switched on
R the battery's charge status is too low
Shifting the transmission to position Pdoes not
start the engine.
If you shift the transmission from Rto D, the
ECO start/stop function is available again as
soon as the èECO symbol reappears in the
multifunction display.
Switching the ECO start/stop function
off/on All vehicles (except Mercedes-AMG vehi-
cles)
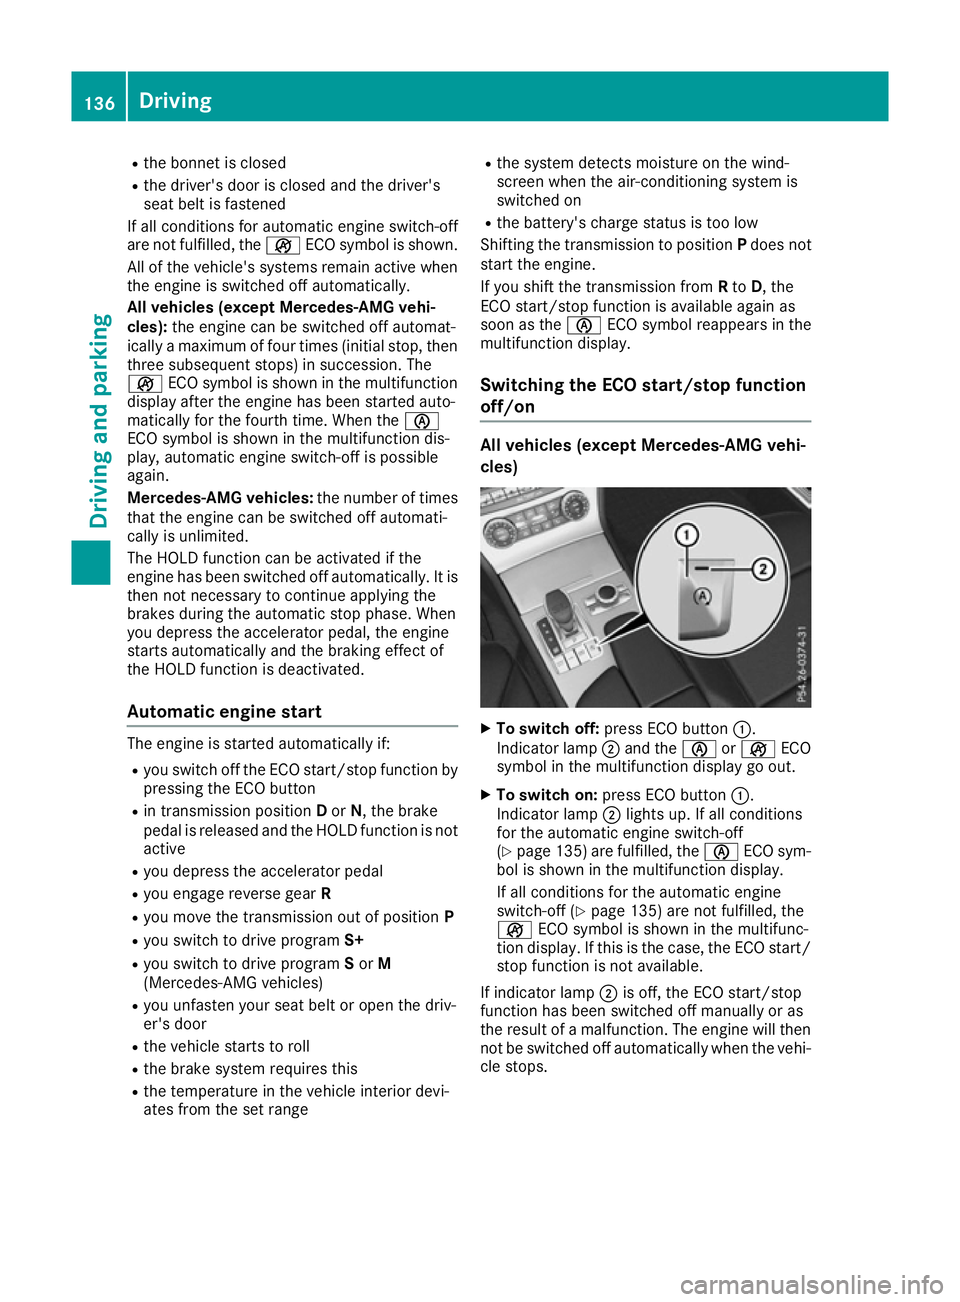
X
To switch off: press ECO button :.
Indicator lamp ;and the èorç ECO
symbol in the multifunction display go out.
X To switch on: press ECO button :.
Indicator lamp ;lights up. If all conditions
for the automatic engine switch-off
(Y page 135 )are fulfilled, the èECO sym-
bol is shown in the multifunction display.
If all conditions for the automatic engine
switch-off (Y page 135) are not fulfilled, the
ç ECO symbol is shown in the multifunc-
tion display. If this is the case, the ECO start/
stop function is not available.
If indicator lamp ;is off, the ECO start/stop
function has been switched off manually or as
the result of a malfunction. The engine will then
not be switched off automatically when the vehi- cle stops. 136
DrivingDriving and parking
Page 203 of 333
The outside temperature display is in the multi-
function display (Y page 201).
A change in the outside temperature is shown in
the multifunction display after a delay. Coolant temperature gauge
G
WARNING
If you open the bonnet while the engine is
overheating or while there is a fire in the
engine compartment, you could come into
contact with hot gases or other leaking ser-
vice products. There is a danger of injury.
Allow an overheating engine to cool down
before opening the bonnet. If there is a fire in the engine compartment, leave the bonnet
closed and notify the fire brigade.
The coolant temperature gauge is in the instru-
ment cluster on the right-hand side (Y page 32).
Under normal operating conditions and at the
correct coolant level, the coolant temperature
may rise to 120 †.
At high outside temperatures and when driving
uphill, the coolant temperature may rise to the
end of the scale. Operating the on-board computer
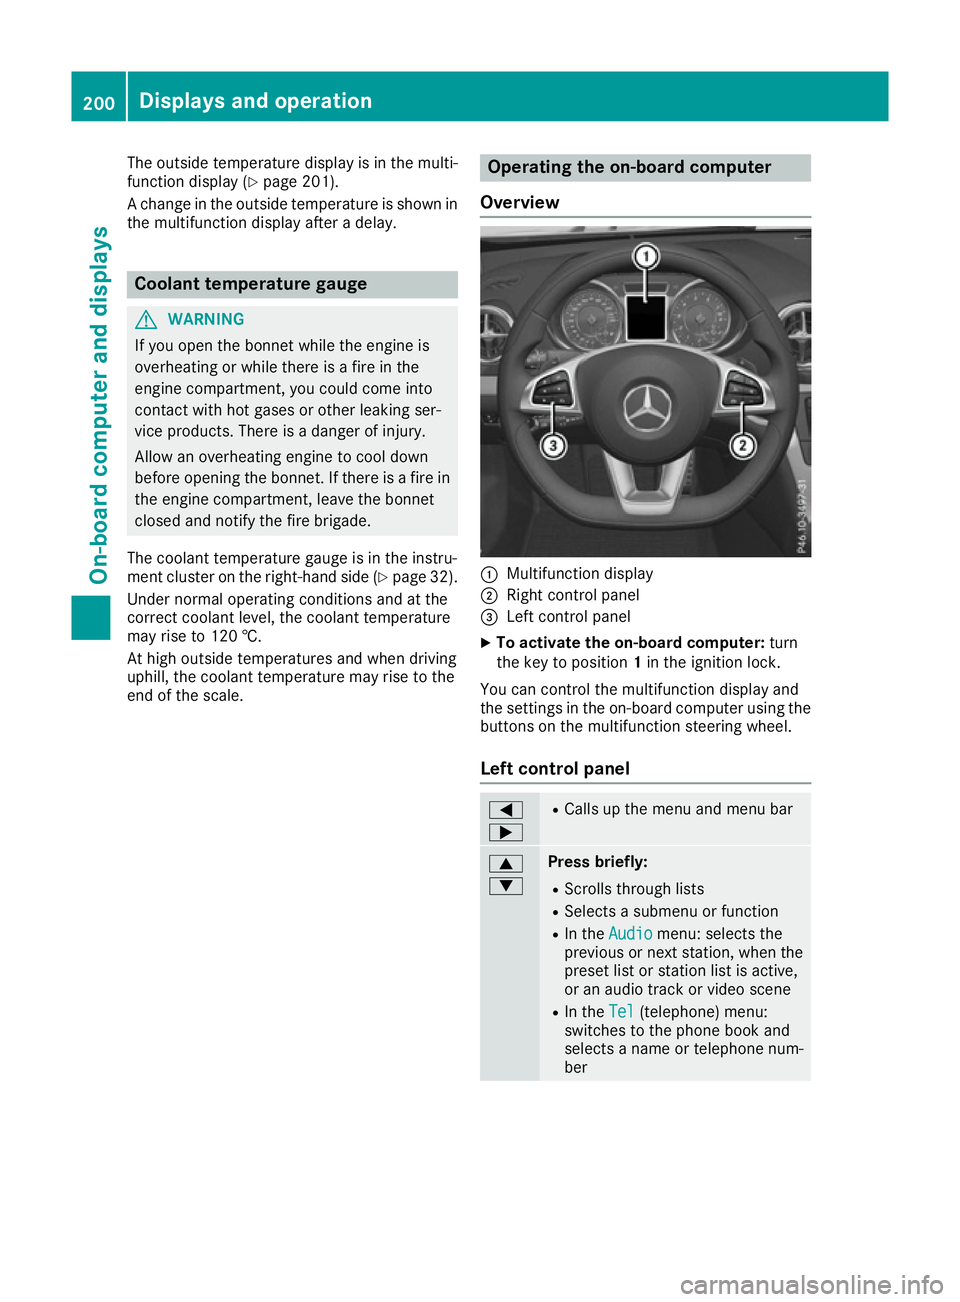
Overview :
Multifunction display
; Right control panel
= Left control panel
X To activate the on-board computer: turn
the key to position 1in the ignition lock.
You can control the multifunction display and
the settings in the on-board computer using the buttons on the multifunction steering wheel.
Left control panel =
; R
Calls up the menu and menu bar 9
: Press briefly:
R Scrolls through lists
R Selects a submenu or function
R In the Audio Audio menu: selects the
previous or next station, when the preset list or station list is active,
or an audio track or video scene
R In the Tel Tel(telephone) menu:
switches to the phone book and
selects a name or telephone num-
ber 200
Displays and operationOn-board computer and displays