2016 MERCEDES-BENZ SL ROADSTER tow bar
[x] Cancel search: tow barPage 53 of 333

Problems with automatic front-passenger front airbag deactivation
Be sure to observe the notes on "System self-test" (Y
page 48).Problem
Possible causes/consequences and
M
MSolutions The PASSENGER AIR
BAG OFF indicator lamp
lights up and remains lit,
even though the front-
passenger seat is occu-
pied by an adult or a per-
son with a build corre-
sponding to that of an
adult. The classification of the person on the front-passenger seat is false.
X Make sure the conditions for a correct classification of the person
on the front-passenger seat are met (Y page 46).
X If the PASSENGER AIR BAG OFF indicator lamp remains lit, the front-
passenger seat may not be used.
X Have the automatic front-passenger front airbag deactivation sys-
tem checked immediately at a qualified specialist workshop. The PASSENGER AIR
BAG OFF indicator lamp
does not light up and/or
does not stay on.
The front-passenger seatis:
R empty
R occupied with a rear-
ward-facing child
restraint system The automatic front-passenger front airbag deactivation system is
malfunctioning.
X Make sure there is nothing between the seat and the child restraint
system.
X Make sure that the entire base of the child restraint system rests on
the seat cushion of the front-passenger seat.
X Make sure that the seat cushion length is fully retracted.
X When installing the child restraint system, make sure that the seat
belt is tight. Do not pull the seat belt tight with the front-passenger
seat adjustment. This could result in the seat belt and the child
restraint system being pulled too tightly.
X Check that the child restraint system is installed correctly.
X Make sure that no objects are applying additional weight to the
seat.
X If the PASSENGER AIR BAG OFF indicator lamp remains off and/or
the PASSENGER AIR BAG ON indicator lamp lights up, do not install
a rearward-facing child restraint system on the front-passenger
seat.
X Have the automatic front-passenger front airbag deactivation sys-
tem checked immediately at a qualified specialist workshop. Roll bars
G
DANGER
If the roll bar has developed a fault, it may not function, e.g. in the event of an accident. The
roll bars may then not protect the vehicle
occupants as intended. This poses an
increased risk of injury or even fatal injury.
Have roll bars checked immediately at a quali-
fied specialist workshop. G
WARNING
If you place objects or clothing on the roll bar covers, these could impair roll bar extension.
The roll bars may then not protect the vehicle occupants as intended. In addition, objects
could endanger the vehicle occupants when
the roll bar is extending. This poses an
increased risk of injury or even fatal injury.
Ensure that the movement area of the roll barcovers is kept clear. Always stow all objects in
the vehicle correctly. 50
Occupant safetySafety
Page 54 of 333
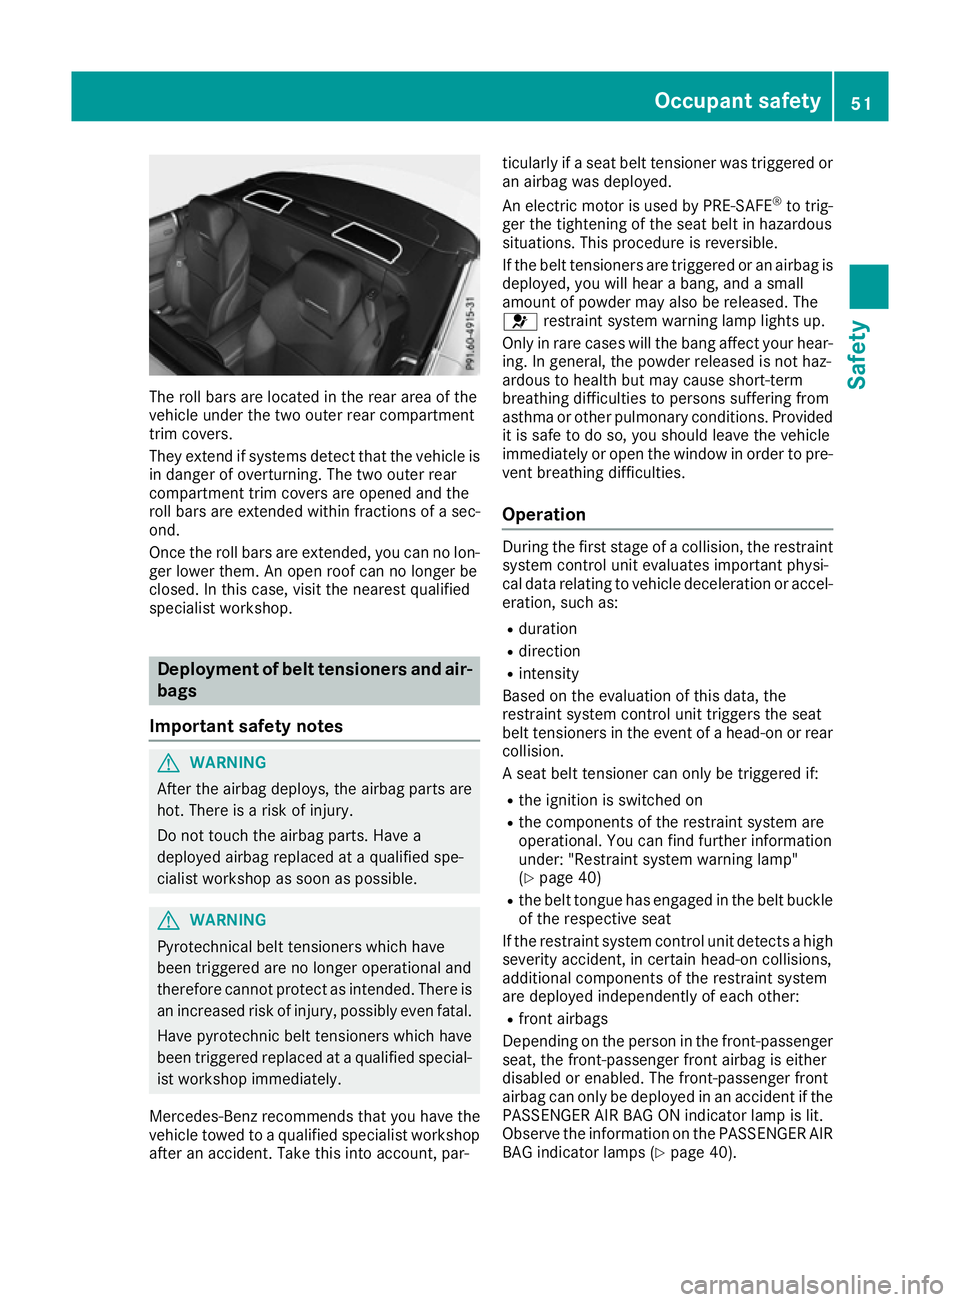
The roll bars are located in the rear area of the
vehicle under the two outer rear compartment
trim covers.
They extend if systems detect that the vehicle is in danger of overturning. The two outer rear
compartment trim covers are opened and the
roll bars are extended within fractions of a sec-
ond.
Once the roll bars are extended, you can no lon-
ger lower them. An open roof can no longer be
closed. In this case, visit the nearest qualified
specialist workshop. Deployment of belt tensioners and air-
bags
Important safety notes G
WARNING
After the airbag deploys, the airbag parts are
hot. There is a risk of injury.
Do not touch the airbag parts. Have a
deployed airbag replaced at a qualified spe-
cialist workshop as soon as possible. G
WARNING
Pyrotechnical belt tensioners which have
been triggered are no longer operational and
therefore cannot protect as intended. There is an increased risk of injury, possibly even fatal.
Have pyrotechnic belt tensioners which have
been triggered replaced at a qualified special-
ist workshop immediately.
Mercedes-Benz recommends that you have the
vehicle towed to a qualified specialist workshop
after an accident. Take this into account, par- ticularly if a seat belt tensioner was triggered or
an airbag was deployed.
An electric motor is used by PRE-SAFE ®
to trig-
ger the tightening of the seat belt in hazardous
situations. This procedure is reversible.
If the belt tensioners are triggered or an airbag is
deployed, you will hear a bang, and a small
amount of powder may also be released. The
6 restraint system warning lamp lights up.
Only in rare cases will the bang affect your hear-
ing. In general, the powder released is not haz-
ardous to health but may cause short-term
breathing difficulties to persons suffering from
asthma or other pulmonary conditions. Provided it is safe to do so, you should leave the vehicle
immediately or open the window in order to pre-vent breathing difficulties.
Operation During the first stage of a collision, the restraint
system control unit evaluates important physi-
cal data relating to vehicle deceleration or accel-
eration, such as:
R duration
R direction
R intensity
Based on the evaluation of this data, the
restraint system control unit triggers the seat
belt tensioners in the event of a head-on or rear
collision.
A seat belt tensioner can only be triggered if:
R the ignition is switched on
R the components of the restraint system are
operational. You can find further information
under: "Restraint system warning lamp"
(Y page 40)
R the belt tongue has engaged in the belt buckle
of the respective seat
If the restraint system control unit detects a high severity accident, in certain head-on collisions,
additional components of the restraint system
are deployed independently of each other:
R front airbags
Depending on the person in the front-passenger seat, the front-passenger front airbag is either
disabled or enabled. The front-passenger front
airbag can only be deployed in an accident if the PASSENGER AIR BAG ON indicator lamp is lit.
Observe the information on the PASSENGER AIR
BAG indicator lamps (Y page 40). Occupant safety
51Safety Z
Page 107 of 333
Adjust the driver's seat, head restraint, steer-
ing wheel and mirrors and fasten your seat
belt before starting the engine.
X To adjust the head restraint height: slide
the switch for the head restraint adjust-
ment :up or down in the direction of the
arrow. Sliding the seats forward/back
G
WARNING
When adjusting a seat, you or another vehicle occupant could become trapped by the guiderail of the seat, for instance. There is a risk of
injury.
Make sure that no one has any part of their
body within the sweep of the seat when
adjusting it.
! Make sure that there are no containers in
the cup holder and no objects in the footwell
or behind the seats when adjusting the seats.
Otherwise, you could damage the seats and
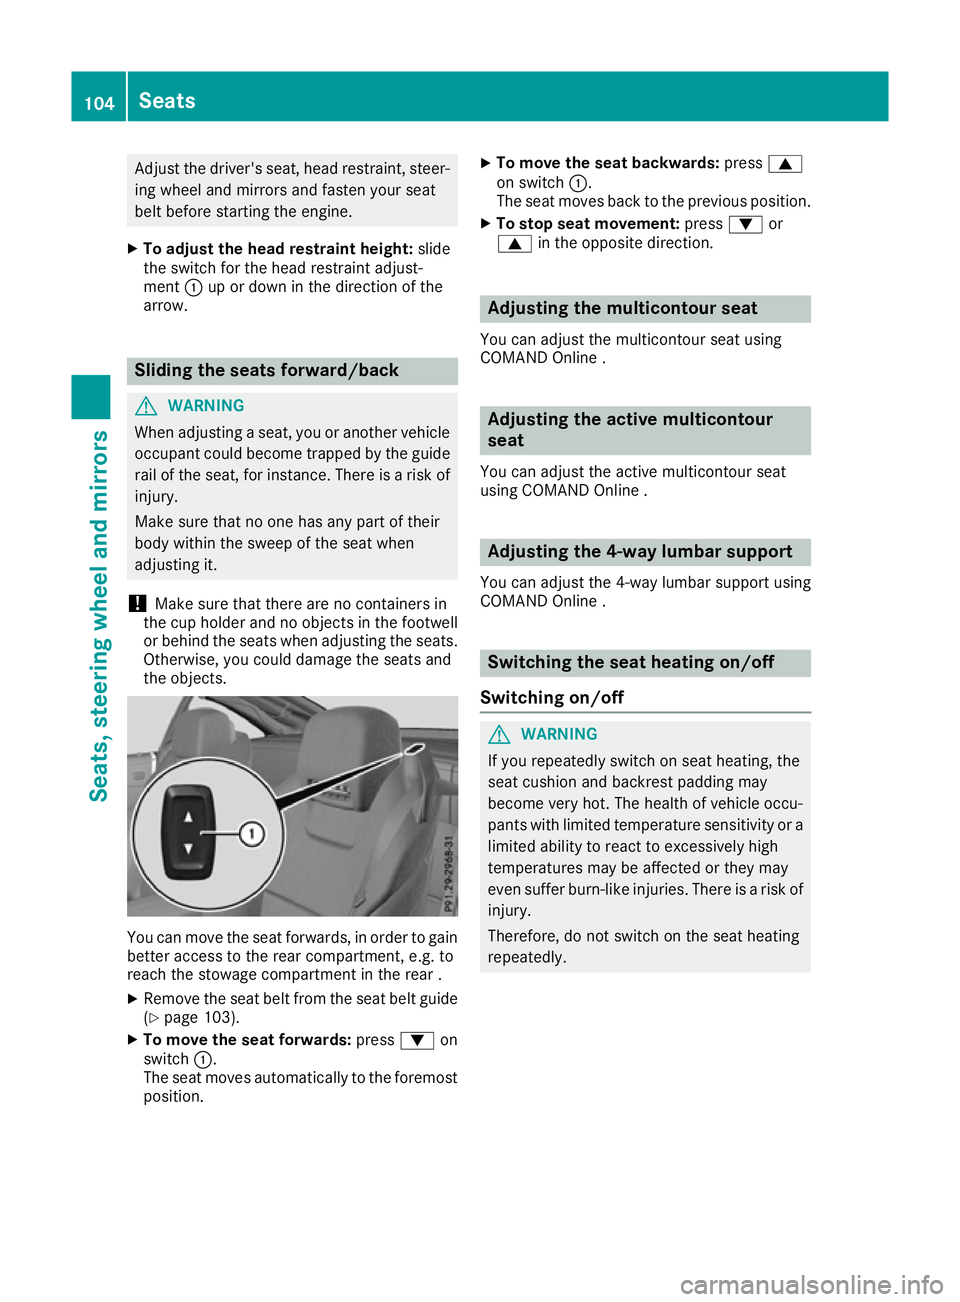
the objects. You can move the seat forwards, in order to gain
better access to the rear compartment, e.g. to
reach the stowage compartment in the rear .
X Remove the seat belt from the seat belt guide
(Y page 103).
X To move the seat forwards: press:on
switch :.
The seat moves automatically to the foremost
position. X
To move the seat backwards: press9
on switch :.
The seat moves back to the previous position.
X To stop seat movement: press:or
9 in the opposite direction. Adjusting the multicontour seat
You can adjust the multicontour seat using
COMAND Online . Adjusting the active multicontour
seat
You can adjust the active multicontour seat
using COMAND Online . Adjusting the 4-way lumbar support
You can adjust the 4-way lumbar support using
COMAND Online . Switching the seat heating on/off
Switching on/off G
WARNING
If you repeatedly switch on seat heating, the
seat cushion and backrest padding may
become very hot. The health of vehicle occu-
pants with limited temperature sensitivity or a limited ability to react to excessively high
temperatures may be affected or they may
even suffer burn-like injuries. There is a risk of
injury.
Therefore, do not switch on the seat heating
repeatedly. 104
SeatsSeats, steering
wheel and mirrors
Page 190 of 333

When Active Parking Assist is cancelled, you
must steer again yourself. Reversing camera
General notes Reversing camera
:is an optical parking and
manoeuvring aid. It shows the area behind your vehicle with guide lines in the multimedia sys-
tem.
The area behind the vehicle is displayed as a
mirror image, as in the rear-view mirror.
i The text shown in the multimedia system
display depends on the language setting. The following are examples of reversing camera
messages in the multimedia system.
Important safety notes The reversing camera is only an aid. It is not a
substitute for your attention to the immediate
surroundings. The responsibility for safe
manoeuvring and parking remains with you.
Make sure that there are no persons, animals or objects in range while manoeuvring and parking.
Under the following circumstances, the revers-
ing camera will not function, or will function in a limited manner:
R if the boot lid is open
R in heavy rain, snow or fog
R at night or in very dark places
R if the camera is exposed to very bright light
R if the area is lit by fluorescent bulbs or LED
lighting (the display may flicker)
R if there is a sudden change in temperature,
e.g. when driving into a heated garage in win- ter R
if the camera lens is dirty or obstructed.
Observe the notes on cleaning
(Y page 285)
R if the rear of your vehicle is damaged. In this
case, have the camera position and setting
checked at a qualified specialist workshop.
The field of vision and other functions of the
reversing camera may be restricted due to addi-
tional accessories on the rear of the vehicle (e.g. licence plate holder, bicycle rack).
For technical reasons, leaving the standard
height can result in inaccuracies in the guide
lines on vehicles with a height-adjustable chas-
sis.
Activating/deactivating the reversing
camera X
To activate: make sure that the key is in
position 2in the ignition lock.
X Make sure that the Activation by R gear Activation by R gear
function is selected in the multimedia system; see the Digital Owner's Manual.
X Engage reverse gear.
The multimedia system shows the area
behind the vehicle with guide lines.
The image from the reversing camera is avail-
able throughout the manoeuvring process.
To deactivate: the reversing camera deacti-
vates if you shift the transmission to Por after
driving forwards a short distance.
Displays in the multimedia system The reversing camera may show a distorted view
of obstacles or show them incorrectly or not at
all. Obstacles are not shown by the reversing
camera in the following locations:
R very close to the rear bumper
R under the rear bumper
R in the area immediately above the handle on
the boot lid
! Objects not at ground level may appear to
be further away than they actually are, e.g.:
R the bumper of a parked vehicle
R the drawbar of a trailer
R the ball coupling of a trailer tow hitch
R the rear section of an HGV
R a slanted post Driving systems
187Driving and parking Z
Page 277 of 333
Country Radio type approval num-
ber
Frequency range (MHz)
SK (Slovakia) Article 6 of Directive
1999/5/EC R&TTE
Slovak
206/11/2005 4 May 05
MHz: 27, 40, 433, 868 UK (United
Kingdom) Article 6 of Directive
1999/5/EC R&TTE 18 May
05
MHz: 27, 40, 418, 433, 868
Africa
Country Radio type approval num-
ber
Frequency range (MHz)
EG (Egypt) W-KLE-17/08 Mar. 06
MHz: 27, 30, 40, 418, 433,
868
RE (Réunion) Article 6 of Directive
1999/5/EC R&TTE 11 July 05
MHz: 27, 40, 433, 868 ZA (South
Africa) 11 October 2005
MHz: 27, 40, 433
America
Country Radio type approval num-
ber
Frequency range (MHz)
BB (Barba-
dos) Registration not required
MHz: 27, 40, 433, 868
CL (Chile) 38447/F-23 No.3.3634
MHz: 40, 433
3943/DFRS05165/F-50
MHz: 280 to 433
GF (French
Guyana) Article 6 of Directive
1999/5/EC R&TTE 10668 13
May 05
MHz: 27, 30, 40, 433, 868 GP (Guade-
loupe) Article 6 of Directive
1999/5/EC R&TTE 10668 13
May 05
MHz: 27, 30, 40, 433, 868 Country Radio type approval num-
ber
Frequency range (MHz)
MQ (Martini-
que) Article 6 of Directive
1999/5/EC R&TTE 11 July 05
MHz: 27, 30, 40, 433, 868 MX (Mexico) MHz: 280 to 390
Asia
Country Radio type approval num-
ber
Frequency range (MHz)
AE (United
Arab Emi-
rates) 1623/5/10-2/26/76
MHz: 433
JO (Jordan) TRC/LPD/2005/23
MHz: 27, 30, 40, 433, 868
KW (Kuwait) 5 October 2005
MHz: 27, 30, 40, 418, 433,
868
SA (Saudi
Arabia) 11_02_05/5024-5-6
MHz: 418, 433
SY (Syria) 279/4/14 / 05 March 06
TR (Turkey) National Certification 23 July
07
MHz: 433
Australia
Country Radio type approval num-
ber
Frequency range (MHz)
AU (Aus-
tralia) 28 June 2005
MHz: 27, 30, 40, 433, 868
NZ (New Zea-
land) 20 March 06
MHz: 27, 30, 40, 433
Floormats
G
WARNING
Objects in the driver's footwell may restrict
the clearance around the pedals or block a
depressed pedal. This jeopardises the oper- 274
FeaturesStowing and features
Page 294 of 333
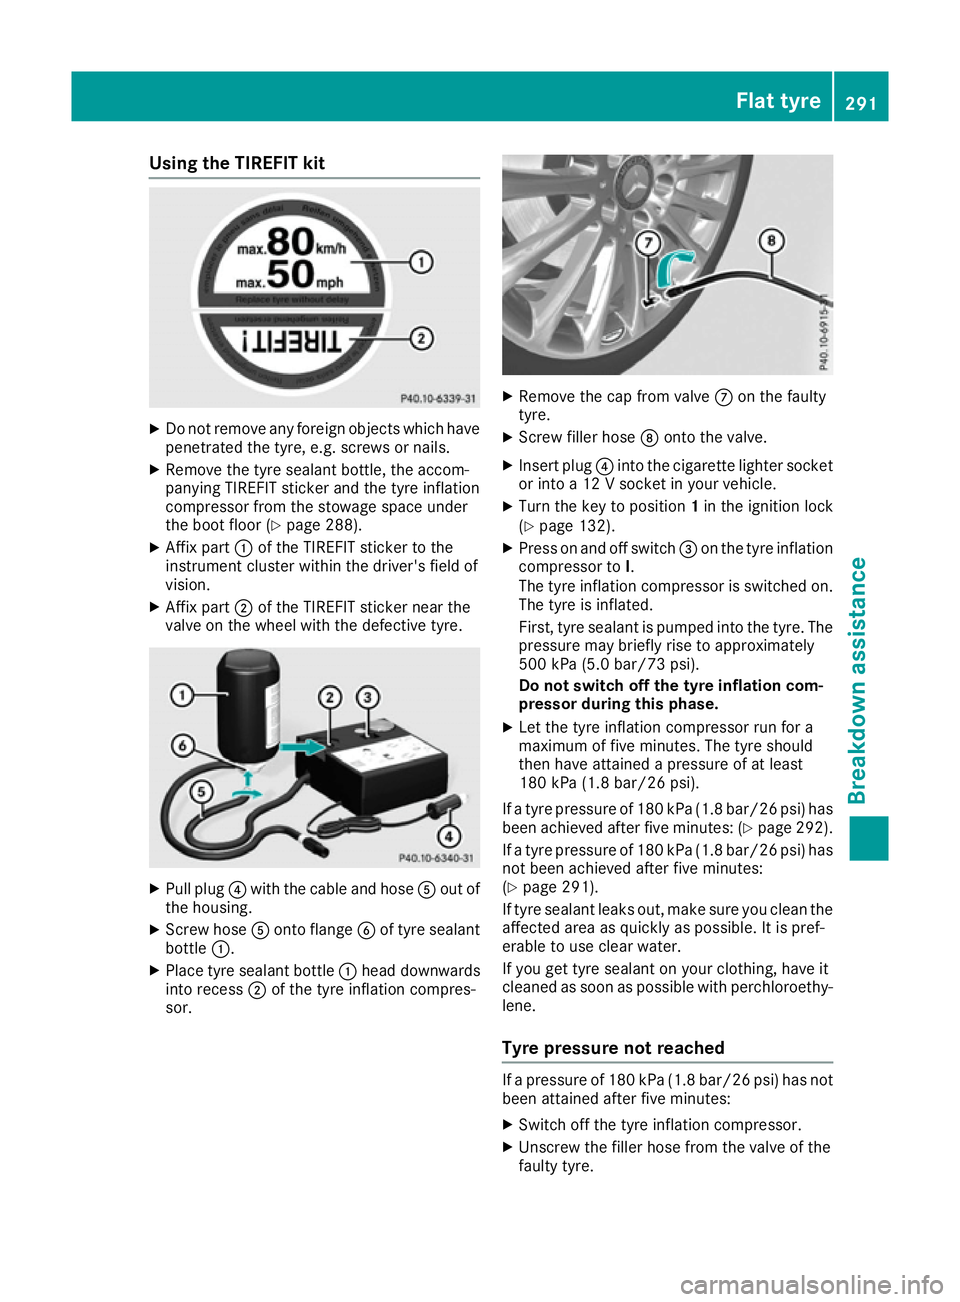
Using the TIREFIT kit
X
Do not remove any foreign objects which have
penetrated the tyre, e.g. screws or nails.
X Remove the tyre sealant bottle, the accom-
panying TIREFIT sticker and the tyre inflation
compressor from the stowage space under
the boot floor (Y page 288).
X Affix part :of the TIREFIT sticker to the
instrument cluster within the driver's field of
vision.
X Affix part ;of the TIREFIT sticker near the
valve on the wheel with the defective tyre. X
Pull plug ?with the cable and hose Aout of
the housing.
X Screw hose Aonto flange Bof tyre sealant
bottle :.
X Place tyre sealant bottle :head downwards
into recess ;of the tyre inflation compres-
sor. X
Remove the cap from valve Con the faulty
tyre.
X Screw filler hose Donto the valve.
X Insert plug ?into the cigarette lighter socket
or into a 12 V socket in your vehicle.
X Turn the key to position 1in the ignition lock
(Y page 132).
X Press on and off switch =on the tyre inflation
compressor to I.
The tyre inflation compressor is switched on.
The tyre is inflated.
First, tyre sealant is pumped into the tyre. The pressure may briefly rise to approximately
500 kPa (5.0 bar/73 psi).
Do not switch off the tyre inflation com-
pressor during this phase.
X Let the tyre inflation compressor run for a
maximum of five minutes. The tyre should
then have attained a pressure of at least
180 kPa (1.8 bar/26 psi).
If a tyre pressure of 180 kPa (1.8 bar/26 psi) has been achieved after five minutes: (Y page 292).
If a tyre pressure of 180 kPa (1.8 bar/26 psi) has not been achieved after five minutes:
(Y page 291).
If tyre sealant leaks out, make sure you clean the affected area as quickly as possible. It is pref-
erable to use clear water.
If you get tyre sealant on your clothing, have it
cleaned as soon as possible with perchloroethy-
lene.
Tyre pressure not reached If a pressure of 180 kPa (1.8 bar/26 psi) has not
been attained after five minutes:
X Switch off the tyre inflation compressor.
X Unscrew the filler hose from the valve of the
faulty tyre. Flat tyre
291Breakdown assistance Z
Page 295 of 333
Please note that tyre sealant may leak out
when unscrewing the filler hose.
X Very slowly drive forwards or reverse approx-
imately 10 m.
X Pump up the tyre again.
After a maximum of five minutes the tyre
pressure must be at least 180 kPa (1.8 bar/
26 psi). G
WARNING
If the required tyre pressure is not reached
after the specified time, the tyre is too badly
damaged. The tyre sealant cannot repair the
tyre in this instance. Damaged tyres and a tyre pressure that is too low can significantly
impair the vehicle's braking and driving char-
acteristics. There is a risk of accident.
Do not continue driving. Contact a qualified
specialist workshop.
Tyre pressure reached G
WARNING
A tyre temporarily sealed with tyre sealant
impairs the driving characteristics and is not
suitable for higher speeds. There is a risk of
accident.
You should therefore adapt your driving style
accordingly and drive carefully. Do not exceed the specified maximum speed with a tyre that
has been repaired using tyre sealant.
The maximum speed for a tyre sealed with tyre
sealant is 80 km/h. The upper part of the
TIREFIT sticker must be affixed to the instru-
ment cluster where it will be easily seen by the
driver.
! After use, excess tyre sealant may run out of
the filler hose. This could cause stains.
Therefore, place the filler hose in the plastic
bag which contained the TIREFIT kit. H
Environmental note
Have the used tyre sealant bottle disposed of professionally, e.g. at a qualified specialist
workshop. If a tyre pressure of 180 kPa (1.8 bar/26 psi) has
been achieved after ten minutes:
X Switch off the tyre inflation compressor.
X Unscrew the filler hose from the valve of the
faulty tyre.
X Stow the tyre sealant bottle, the tyre inflation
compressor and the warning triangle.
X Pull away immediately.
X Stop after driving for approximately ten
minutes and check the tyre pressure with the tyre inflation compressor.
The tyre pressure must now be at least
130 kPa (1.3 bar/19 psi). G
WARNING
If the required tyre pressure is not reached
after driving for a short period, the tyre is too badly damaged. The tyre sealant cannot
repair the tyre in this instance. Damaged tyres and a tyre pressure that is too low can signif-
icantly impair the vehicle's braking and driv-
ing characteristics. There is a risk of accident.
Do not continue driving. Contact a qualified
specialist workshop.
i In your vehicle, you will find a sticker with
the Mercedes-Benz Service24h telephone
number, e.g. on the B-pillar on the driver's
side.
X Correct the tyre pressure if it is still at least
130 kPa (1.3 bar/19 psi). See the tyre pres-
sure table on the fuel filler flap for values.
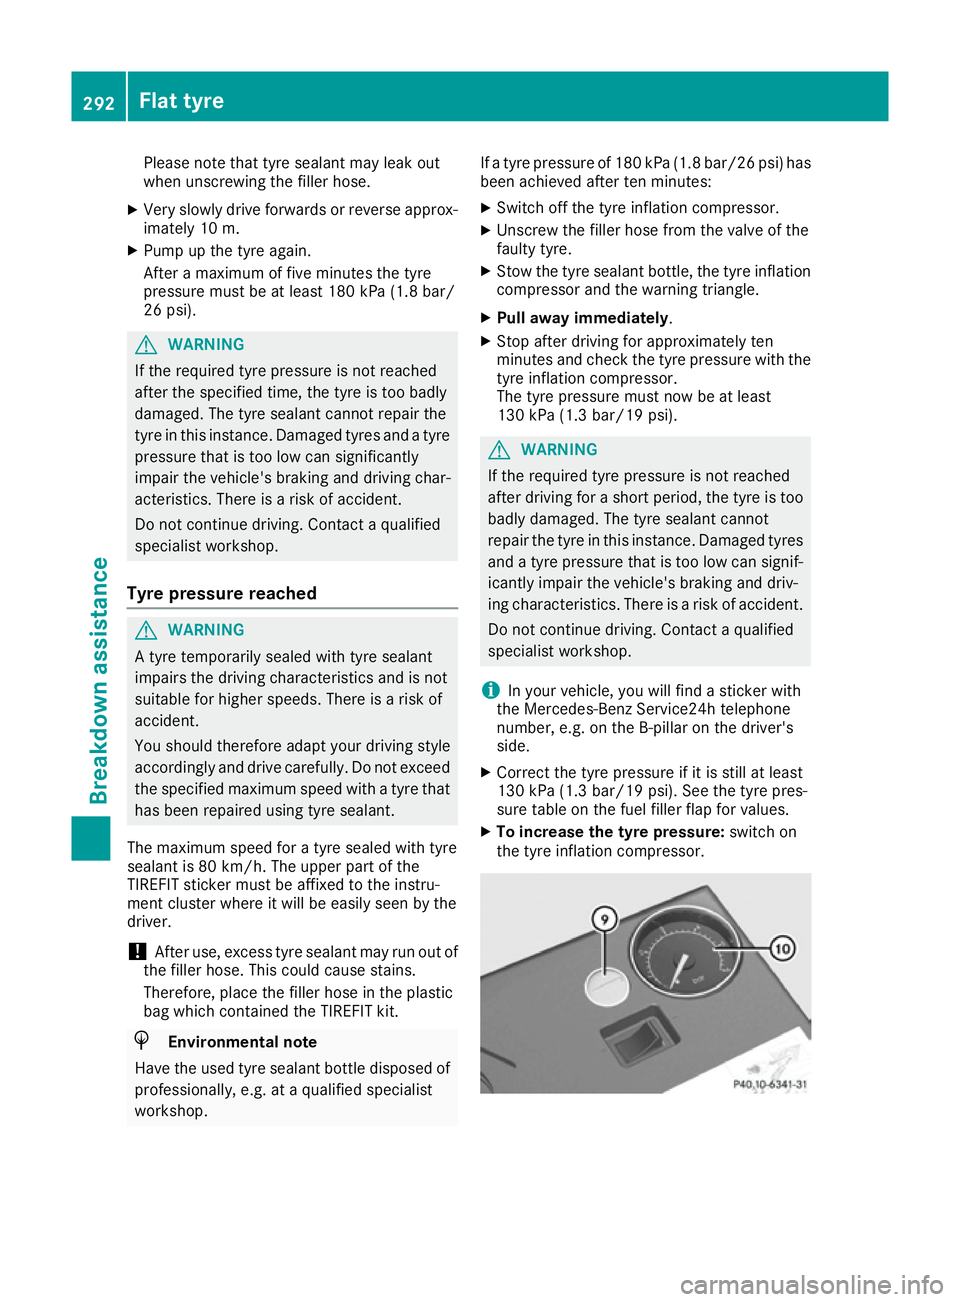
X To increase the tyre pressure: switch on
the tyre inflation compressor. 292
Flat tyreBreakdown assistance
Page 301 of 333
X
Connect negative terminal ?of donor battery Bto earth point Aof your vehicle using the jump
lead, connecting the jump lead to donor battery Bfirst.
X Start the engine.
X Before disconnecting the jump leads, let the engines run for several minutes.
X First, remove the jump leads from earth point Aand negative terminal ?, then from positive
clamp ;and positive terminal =. Begin each time at the contacts on your own vehicle first.
X After the jump lead is removed, return cover :of positive terminal ;to the original position.
Positive terminal ;is covered up and thus insulated again.
X Have the battery checked at a qualified specialist workshop.
Jump-starting is not considered to be a normal operating condition.
i Jump-starting cables and further information regarding jump starting can be obtained at any
qualified specialist workshop. Towing away and tow-starting
Important safety notes
G
WARNING
When towing or tow-starting another vehicle
and its weight is greater than the permissible gross weight of your vehicle, the:
R towing eye may be torn off
R car/trailer combination may swerve or
even overturn
There is a risk of an accident.
When towing or tow-starting another vehicle,
its weight should not be greater than the per- missible gross weight of your vehicle.
Details on the permissible gross vehicle weight
of your vehicle can be found on the vehicle iden-
tification plate (Y page 321).
! When Active Brake Assist, Distance Pilot
DISTRONIC or the HOLD function are activa-
ted, the vehicle brakes automatically in cer-
tain situations.
To avoid damage to the vehicle, deactivate
these systems in the following or similar sit-
uations:
R when towing away
R in a car wash
! Only secure the tow rope or towing bar to
the towing eyes. The vehicle may otherwise
be damaged. !
Observe the following points when towing
with a tow rope:
R secure the tow rope on the same side on
both vehicles.
R make sure that the tow rope is not longer
than legally permitted. Mark the tow rope in
the middle, e.g. with a white cloth
(30 x 30 cm). This makes other road users
aware that a vehicle is being towed.
R only secure the tow rope to the towing eye.
R observe the brake lamps of the towing vehi-
cle while driving. Always maintain a dis-
tance so that the tow rope does not sag.
R do not use steel cables or chains to tow
your vehicle. You could otherwise damage
the vehicle.
! Do not use the towing eye for recovery, this
could damage the vehicle. If in doubt, recover the vehicle with a crane.
! When towing, pull away slowly and
smoothly. If the tractive power is too high, the
vehicles could be damaged.
! To tow vehicles with KEYLESS-GO, use the
key instead of the Start/Stop button. The
automatic transmission may otherwise
switch to position Pwhen you open the driv-
er's or front-passenger door which could
damage the transmission.
! Make sure that the electric parking brake is
released. If the electric parking brake is faulty,
visit a qualified specialist workshop.
! You may tow the vehicle for a maximum of
50km. A towing speed of 50 km/h must not
be exceeded. 298
Towing away and tow-startingBreakdown assistance