2016 MERCEDES-BENZ SL ROADSTER boot
[x] Cancel search: bootPage 91 of 333
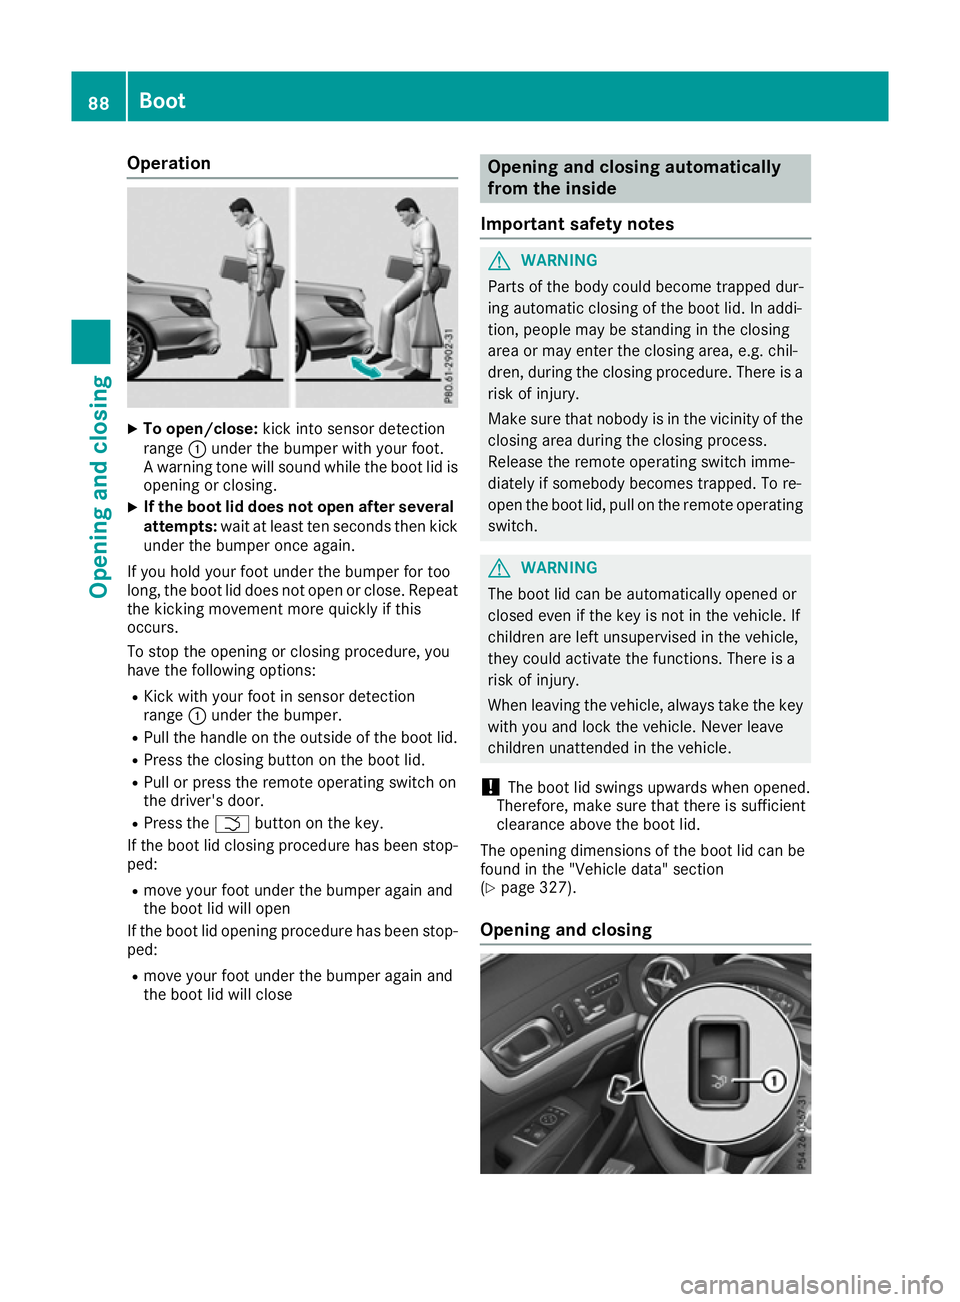
Operation
X
To open/close: kick into sensor detection
range :under the bumper with your foot.
A warning tone will sound while the boot lid is opening or closing.
X If the boot lid does not open after several
attempts: wait at least ten seconds then kick
under the bumper once again.
If you hold your foot under the bumper for too
long, the boot lid does not open or close. Repeat
the kicking movement more quickly if this
occurs.
To stop the opening or closing procedure, you
have the following options:
R Kick with your foot in sensor detection
range :under the bumper.
R Pull the handle on the outside of the boot lid.
R Press the closing button on the boot lid.
R Pull or press the remote operating switch on
the driver's door.
R Press the Fbutton on the key.
If the boot lid closing procedure has been stop- ped:
R move your foot under the bumper again and
the boot lid will open
If the boot lid opening procedure has been stop- ped:
R move your foot under the bumper again and
the boot lid will close Opening and closing automatically
from the inside
Important safety notes G
WARNING
Parts of the body could become trapped dur-
ing automatic closing of the boot lid. In addi-
tion, people may be standing in the closing
area or may enter the closing area, e.g. chil-
dren, during the closing procedure. There is a risk of injury.
Make sure that nobody is in the vicinity of theclosing area during the closing process.
Release the remote operating switch imme-
diately if somebody becomes trapped. To re-
open the boot lid, pull on the remote operating
switch. G
WARNING
The boot lid can be automatically opened or
closed even if the key is not in the vehicle. If
children are left unsupervised in the vehicle,
they could activate the functions. There is a
risk of injury.
When leaving the vehicle, always take the key with you and lock the vehicle. Never leave
children unattended in the vehicle.
! The boot lid swings upwards when opened.
Therefore, make sure that there is sufficient
clearance above the boot lid.
The opening dimensions of the boot lid can be
found in the "Vehicle data" section
(Y page 327).
Opening and closing 88
BootOpening and closing
Page 92 of 333
X
To open: pull remote operating switch :for
the boot lid until the boot lid opens.
If the boot separator was closed, it opens
automatically and remains open.
X To close: press remote operating switch :
for the boot lid until the boot lid is closed.
When the roof is open, the boot separator
closes automatically.
You can open and close the boot lid from the
driver's seat when the vehicle is stationary and
unlocked. Locking the boot separately
The separate boot locking function is only avail-
able in certain countries.
You can lock the boot separately. If you then
unlock the vehicle centrally, the boot remains
locked and cannot be opened.
X Close the boot lid.
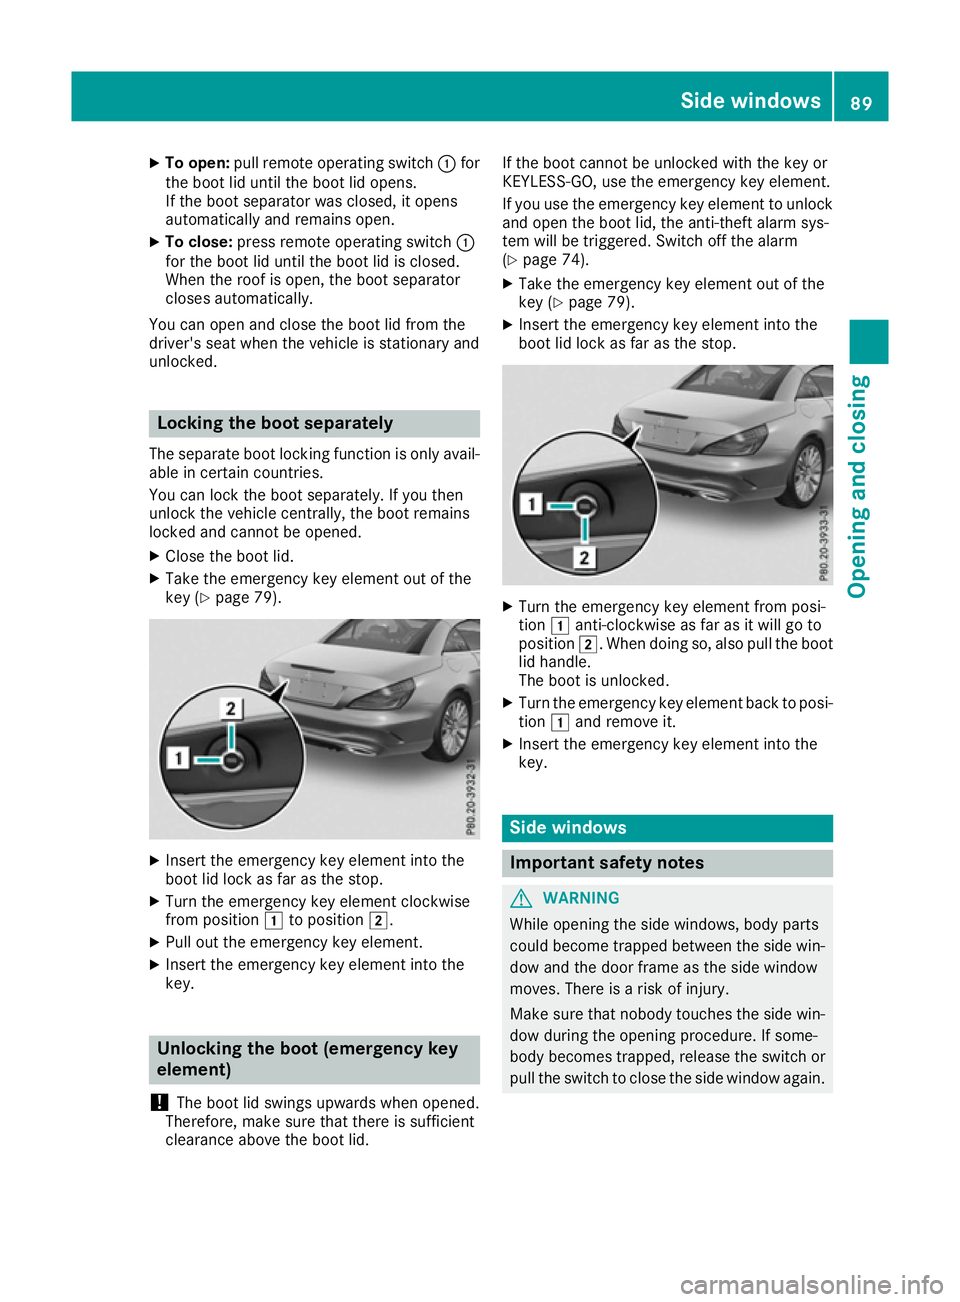
X Take the emergency key element out of the
key (Y page 79). X
Insert the emergency key element into the
boot lid lock as far as the stop.
X Turn the emergency key element clockwise
from position 1to position 2.
X Pull out the emergency key element.
X Insert the emergency key element into the
key. Unlocking the boot (emergency key
element)
! The boot lid swings upwards when opened.
Therefore, make sure that there is sufficient
clearance above the boot lid. If the boot cannot be unlocked with the key or
KEYLESS-GO, use the emergency key element.
If you use the emergency key element to unlock
and open the boot lid, the anti-theft alarm sys-
tem will be triggered. Switch off the alarm
(Y page 74).
X Take the emergency key element out of the
key (Y page 79).
X Insert the emergency key element into the
boot lid lock as far as the stop. X
Turn the emergency key element from posi-
tion 1anti-clockwise as far as it will go to
position 2. When doing so, also pull the boot
lid handle.
The boot is unlocked.
X Turn the emergency key element back to posi-
tion 1and remove it.
X Insert the emergency key element into the
key. Side windows
Important safety notes
G
WARNING
While opening the side windows, body parts
could become trapped between the side win- dow and the door frame as the side window
moves. There is a risk of injury.
Make sure that nobody touches the side win-
dow during the opening procedure. If some-
body becomes trapped, release the switch or pull the switch to close the side window again. Side windows
89Opening and closing Z
Page 96 of 333
Problems with the side windows
G
WARNING
If you close a side window again immediately after it has been blocked or reset, the side window
closes with increased or maximum force. The reversing function is then not active. Parts of the
body could be trapped in the closing area in the process. This poses an increased risk of injury or even fatal injury.
Make sure that no parts of the body are in the closing area. To stop the closing process, releasethe switch or push the switch again to reopen the side window. Problem
Possible causes/consequences and
M MSolutions A side window cannot be
closed because it is
blocked by objects, e.g.
leaves in the window
guide. X
Remove the objects.
X Close the side window. A side window cannot be
closed and you cannot
see the cause. If a side window is obstructed during closing and reopens again
slightly:
X Immediately after the window blocks, pull the corresponding switch
again until the side window has closed.
The side window is closed with increased force.
If a side window is obstructed again during closing and reopens again slightly:
X Immediately after the window blocks, pull the corresponding switch
again until the side window has closed.
The side window is closed without the automatic reversing feature. Roof
Important safety notes
G
WARNING
If you do not fully open/close the soft top, the soft-top hydraulics depressurise after a short time. This causes the soft top to lower unex-
pectedly and may cause you or others to be
trapped. There is a risk of injury.
Always open or close the soft top completely. G
WARNING
Closing the roof manually is a complex, tech-
nically challenging procedure that requires
considerable effort during certain phases.
You or others could be trapped while perform- ing this task. There is a risk of injury. Only have the soft top closed manually at a
qualified specialist workshop.
! Never sit on the rear compartment trim or
stow heavy objects there. You will otherwise
damage the roof and rear compartment trim
of the vehicle.
! Do not forget that the weather can change
abruptly. Make certain that the roof is closed when you leave the vehicle. The vehicle elec-tronics can be damaged if water enters the
vehicle interior.
! When opening and closing the roof, make
sure that:
R there is sufficient upward clearance, as the
roof swings upwards.
R there is sufficient clearance behind the
vehicle, as the boot lid swings backwards
beyond the bumper. Roof
93Opening and closing Z
Page 97 of 333

R
the boot is only loaded to below the boot
separator.
R the boot separator is not pushed up by the
load.
R the boot separator is closed.
R the boot lid is closed.
R the outside temperature is above Ò15 †.
You could otherwise damage the roof, boot
and other parts of the vehicle.
The vehicle dimensions for opening/closing the
roof can be found in the "Vehicle data" section
(Y page 327).
Make sure that the roof and rear window are dry
and clean before opening the roof. Otherwise,
water or dirt could enter the vehicle interior or
boot. Opening and closing using the roof
switch
Important safety notes G
WARNING
When opening or closing the roof, body parts could be trapped by, for example, the roof
mechanism, boot lid or side windows. There is a risk of injury.
When raising or lowering the roof, make sure
that no body parts are in the vicinity of moving
components. If someone becomes trapped,
release the button.
For safety reasons, the roof can only be opened
or closed when the vehicle is stationary.
! Operating the roof while pulling away:
R Observe the following traffic carefully.
R Do not drive faster than 40 km/h.
R Avoid abrupt braking and swerving
manoeuvres.
Do not operate the roof when cornering, driv-
ing on uneven surfaces or during strong
winds. The vehicle could otherwise be dam-
aged.
i If the traffic conditions mean that you have
to drive off while opening/closing the roof,
the procedure which was started while sta-
tionary can be continued at speeds of up to
approx. 40 km/h. Opening and closing
X
Close the boot lid (Y page 85).
If the boot is loaded correctly, the boot sep-
arator is automatically closed.
X Turn the key to position 2in the ignition lock.
X Open the cover on the lower centre console.
Roof switch :is located under the cover.
X To open: pull roof switch :until the entire
roof is stowed away in the boot.
You see the Vario-roof in operation Vario-roof in operation
message in the multifunction display. As soon
as the opening procedure has ended, the
message disappears and you hear a tone.
The front side windows close. The rear side
windows open.
X To close: press and hold soft-top switch :
until the soft top is fully closed.
You see the Vario-roof in operation Vario-roof in operation
message in the multifunction display. As soon as the closing procedure has ended, the mes-
sage disappears and you hear a tone.
All of the side windows close.
X Make sure that all the side windows are fully
closed. Opening and closing with the key
Important safety notes G
WARNING
When opening or closing the roof, body parts could be trapped by, for example, the roof
mechanism, boot lid or side windows. There isa risk of injury.
When raising or lowering the roof, make sure
that no body parts are in the vicinity of moving 94
RoofOpening and closing
Page 98 of 333

components. If someone becomes trapped,
release the button.
Opening and closing This function is only available on vehicles with
KEYLESS-GO or with roof comfort operation.
X Close the boot lid (Y page 85)
If the boot has been correctly loaded the boot separator is automatically closed.
X Vehicles with comfort operation: point the
tip of the key at the driver's door handle.
X Vehicles with KEYLESS-GO: the key must
be within 2 m of the vehicle.
X To open: press and hold the %button on
the key until the roof is fully opened.
The roof and the rear side windows open. The
front side windows close.
X To interrupt the opening procedure:
release the
%button.
X To open the front side windows: press the
% button on the key again.
X To close: press and hold the &button on
the key until the roof is fully closed.
The roof and the side windows close.
X To interrupt the closing procedure: release
the & button. Locking the roof again
Important safety notes G
WARNING
If you do not fully open/close the soft top, the soft-top hydraulics depressurise after a short time. This causes the soft top to lower unex-
pectedly and may cause you or others to be
trapped. There is a risk of injury.
Always open or close the soft top completely.
The roof is not locked if: R the K symbol and the Vario-roof in Vario-roof in
operation
operation message appears in the multi-
function display
R the K symbol and the Open/close
Open/close
vario-roof completely
vario-roof completely message appear
and you hear a warning tone
R you hear a warning tone for up to ten seconds
when pulling away or while driving Locking You can lock the roof again if it is not locked
fully.
X Pull over and stop the vehicle safely as soon
as possible, paying attention to road and traf-
fic conditions.
X Make sure that the key is in position 2in the
ignition lock.
X Press the roof switch (Y page 94). Boot separator
General notes !
To avoid damaging the roof or luggage when
folding back the roof, you should:
R only load the boot to below the boot sepa-
rator
R not place any objects on or in front of the
boot separator
R not place any objects on the cover behind
the roll bars
R not allow the load to push up the boot sep-
arator
! Make sure that the boot separator is fully
closed. Otherwise, the roof could be blocked
when opening or closing.
The boot separator can be used to cover luggage
and loads in the boot.
Opening and closing Boot separator
:can be opened and closed
using button ;, e.g. to check correct loading. Roof
95Opening and closing Z
Page 99 of 333
X
To open: press button ;.
X To close: press button ;.
If the boot is loaded correctly, boot separa-
tor :is automatically closed to the full
extent.
When the boot lid is opened, boot separator :
opens automatically.
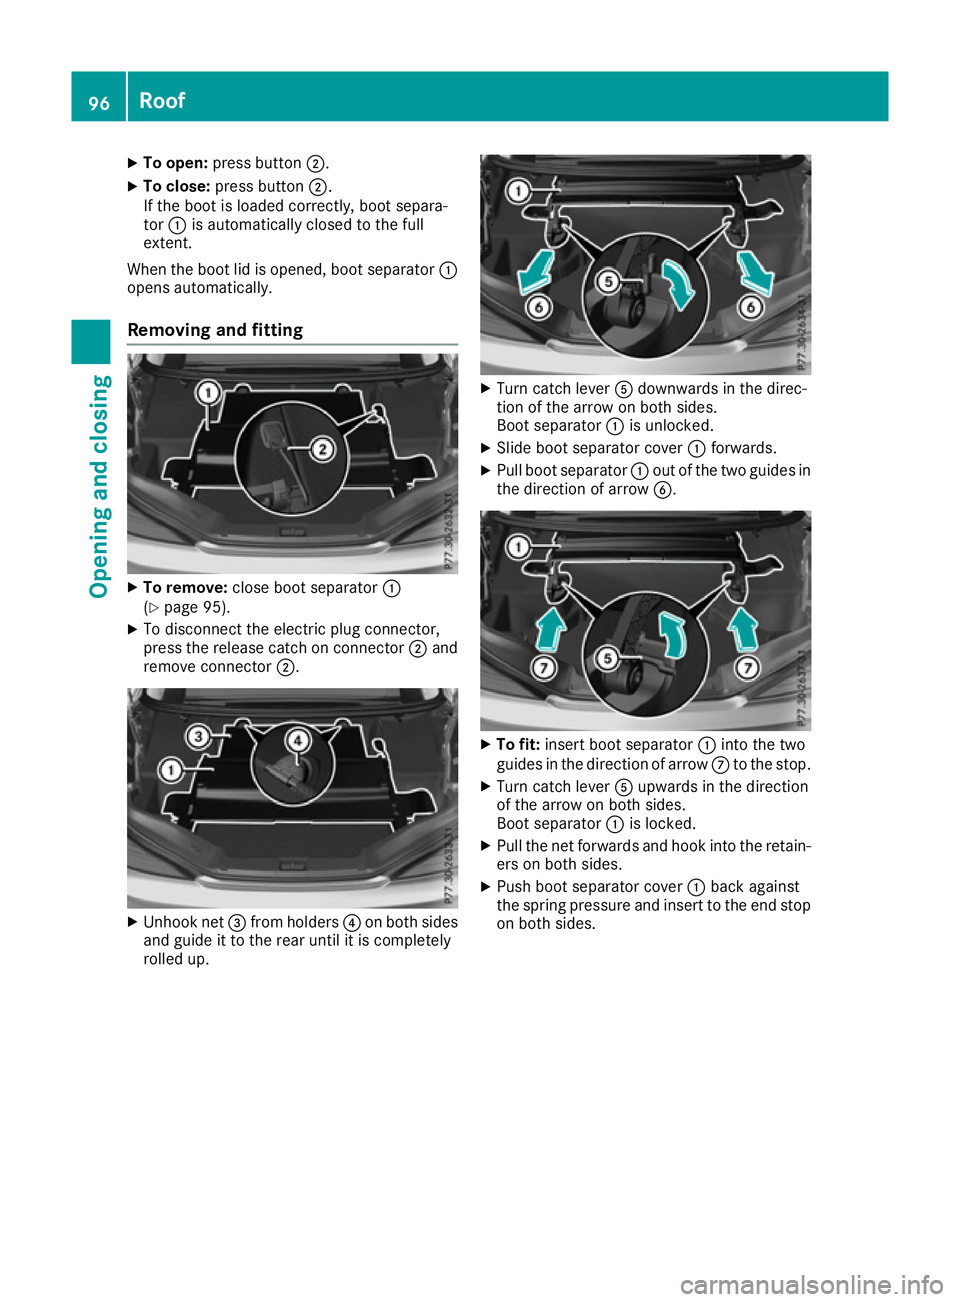
Removing and fitting X
To remove: close boot separator :
(Y page 95).
X To disconnect the electric plug connector,
press the release catch on connector ;and
remove connector ;.X
Unhook net =from holders ?on both sides
and guide it to the rear until it is completely
rolled up. X
Turn catch lever Adownwards in the direc-
tion of the arrow on both sides.
Boot separator :is unlocked.
X Slide boot separator cover :forwards.
X Pull boot separator :out of the two guides in
the direction of arrow B. X
To fit: insert boot separator :into the two
guides in the direction of arrow Cto the stop.
X Turn catch lever Aupwards in the direction
of the arrow on both sides.
Boot separator :is locked.
X Pull the net forwards and hook into the retain-
ers on both sides.
X Push boot separator cover :back against
the spring pressure and insert to the end stop
on both sides. 96
RoofOpening and closing
Page 103 of 333
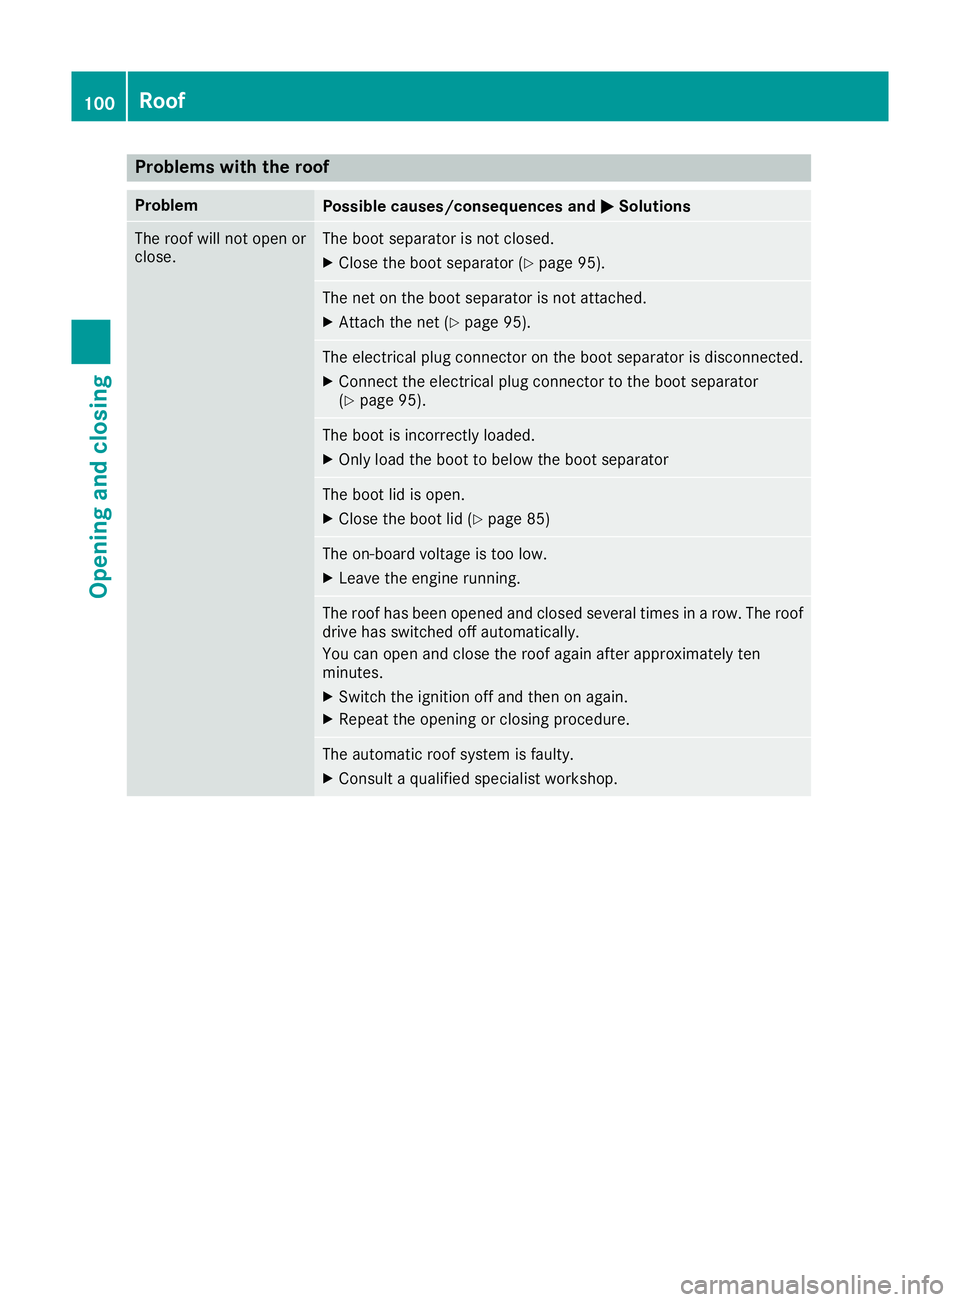
Problems with the roof
Problem
Possible causes/consequences and
M
MSolutions The roof will not open or
close. The boot separator is not closed.
X Close the boot separator (Y page 95). The net on the boot separator is not attached.
X Attach the net (Y page 95). The electrical plug connector on the boot separator is disconnected.
X
Connect the electrical plug connector to the boot separator
(Y page 95). The boot is incorrectly loaded.
X Only load the boot to below the boot separator The boot lid is open.
X Close the boot lid (Y page 85) The on-board voltage is too low.
X Leave the engine running. The roof has been opened and closed several times in a row. The roof
drive has switched off automatically.
You can open and close the roof again after approximately ten
minutes.
X Switch the ignition off and then on again.
X Repeat the opening or closing procedure. The automatic roof system is faulty.
X Consult a qualified specialist workshop. 100
RoofOpening and closing
Page 158 of 333
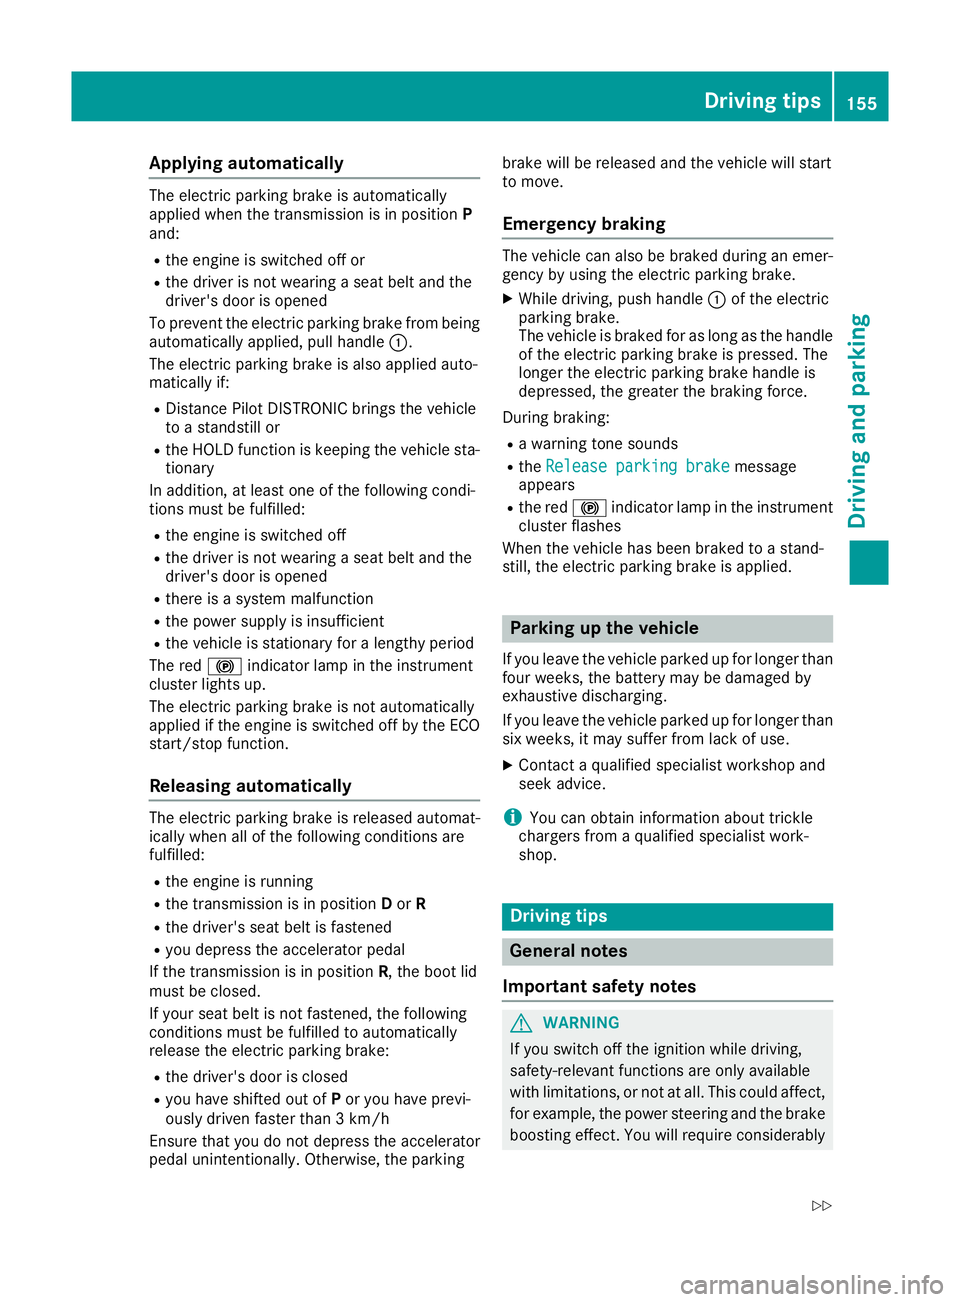
Applying automatically
The electric parking brake is automatically
applied when the transmission is in position P
and:
R the engine is switched off or
R the driver is not wearing a seat belt and the
driver's door is opened
To prevent the electric parking brake from being automatically applied, pull handle :.
The electric parking brake is also applied auto-
matically if:
R Distance Pilot DISTRONIC brings the vehicle
to a standstill or
R the HOLD function is keeping the vehicle sta-
tionary
In addition, at least one of the following condi-
tions must be fulfilled:
R the engine is switched off
R the driver is not wearing a seat belt and the
driver's door is opened
R there is a system malfunction
R the power supply is insufficient
R the vehicle is stationary for a lengthy period
The red !indicator lamp in the instrument
cluster lights up.
The electric parking brake is not automatically
applied if the engine is switched off by the ECO start/stop function.
Releasing automatically The electric parking brake is released automat-
ically when all of the following conditions are
fulfilled:
R the engine is running
R the transmission is in position Dor R
R the driver's seat belt is fastened
R you depress the accelerator pedal
If the transmission is in position R, the boot lid
must be closed.
If your seat belt is not fastened, the following
conditions must be fulfilled to automatically
release the electric parking brake:
R the driver's door is closed
R you have shifted out of Por you have previ-
ously driven faster than 3 km/h
Ensure that you do not depress the accelerator
pedal unintentionally. Otherwise, the parking brake will be released and the vehicle will start
to move.
Emergency braking The vehicle can also be braked during an emer-
gency by using the electric parking brake.
X While driving, push handle :of the electric
parking brake.
The vehicle is braked for as long as the handle of the electric parking brake is pressed. The
longer the electric parking brake handle is
depressed, the greater the braking force.
During braking:
R a warning tone sounds
R the Release parking brake
Release parking brake message
appears
R the red !indicator lamp in the instrument
cluster flashes
When the vehicle has been braked to a stand-
still, the electric parking brake is applied. Parking up the vehicle
If you leave the vehicle parked up for longer than
four weeks, the battery may be damaged by
exhaustive discharging.
If you leave the vehicle parked up for longer than
six weeks, it may suffer from lack of use.
X Contact a qualified specialist workshop and
seek advice.
i You can obtain information about trickle
chargers from a qualified specialist work-
shop. Driving tips
General notes
Important safety notes G
WARNING
If you switch off the ignition while driving,
safety-relevant functions are only available
with limitations, or not at all. This could affect, for example, the power steering and the brake
boosting effect. You will require considerably Driving tips
155Driving and pa rking
Z