Page 265 of 310

!Vehicles withagasolinee ngine:avoid
repeated and lengthy starting attempts. Oth-
erwise, the catalytic converter could be dam-
aged by non-combusted fuel.
If the indicator and warning lamps in the instru-
ment cluster do not light up at low tempera-
tures, the discharged battery may have frozen.
In this case you may neither charge the battery
nor jump-start the vehicle. The service life of a
thawed battery may be shorter. Start-up behav-
ior may deteriorate, in particular at low temper-
atures. Have the thawed battery checked at a
qualified specialist workshop.
Do not use arapid charging device to start the
vehicle. If your vehicle's battery is discharged,
the engine can be jump-started from another
vehicle or from adonor battery using jumper
cables. For this purpose, the vehicle has ajump-
starting connection point in the engine com-
partment.
When jump-starting, observe the following
points:
RThe battery is not accessible in all vehicles. If
the other vehicle's battery is not accessible,
jump-start the vehicle using adonor battery
or ajump-startingd evice.
RYou may only jump-start the vehicle when the
engine and exhaust system are cold.
RDo not start the engine if the battery is frozen.
Let the battery thaw first.
RJump-starting may only be performed from
batteries with anominal voltage of 12 V.
ROnly use jumper cables that have asufficient
cross-section and insulated terminal clamps.
RIf the battery is fully discharged, attach the
battery of another vehicle for afew minutes
before attempting to start. This charges the
empty battery alittle.
RMake sure that the two vehicles do not touch.
Make sure that:
Rthe jumper cables are not damaged.
Rbare parts of the terminal clamps do not come
into contact with other metal parts while the
jumper cables are connected to the battery.
Rthe jumper cables cannot come into contact
with parts such as the V-belt pulley or the fan.
These parts move when the engine is started
and while it is running.
Jumper cables and further information regarding
jump starting can be obtained at any qualified
specialist workshop.
Before connecting the jumper cables
XApply the parking brake.
XShift the transmission to position P.
XSwitch off all electrical consumers, e.g. audio
equipment, blower.
XTurn key to position 0in the ignition lock and
remove it.
XOpen the hood (Ypage 241).
Connecting the jumper cable
XPush contact protection cover :of the jump-
starting connection point backwards against
the spring force as far as it will go.
The jump-startingc onnection point is visible.
Terminal connecting plan
XRemove the cover from positive terminal =
of the donor vehicle's battery.
XConnect the positive terminal clamp of the
jumper cable to positive terminal =of the
donor vehicle's battery, and then to positive
terminal Aof the jump-startingc onnection
point.
XRun the donor vehicle's engine at idling
speed.
Jump-starting263
Breakdown assistance
Z
Page 266 of 310

XConnect thenegative terminal clam pofthe
jumper cabl etonegative terminal ;of the
donor veh icle's battery, and then to earth
contact ?of your own veh icle.
XInsertt hekeyintot he ignition locka nd start
th ee ngine.
You can no wswitch electrical consumers
back on excep tthe lighting system.
XBefore disconnecting th ejumper cables, let
th ee nginer un for several minutes.
XDisconnect th enegative terminal of the
jumper cabl efrome arthc ontac t? and then
from negative terminal ;of th edonor veh i-
cle's battery.
XDisconnect th epositiv etermi nal clam pofthe
jumper cabl efromp ositiv etermi nalAon the
jump-startin gconnectio npoint, and then
from positiv etermi nal=of th edonor veh i-
cle's battery.
Contac tprotection cover :isautomatically
returned forwards to its original positio nby
th es pring force and th ejump-startin gcon-
nection pointisc losed.
XPositio nthe cover on positiv etermi nal=of
th ed onor veh icle's battery.
You can no wswitch on th elighting system.
XHav ethe battery checked at aqualified spe-
cialist workshop.
Tow-startin gand towin gaway
Important safety notes
GWAR NING
Functionsr elevanttosafety are restricted or
no longer availab leif:
Rthee ngineisn otrunning.
Rtheb rak esystem or th epower steering is
malfunctioning.
Rthere isam alfunctio ninthevoltage supply
or th evehicle 's electrical system.
If your veh icle is bein gtow ed, muc hmore
force may benecessary to steer or brake.
Thereisar iskofana cciden t.
In suchc ases, use atow bar. Before to wing,
mak esure that th esteering moves freely.
GWARNING
You can no longer steer th evehicle ifthe
steering wheel lockh as been engaged.There
is ar iskofana ccident.
Alwa ysswit ch off th eignition when to wingthe
vehicle withat owcabl eorat owbar.
GWARNING
When to wingor tow-startin ganother vehicle
and its weightisg reatertha nt he permissible
gross weightofy our vehicle,the :
Rthet ow ing eye could detach itself
Rthev ehicle /traile rcom binatio ncould roll-
over.
Thereisar iskofana ccident.
When towing or tow-startin ganother vehicle,
its weights hould notbegreatertha nt he per-
missible gross weightofy our vehicle.
In formation on th egross vehicle weightc anbe
foun dont hevehicle identification plate
(
Ypage 294).
!Secure th etow rop eort owbar to th etow ing
eye or trailer to whitch only. Otherwise, the
vehicle could become damaged.
!Do no tuse th etow ing eye for recovery, this
could damag ethe vehicle .Ifindoubt,recover
th ev ehicle withac rane.
!Drive slowlya nd smoothly when to wing.
Excessivet ractive power could otherwise
damag ethe vehicles.
!Shift th eautomatic transmission to Nand
do noto pen th edriver' sorf rontpassenger's
door durin gtow ing .The automatic transmis-
sion may otherwise shifttop ositionP,which
could damag ethe transmission.
!The vehicle can be towed amaximum of
30 mile s(50km ).The to wingspeedof30m ph
(50 km/h) must no tbeexceeded.
If th evehicle has to betowed mor ethan
30 mile s(50km) ,the entire vehicl emus
tbe
ra
ised and transported.
When towing away, you must observet helegal
requirement sfor th ecountr yinw hichy ou are
currently driving.
It is bette rtohave th evehicle transported than
to have it towed.
264Tow-startin gand towing away
Breakdown assistance
Page 267 of 310

Have the vehicle transported onatransporter or
trailer if it has transmission damage.
Whent owing, the automati ctransmission must
be in position N.Ifthe automati ctransmission
cannot be shifted to position N,havet he vehicle
transported on atransporter or trailer.
The battery mus tbeconnected and charged.
Otherwise ,you :
Rcannot turn the key to position 2in the igni-
tion lock
Rcannot shift the transmission to position N
Before the vehicle is towed, switch off the auto-
mati clocking feature (
Ypage 72). You could
otherwise lock yourself out of the vehicle when
pushing or towing away the vehicle.
Installing/removin gthe towing eye
The fixtur efor the front towing eyeisl ocated in the
bumper.
The rea rtowing eyeisl ocated underthe bumper.
If yo utow or tow-start avehicle, attach the tow-
ing device to rea rtowing eye ;.
If your vehicle is equipped with atrailer tow
hitch, attach the towing device to the trailer tow
hitch (
Ypage 162). Installing the front towing eye
XTake the towing eyea
nd screwdriver from the
vehicle tool kit (Ypage 260).
XPres sthe arro wonthe cover :and remove
cover :from the opening.
You will see the fixtur efor the towing eye.
XScrew in the towing eyec lockwise to the stop.
XInsert the screwdriver into the towing eyea nd
tighte nthe towing eye.
XStow the screwdriver in the vehicle tool kit
(Ypage 260).
Removing the front towing eye
XRemove the screwdriver from the vehicle tool
kit (Ypage 260).
XInsert the screwdriver into the towing eyea nd
turn the screwdriver counter-clockwise.
XUnscrew the towing eye.
XInsert cover :with the lu gatthe top and
pres sitinatt he bottom until it engages.
XStow the towing eyea nd the screwdriver with
the vehicle tool kit (Ypage 260).
Towing with the rear axle raised
!
Vehicles with automati ctransmission must
not be towe dwitht he rea raxler aised.T he
vehicle/trailer combinatio nmay otherwise
swerve or even roll over.
!The ignition mus tbeswitched off if the vehi-
cle is being towe dwitht he front or rea raxle
raised.O therwise,ESP
®may intervene and
damag ethe brake system.
Always raise the rea raxlef or towing away.
XSwitch on the hazard warning lamps
(Ypage 94).
XTur nthe front wheels to the straight-ahead
position.
XRelease the parking brake.
XIf necessary ,turn the key to position 0in the
ignition lock and remov eit.
XTake the key with yo uwhenleaving the vehi-
cle.
XDo not excee dthe towing speed of 30 mph
(50 km/h).
Please observe the important safety instruc-
tions whe ntowing your vehicle with the rea raxle
raised (
Ypage 264).
Tow-starting and towing away265
Breakdow nassistance
Z
Page 268 of 310

Towingthe vehicle with both axles on
the ground
Important safety notes
GWARNING
Yo uc an no longe rstee rthe vehicl eifthe
steerin gwheel lock hasb eene ngaged .There
is ar iskofana ccident.
Alway sswitch off the ignition when towing the
vehicl ewithat ow cable or atow bar.
!Do not exceed the towing spee dof30mph
(50 km/h). Yo ucould otherwis edamag ethe
transmission.
Please observe the important safety notes
befor etowing your vehicl e(
Ypage 264).
Towingvehicle switha utomatic trans-
mission
XTurn the key to position 2in the ignition lock.
XDepres sthe brake peda land kee pit
depressed.
XShift the automatic transmission to position
N.
XLeave the key in position 2in the ignition lock.
XSwitch on the hazar dwarning lamps
(Ypage 94).
XReleas ethe parkin gbrake.
XReleas ethe brake pedal.
XDo not exceed the towing spee dof30m ph
(50 km/h).
Recovering avehicle that is stuck
!
When recovering avehicl ethath asbecome
stuck, pull it as smoothl yand evenly as pos-
sible. Excessive tractiv epower could damage
the vehicles.
If the drive wheels gett rapped on loose or
mudd yground ,recover the vehicl ewitht he
utmost care. Thi sisespecially the cas eifthe
vehicl eisladen .
Never attempt to recover avehicl ewithat railer
attached.
Pull ou tthe vehicl ebackwards ,ifpossible, using
the tracks it made when it becam estuck.
Transporting the vehicle
!
Yo um ayonl ysecur ethe vehicl ebythe
wheels ,not by parts of the vehicl esucha s
axl eors teerin gcomponents. Otherwise, the
vehicl ecould be damaged.
The towing ey eortrailer tow hitch can be used
to pull the vehicl eonto atrailer or transporte rif
yo uw ishtot ransport it.
XTurn the key to position 2in the ignition lock.
XShift the transmission to position N.
XReleasethe parkin gbrake.
If the vehicle is loaded:
XShift the transmission to position P.
XTurn the key to position 0in the ignition lock
and remove it.
XMake sure the parkin gbrake is applied.
XLash down the vehicle.
Tow-starting (emergency engine
starting)
Vehicle switha utomatic transmission
!Vehicles with automatic transmission must
not be tow-started .You could otherwis edam -
ag et he automatic transmission.
Yo uc an find informatio nonjump-starting under
"Jump-starting “(
Ypage 262).
Electrical fuses
The fuse allocation chart and important safety
informationonthe fuses can be found in the
"Fuse allocation chart" supplement.
266Electrical fuses
Breakdow nassistance
Page 269 of 310

Useful information
This Operator's Manual describes all models as
well as standard and optional equipment of your
vehicle that were available at the time of going
to print.Country-specific variation sare possi-
ble. Note that your vehicle may not be equipped
with all of the described functions. This also
applies to system sand function srelevantt o
safety.
Read the information on qualified specialist
workshops (
Ypage 29).
Important safetyn otes
GWarning
Af lat tire severely impairs the driving, steer-
ing and brakin gcharacteristic softhe vehicle.
There is arisk of an accident.
do not drive with aflat tire. Immediately
replace the flat tire with your spare wheel, or
consult aqualified specialist workshop.
GWARNING
If wheels and tires of the wrong size are used, the wheel brakes or suspensio ncomponents
may be damaged. There is arisk of an acci-
dent.
Always replace wheels and tires with those
that fulfill the specification softhe original
part.
When replacingw heels, make sure to use the
correct:
Rdesignation
Rmodel
When replacingt ires,make sure to use the
correct:
Rdesignation
Rmanufacturer
Rmodel
Accessories that are not approved for your vehi-
cle by Mercedes-Benz or are not being used cor-
rectly can impair operatin gsafety. Beforep
urchasin gand using non-approved
accessories, visit aqualified specialist work-
shop and inquire about:
Rsuitability
Rlegal stipulations
Rfactory recommendations
Information on the dimensions and types of
wheels and tires for your vehicle can be found
under "Wheel and tire combinations"
(
Ypage 290).
Information on your vehicle' stire pressure can
be found:
Rin the Tire and Loading Information placard on
the B-pillar, driver'ss ide
Rin the tire pressure table inside the fuel filler
flap (Ypage 271)
Runder "Tire pressure tables" (Ypage 278)
Runder "Tire pressure" (Ypage 270)
Modifications to the brake system or wheels are not permitted. The use of aspacer and brake
dust shields is not permitted. This invalidates
the general operatin gpermit for the vehicle.
Further information on wheels and tires can be
obtained at any qualified specialist workshop.
Operation
Information for ajourney
If the vehicle is heavily laden, checkt he tire
pressures,a nd correct them ,ifnecessary
(
Ypage 270).
While driving, pay attention to vibrations, noises
and unusual handling characteristics, e.g. pull-
ing to one side. This may indicat ethat the
wheels or tires are damaged. If you suspect that
at ire is defective, reduce your speed immedi-
ately. Stop the vehicle as soon as possible to
checkt he wheels and tires for damage. Hidden
tire damage could also be causing the unusual
handling characteristics. If you find no signs of
damage, have the tires and wheels checked at a
qualified specialist workshop.
When parkin gyour vehicle, make sure that the
tires do not get deformed by the curb or other
obstacles. If it is necessary to drive over curbs,
speed humps or similar elevations, try to do so
slowly and not at asharp angle. Otherwise, the
tires ,particularly the sidewalls, can get dam-
aged.
Operation267
Wheels and tires
Z
Page 270 of 310

Regular wheel and tire checks
GWARNING
Damaged tire scan cause tire inflation pres-
sure loss. As aresult, yo ucould lose control of
your vehicle. There is ariskofa ccident.
Check the tire sregularl yfor signs of damage
and replace any damaged tire simmediately.
Check the wheel sand tire sofyourv ehicl efor
damag eregularly, i.e .atleast every two weeks,
as well as afte rdriving off-road or on rough
roads. Damaged wheel scan cause alos soft ire
pressure. Payp articula rattention to damage
such as:
Rcuts in the tires
Rpunctures
Rtears in the tires
Rbulges on tires
Rdeformation or severe corrosio nonwheels
Regularly check the tire trea ddepth and the
condition of the trea dacross the wholew idth of
the tire (
Ypage 268). If necessary, turn the
front wheel stofullloc kino rder to inspect the
inner sid eofthe tire surface.
All wheel smusth aveav alve cap to protect the
valve against dirt and moisture. Do not install
anything onto the valve othe rthan the standard
valve cap or othe rvalve cap sapproved for your
vehicl ebyd ealers listed on the inside of the
front cover. Do not install any othe rvalve caps
or systems ,e.g. tire pressure monitor systems.
Regularly check the pressure of al lthe tires,
particularly prior to long trips. Adjust the tire
pressure if neces sary (
Ypage 270).
The service life of tire sdepends on various fac-
tors, including the following:
Rdriving style
Rtire pressure
Rmileage
Tire tread
GWARNING
Insufficient tire trea dwillr educe tire traction.
The tire is no longer able to dissipate water.
Thi sm eans that on we troa ds urfaces, the risk
of hydroplaning increases, in particula rwhere
speed is not adapted to suit the driving con-
ditions .There is ariskofa ccident.
If the tire pressure is too hig hortoo low, tires
may exhibi tdifferent level sofwearatd iffer-
ent locations on the tire tread. Thus, you
shoul dregularl ycheck the trea ddepth and
the condition of the trea dacross the entire
width of al ltires.
Minimum tire trea ddepth for:
RSummer tires: âin (3 mm)
RM+S tires: ãin (4 mm)
For safety reasons,r eplace the tiresbefore
the legall yprescribed limit for the minimum
tire trea ddepth is reached.
Marker :shows the location where the bar
indicator (arrow )for trea dwearisi ntegrated
into the tire tread.
Tread wear indicators (TWIs) are required by
law. Six indicators are positioned ove rthe tire
tread. The yare visible once the trea ddepth is
approximately áin (1.6 mm). If this is the case,
the tire is so worn that it mus tbereplaced.
Selecting,m ounting and replacing
tires
ROnly mount tire sand wheel softhe same type
and make.
ROnly us ewheelsw itht ire size sapproved by
Mercedes-Benz.
ROnly mount tire softhe correct size onto the
wheels.
RBrea kinn ew tire satmoderate speeds for the
firs t65m iles (100 km).
268Operation
Wheel sand tires
Page 271 of 310
.
RReplace the tire safter 6y ears at the latest,
regardless of wear .This")
RDo not drive with tireswhich have too little
trea ddepth,ast hissignificantl yreduce sthe
tractio nonw etroads (hydroplaning).
RReplace the tire safter 6y ears at the latest,
regardless of wear .Thisa lsoa pplies to the
spar ewheel .
Operatio ninwinter
General notes
Hav eyourv ehicl ewinterproofed at aquali fied
specialis tworkshop at the onse tofwinter.
Onlyu sewheels with tire sizes approved by
Mercedes-Benz.
Prior to the onse tofwinter, ensur ethats now
chains ar estowed in the vehicl e(
Ypage 270).
Snow chains canno tbem ounted on al lwheel /
tire combinations. Observe the restrictions on
the us eofsnow chains under "Wheel/tir ecom-
binations" (
Ypage 291).
Als oo bserve the note sinthe "Changing a
wheel" sectio n(
Ypage 286).
Driving with summe rtires
At temperatures belo w45‡(+7 †),summer
tire slos ee last icity and therefore tractio nand
braking power. Chang ethe tire sonyourvehicle
to M+S tire s. Usingsumme rtires at very cold
temperatures could cause tears to form,
thereby damaging the tires permanently.
Mercedes-Benz cannot accept responsibility for
this type of damage.
M+S tires
GWARNING
Wheel and tire dimensions as wel lasthe type
of tire can vary betwee nthe spare whee land
the whee ltobereplaced. When the spare
whee lismounted, driving characteristics may
be severelya ffected. There is arisk of an acci-
dent.
In order to reduce risks:
Ryou should therefore adapt you rdriving
style and drive carefully.
Rnever mount more than one spare wheel
that differs from the whee ltobereplaced.
Ronly use aspare whee lthat differs from the
whee ltober eplaced for ashort time.
Rhave aspare whee lthat differs from the
whee lthat has been changed replaced at
the nearest qualified specialist workshop.
You must observe the correct whee land
tire dimensions as wel lasthe whee ltype.
GWARNING
M+S tires with atire tread depth of less than
ã in (4 mm) are not suitable for use in winter
and do not provid esufficient traction. There is
ar isk of an accident.
M+S tires with atread depth of less than ãin
(4 mm) must be replaced immediately.
Use winter tires or all-season tires at tempera-
tures below4 5‡(+7 †). Both types of tire are
identified by the M+S marking.
Only winter tires bearing the isnowflake
symbo linaddition to the M+S marking provide
the best possible grip in wintry road conditions.
Only these tires wil lallow driving safety systems
such as ABS and ESP
®to function optimally in
winter. These tires have been developed specif-
ically for driving in snow.
For safe driving, use M+S tires of the same make
and tread pattern on all wheels.
Always observe the maximu mpermissible
speed specified for the M+S tires you have
mounted.
If you mount M+S tires that have alower maxi-
mum permissibl espeed than the maximum
design speed of the vehicle, affix acorrespond-
ing warning label in the driver' sfieldofv ision.
You can obtai nthis at aqualified specialist work-
shop.
Once you have mounted the winter tires:
XCheck the tire pressure (Ypage 270).
XRestart the tire pressure monitor
(Ypage 277).
Operation in winter269
Wheel sand tires
Z
Page 272 of 310

Snow chains
GWARNING
If snow chains are installed to the front
wheels, they may drag against the vehicle
body or chassis components. This could
cause damage to the vehicle or the tires.
There is arisk of an accident.
To avoid hazardous situations:
Rnever install snow chains to the front
wheels
Ralways install snow chains in pairs to the
rear wheels.
GWARNING
If you drive too fast with snow chains moun-
ted, they may snap. As aresult, you could
injure others and damage the vehicle. There is
ar isk of an accident.
Observe the maximum permissible speed for
operation with snow chains.
Observe the country-specific laws and regula-
tions for operation with snow chains.
!Check the snow chains for damage before
mounting them. Damaged or worn snow
chains may snap and damage the following
components:
Rwheel
Rwheel housing
Rwheel suspension
For this reason, you must use only snow
chains that are free of defects. Observe the
manufacturer's mounting instructions.
!Vehicles with steel wheels: if you mount
snow chains on steel wheels, you may dam-
age the hub caps. Remove the hub caps from
the relevant wheels before mounting the
snow chains.
Snow chains increase traction on roads in wintry conditions.
For safety reasons, Mercedes-Benz recom-
mends that you only use snow chains or traction
aids which have been approved for Mercedes-
Benz vehicles. The snow chains or traction aids
must be of class Uormeet the SAE type U
specification. Information about snow chains can be obtained
from any Mercedes-Benz Commercial Van Cen-
ter.
When mounting snow chains, please bear the
following points in mind:
RSnow chains cannot be mounted on all
wheel/tire combinations
.When mounting the
snow chains, note the permissible tire and
snow chain dimensions. Observe the restric-
tions on the use of snow chains under
"Wheel/tire combinations "(
Ypage 291).
RMount snow chains only in pairs and only to
the rear wheels. Observe the manufacturer's
mounting instructions.
ROnly use snow chains when the road is cov-
ered byalaye rofs now. Remove the snow
chains as soon as possible when you come to
ar oad that is not snow-covered.
RThe use of snow chains may be restricted by
local regulations. Observe the appropriate
regulations before mounting snow chains.
RWhen driving with snow chains installed, do
not exceed the maximum permissible speed
of 30 mph (50 km/h).
RCheck the tension of the chains after adis-
tance of approximately 0.5 miles (1.0 km).
You may wish to deactivate ESP
®when pulling
away with snow chains installed (Ypage 64).
This allowst he wheels to spin in acontrolled
manner, achieving an increased driving force
(cut tinga ction).
Tire pressure
Tire pressures pecifications
Important safety notes
GWARNING
Underinflated or overinflated tires pose the
following risks:
Rthe tires may burst, especially as the load
and vehicle speed increase.
Rthe tires may wear excessively and/or
unevenly, which may greatly impair tire
traction.
Rthe driving characteristics, as well as steer-
ing and braking, may be greatly impaired.
There is arisk of an accident.
270Tire pressure
Wheels and tires
 1
1 2
2 3
3 4
4 5
5 6
6 7
7 8
8 9
9 10
10 11
11 12
12 13
13 14
14 15
15 16
16 17
17 18
18 19
19 20
20 21
21 22
22 23
23 24
24 25
25 26
26 27
27 28
28 29
29 30
30 31
31 32
32 33
33 34
34 35
35 36
36 37
37 38
38 39
39 40
40 41
41 42
42 43
43 44
44 45
45 46
46 47
47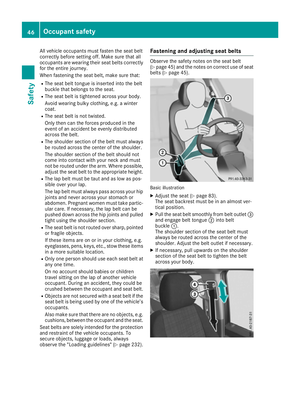 48
48 49
49 50
50 51
51 52
52 53
53 54
54 55
55 56
56 57
57 58
58 59
59 60
60 61
61 62
62 63
63 64
64 65
65 66
66 67
67 68
68 69
69 70
70 71
71 72
72 73
73 74
74 75
75 76
76 77
77 78
78 79
79 80
80 81
81 82
82 83
83 84
84 85
85 86
86 87
87 88
88 89
89 90
90 91
91 92
92 93
93 94
94 95
95 96
96 97
97 98
98 99
99 100
100 101
101 102
102 103
103 104
104 105
105 106
106 107
107 108
108 109
109 110
110 111
111 112
112 113
113 114
114 115
115 116
116 117
117 118
118 119
119 120
120 121
121 122
122 123
123 124
124 125
125 126
126 127
127 128
128 129
129 130
130 131
131 132
132 133
133 134
134 135
135 136
136 137
137 138
138 139
139 140
140 141
141 142
142 143
143 144
144 145
145 146
146 147
147 148
148 149
149 150
150 151
151 152
152 153
153 154
154 155
155 156
156 157
157 158
158 159
159 160
160 161
161 162
162 163
163 164
164 165
165 166
166 167
167 168
168 169
169 170
170 171
171 172
172 173
173 174
174 175
175 176
176 177
177 178
178 179
179 180
180 181
181 182
182 183
183 184
184 185
185 186
186 187
187 188
188 189
189 190
190 191
191 192
192 193
193 194
194 195
195 196
196 197
197 198
198 199
199 200
200 201
201 202
202 203
203 204
204 205
205 206
206 207
207 208
208 209
209 210
210 211
211 212
212 213
213 214
214 215
215 216
216 217
217 218
218 219
219 220
220 221
221 222
222 223
223 224
224 225
225 226
226 227
227 228
228 229
229 230
230 231
231 232
232 233
233 234
234 235
235 236
236 237
237 238
238 239
239 240
240 241
241 242
242 243
243 244
244 245
245 246
246 247
247 248
248 249
249 250
250 251
251 252
252 253
253 254
254 255
255 256
256 257
257 258
258 259
259 260
260 261
261 262
262 263
263 264
264 265
265 266
266 267
267 268
268 269
269 270
270 271
271 272
272 273
273 274
274 275
275 276
276 277
277 278
278 279
279 280
280 281
281 282
282 283
283 284
284 285
285 286
286 287
287 288
288 289
289 290
290 291
291 292
292 293
293 294
294 295
295 296
296 297
297 298
298 299
299 300
300 301
301 302
302 303
303 304
304 305
305 306
306 307
307 308
308 309
309