Page 249 of 310

Example: washerfluid reservoir
Add windshield washe rconcentrate to the
washe rfluid al lyea rround. Observ ethe infor-
matio nregarding washe rfluid under "Service
Products and Capacities" (
Ypage 302).
Adding washe rfluid
XMixt he washe rfluid to the appropriate mixing
ratio in acontaine rbeforehand.
XOpe nthe hoo d(Ypage 241).
XPull cap :on the washe rfluid reservoir
upwards at the tab.
XAdd the premixe dwashe rfluid.
XPress cap :onto the fille rneck unti lit
engages audibly.
XClose the hood.
Maintenance
General notes
HEnvironmental note
Observ emeasures to protect the environ-
ment when working on the vehicle. Yo umust
observe the legalr equirements when dispos-
ing of servic eproducts, e.g .engine oil. This
also includes al lcomponents, e.g .filters,
which have come into contact with service
products. Any qualified specialist workshop
can provid einformatio nabout this.
Dispose of empty containers, cleaning cloths
and car eproducts in an environmentally
responsibl emanner. Compl ywitht he instruc-
tions for us eofthe car eproducts.
Do not runt he engine for longert hanneces-
sary when the vehicl eisstationary. Before carrying outm
aintenance measures and
repairs, yo umustrea dt he following documents
relating to maintenance measures and repairs:
Rthe applicabl esections of the technica ldoc-
umentation, e.g .the Operator' sManualand
workshop information.
Rregulations such as industria lsafety regula-
tions and accident prevention regulations.
While working under the vehicle, yo umust
secur ethe vehicl eonjack stands with sufficient
load capacity.
Never us eavehicl ejack instea dofstands. The
jack is designe donlytor aisethe vehicl efor a
short time when changing awheel .Itisn ot
s ui
te df or performing maintenance work under
the vehicle.
Please also refer to the notesa boutqualified
specialist workshops(
Ypage 29).
The scop eand regularity of the inspectio nand
maintenance work primaril ydepen dont he
ofte ndiverse operating conditions. Specialist
knowledg ebeyond the scop eofthisOperator's
Manua lisrequired when carrying outt esting
and maintenance work. Thi sworks houl donlyb e
carrie doutby trained staff.
The vehicl eMaintenance Bookle tdescribe sthe
scop eand frequency of maintenance work and
contains additional notes on the Limite dWar-
ranty. Yo uwillf ind informatio nabout service
products approved by Mercedes-Benz and
capacitie sunder "Service products and capaci-
ties" (
Ypage 295)
Maintenance services must be carrie doutin
accordance with the provisions and recommen-
dations in the Maintenance Booklet. Not doing
so could voi dthe warranty claim and lead to
refusal of goodwil lgestures afte rthe manufac-
turer hass ubmitted adamag ereport.
Observ ethe informatio nunder "Mercedes-Benz
genuine parts" (
Ypage 31).
Service interval display
General notes
The servic eintervald isplay informs yo uofthe
next servic eduedate. Informatio nonthe typ eof
servic eand servic eintervals can be found in the
Maintenance Booklet.
iThe servic eintervald isplay does not provide
informatio nabout the engine oill evel.T he
Maintenance247
Maintenance and care
Z
Page 250 of 310

service interval displayshould therefore not
be confused with the engine oil level display.
For example, the displays hows one of the fol-
lowing service messages for afew seconds:
RNext Service Ain..Days
RServiceADueorService ADue
RServ. AExceed. by .. Days
Then either the remaining time or distance until
the next service due date is displayed. If the
service due date has been exceeded, the
elapsedt ime or distance traveled after the over-
due service date is shown. The letter in the dis-
play message indicates which service is due. A
stands foraminor service and Bforam ajor ser-
vice.
Aq ualified specialist workshop, e.g. an author-
ized Mercedes-Benz Commercial Van Center,
will reset the service interval displaya fter the
service work has been carried out. You can also
obtain further information on maintenance
work, for example.
The prescribed service interval is based on nor- mal vehicle use. Service work will need to be
performed more frequently than prescribed if
the vehicle is operated under more arduousc on-
ditions or with higher loads. Such arduousc on-
ditions include:
Rregularc ity driving with frequent intermediate
stops
Rdriving predominantly short distances
Rfrequent operation in mountainous terrain or
on poor road surfaces
Rleaving the engine idling for long periods on a frequent basis
In these or similar operating conditions, have
the air filter, engine oil and oil filter, for example,
replaced more frequently. Under more arduous
operating conditions, the tires must be checked more often. Further information can be obtained
at aq ualified specialist workshop, e.g. an
authorized Mercedes-Benz Commercial Van
Center.
Hiding service messages
Vehicles without steering wheel buttons
XPress the 3button on the instrument clus-
ter.
Vehicles with steering wheel buttons
XPress the aor% button on the steering
wheel.
Callingupt he service due date
Vehicles without steering wheel buttons
The vehicle must be stationary. Use the buttons
in the instrument cluster.
XTurn the key to position 2in the ignition lock.
XPress Èto select the service display.
The displays howsapossible service mes-
sage.
Vehicles with steering wheel buttons
Using the steering wheel buttons
XTurn the key to position 2in the ignition lock.
XPress =or; to select the Servicemenu.
XPress the9or: button to select the
ASSYST PLUSsubmenu and press ato
confirm.
The displays hows the service due date.
Battery
Important safety notes
Work on the battery, e.g. removing or installing,
requires specialist knowledge and the use of
special tools. Therefore, always have work on
the battery carried out at aqualified specialist
workshop.
GWARNING
Work carried out incorrectly on the battery
can lead, for example, to ashort circuit and
thus damage the vehicle electronics. This can
lead to function restrictions applying to
safety-relevant systems, e.g the lighting sys-
tem, the ABS (anti-lock braking system) or the
ESP
®(Electronic Stability Program). The oper-
ating safety of your vehicle may be restricted.
You could lose control of the vehicle, for
example:
Rwhen braking
Rin the event of abrupt steering maneuvers
and/or when the vehicle's speed is not
adapted to the road conditions
There is arisk of an accident.
In the event of ashort circuit or asimilari nci-
dent, contact aqualified specialist workshop
248Battery
Maintenance and care
Page 251 of 310
 a")
immediately. Do not drive any further. You
should have all work involvingthe battery car-
ried out at aqualified specialist workshop.
Further information can be foundu nder "ABS"
(
Ypage 62) and under "ESP®"(Ypage 64).
GWARNING
Electrostatic build-up can lead to the creation of sparks, which could ignit ethe highly explo-
sive gases of abattery. There is arisk of an
explosion.
Before handlin gthe battery, touc hthe vehicle
body to remove any existin gelectrostatic
build-up.
The flammable gas mix is produced when the
battery is charged or when the vehicle is jump-
started.
Always make sure that neither you nor the bat-
ter ya re electro statically charged. Electrostatic
charging results, for example, from:
Rwearings ynthetic clothing
Rfriction betwee nclothing and the seat
Rdraggingorp ushingthe battery across carpet
flooring or any other synthetic materials
Rrubbingt he battery with cloths or towels.
Comply with the followings afetyprecautions
and tak eprotective measuresw hen handling
batteries.
Risk of explosion.E xplosive oxyhy-
drogen is produced when batteries
are being charged. Only charge bat-
teries in well-ventilated areas.
Fire ,open flames and smoking are
therefore prohibited when working
on the battery. Avoid creating
sparks.
Batter yacid is caustic. Avoid con-
tac twith the skin ,eyes or clothing.
Wear acid-proof protective gloves.I f
skin or clothes are splashed with
acid, neutralize the splashes imme-
diately with soapy water or an acid
neutralizer, and the nclean the affec-
ted areas with water .Consult adoc-
tor if necessary.
Wear eye protection. When mixing
water and acid, the liquid can splash
int oy our eyes. Rinse acid splashes
to the eyes immediately with clean water and contac
tadoctor immedi-
ately.
Keep children at asafe distance.
Children are not able to assess the
danger sposed by batteries and
acid.
When handlin gbatteries, observe
the safetyp recautionsand special
protective measuresc ontained in
this Operator's Manual.
HEnvironmental note
Batteries contain dangerous
substances. It is against the
law to dispose of the mwith
the household rubbish. They
must be collected separately and recycled to protect the
environment.
Dispose of batteries in an
environmentally friendly
manner. Take discharged
batteries to aqualified spe-
cialist workshop or aspecial
collection point for used bat-
teries.
Observe the followingn otes:
RRecharge the battery more frequently, if you:
-predominantly drive shortd istances
-predominantly drive at low outside temper-
atures
-leave the vehicle parked for alengthy
period
In order for the batteries to achiev etheir max-
imum possible service life, the ymust always
be sufficiently charged.
RConsult an authorized Mercedes-Ben zCom-
mercial Van Center if you wish to leave your
vehicle parked for along period of time.
RWhen you park the vehicle, remove the Smart-
Key if you do not require any electrical con-
sumers. The vehicle will the nuse very little
energy, thus conserving battery power.
RIf your vehicle requiresj ump-starting, or if you
wish to provide jump-startin gassistanc eto
another vehicle, only use the jump-starting
Battery249
Maintenance and care
Z
Page 252 of 310
.
RHave the battery removed ataquali fied spe-
cialist workshop.
Installationl ocations
You rvehicle may be equipped with three bat-
teries, depen")
connection point in the engine compartment
(Ypage 262).
RHave the battery removed ataquali fied spe-
cialist workshop.
Installationl ocations
You rvehicle may be equipped with three bat-
teries, depending on the equipment version:
RStarter battery in the seatb aseoft he right-
hand front seat
RAuxiliary battery in the seatb aseoft he right-
hand front seat
RAdditiona lbattery in the seatb aseoft he left-
hand front seat
Disconnecting and removing
GWARNING
During the charging process ,abattery produ-
ces hydrogen gas. If ashort circuit occurs or
sparks are created, the hydrogen gasc an
ignite. There is ariskofane xplosion.
RMake sure that the positive terminal of a
connected battery doe snot come into con-
tact with vehicle parts.
RNeve rplace metalo bjects or toolsonab at-
tery.
RIt is important that yo uobserve the descri-
bed order of the battery terminal swhen
connecting and disconnecting abattery.
RWhe njump-starting, make sure that the
battery poles with identica lpolarity are
connected.
RIt is particularly important to observe the
described order whe nconnecting and dis-
connecting the jumper cables.
RNeve rconnect or disconnect the battery
terminal swhile the engine is running.
GWARNING
Batter yacidisc austic. There is ariskofi njury.
Avoidc ontact with skin, eyes or clothing. Do
not inhale any battery gases .Donot lean over
the battery.K eepc hildre nawayfrom batter-
ies. Wash away battery aci dimmediatel ywith
plenty of clean water and seekm edicalatten-
tion.
!You shoul dhavea llwork involving the bat-
tery carrie doutataq uali fied specialist work-
shop.
If, in exceptiona lcircumstances, yo uneed to
disconnect the battery yourself, please make
sure that:
RSecure the vehicle to prevent it from rolling
away.
RYou have switched off the engine and
removed the key.M akes uret he ignition is
switched off. Check to see that there are no indicator lamps lighting in the instrument
cluster. Electronic components such as the
alternator may otherwise be damaged.
RAfter the battery hasb eend isconnected,
the parking brake is automatically
engaged .You can then no longer move the
vehicle.
RFor vehicle switha utomatic transmission,
the transmission is locke dinposition P
afte rdisconnecting the battery.Y ou can
then no longer move the vehicle.
RYou have firs tremoved the negative termi-
nal and then the positive terminal .Never
mix up the terminal clamp disconnection/
connection order and never mix up the ter-
mina lclamps. The vehicle's electronics
may otherwise be damaged.
The battery and the cover of the positive ter-
mina lclamp mus tbeinstalled securel yduring
operation.
Seatb ase( example: right-hand front seat)
The following description on disconnecting and
removing the battery is based upon the example
of the starter battery in the seatb aseoft he
driver' sseat. The additiona lbattery is discon-
nected and removed in the sam ewayas the
250Battery
Maintenancea nd care
Page 253 of 310

starter battery. The auxiliary battery is located in
the seat base of the left-hand front seat.
XSwitch off all electrical consumers.
XSwitch off the engine and remove the Smart-
Key from the ignition lock.
XOpen the front door on the right-hand side.
iTo disconnect or remove the additional bat-
tery, open the left-hand front door. The auxil-
iary battery is located in the seat base of the
left-hand front seat.
XPress both latching springs :down and
remove cover ;upwards from the seat base.
XRemove cover ;by pulling upwards at an
angle from the seat base.
Open seat base (example: right-hand front seat)
XRemove screws Afrom holder B.
XRemove holder B.
XRemove breather hose ?from the top of the
battery.
XPull the battery out of the seat base until the
negative clamp can be released and removed.
XDisconnect the negative clamp from negative
terminal =.
XRemove the negative clamp in such away that
the battery cable terminal no longer touches
negative terminal =.
Example: starter battery
XRemove the battery from the seat base and
place it on the door sill panel as shown. If
necessary, hold the battery by handles E.
XRemove the positive clamp cover from posi-
tive terminalC.
XLoosen positive clamp Don positive terminal
C.
XRemove positive clamp Din such away that
the battery cable terminal no longer touches
positive terminal C.
XLift the battery from the door sill panel by
handlesE.
Reconnecting and installing
GWARNING
During the charging process, abattery produ-
ces hydrogen gas. If ashort circuit occurs or
sparks are created, the hydrogen gas can
ignite. There is arisk of an explosion.
RMake sure that the positive terminal of a
connected battery does not come into con-
tact with vehicle parts.
RNever place metal objects or tools on abat-
tery.
RIt is important that you observe the descri-
bed order of the battery terminals when
connecting and disconnecting abattery.
RWhen jump-starting, make sure that the
battery poles with identical polarity are
connected.
Battery251
Maintenance and care
Z
Page 254 of 310

RIt is particularly important to observe the
describedorder when connecting and dis-
connecting the jumper cables.
RNever connect or disconnect the battery
terminals whil ethe engine is running.
!Alway sconnect the battery in the order
describedb elow. Never mix up the terminal
clamp disconnection/connection order and
never mix up the terminal clamps. You may
otherwise damage the vehicle electronics.
Alway sobserve the prescribedp ositive ter-
minal installation positionw hen doing so.
Otherwise ,the positive clamp may come into
contact with vehicle parts. In this case there is
ar isk that the vehicle may short-circuit and
catch fire.
The following descriptiononc onnecting and
installing the battery is base dupon the example
of the starter battery in the seat base of the
right-hand front seat. The additional battery is
connected and installe dinthe same way as the
starter battery. The auxiliary battery is located in
the seat base of the left-hand front seat.
Example: starter battery
XPlace the battery on the door sill panel as
shown and secure with handles =if neces-
sary.
XConnect positive clamp ;to positive termi-
nal :.A lwaysobserve the positive terminal
installation positions hown when doing so.
The positive leadm ust be routed parallel to
the side of the battery housing in the connec-
tion area.
XPlace the positive clamp cover on positive
terminal :.
XFold both handles =down onto the battery.
XPush the battery into the seat base until the
negative terminal can be connected.
XConnect the negative clamp to negative ter-
minal ?.
XPush the battery into the seat base as far as it
wil lgo.
Open seat base with installe dbattery (example:
right-hand front seat)
XPush breather hose Aonto the battery con-
nection at the top.
XGuide holder Cover the lowers ide of the
battery housing and the threads for screws
B.
XScrew on holder Cwith screws B.
The battery is secured to prevent slipping.
Seat base (example: right-hand front seat)
XInsert cover Edown in front of the battery
compartment into the seat base and close it.
Latching springs Dof cover Eshould
engage audibly.
Carry out the following work after connecting
the battery:
XRese tthe side window (Ypage 81).
XRese tthe electric sliding doors (Ypage 77).
252Battery
Maintenancea nd care
Page 255 of 310

Charging
GWARNING
Ad ischarged battery can freezeatt empera-
tures below freezing point. When jump-start-
ing th evehicle or chargin gthe battery, gases
can escape from th ebattery. Thereisar isko f
an explosion.
Allow th efroze nbattery to thaw out before
chargin gitorjump-starting.
If th eindicator/warning lamps do no tlight up in
th ei nstrumen tcluste rwhen temperatures are
low, it is probably because th edischarged bat-
tery has frozen.S hould this be th ecase, do not
jump-star tthe vehicle or charge th ebattery. The
servic elife of athawed battery may be shorter.
Start-up behavior may deteriorate, in particular
at low temperatures. Hav ethe thawed battery
checked at aqualified specialist workshop.
GWARNING
During chargin gand jump-starting, explosive
gases can escape from th ebattery. Thereisa
ris kofane xplosion.
Particularly avoid fire, open flames, creating
sparks and smoking. Ensure there is sufficient
ventilatio nwhile chargin gand jump-starting.
Do no tlean ove rabattery.
GWARNING
Battery acid is caustic .Thereisar iskofi njury.
Avoid contac twiths kin, eyes or clothing .Do
no tinhale any battery gases.Don otlean over
th eb attery. Keep childre naway from batter-
ies. Wash away battery acid immediately with
plenty of clean wate rand seek medical atten-
tion.
!Only charge th einstalled battery withab at-
tery charge rtha th as been tested and
approved by Mercedes-Benz. This device
allows th ebattery to be charge dwhen it is
installed in th evehicle .The vehicle's elec-
tronics system may otherwise be damaged.
!Only charge th ebattery usingt hejump-
starting connection point.
Ab attery charge runit specially adapted for
Mercedes-Ben zvehicle sand tested and approved by Mercedes-Ben
zisavailable as an
accessory. Only this device permits th echarging
of th ebattery in its installed position. Contac tan
authorized Mercedes-Ben zCommercial Van
Cente rfor informatio nand availability. Read the
operatin ginstructionsf or your charge rbefore
chargin gthe battery.
Recharge th ebattery mor efrequently if you use
th ev ehicle mainly for short trips and/or driv eat
low outside temperatures.
Only charge th einstalled battery withab attery
charge rtha th as been tested and approved by
Mercedes-Benz, usingt hejum p-st
artc on
nec-
tio np ointint heenginec ompartment.
XConnect th ebattery charge rtothepositive
terminal and ground terminal in th esame
order as when connecting th edonor battery in
th ej ump-startin gprocedure (
Ypage 262).
iRecharge uninstalled, out of servic ebatter-
ies every 3month s.This will counter self-dis-
charging and prevent battery damage.
Care
!
Dirt ybattery clamps and battery surfaces
cause leak currentsw hich lead to the batter-
ies discharging.
!Do not use cleaning agents containing fuel.
Cleaning agents containing fuel corrode the
battery housing.
!If dirt gets into the battery cell, battery self-
discharge will increase and the battery may
be damaged.
The following points on battery care must be
observed:
XRegularly check the battery terminals and the
fastening of the negative cable to the chassis
to ensure that they are firmly seated.
XAlways keep the battery terminals and battery
surfaces clean and dry.
XLightly grease the undersides of the battery
terminals with acid-resistant grease.
XOnly clean the battery casing with acommer-
cially availablec leaning product.
Battery253
Maintenance and care
Z
Page 256 of 310

Care
Notes on care
GWARNING
If you use opening sinthebodywork or
detachable part sassteps, you could:
Rslip and/or fall
Rdamag ethe vehicle and caus eyourself to
fall.
Thereisar iskofi njury.
Always use secure climbinga ids, e.g.asuita-
ble ladder.
!Do no tuse th elower slidingd oor guide (car-
riage )asas tep. Otherwise, you coul ddamage
th ep anelinga nd/or theslidingd oor mecha-
nism.
!For cleanin gyour vehicle ,donotuse any of
th ef ollowing:
Rdry, roug horhard cloths
Rabrasive cleanin gagents
Rsolvents
Rcleanin gagents containing solvents
Do no tscrub.
Do no ttou ch th esurfaces or protective films
withh ard objects, e.g .aringori ce scraper.
You coul dotherwise scratch or damag ethe
surfaces and protective film.
!Do no tpark th evehicle for an extended
period straigh tafter cleanin git, particularly
after having cleane dthe wheelsw ithwheel
cleaner. Wheelc leaners couldcause
increased corrosion of th ebrak ediscsa nd
brak epads/linings. For this reason,y ou
should driv efor afew minute safter cleaning.
Brakin gheatst hebrak ediscsa nd thebrake
pads/linings, thus dryin gthem. The vehicle
can then be parked.
HEnvironmental note
Only clean your vehicle at specially designed
wash bays. Dispose of emptyc ontainers and
used cleanin gproduct sinane nvironmentally
responsible manner.
HEnvironmental note
Dispose of emptyp ackagingand cleaning
cloth sinane nvironmentall yresponsible man-
ner.
Regular car eofyour vehicle is acondition for
retaining th equalityint helongt erm.
Use car eproduct sand cleanin gagents recom-
mended and approved by Mercedes-Benz.
Washingt hevehicle and cleaning the
paintwork
Automatic car wash
GWARNING
Brakin gefficienc yisreduced after washing
th ev ehicle .Thereisar iskofana ccident.
Afte rthe vehicle has been washed, brake
carefull ywhile payinga ttentiontothetraffic
conditionsu ntil full braking power is restored.
!Makesure that th eautomatic car wash is
suitable for th esizeoft hevehicle.
Before washingt hevehicle in an automatic
car wash, fold in th eexteri or mirror sand
remove any additional antennas .Otherwise,
th ee xteri or mirror ,antenna or th evehicle
itself coul dbedamaged.
Makes ure that th eexteri or mirror sare fully
folded out again and that any additional
antennas are re-installed when you leave the
automatic car wash.
!Makes ure that:
Rthes ide windows and th eroofa re com-
pletely closed
Rth ec limate control blower is switched off
Rthew indshield wiper switch is at position 0
The vehicle coul dotherwise be damaged.
You can wash th evehicle in an automatic car
wash from th everys tart.
Wash off exces sdirt before cleanin gthe vehicle
in an automatic car wash.
Afte rputtin gthe vehicle throug hanautomatic
car wash, wipe off wax from:
Rth ew indshield
Rthew indshield wiper blades
254Care
Maintenance and care
 1
1 2
2 3
3 4
4 5
5 6
6 7
7 8
8 9
9 10
10 11
11 12
12 13
13 14
14 15
15 16
16 17
17 18
18 19
19 20
20 21
21 22
22 23
23 24
24 25
25 26
26 27
27 28
28 29
29 30
30 31
31 32
32 33
33 34
34 35
35 36
36 37
37 38
38 39
39 40
40 41
41 42
42 43
43 44
44 45
45 46
46 47
47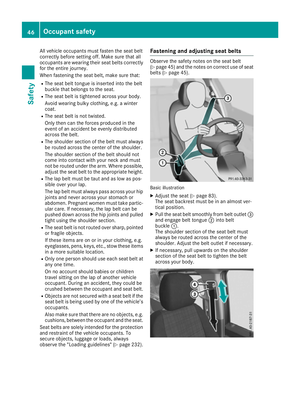 48
48 49
49 50
50 51
51 52
52 53
53 54
54 55
55 56
56 57
57 58
58 59
59 60
60 61
61 62
62 63
63 64
64 65
65 66
66 67
67 68
68 69
69 70
70 71
71 72
72 73
73 74
74 75
75 76
76 77
77 78
78 79
79 80
80 81
81 82
82 83
83 84
84 85
85 86
86 87
87 88
88 89
89 90
90 91
91 92
92 93
93 94
94 95
95 96
96 97
97 98
98 99
99 100
100 101
101 102
102 103
103 104
104 105
105 106
106 107
107 108
108 109
109 110
110 111
111 112
112 113
113 114
114 115
115 116
116 117
117 118
118 119
119 120
120 121
121 122
122 123
123 124
124 125
125 126
126 127
127 128
128 129
129 130
130 131
131 132
132 133
133 134
134 135
135 136
136 137
137 138
138 139
139 140
140 141
141 142
142 143
143 144
144 145
145 146
146 147
147 148
148 149
149 150
150 151
151 152
152 153
153 154
154 155
155 156
156 157
157 158
158 159
159 160
160 161
161 162
162 163
163 164
164 165
165 166
166 167
167 168
168 169
169 170
170 171
171 172
172 173
173 174
174 175
175 176
176 177
177 178
178 179
179 180
180 181
181 182
182 183
183 184
184 185
185 186
186 187
187 188
188 189
189 190
190 191
191 192
192 193
193 194
194 195
195 196
196 197
197 198
198 199
199 200
200 201
201 202
202 203
203 204
204 205
205 206
206 207
207 208
208 209
209 210
210 211
211 212
212 213
213 214
214 215
215 216
216 217
217 218
218 219
219 220
220 221
221 222
222 223
223 224
224 225
225 226
226 227
227 228
228 229
229 230
230 231
231 232
232 233
233 234
234 235
235 236
236 237
237 238
238 239
239 240
240 241
241 242
242 243
243 244
244 245
245 246
246 247
247 248
248 249
249 250
250 251
251 252
252 253
253 254
254 255
255 256
256 257
257 258
258 259
259 260
260 261
261 262
262 263
263 264
264 265
265 266
266 267
267 268
268 269
269 270
270 271
271 272
272 273
273 274
274 275
275 276
276 277
277 278
278 279
279 280
280 281
281 282
282 283
283 284
284 285
285 286
286 287
287 288
288 289
289 290
290 291
291 292
292 293
293 294
294 295
295 296
296 297
297 298
298 299
299 300
300 301
301 302
302 303
303 304
304 305
305 306
306 307
307 308
308 309
309