Page 169 of 310
.
The permissible Gross Combination Weight Rat-
ing is vehicle-specific and depends on the equip-
ment level.
When driving with atrailer, you should")
driver'sweight of approximately 150 lbs (68 kg).
The permissible Gross Combination Weight Rat-
ing is vehicle-specific and depends on the equip-
ment level.
When driving with atrailer, you should not
exceed the permitted Gross Combination
Weight Rating (GCWR).
The permissible values, which must not be
exceeded, can be found in your vehicle docu-
ment sand on the trailer tow hitc htype plates for
the trailer and the vehicle (
Ypage 294). The
basic values approved by the manufacturer can
also be found in the "Technical data" section
(
Ypage 305). If the values vary, the lowest
value always applies.
Loading atrailer
!Utiliz ethe maximum permissible nose-
weight as fully as possible. Do not allow the
weight to fall below the minimum permissible
noseweight ,otherwise the trailer may come
loose.
RThe load must be distributed over the vehicle
and the trailer so as not to exceed either the
maximum permissible values for the gross
vehicle weight ratin g(GVWR) and gross trailer
weight (GTW), the gross combination weight
ratin g(GCWR), nor the maximum permissible
gross axle weight ratin g(GAWR) and trailer
drawbar noseweight ratin gofyour vehicle.
RAdd the drawbar noseweight on the ball cou-
pling (TWR) to the rear axle load. This will pre-
vent you from exceeding the permissible
gross axle weight (GAWR).
RAdd the drawbar noseweight on the ball cou-
pling (TWR) to the vehicle payload. This will
ensure that you do not exceed the permissi-
ble gross vehicle weight ratin g(GVWR).
Checking the vehicle and trailer weight
RMake sure the weights of the towing vehicle
and the trailer comply with the maximum per-
missible values. Have the vehicle/trailer com-
bination weighed on acalibrated weigh-
bridge. The vehicle/trailer combination con-
sists of the towing vehicle includin gthe driver,
passenger sand load, as well as the loaded
trailer.
RCheck the maximum permissible gross axle
weight ratin gofthe fronta nd rear axles
(GAWR), the gross trailer weight (GTW), the gross combination weight ratin
g(GCWR) and
the noseweight of the trailer drawbar (TWR).
Trailer power supply
!
Incorrectw iring of the connector plug could,
under certain circumstances, cause malfunc-
tion sint he vehicle's other electronic sys-
tems .Wet herefore recommend having the
connector plug wired at aqualified specialist
workshop.
!You can connec taccessories with amaxi-
mum power consumption of 240 Wtothe
permanen tpower supply.
You must not charge atrailer battery using the
power supply.
Your vehicle may be equipped with various elec-
trical installations for trailer towing .Depending
on your trailer, you may need an adapter to con-
nec tthe electrical system of the trailer with that
of the vehicle.
The trailer socket of your vehicle is equipped at
the factory with apermanen tpower supply.
The permanen tpower supply is on the trailer
socket pin assignmen t4.
Note that the permanen tpower supply of the
trailer is not switched off when the on-board
voltage is low. This can completely discharge
the starter battery of your vehicle.
Further information on the electrical equipment currently installed on your vehicle and on instal-
ling trailer electrics can be obtained at any quali-
fied specialist workshop.
Towing atrailer167
Driving and parking
Z
Page 170 of 310

Useful information
This Operator's Manual describes all models as
well as standard and optional equipment of your
vehicle that were available at the time of going
to print.Country-specific variation sare possi-
ble. Note that your vehicle may not be equipped
with all of the described functions. This also
applies to system sand function srelevantt o
safety.
Read the information on qualified specialist
workshops (
Ypage 29).
Important safetyn otes
GWARNING
If you operate information system sand com-
munication equipment integrated in the vehi-
cle while driving, you will be distracted from
traffic conditions. You could also lose control
of the vehicle. There is arisk of an accident.
Only operate the equipment when the traffic
situatio npermits. If you are not sure that this
is possible, park the vehicle paying attention
to traffic condition sand operate the equip-
ment when the vehicle is stationary.
GWARNING
If you are drivinga nd reach through the steer-
ing wheel to operate the adjustment knob,
you could lose contro lofthe vehicle. There is
ar isk of an acciden tand injury.
Only operate the adjustment knobs when the vehicle is stationary. Do not reach through the
steering wheel when driving.
You must observet he legal requirements for the
country in which you are currently drivingw hen
operatin gthe on-board computer.
GWARNING
If the instrumentc luster has failed or mal-
functioned, you may not recogniz efunction
restrictions in system srelevanttos afety. The
operatin gsafetyofy our vehicle may be
impaired. There is arisk of an accident.
Driv eonc arefully. Have the vehicle checked
at aq ualified specialist workshop immedi-
ately.
The on-board computer display only shows mes-
sages and warnings from certain systems. You
should therefore make sure your vehicle is oper-
ating safely at all times .Ifthe operatin gsafetyo f
your vehicle is impaired, stop the vehicle as
soon as possible, paying attention to road and
traffic conditions. Then consult aqualified spe-
cialist workshop.
The accurac yofthe speedometer and odometer
displays is legally prescribed. Determining the
speed is dependen tonthe wheel size or the
rolling circumference of the wheels. If you
change the wheel size on your vehicle, make
sure it is assigned to the correct wheel size cat-
egory (
Ypage 267). If you change wheel size
category without recoding the contro lunit, the
speedometer indication will be inaccurate. Driv-
ing safetya nd drivings ystemsmay be impaired
or detec tamalfunction and shut down.
An overview of the instrumentc luster can be
found under "Instrumentc luster":
Rfor vehicles without steering wheel buttons
(Ypage 35)
Rfor vehicles with steering wheel buttons
(Ypage 37)
Display and operation
Instrument lighting
Brightness controlkno b( example: vehicle with
steering wheel buttons)
In daylight, the displays in the instrumentc luster
are illuminated. Adimmingf unction is not pos-
sible in daylight.
168Display and operation
On-boardc omputer and displays
Page 171 of 310

On vehicles with steering wheel buttons, the
light sensor in the instrument cluster automati-
cally controls the brightness of the displaylight-
ing.
While the lights are on, the brightness is depend-
ent upon the brightness of the ambient light.
You can also adjust the brightness of the instru-
ment lighting and the displayl ighting
Rby pressing thefand gbuttons on the
instrument cluster on vehicles without steer-
ing wheel buttons (not in the Settings
menu)
Rby turning control:on vehicles with steer-
ing wheel buttons.
Speedometer
If you change the wheel size on your vehicle,
make sure it is assigned to the correct wheel
size category (
Ypage 267). If you change wheel
size category without recoding the control unit,
the speedometer indication will be inaccurate.
The current vehicle speed may then be higher
than the speed displayed in the speedometer.
The speed can also be shown in the displayi n
the form of adigital speedometer:
Ron vehicles without steering wheel buttons
(Ypage 172)
Ron vehicles with steering wheel buttons
(Ypage 178)
iIn some countries, awarning sounds and/or
the displays howsamessage when the vehi-
cle reaches the maximum legally permissible
speed limit, e.g. at 75 mph (120 km/h).
Tachometer
!
Do not drive in the overrevving range, as this
could damage the engine.
HEnvironmental note
Avoid driving at high engine speeds. This
unnecessarily increases the fuel consumption
of your vehicle and harms the environment as
ar esult of increased emissions.
The red band in the tachometer indicates the
engine's overrevving range.
To protect the engine, the fuel supply is inter-
rupted when the red band is reached.
Outside temperatured isplay
You should pay special attention to road condi-
tions when temperatures are around freezing
point.
Please bear in mind that the outside tempera-
ture displayshows the air temperature meas-
ured and not the road temperature.
The displays hows the outside temperature in
the header:
Ron vehicles without steering-wheel buttons
(Ypage 170)
Ron vehicles with steering wheel buttons
(Ypage 176).
Changes in the outside temperature are dis-
played after ashort delay.
Coolant temperatureg auge
GWARNING
Opening the hood when the engine is over-
heated or when there is afire in the engine
compartment could expose you to hot gases
or other service products. There is arisk of
injury.
Let an overheated engine cool down before
opening the hood. If there is afire in the
engine compartment,k eep the hood closed
and contact the fire department.
On vehicles without steering wheel buttons, you
can have the coolant temperature shown in the
display(
Ypage 172).
On vehicles with steering wheel buttons, an ana-
log coolant temperature gage is located in the
tachometer in the instrument cluster
(
Ypage 37).
Under normal operating conditions and with the
specified coolant level, the gage may rise to
248 ‡(120† ).
Display and operation169
On-board computer and displays
Z
Page 172 of 310

Operating the on-board computer
Overview
:È and 3buttons
;Display
=f and gbuttons
XTo activate the on-board computer: turn
the key to positi")
On-boardcomputer (vehicles without
steering wheel buttons)
Operating the on-board computer
Overview
:È and 3buttons
;Display
=f and gbuttons
XTo activate the on-board computer: turn
the key to position 1in the ignition lock.
If you remove the key, then quickly re-insert it
and turn to position 1,the on-board computer
and instrument cluster are not activated.
You can control the display and the settings in
the on-board computer with buttons :and =
on the instrument cluster.
Buttons on the instrument cluster
GWARNING
If you are driving and reach through the steer- ing wheel to operate the adjustment knob,
you could lose control of the vehicle. There is
ar isk of an accidenta nd injury.
Only operate the adjustment knobs when the vehicle is stationary. Do not reach through the
steering wheel when driving.
ÈPress briefly:
RSelectst he menu or display
RIn theSettingsmenu: exits the
submenu without adopting the last
setting and return stothe menu's
start screen
ÈPress and hold:
RReturns to the standard display or the Distance menu without adopt-
ing the last setting
3Press briefly:
RSelectsas ubmenu or function
RConfirmsthe selected entry in the
list or the display, or confirms the
setting
3Press and hold:
RResets the trip odometer and trip
computer values
RIn the start screen of the Settingsmenu: resetssettings to the fac-
tory settings
RIn the Settingsmenu: resetsv al-
ues and return stothe menu's start
screen
f
gRSetst he instrument cluster light-
ing (not in the Settingsmenu)
RScrolls through lists
RChanges values or settings
Display
Instrument cluster display
:
Clock (Ypage 186)
V Cruise control (
Ypage 140)
;Permanen tdisplay: outside temperature or
speed (Ypage 174)
170On-boardc omputer (vehicles without steering wheel buttons)
On-boardcomputer and displays
Page 173 of 310
 max-
imum permissibles peed exceeded
=Display panel for displaym essages, menus
and menu bar
?Transmission position (Ypage 127)
AFuel level
Bè ECO start/stop func")
120km/h!(only for certain countries) max-
imum permissibles peed exceeded
=Display panel for displaym essages, menus
and menu bar
?Transmission position (Ypage 127)
AFuel level
Bè ECO start/stop function
(Ypage 122)
Cè Rear window wiper (Ypage 102)
Display panel =shows the selected menu or
submenu and displaym essages.
Menu overview
TheSettingsmenu is only displayed when the
vehicle is stationary. You can think of the order
of the menus and functions as acircle. Press È
on the instrument cluster to scroll through the
menus.
If you scroll forward in the Settings
menu using
3,t he setting from the previous submenu or
function is adopted.
If you press Èinas ubmenu, the submenu or
function is exited without adopting the setting.
The displayt hen shows the start screen of the
Settings
menu.
Operation information can be found under
"Operating the on-board computer"
(
Ypage 170).
Depending on the vehicle equipment, you can
call up the following menus, displays or func-
tions:
Rtrip odometer and odometer display
(Ypage 171)
Rtrip computer display(Ypage 171)
Rcurrent range display(Ypage 172)
Rcurrent fuel consumption display
(Ypage 172)
Rdigital speedometer (Ypage 172)
Rcoolant temperature gage (Ypage 172)
Rdisplaym essages in the message memory
(Ypage 188)
The following menus, displays and functions are only displayed when the vehicle is stationary:
Rnext service due date display(Ypage 248)
Rtire pressure monitor restart (Ypage 274)
RSettingsmenu for setting or activating/
deactivating driving and driving assistance systems as well as displayo
ptions
(
Ypage 173)
Distance menu
Odometer
If the displays hows the speed in the header, the
displayb eside trip odometer :also shows the
outside temperature.
You can switch the permanent displayint he
header (
Ypage 174).
Using the buttons in the instrument cluster
XTo display: press and hold Èuntil the dis-
play shows trip odometer :and odome-
ter ;.
XTo reset: press and hold 3until the trip
odometer is reset to 0.0
.
You can set the unit of measurement for the trip
odometer in the Distance Unit:
submenu
(Ypage 174).
Trip computer menu
Trip computer
:
Distance
;Length of journey
=Average fuel consumption
?Average speed
On-board computer (vehicles without steering wheelb uttons)171
On-board computer and displays
Z
Page 174 of 310

Use the buttons in the instrument cluster.
XTo display:pressÈto select the trip com-
puter display.
The valuesd isplayed relate to those meas-
ured since the trip computer was last reset.
XTo reset values: press and hold3until all
valuesa re reset.
The trip computer is automaticallyr eset if the
value exceeds 9,999 hours or 99,999 miles.
You can set the unit of measurement for con-
sumption and distance in the Distance Unit:
submenu (Ypage 174).
Range menu
Use the buttons in the instrument cluster.
XPressÈto select the Rangedisplay.
The approximate range that can be covered is calculated according to your current driving
style and the amount of fuel in the tank. If
there is only asmall amount of fuel left in the
fuel tank, the displays howsavehicle being
refueled Ïinstead of the approximate
range.
You can set the unit of measurement for dis-
tance in the Distance Unit:
submenu
(Ypage 174).
Current fuel consumption menu
Use the buttons in the instrument cluster.
XPress Èto select the fuel consumption bar
display.
The fuel consumption displayisb ased on the
current driving style.
You can set the unit of measurement for con-
sumption in the Distance Unit:
submenu
(Ypage 174).
Digital speedometer menu
Use the buttons in the instrument cluster.
XPress Èto select the speed display.
You can set the unit for the digital speedometer
in the Distance
Unit:submenu (Ypage 174).
Coolant temperaturem enu
GWARNING
Opening the hood when the engine is over-
heated or when there is afire in the engine
compartment could expose you to hot gases
or other service products. There is arisk of
injury.
Let an overheated engine cool down before
opening the hood. If there is afire in the
engine compartment,k eep the hood closed
and contact the fire department.
Use the buttons in the instrument cluster.
XPress Èto select the ?coolant temper-
ature bar display.
Under normal operating conditions and with the
specified coolant level, the gage may rise to
248 ‡(120 †).
172On-board computer (vehicles without steering wheelb uttons)
On-board computer and displays
Page 175 of 310

Settings menu
Introduction
Settings menu start screen
The vehicle must be stationary. Use the buttons
in the instrumentc luster.
XTo display:pressÈto select the Settingsmenu.
The Settings
menu is only displayed when the
vehicle is stationary. You can think of the order
of the submenus and functions as acircle. Press
3 on the instrumentc luster to scroll through
the menu, startin gwith its start screen and
select its submenus or functions successively.
If you scroll forward using 3,the settingf rom
the previous submenu or function is adopted.
If you press Èinas ubmenu, the submenu or
function is exited without adopting the setting.
The display then shows the start screen of the
Settings
menu.
Depending on the vehicle’s equipment, you have the following options in the Settings
menu:
RSetting the language for the display messages
and displays(Ypage 173)
RDeactivating and activating ESP®
(Ypage 173)
RSetting the sensitivity of the rain sensor
(Ypage 174)
RActivating and deactivating ATTENTION
ASSIST (Ypage 174)
RSelectingthe permanent display in the header
of the display (Ypage 174)
RSetting the unit for distance, consumption
and speed displays(Ypage 174)
RSetting the time and date (Ypage 175).
XTo reset settings to the factory settings:
turn the key to position 1in the ignition lock
and press and hold 3in the Settings
menu
for at least five seconds.
For safety reasons, not all functions are reset.
Setting the display language
The vehicle must be stationary. Use the buttons
in the instrumentc luster.
XPressÈto select the Settingsmenu.
XPress3to select the Languagesubmenu.
The display shows the current language selec- tion.
XPress forg to set the language for all dis-
play messages.
XPress 3to confirm.
The next submenu is shown in the display.
Deactivating/activating ESP®
This menu is only available on vehicles without
the å button on the center console.
Please observe the important safety notes
under "ESP
®(Electronic Stability Program)"
(Ypage 64).
GWARNING
If you deactivate ESP
®,E SP®no longer sta-
bilizes the vehicle. There is an increased risk
of skidding and an accident.
Only deactivate ESP
®in the situations descri-
bed in the following.
It may be best to deactivate ESP
®in the follow-
ing situations:
Rwhen using snow chains
Rin deep snow
Ron sand or gravel
Further information can be found under "ESP®
(Electronic Stability Program)" (Ypage 64).
The vehicle must be stationary and the engine
must be running. Use the buttons in the instru-
ment cluster.
XPress Èto select the Settingsmenu.
XPress3to select the ESPsubmenu.
The display shows the current status.
If the display shows the Oper.
OnlyPoss.WithEngineOnmessage, confirm the mes-
sage with 3and start the engine. The display
then shows the ESP
submenu and the ESP®
status.
If theESP
Inoperativemessage is shown in
the display,E SP is not available due to amal-
function and is deactivated. If you confirm the
On-board computer (vehicles without steering wheel buttons)173
On-board computer and displays
Z
Page 176 of 310

message with3,the display shows the next
submenu.
XPress forg to activate or deactivate ESP.
XPress 3to confirm.
The next submenu is shown in the display.
If the å warning lamp in the instrument
cluster lights up when the vehicleisr eadyto
drive, ESP
®is deactivated.
Observe the informatio nonwarning lamps
(
Ypage 221) and display messages
(Ypage 193).
Setting the sensitivity of the rain sensor
The vehiclem ust be stationary .Use the buttons
in the instrument cluster.
XPress Èto select the Settingsmenu.
XPress3to select the Rain Sensorsub-
menu.
The display shows the current sensitivity set-
ting.
XPress forg to select the Low,Standardor
Sensitivesetting. This setting controls the
rain sensor's sensitivity to precipitation. The
windshieldw iper willthen wip emore or less
frequently at the same precipitation intensity.
XPress 3to confirm.
The next submenu is shown in the display.
You can find further informatio nunder "Wind-
shiel dwiper" (
Ypage 101).
Activating/deactivatin gATTENTION
ASSIST
The vehiclem ust be stationary .Use the buttons
in the instrument cluster.
XPress Èto select the Settingsmenu.
XPress3to select the Attention Assistsubmenu.
The display shows the current status.
If theAttention Assist Inoperative
message is shown in the display ,ATTENTION
ASSIST is not available due to amalfunction
and is deactivated. If you confirm the mes-
sage with 3,the display shows the next sub-
menu.
XPress forg to activate or deactivate
ATTENTION ASSIST.
XPress 3to confirm.
The next submenu is shown in the display. Further informatio
ncan be found under "ATTEN-
TION ASSIST" (
Ypage 149).
Selecting the permanent display func-
tion
With the Permanent Display:function, you
can switch the display in the header between
outsid etemperature and speed.
If the display shows the speed in the header, the
outsid etemperature is shown with the odome-
ters (
Ypage 171).
The additional speedometer unit in the header is
alway sinverse to the speedometer unit.
The vehiclem ust be stationary .Use the buttons
in the instrument cluster.
XUsing Èselect the Settingsmenu.
XUsing3select the Permanent Display:submenu.
The display indicates the selected setting of
Outside Temp.
orSpeedometer.
XChange the setting by pressing forg.
XPress 3to confirm.
The next submenu is shown in the display.
Selecting the unit for the distance
In the Distance Unit:submenu, you can
select whether the display shows certain infor-
mation in kilometers or miles.
The vehiclem ust be stationary .Use the buttons
in the instrument cluster.
XPress Èto select the Settingsmenu.
XPress3to select the Distance Unit:sub-
menu.
The display indicates the selected setting of
km
or Miles.
XChange the setting by pressing forg.
XPress 3to confirm.
The display shows the next submenu or the
Settings
menu again.
The selected distance units are used for the dis- plays:
RDigital speedometer
ROdometer and trip odometer
RTrip computer
RRange
RCurrent consumption
RCruise control
RService intervals
174On-board computer (vehicles without steerin gwheel buttons)
On-board computer and displays
 1
1 2
2 3
3 4
4 5
5 6
6 7
7 8
8 9
9 10
10 11
11 12
12 13
13 14
14 15
15 16
16 17
17 18
18 19
19 20
20 21
21 22
22 23
23 24
24 25
25 26
26 27
27 28
28 29
29 30
30 31
31 32
32 33
33 34
34 35
35 36
36 37
37 38
38 39
39 40
40 41
41 42
42 43
43 44
44 45
45 46
46 47
47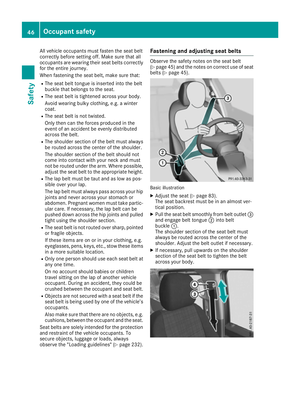 48
48 49
49 50
50 51
51 52
52 53
53 54
54 55
55 56
56 57
57 58
58 59
59 60
60 61
61 62
62 63
63 64
64 65
65 66
66 67
67 68
68 69
69 70
70 71
71 72
72 73
73 74
74 75
75 76
76 77
77 78
78 79
79 80
80 81
81 82
82 83
83 84
84 85
85 86
86 87
87 88
88 89
89 90
90 91
91 92
92 93
93 94
94 95
95 96
96 97
97 98
98 99
99 100
100 101
101 102
102 103
103 104
104 105
105 106
106 107
107 108
108 109
109 110
110 111
111 112
112 113
113 114
114 115
115 116
116 117
117 118
118 119
119 120
120 121
121 122
122 123
123 124
124 125
125 126
126 127
127 128
128 129
129 130
130 131
131 132
132 133
133 134
134 135
135 136
136 137
137 138
138 139
139 140
140 141
141 142
142 143
143 144
144 145
145 146
146 147
147 148
148 149
149 150
150 151
151 152
152 153
153 154
154 155
155 156
156 157
157 158
158 159
159 160
160 161
161 162
162 163
163 164
164 165
165 166
166 167
167 168
168 169
169 170
170 171
171 172
172 173
173 174
174 175
175 176
176 177
177 178
178 179
179 180
180 181
181 182
182 183
183 184
184 185
185 186
186 187
187 188
188 189
189 190
190 191
191 192
192 193
193 194
194 195
195 196
196 197
197 198
198 199
199 200
200 201
201 202
202 203
203 204
204 205
205 206
206 207
207 208
208 209
209 210
210 211
211 212
212 213
213 214
214 215
215 216
216 217
217 218
218 219
219 220
220 221
221 222
222 223
223 224
224 225
225 226
226 227
227 228
228 229
229 230
230 231
231 232
232 233
233 234
234 235
235 236
236 237
237 238
238 239
239 240
240 241
241 242
242 243
243 244
244 245
245 246
246 247
247 248
248 249
249 250
250 251
251 252
252 253
253 254
254 255
255 256
256 257
257 258
258 259
259 260
260 261
261 262
262 263
263 264
264 265
265 266
266 267
267 268
268 269
269 270
270 271
271 272
272 273
273 274
274 275
275 276
276 277
277 278
278 279
279 280
280 281
281 282
282 283
283 284
284 285
285 286
286 287
287 288
288 289
289 290
290 291
291 292
292 293
293 294
294 295
295 296
296 297
297 298
298 299
299 300
300 301
301 302
302 303
303 304
304 305
305 306
306 307
307 308
308 309
309