2016 MERCEDES-BENZ GLS SUV brake
[x] Cancel search: brakePage 178 of 397
Brake pads/linings and discs that are either new
or have been replaced only achieve optimum
braking effect after several hundred kilometres
of driving. Compensate for the reduced braking
effect by applying greater force to the brake
pedal. Always be aware of this and adapt your
driving and braking accordingly during the run-
ning-in period.
Excessive heavy braking results in correspond-
ingly high brake wear. Observe the #brake
wear warning lamp in the instrument cluster and
note any brake status messages in the multi-
function display. If you regularly drive at high
speeds, it is particularly important to have the
brake system checked and maintained regu-
larly. Driving on wet roads
Aquaplaning If water has accumulated to a certain depth on
the road surface, there is a danger of aquaplan-
ing occurring, even if:
R you are driving at low speeds
R the tyres have adequate tread depth
For this reason, drive in the following manner in
the event of heavy rain or in conditions in which aquaplaning can occur:
R lower your speed
R avoid tyre ruts
R avoid sudden steering movements
R brake carefully
Driving on flooded roads !
Bear in mind that vehicles travelling in front
or in the opposite direction create waves. This may cause the maximum permissible water
depth to be exceeded.
These notes must be observed under all cir-
cumstances. You could otherwise damage
the engine, the electronics or the transmis-
sion.
If you must drive on stretches of road on which
water has collected, please bear in mind that:
R in the case of standing water, the water level
must be no higher than the lower edge of the vehicle body
R you should drive no faster than walking pace Off-road fording !
Under no circumstances should you accel-
erate before entering the water. The bow
wave could cause water to enter and damage
the engine and neighbouring assemblies.
! Do not open any of the vehicle's doors while
fording. Otherwise, water could get into the
vehicle interior and damage the vehicle's
electronics and interior equipment.
R Establish how deep the water is and the char-
acteristics of the body of water before ford-
ing.
R Select the highest possible vehicle level.
R Shift to a lower gear using the left-hand steer-
ing wheel gearshift paddle.
R Avoid high engine speeds.
R Enter and exit the water at a flat place and at
a steady walking pace.
R Drive slowly and at a constant speed through
the water.
R Ensure that a bow wave does not form as you
drive.
R Do not stop and do not switch off the engine.
Water offers a high degree of resistance, the
ground is slippery and, in some cases, unsta- ble. Therefore, it is difficult and dangerous to
pull away in the water.
R Clean any mud from the tyre tread after ford-
ing.
R Apply the brakes to dry them after fording.
Always observe the fording depth values
(Y page 388). Winter driving
G
WARNING
If you shift down on a slippery road surface in an attempt to increase the engine's braking
effect, the drive wheels could lose their grip.
This increases the risk of skidding and having
an accident.
Do not shift down for additional engine brak-
ing on a slippery road surface. G
DANGER
If the exhaust pipe is blocked or adequate
ventilation is not possible, poisonous gases Driving tips
175Driving and parking
Z
Page 180 of 397
twigs can gather between the underbody and
the underbody panelling. If these materials
come in contact with hot parts of the exhaust
system, they can catch fire.
In such situations, have the vehicle checked
and repaired immediately at a qualified spe-
cialist workshop. If on continuing your jour-
ney you notice that driving safety is impaired, pull over and stop the vehicle immediately,
paying attention to road and traffic condi-
tions. In such cases, consult a qualified spe-
cialist workshop.
When driving off-road, substances such as sand,
mud and water or water mixed with oil may get
into the brakes. This may lead to a reduction in
braking performance or total brake failure as a
result of increased wear. The braking charac-
teristics will vary depending on the substances
that get into the brakes. Clean the brakes after
driving off-road. If you notice grinding noises or a reduction in braking performance, have the
brake system checked at a qualified specialist
workshop immediately. Adapt your driving style
to the altered braking characteristics.
Driving off-road increases the possibility of dam- age to the vehicle, which may cause assemblies
or systems to fail. Adapt your driving style to the conditions of the terrain. Drive carefully. Have
vehicle damage rectified immediately at a quali-
fied specialist workshop.
Do not shift into transmission position Nwhen
driving off-road. You could lose control of the
vehicle if you attempt to brake the vehicle using
the service brake. If the gradient is too steep for your vehicle, back up in reverse gear.
General notes H
Environmental note
Protection of the environment is of primary
importance. Treat nature with respect.
Observe all prohibiting signs.
Read this section before driving your vehicle off- road. Practise by driving over more gentle off-
road terrain first. The following driving systems are specially
adapted to off-road driving:
R the Offroad drive program (vehicles without
Off-Road Engineering package)
(Y page 228)
R Offroad andOffroad Plus drive programs
(vehicles with Off-Road Engineering package) (Y page 229)
R LOW RANGE offroad gear (vehicles with the
Off-Road Engineering package)
(Y page 230)
R Differential lock (vehicles with the Off-Road
Engineering package) (Y page 230)
R Off-road ABS (Y page 69)
R Off-road 4ETS (Y page 72)
R Off-road ESP ®
(Y page 74)
R AIRMATIC package (vehicle level)
(Y page 196)
R DSR (Downhill Speed Regulation)
(Y page 227)
Observe the following notes:
R Stop the vehicle before driving off-road. If
necessary, select the offroad program
(Y page 229) or shift to the LOW RANGE off-
road gear (Y page 230).
R Select a vehicle level suitable for the off-road
terrain. To avoid damaging the vehicle, ensure
sufficient ground clearance at all times.
R Make sure that items of luggage and loads are
stowed safely and are well secured
(Y page 316).
R Always keep the engine running and in gear
when driving on a downhill gradient. Activate
DSR (Y page 227).
R Drive slowly and evenly, if necessary at walk-
ing pace.
R Ensure that the wheels are in contact with the
ground at all times.
R Drive with extreme care on unknown off-road
routes where visibility is poor. For safety rea-
sons, get out of the vehicle first and survey
the off-road route.
R Look out for obstacles such as rocks, holes,
tree stumps and furrows.
R Take care when turning on an uphill or down-
hill slope or when driving across a slope. The
vehicle could otherwise tip over.
R Always keep the doors, the tailgate and the
sliding sunroof closed while the vehicle is in
motion. Driving
tips
177Driving an d parking Z
Page 181 of 397
R
Do not stray from marked routes or paths.
R Observe the notes on off-road fording
(Y page 175).
i Information about retrofitting special all-ter-
rain tyres is available from any qualified spe-
cialist workshop.
i Do not use the HOLD function when driving
off-road, on steep uphill or downhill gradients or on slippery or loose surfaces. The HOLD
function cannot hold the vehicle on such sur- faces.
Checklist before off-road driving X
Engine oil level: check the engine oil and top
it up if necessary.
When driving on steep gradients, the oil level must be sufficiently high to ensure a correct
oil supply in the vehicle.
X AdBlue ®
tank (BlueTEC vehicles): check the
level and top up if necessary (Y page 166).
X Tyre-change tool kit: check that the jack is
working and make sure that the wheel
wrench, a robust tow cable and a folding
spade are in the vehicle.
X Wheels and tyres: check the tyre tread
depth and tyre pressure.
X Check for damage and remove any foreign
objects, e.g. small stones, from the wheels/
tyres.
X Replace any missing valve caps.
X Replace dented or damaged wheels.
X Wheels: dented or bent wheels can lead to a
loss of tyre pressure and damage to the tyre
bead. Before driving off-road, check the
wheels and replace them if necessary.
Checklist after off-road driving !
If you detect damage to the vehicle after
driving off-road, have the vehicle checked
immediately at a qualified specialist work-
shop.
Driving over rough terrain places greater
demands on your vehicle than driving on normal
roads. After driving off-road, check the vehicle.
This allows you to detect damage promptly and reduce the risk of an accident to yourself and
other road users.
X If the Off-road orOff-road Plus drive pro-
gram is selected: select the Individual,Sport,
Comfort orSlippery drive program
(Y page 155).
X Deactivate the LOW RANGE offroad gear
(Y page 230).
X Deactivate DSR (Y page 227).
X Lower the vehicle level again to a level suita-
ble to the road conditions, e.g. to the normal
level.
X Clean the headlamps and rear lights and
check for damage.
X Clean the front and rear licence plates.
X Clean the wheels and tyres with a water jet
and remove any foreign objects.
X Clean the wheels, wheel arches and the vehi-
cle underside with a water jet; check for any
foreign objects and damage.
X Check whether twigs or other parts of plants
have become trapped. These increase the risk
of fire and can damage fuel pipes, brake
hoses or the rubber bellows of the axle joints
and propeller shafts.
X After the trip, examine without fail the entire
undercarriage, wheels, tyres, brakes, body-
work structure, steering, chassis and exhaust
system for damage.
X After driving for extended periods across
sand, mud, gravel, water or in similarly dirty
conditions, have the brake discs, wheels,
brake pads/linings and axle joints checked
and cleaned.
X If you detect strong vibrations after driving
off-road, check for foreign objects in the
wheels and drive train and remove them if
necessary. Foreign objects can disturb the
balance and cause vibrations.
Driving on sand Observe the following rules when driving on
sand:
R Select the Offroaddrive program (vehicles
without Off-Road Engineering package)
(Y page 228).
R Select the Offroaddrive program (vehicles
with Off-Road Engineering package)
(Y page 229).
R Select a higher vehicle level.
R Avoid high engine speeds.
R Use the left-hand steering wheel gearshift
paddle to shift to a lower gear appropriate to
the terrain. 178
Driving
tipsDriving an d parking
Page 183 of 397
Hill start assist will aid you when pulling away on
a hill. Further information on hill start assist
(Y page 151).
Do not shift into transmission position Nwhen
driving off-road. You could lose control of the
vehicle if you attempt to brake the vehicle using
the service brake. If the gradient is too steep for
your vehicle, back up in reverse gear.
Always observe the approach/departure angle
values (Y page 389).
Maximum gradient-climbing capability Always observe the maximum gradient climbing
ability values (Y page 389).
Hilltops When driving up an uphill gradient, slightly
reduce pressure on the accelerator immediately
before reaching the brow of the hill. Make use of the vehicle's own impetus to travel over the
brow.
This style of driving prevents:
R the vehicle from lifting off the ground on the
brow of a hill
R the vehicle from travelling too quickly down
the other side
Driving downhill R
Drive slowly.
R Do not drive at an angle down steep inclines.
Steer into the line of fall and drive with the
front wheels aligned straight. Otherwise, the
vehicle could slip sideways, tip and overturn.
R Before tackling steep downhill gradients, use
the left-hand steering wheel gearshift paddle
to shift to a lower gear.
R Activate DSR. If this is not sufficient, brake
gently. When doing so, make sure that the
vehicle is facing in the direction of the line of fall.
R Check that the brakes are working normally
after a long downhill stretch.
i Off-road ABS is activated when the off-road
program is selected.
At speeds below 30 km/h the front wheels
lock cyclically during braking. The digging-in
effect achieved in the process reduces the
stopping distance when driving off-road. The steerability of the vehicle is considerably
reduced if the wheels lock. Driving systems
Intelligent Drive
Mercedes-Benz Intelligent Drive stands for inno- vative driver assistance and safety systems
which enhance comfort and support the driver in
critical situations. With these intelligent co-ordi- nated systems Mercedes-Benz has set a mile-
stone on the path towards autonomous driving.
Mercedes-Benz Intelligent Drive embraces all
elements of active and passive safety in one well thought-out system – for the safety of the vehi-
cle occupants and that of other road users.
Further information on driving safety systems
(Y page 68). Cruise control
General notes Cruise control maintains a constant road speed
for you. It brakes automatically in order to avoid
exceeding the set speed. You must select a
lower gear in good time on long and steep down-
hill gradients, especially if the vehicle is laden or towing a trailer. By doing so, you will make use of
the braking effect of the engine. This relieves the load on the brake system and prevents the
brakes from overheating and wearing too
quickly.
Use cruise control only if road and traffic con-
ditions are appropriate for maintaining a steady
speed for a prolonged period. You can store any road speed above 30 km/h.
Important safety notes If you fail to adapt your driving style, cruise con-
trol can neither reduce the risk of an accident
nor override the laws of physics. Cruise control
cannot take into account road, weather or traffic
conditions. Cruise control is only an aid. You are
responsible for the distance to the vehicle in
front, for vehicle speed, for braking in good time and for staying in lane. 180
Driving systemsDriving and parking
Page 184 of 397
Do not use cruise control:
R in road and traffic conditions which do not
allow you to maintain a constant speed, e.g. in
heavy traffic or on winding roads
R on smooth or slippery roads. Braking or accel-
erating can cause the drive wheels to lose
traction and the vehicle could then skid
R when there is poor visibility, e.g. due to fog,
heavy rain or snow
If there is a change of drivers, advise the new
driver of the speed stored.
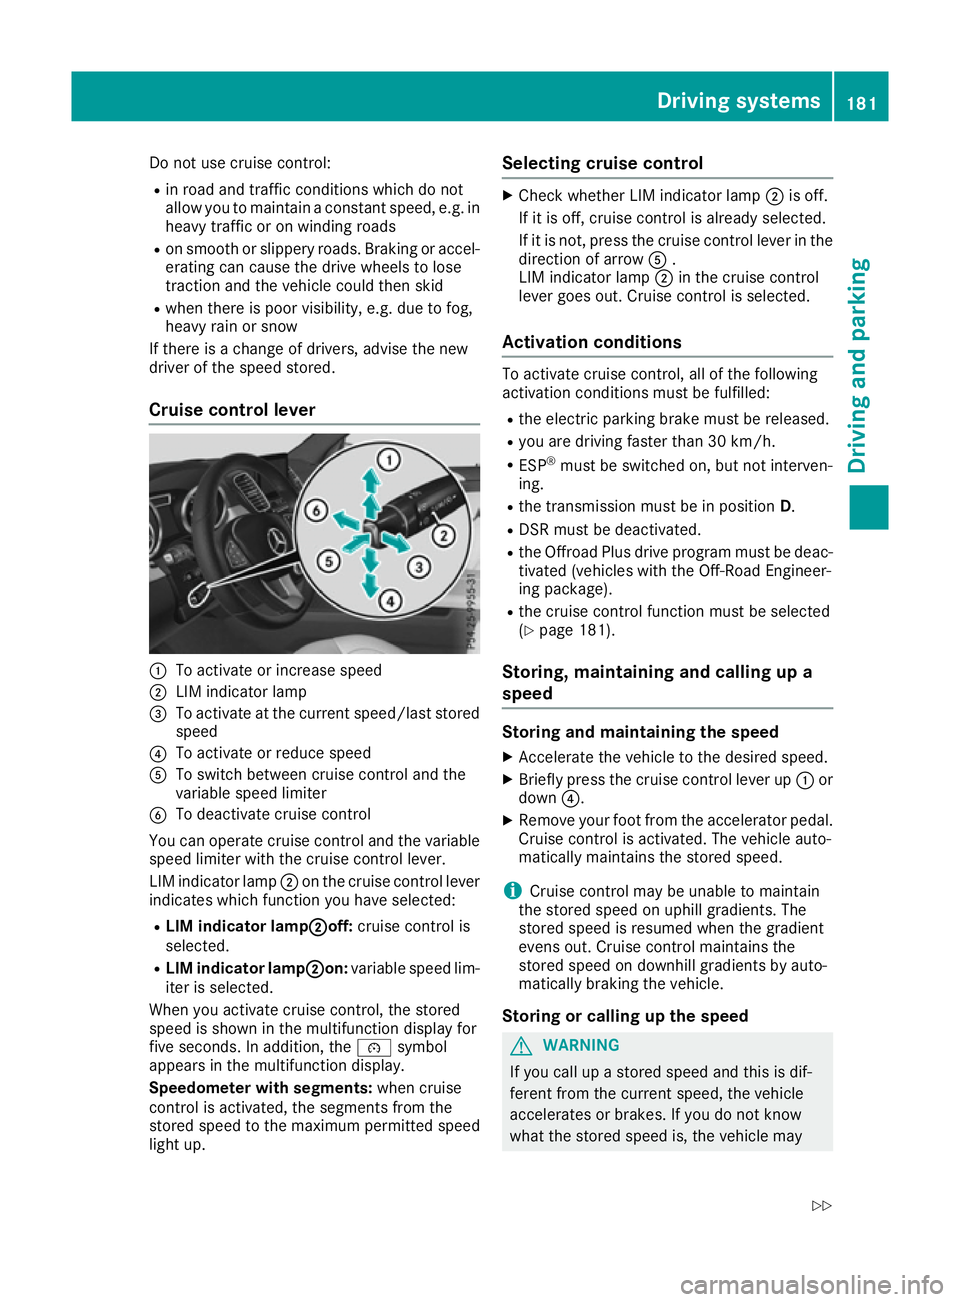
Cruise control lever :
To activate or increase speed
; LIM indicator lamp
= To activate at the current speed/last stored
speed
? To activate or reduce speed
A To switch between cruise control and the
variable speed limiter
B To deactivate cruise control
You can operate cruise control and the variable
speed limiter with the cruise control lever.
LIM indicator lamp ;on the cruise control lever
indicates which function you have selected:
R LIM indicator lamp; ;off:cruise control is
selected.
R LIM indicator lamp ;
;on: variable speed lim-
iter is selected.
When you activate cruise control, the stored
speed is shown in the multifunction display for
five seconds. In addition, the ésymbol
appears in the multifunction display.
Speedometer with segments: when cruise
control is activated, the segments from the
stored speed to the maximum permitted speed
light up. Selecting cruise control X
Check whether LIM indicator lamp ;is off.
If it is off, cruise control is already selected.
If it is not, press the cruise control lever in the direction of arrow A.
LIM indicator lamp ;in the cruise control
lever goes out. Cruise control is selected.
Activation conditions To activate cruise control, all of the following
activation conditions must be fulfilled:
R the electric parking brake must be released.
R you are driving faster than 30 km/h.
R ESP ®
must be switched on, but not interven-
ing.
R the transmission must be in position D.
R DSR must be deactivated.
R the Offroad Plus drive program must be deac-
tivated (vehicles with the Off-Road Engineer-
ing package).
R the cruise control function must be selected
(Y page 181).
Storing, maintaining and calling up a
speed Storing and maintaining the speed
X Accelerate the vehicle to the desired speed.
X Briefly press the cruise control lever up :or
down ?.
X Remove your foot from the accelerator pedal.
Cruise control is activated. The vehicle auto-
matically maintains the stored speed.
i Cruise control may be unable to maintain
the stored speed on uphill gradients. The
stored speed is resumed when the gradient
evens out. Cruise control maintains the
stored speed on downhill gradients by auto-
matically braking the vehicle.
Storing or calling up the speed G
WARNING
If you call up a stored speed and this is dif-
ferent from the current speed, the vehicle
accelerates or brakes. If you do not know
what the stored speed is, the vehicle may Driving systems
181Driving and parking
Z
Page 185 of 397
accelerate or brake unexpectedly. There is a
risk of an accident.
Take the traffic conditions into account
before calling up the stored speed. If you do
not know what the stored speed is, store the
desired speed again.
X Briefly pull the cruise control lever towards
you =.
X Remove your foot from the accelerator pedal.
Cruise control is on and, when activated for
the first time, accepts the current speed or it
adjusts the vehicle's speed to the speed
stored.
Setting a speed Bear in mind that it may take a brief moment
until the vehicle has accelerated or braked to
the set speed.
X Press the cruise control lever up :for a
higher speed or down ?for a lower speed.
X Keep the cruise control lever pressed until the
desired speed is reached.
X Release the cruise control lever.
The new speed is stored.
X To adjust the set speed in1 km/hincre-
ments: briefly press the cruise control lever
up : or down ?to the pressure point.
The last stored speed increases or decreases
in 1 km/h increments.
X To adjust the set speed in10 km/hincre-
ments: briefly press the cruise control lever
up : or down ?beyond the pressure point.
The last stored speed increases or decreases
in 10 km/h increments.
i Cruise control is not deactivated if you
depress the accelerator pedal. For example, if
you accelerate briefly to overtake, cruise con-
trol adjusts the vehicle's speed to the speed
stored after you have finished overtaking.
Deactivating cruise control There are several ways to deactivate cruise con-
trol:
X Briefly press the cruise control lever forwards
=.
or
X Brake. or
X Briefly press the cruise control lever in the
direction of arrow ;.
The variable speed limiter is selected. LIM
indicator lamp :in the cruise control lever is
on.
Cruise control is automatically deactivated if: R you apply the electric parking brake
R you are driving at less than 30 km/h
R ESP ®
engages or you deactivate ESP ®
R you activate DSR
R you activate the Offroad Plus program (vehi-
cles with the Off-Road Engineering package)
R you shift the transmission to position Nwhile
driving
If cruise control is deactivated, you will hear a
warning tone. You will see the Cruise con‐
Cruise con‐
trol off trol off message in the multifunction display
for approximately five seconds.
i The last speed stored is cleared when you
switch off the engine. Speed limiter
General notes The speed limiter brakes automatically so that
you do not exceed the set speed. You must
select a lower gear in good time on long and
steep downhill gradients, especially if the vehi-
cle is laden or towing a trailer. By doing so, you
will make use of the braking effect of the engine. This relieves the load on the brake system and
prevents the brakes from overheating and wear-ing too quickly.
You can set a variable or permanent limit speed:
R variable for speed limits, e.g. in built-up areas
R permanent for long-term speed restrictions,
e.g. when driving with winter tyres fitted
(Y page 184)
i The speed indicated in the speedometer
may differ slightly from the limit speed stored.
Important safety notes If you fail to adapt your driving style, the speed
limiter can neither reduce the risk of an accident
nor override the laws of physics. The speed lim-
iter cannot take into account road, weather or
traffic conditions. The speed limiter is only an 182
Driving systemsDriving and parking
Page 187 of 397
up
: to the pressure point for a higher speed
or down ?for a lower speed.
or
X Keep the cruise control lever pressed to the
pressure point until the desired speed is set.
Press the cruise control lever up :for a
higher speed or down ?for a lower speed.
Switching the speed limiter to passive
If you depress the accelerator pedal beyond the pressure point (kickdown), the speed limiter is
switched to passive mode. The Limiter pas‐
Limiter pas‐
sive sive message appears in the multifunction dis-
play.
You can then exceed the stored speed. The
speed limiter is activated again if you:
R drive slower than the stored speed without
kickdown
R set a new speed or
R call up the last speed stored again
The Limiter passive
Limiter passive message in the multi-
function display disappears.
Switching off the variable speed limiter There are several ways to deactivate the varia-
ble speed limiter:
X Briefly press the cruise control lever forwards
B.
or X Briefly move the cruise control lever in the
direction of arrow A.
LIM indicator lamp ;in the cruise control
lever goes out. The variable speed limiter is
switched off.
Cruise control or Distance Pilot DISTRONIC is selected.
You cannot switch the variable speed limiter off
by braking.
i The last speed stored is cleared when you
switch off the engine.
Permanent limiter
You can use the on-board computer to perma-
nently limit the speed to a value between
160 km/h(e.g. for driving on winter tyres) and
the maximum design speed (Y page 252).
Shortly before the stored speed is reached, it
appears in the multifunction display.
The permanent speed limiter remains active
even if the variable speed limiter is deactivated. You cannot exceed the stored limit speed, even
if you depress the accelerator pedal beyond the
pressure point (kickdown). Distance Pilot DISTRONIC
General notes Distance Pilot DISTRONIC regulates the speed
and automatically helps you maintain the dis-
tance to the vehicle detected in front. Vehicles
are detected with the aid of the radar sensor
system. Distance Pilot DISTRONIC brakes auto-
matically so that the set speed is not exceeded.
You must select a lower gear in good time on
long and steep downhill gradients, especially if
the vehicle is laden or towing a trailer. By doing
so, you will make use of the braking effect of the engine. This relieves the load on the brake sys-
tem and prevents the brakes from overheating
and wearing too quickly.
If Distance Pilot DISTRONIC detects that there is
a risk of a collision, you will be warned visually
and acoustically. Without your intervention, Dis- tance Pilot DISTRONIC cannot prevent a colli-
sion. An intermittent warning tone will then
sound and the distance warning lamp will light
up in the instrument cluster. Brake immediately to increase the distance to the vehicle in front,
or take evasive action, provided it is safe to do
so.
For Distance Pilot DISTRONIC to assist you
when driving, the radar sensor system must be
operational.
Distance Pilot DISTRONIC operates in the range
between 0 km/h and 200 km/h.
Do not use Distance Pilot DISTRONIC while driv- ing on roads with steep gradients.
Important safety notes G
WARNING
Distance Pilot DISTRONIC does not recognise
R people or animals
R stationary objects on the road, e.g. stopped
or parked vehicles
R oncoming vehicles or crossing traffic
As a result, Distance Pilot DISTRONIC may
neither give warnings nor intervene in such
situations. There is a risk of an accident. 184
Driving systemsDriving and pa
rking
Page 188 of 397
Always pay careful attention to the traffic sit-
uation and be ready to brake. G
WARNING
Distance Pilot DISTRONIC cannot always
clearly identify other road users and complex
traffic situations.
In such cases, Distance Pilot DISTRONIC may:
R give an unnecessary warning and then
brake the vehicle
R neither give a warning nor intervene
R accelerate or brake unexpectedly
There is a risk of an accident.
Continue to drive carefully and be ready to
brake, especially if Distance Pilot DISTRONIC
warns you. G
WARNING
Distance Pilot DISTRONIC brakes your vehicle with up to 50% of the maximum possible
deceleration. If this deceleration is not suffi-
cient, Distance Pilot DISTRONIC alerts you
with a visual and acoustic warning. There is a
risk of an accident.
Apply the brakes yourself in these situations
and try to take evasive action.
! When Distance Pilot DISTRONIC or the
HOLD function is activated, the vehicle
brakes automatically in certain situations.
To avoid damage to the vehicle, deactivate
DISTRONIC PLUS and the HOLD function in
the following or similar situations:
R when towing away
R in a car wash
If you fail to adapt your driving style, Distance
Pilot DISTRONIC can neither reduce the risk of
an accident nor override the laws of physics.
Distance Pilot DISTRONIC cannot take into
account road, weather or traffic conditions. Dis-
tance Pilot DISTRONIC is only an aid. You are
responsible for the distance to the vehicle in
front, for vehicle speed, for braking in good time
and for staying in lane. Do not use Distance Pilot DISTRONIC:
R in road and traffic conditions that do not allow
you to maintain a constant speed, e.g. in
heavy traffic or on winding roads.
R on smooth or slippery roads. Braking or accel-
erating can cause the drive wheels to lose
traction and the vehicle could then skid.
R in poor visibility, e.g. due to fog, heavy rain or
snow.
Distance Pilot DISTRONIC may not detect nar-
row vehicles driving in front, e.g. motorcycles, or
vehicles driving on a different line.
In particular, the detection of obstacles can be
impaired in the following situations:
R dirt on the sensors or obscured sensors
R snow or heavy rain
R interference by other radar sources
R the possibility of strong radar reflections, for
example, in multi-storey car parks
If Distance Pilot DISTRONIC no longer detects a vehicle in front, Distance Pilot DISTRONIC may
unexpectedly accelerate to the speed stored.
This speed can:
R be too high for a filter lane or a slip road
R be so high in the right lane that you pass vehi-
cles driving on the left
R be so high in the left lane that you pass vehi-
cles driving on the right
If a new driver takes over, advise the new driver
of the speed stored.
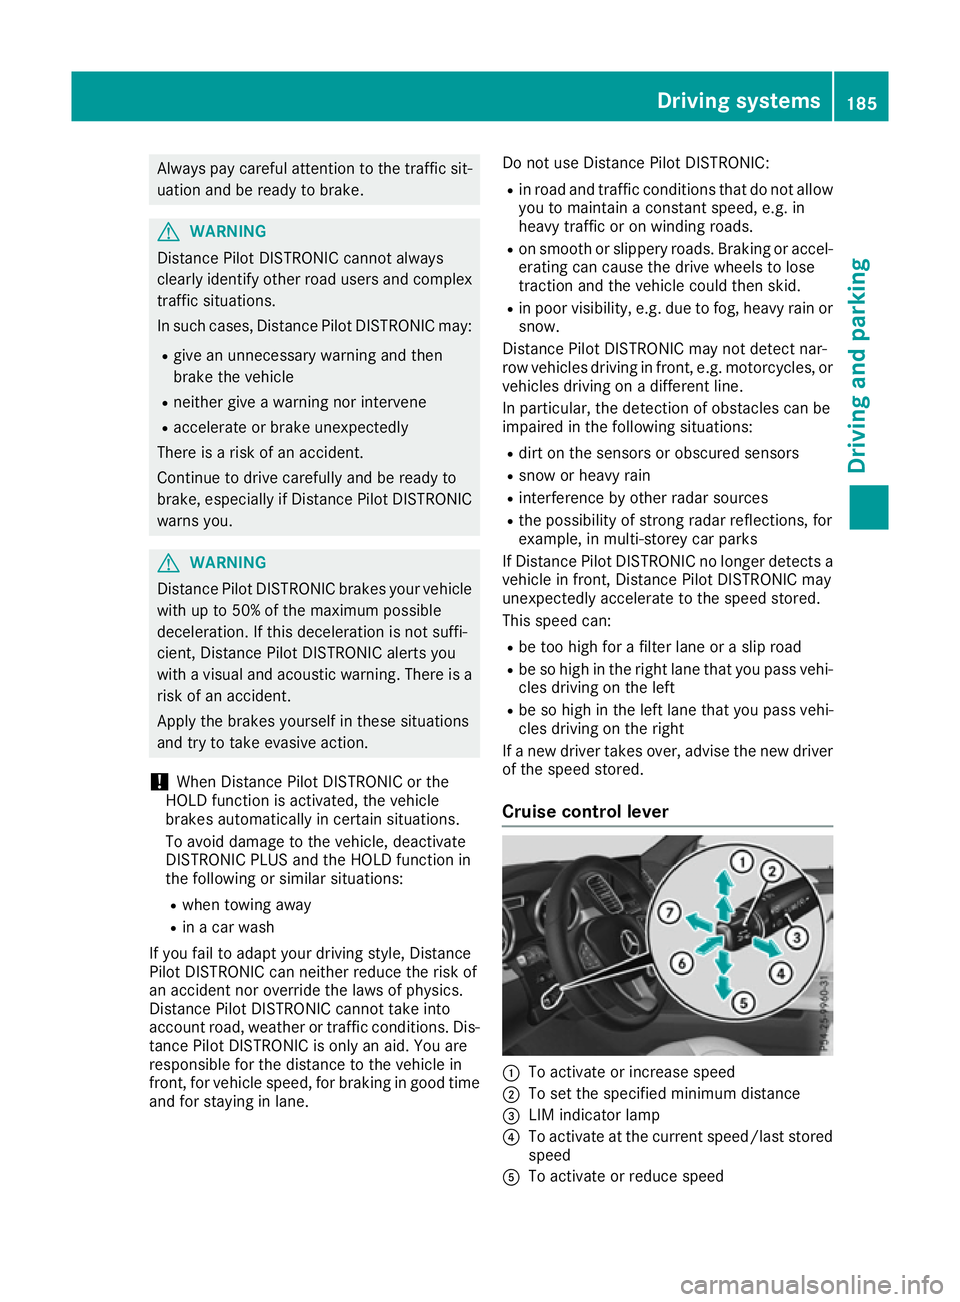
Cruise control lever :
To activate or increase speed
; To set the specified minimum distance
= LIM indicator lamp
? To activate at the current speed/last stored
speed
A To activate or reduce speed Driving systems
185Driving and parking Z