2016 MERCEDES-BENZ GLS SUV brake
[x] Cancel search: brakePage 228 of 397
Important safety notes
If you fail to adapt your driving style, Active Lane
Keeping Assist can neither reduce the risk of an accident nor override the laws of physics. ActiveLane Keeping Assist cannot take into account
road, weather or traffic conditions. Active Lane
Keeping Assist is only an aid. You are responsi-
ble for the distance to the vehicle in front, for
vehicle speed, for braking in good time and for
staying in lane.
Active Lane Keeping Assist cannot continuously
keep your vehicle in its lane. G
WARNING
Active Lane Keeping Assist cannot always
clearly detect lane markings.
In such cases, Active Lane Keeping Assist
can:
R give an unnecessary warning and then
make a course-correcting brake application
to the vehicle
R neither give a warning nor intervene
There is a risk of an accident.
Always pay particular attention to the traffic
situation and keep within the lane, especially
if Active Lane Keeping Assist alerts you. Ter-
minate the intervention in a non-critical driv-
ing situation.
The system may be impaired or may not function if:
R there is poor visibility, e.g. due to insufficient
illumination of the road, or due to snow, rain,fog or spray
R there is glare, e.g. from oncoming traffic, the
sun or reflection from other vehicles (e.g. if
the road surface is wet)
R the windscreen is dirty, misted up, damaged
or covered, for instance by a sticker, in the
vicinity of the camera
R no or several, unclear lane markings are pres-
ent for one lane, e.g. in a construction area
R the lane markings are worn away, dark or cov-
ered up, e.g. by dirt or snow
R the distance to the vehicle in front is too small
and the lane markings thus cannot be detec-
ted
R the lane markings change quickly, e.g. lanes
branch off, cross one another or merge R
the road is narrow and winding
R there are highly variable shade conditions on
the roadway
R no vehicle is detected in the adjacent lane and
there are broken lane markings
Warning vibration through the steering
wheel A warning may be given if a front wheel passes
over a lane marking. It will warn you by means of intermittent vibration in the steering wheel for
up to 1.5 seconds.
In order that you are warned only when neces-
sary and in good time if you cross the lane mark-
ing, the system detects certain conditions and
warns you accordingly.
The warning vibration occurs earlier if:
R you approach the outer lane marking on a
bend
R the road has very wide lanes, e.g. a motorway
R the system detects solid lane markings
The warning vibration occurs later if:
R the road has narrow lanes
R you cut the corner on a bend
Lane-correcting brake application G
WARNING
A lane-correcting brake application cannot
always bring the vehicle back into the original lane. There is a risk of an accident.
Always steer, brake or accelerate yourself,
especially if Active Lane Keeping Assist warns
you or makes a lane-correcting brake appli-
cation. G
WARNING
Active Lane Keeping Assist does not detect
traffic conditions or road users. In very rare
cases, the system may make an inappropriate brake application, e.g. after intentionally driv-
ing over a solid lane marking. There is a risk of an accident.
An inappropriate brake application may be
interrupted at any time if you steer slightly in
the opposite direction. Always make sure that
there is sufficient distance to the side for
other traffic or obstacles. Driving systems
225Driving and parking Z
Page 229 of 397
If you leave your lane under certain circumstan-
ces, the vehicle will brake briefly on one side.
This is intended to help you return the vehicle to
the original lane.
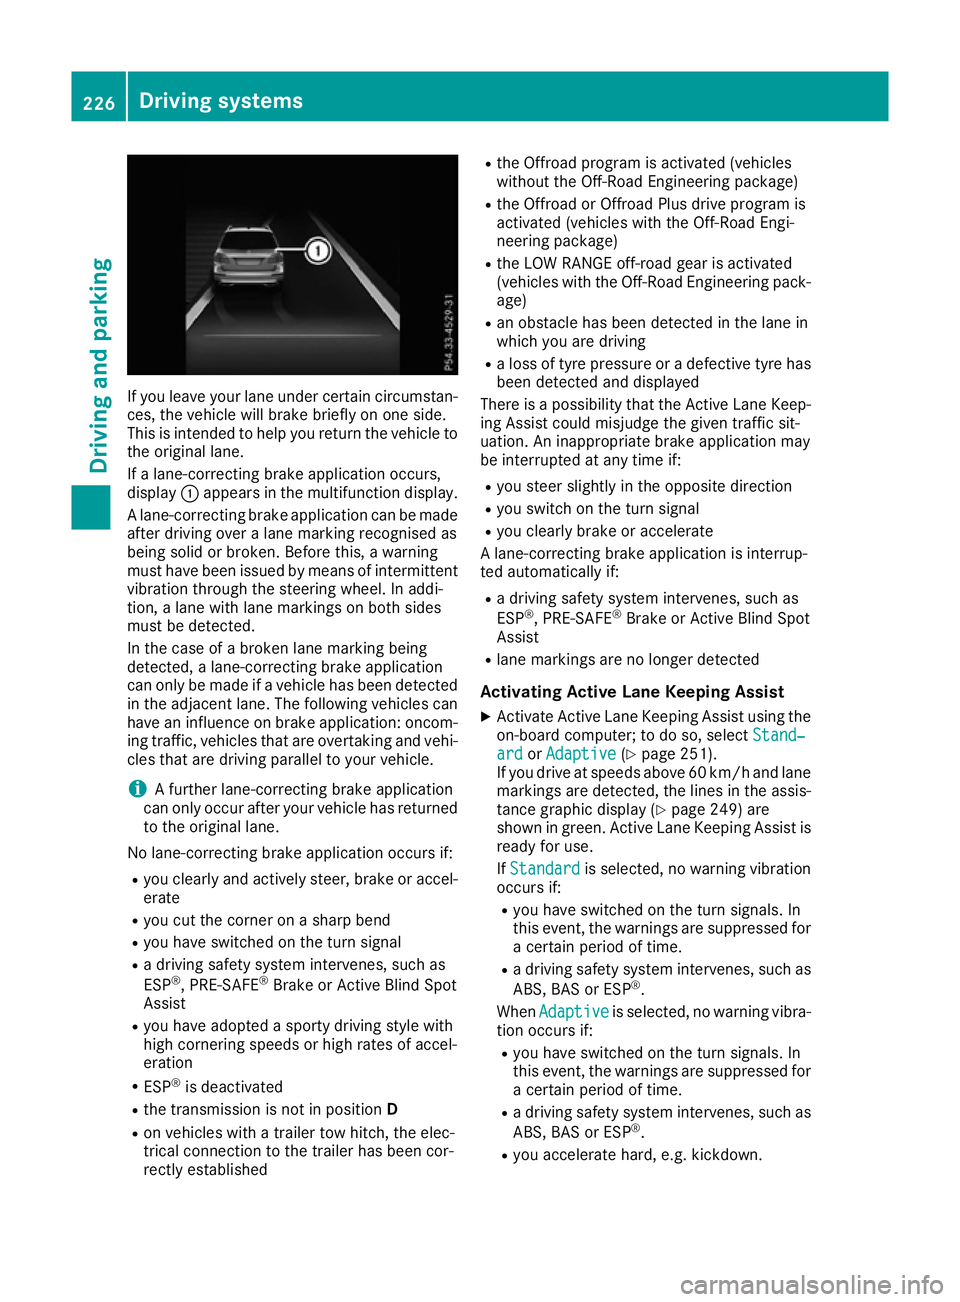
If a lane-correcting brake application occurs,
display :appears in the multifunction display.
A lane-correcting brake application can be made
after driving over a lane marking recognised as
being solid or broken. Before this, a warning
must have been issued by means of intermittent
vibration through the steering wheel. In addi-
tion, a lane with lane markings on both sides
must be detected.
In the case of a broken lane marking being
detected, a lane-correcting brake application
can only be made if a vehicle has been detected
in the adjacent lane. The following vehicles can have an influence on brake application: oncom- ing traffic, vehicles that are overtaking and vehi-
cles that are driving parallel to your vehicle.
i A further lane-correcting brake application
can only occur after your vehicle has returned
to the original lane.
No lane-correcting brake application occurs if: R you clearly and actively steer, brake or accel-
erate
R you cut the corner on a sharp bend
R you have switched on the turn signal
R a driving safety system intervenes, such as
ESP ®
, PRE-SAFE ®
Brake or Active Blind Spot
Assist
R you have adopted a sporty driving style with
high cornering speeds or high rates of accel-
eration
R ESP ®
is deactivated
R the transmission is not in position D
R on vehicles with a trailer tow hitch, the elec-
trical connection to the trailer has been cor-
rectly established R
the Offroad program is activated (vehicles
without the Off-Road Engineering package)
R the Offroad or Offroad Plus drive program is
activated (vehicles with the Off-Road Engi-
neering package)
R the LOW RANGE off-road gear is activated
(vehicles with the Off-Road Engineering pack-
age)
R an obstacle has been detected in the lane in
which you are driving
R a loss of tyre pressure or a defective tyre has
been detected and displayed
There is a possibility that the Active Lane Keep-
ing Assist could misjudge the given traffic sit-
uation. An inappropriate brake application may
be interrupted at any time if:
R you steer slightly in the opposite direction
R you switch on the turn signal
R you clearly brake or accelerate
A lane-correcting brake application is interrup-
ted automatically if:
R a driving safety system intervenes, such as
ESP ®
, PRE-SAFE ®
Brake or Active Blind Spot
Assist
R lane markings are no longer detected
Activating Active Lane Keeping Assist
X Activate Active Lane Keeping Assist using the
on-board computer; to do so, select Stand‐
Stand‐
ard ard orAdaptive
Adaptive (Ypage 251).
If you drive at speeds above 60 km/h and lane
markings are detected, the lines in the assis-
tance graphic display (Y page 249) are
shown in green. Active Lane Keeping Assist is
ready for use.
If Standard Standard is selected, no warning vibration
occurs if:
R you have switched on the turn signals. In
this event, the warnings are suppressed for
a certain period of time.
R a driving safety system intervenes, such as
ABS, BAS or ESP ®
.
When Adaptive Adaptive is selected, no warning vibra-
tion occurs if:
R you have switched on the turn signals. In
this event, the warnings are suppressed for
a certain period of time.
R a driving safety system intervenes, such as
ABS, BAS or ESP ®
.
R you accelerate hard, e.g. kickdown. 226
Driving systemsDriving and parking
Page 230 of 397
R
you brake hard.
R you steer actively, e.g. swerve to avoid an
obstacle or change lane quickly.
R you cut the corner on a sharp bend.
Towing a trailer
If you couple up a trailer, make sure that you
have correctly established the electrical con-
nection. This can be accomplished by checking
the trailer lighting. Lane-correcting brake appli-
cation does not take place when towing a trailer.
Active Lane Keeping Assist is not activated and the lines in the assistance graphic are grey. Off-road driving systems
4MATIC (permanent all-wheel drive) 4MATIC ensures that all four wheels are perma-
nently driven. Together with ESP ®
and 4ETS, it
improves the traction of your vehicle whenever
a drive wheel spins due to insufficient grip.
If you fail to adapt your driving style, 4MATIC can
neither reduce the risk of an accident nor over-
ride the laws of physics. 4MATIC cannot take
account of road, weather and traffic conditions.
4MATIC is only an aid. You are responsible for
the distance to the vehicle in front, for vehicle
speed, for braking in good time and for staying in
lane.
! Never tow the vehicle with one axle raised.
This may damage the transfer case. Damage
of this sort is not covered by the Mercedes-
Benz implied warranty. All wheels must
remain either on the ground or be fully raised. Observe the instructions for towing the vehi-
cle with all wheels in full contact with the
ground.
! A function or performance test should only
be carried out on a twin-axle dynamometer.
Before you operate the vehicle on such a
dynamometer, please consult a qualified
workshop. You could otherwise damage the
drive train or the brake system.
i In wintry driving conditions, the maximum
effect of 4MATIC can only be achieved if you
use winter tyres (M+S tyres), with snow
chains if necessary.
Further information about "Driving off-road"
(Y page 176). DSR (Downhill Speed Regulation) General notes
DSR is an aid to assist you when driving down-
hill. It keeps the speed of travel at the speed
selected on the on-board computer. The steeper
the downhill gradient, the greater the DSR brak- ing effect on the vehicle. When driving on flat
stretches of road or on an uphill gradient, the
DSR braking effect is minimal or non-existent.
DSR controls the vehicle’s speed when it is acti-
vated and the transmission is in position D,Ror
N. By accelerating or braking, you can always
drive at a higher or a lower speed than that set
on the on-board computer.
Important safety notes G
WARNING
If the speed driven and the set speed deviate and you activate DSR on a slippery road sur-
face, the wheels may lose traction. This
increases the risk of skidding and having an
accident.
Before switching DSR on, please take into
consideration the road surface and the differ-
ence between driving speed and the set
speed.
If you fail to adapt your driving style, DSR can
neither reduce the risk of accident nor override the laws of physics. DSR cannot take account ofroad, weather and traffic conditions. DSR is only
an aid. You are responsible for the distance to
the vehicle in front, for vehicle speed, for brak-
ing in good time and for staying in lane.
You are always responsible for keeping control
of the vehicle and for assessing whether the
downhill gradient can be managed. DSR may not
always be able to keep to the set speed, depend-
ing on road surface and tyre conditions. Select a set speed suitable for the prevailing conditions
and when necessary, apply the brakes manually. Driving systems
227Driving and parking Z
Page 235 of 397
Messages in the multifunction display
If a gear change process has not been successful, the following messages may be displayed in the
multifunction display: Display messages
Possible causes/consequences and
M
MSolutions LOW RANGE Max.
LOW RANGE Max.
speed 40 km/h speed 40 km/h You have been driving faster than 40 km/h. Additionally, the indicator
lamp on the button in the centre console blinks.
X Drive more slowly to carry out the gear change process. LOW RANGE Shift to
LOW RANGE Shift to
position N briefly position N briefly The transmission is in position
Dand you are driving at below
40 km/h.
X Shift the transmission to Nto complete the gear change process. LOW RANGE Shifting
LOW RANGE Shifting
cancelled Please cancelled Please
reactivate reactivate The gear change process was not carried out.
X Maintain all gear change conditions and carry out the gear change
process again. LOW RANGE Stop
LOW RANGE Stop
Apply parking brake Apply parking brake A warning tone also sounds. The gear change process has not been
completed. LOW RANGE is in the neutral position. There is no con-
nection between the engine and the drive wheels.
! Do not drive any further. You could otherwise damage the vehi-
cle’s drive train.
X Stop the vehicle. Take into account the road and traffic conditions
when doing so.
X Apply the electric parking brake (Y page 170).
X Repeat the gear change process.
If the gear change process has been carried out, the LOW RANGE LOW RANGE
Stop Apply parking brake
Stop Apply parking brake message disappears.Driving dynamics display in the
COMAND display (vehicles with the Off-
Road Engineering-package) General notes
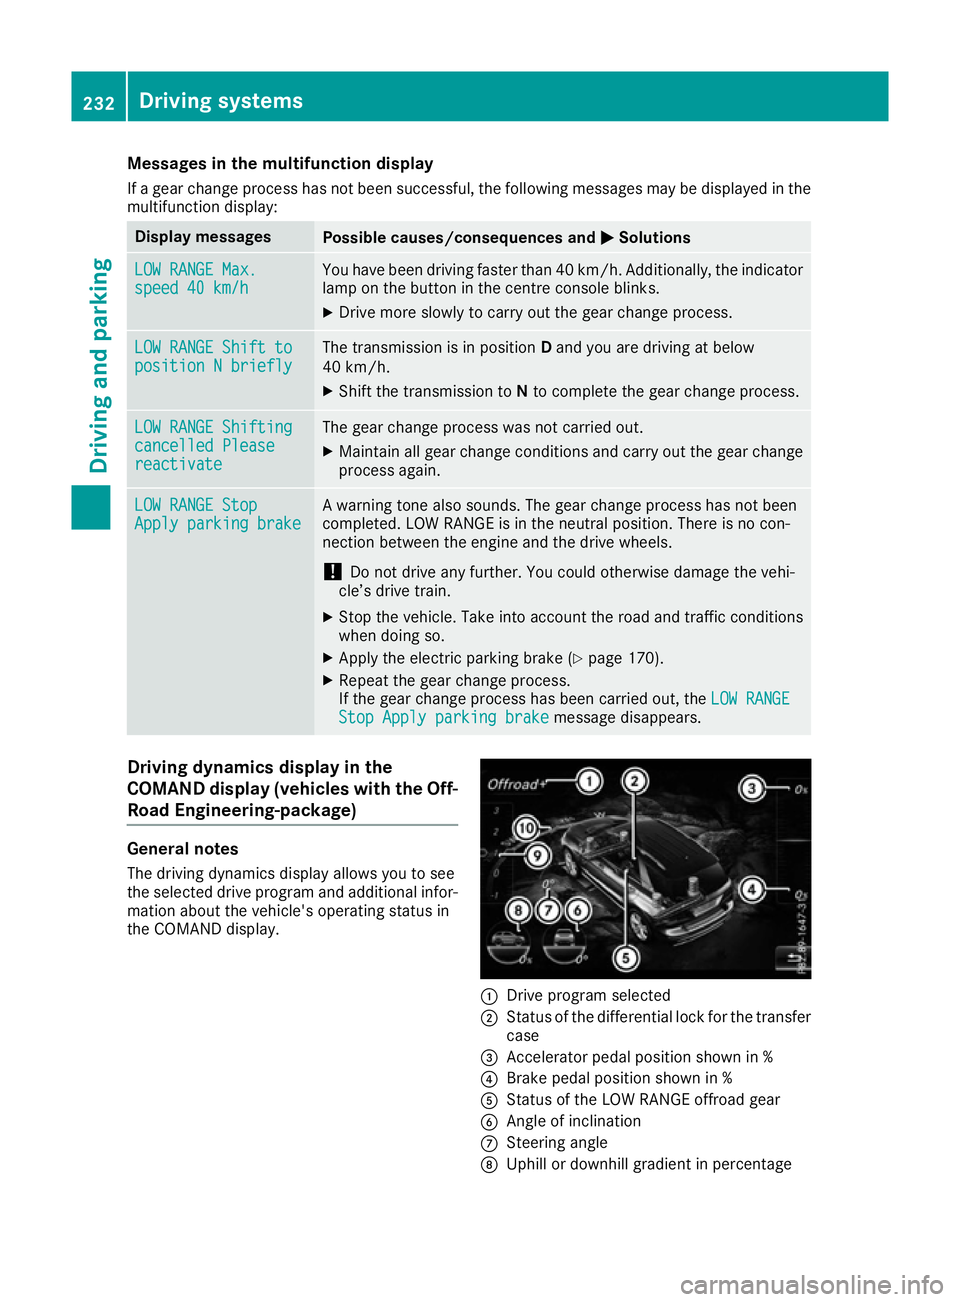
The driving dynamics display allows you to see
the selected drive program and additional infor-
mation about the vehicle's operating status in
the COMAND display. :
Drive program selected
; Status of the differential lock for the transfer
case
= Accelerator pedal position shown in %
? Brake pedal position shown in %
A Status of the LOW RANGE offroad gear
B Angle of inclination
C Steering angle
D Uphill or downhill gradient in percentage 232
Driving systemsDriving and parking
Page 236 of 397
E
Level control
F Compass with angle scale
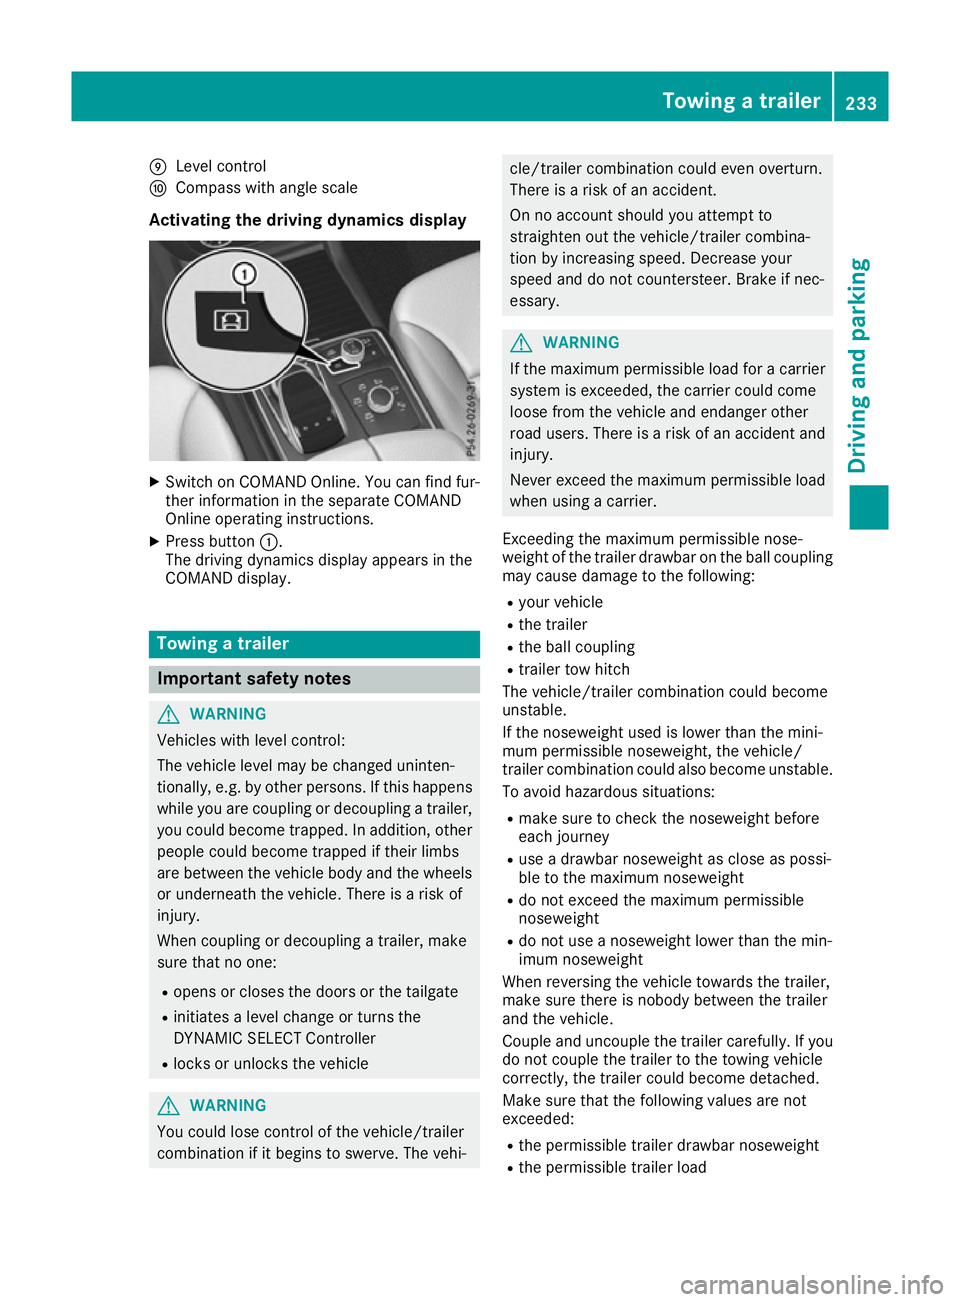
Activating the driving dynamics display X
Switch on COMAND Online. You can find fur-
ther information in the separate COMAND
Online operating instructions.
X Press button :.
The driving dynamics display appears in the
COMAND display. Towing a trailer
Important safety notes
G
WARNING
Vehicles with level control:
The vehicle level may be changed uninten-
tionally, e.g. by other persons. If this happens while you are coupling or decoupling a trailer,
you could become trapped. In addition, other
people could become trapped if their limbs
are between the vehicle body and the wheels or underneath the vehicle. There is a risk of
injury.
When coupling or decoupling a trailer, make
sure that no one:
R opens or closes the doors or the tailgate
R initiates a level change or turns the
DYNAMIC SELECT Controller
R locks or unlocks the vehicle G
WARNING
You could lose control of the vehicle/trailer
combination if it begins to swerve. The vehi- cle/trailer combination could even overturn.
There is a risk of an accident.
On no account should you attempt to
straighten out the vehicle/trailer combina-
tion by increasing speed. Decrease your
speed and do not countersteer. Brake if nec-
essary. G
WARNING
If the maximum permissible load for a carrier system is exceeded, the carrier could come
loose from the vehicle and endanger other
road users. There is a risk of an accident and injury.
Never exceed the maximum permissible load
when using a carrier.
Exceeding the maximum permissible nose-
weight of the trailer drawbar on the ball coupling
may cause damage to the following:
R your vehicle
R the trailer
R the ball coupling
R trailer tow hitch
The vehicle/trailer combination could become
unstable.
If the noseweight used is lower than the mini-
mum permissible noseweight, the vehicle/
trailer combination could also become unstable. To avoid hazardous situations:
R make sure to check the noseweight before
each journey
R use a drawbar noseweight as close as possi-
ble to the maximum noseweight
R do not exceed the maximum permissible
noseweight
R do not use a noseweight lower than the min-
imum noseweight
When reversing the vehicle towards the trailer,
make sure there is nobody between the trailer
and the vehicle.
Couple and uncouple the trailer carefully. If you do not couple the trailer to the towing vehicle
correctly, the trailer could become detached.
Make sure that the following values are not
exceeded:
R the permissible trailer drawbar noseweight
R the permissible trailer load Towing a trailer
233Driving and parking Z
Page 238 of 397
brake system and prevents the brakes from
overheating and wearing too quickly. If you need
additional braking, depress the brake pedal
repeatedly rather than continuously.
Driving tips If the trailer swings from side to side:
X Do not accelerate under any circumstances.
X Do not countersteer.
X Brake, if necessary.
R Maintain a greater distance to the vehicle in
front than when driving without a trailer.
R Avoid braking abruptly. If possible, brake gen-
tly at first to allow the trailer to run on. Then,
increase the braking force rapidly.
R The values given for gradient-climbing capa-
bilities from a standstill refer to sea level.
When driving in mountainous areas, note that
the power output of the engine, and conse-
quently the vehicle's gradient-climbing capa-
bility from a standstill, decrease with increas- ing altitude. Swivelling the ball coupling out/in
Using the switch in the driver's door G
WARNING
If the ball coupling is not engaged, the trailer
may come loose. There is a risk of an accident. Make sure that the ball coupling is securely
engaged and locked in position.
! Do not attempt to speed the up the swing-
out procedure by applying additional pressure
with your foot. The system could otherwise be
mechanically damaged.
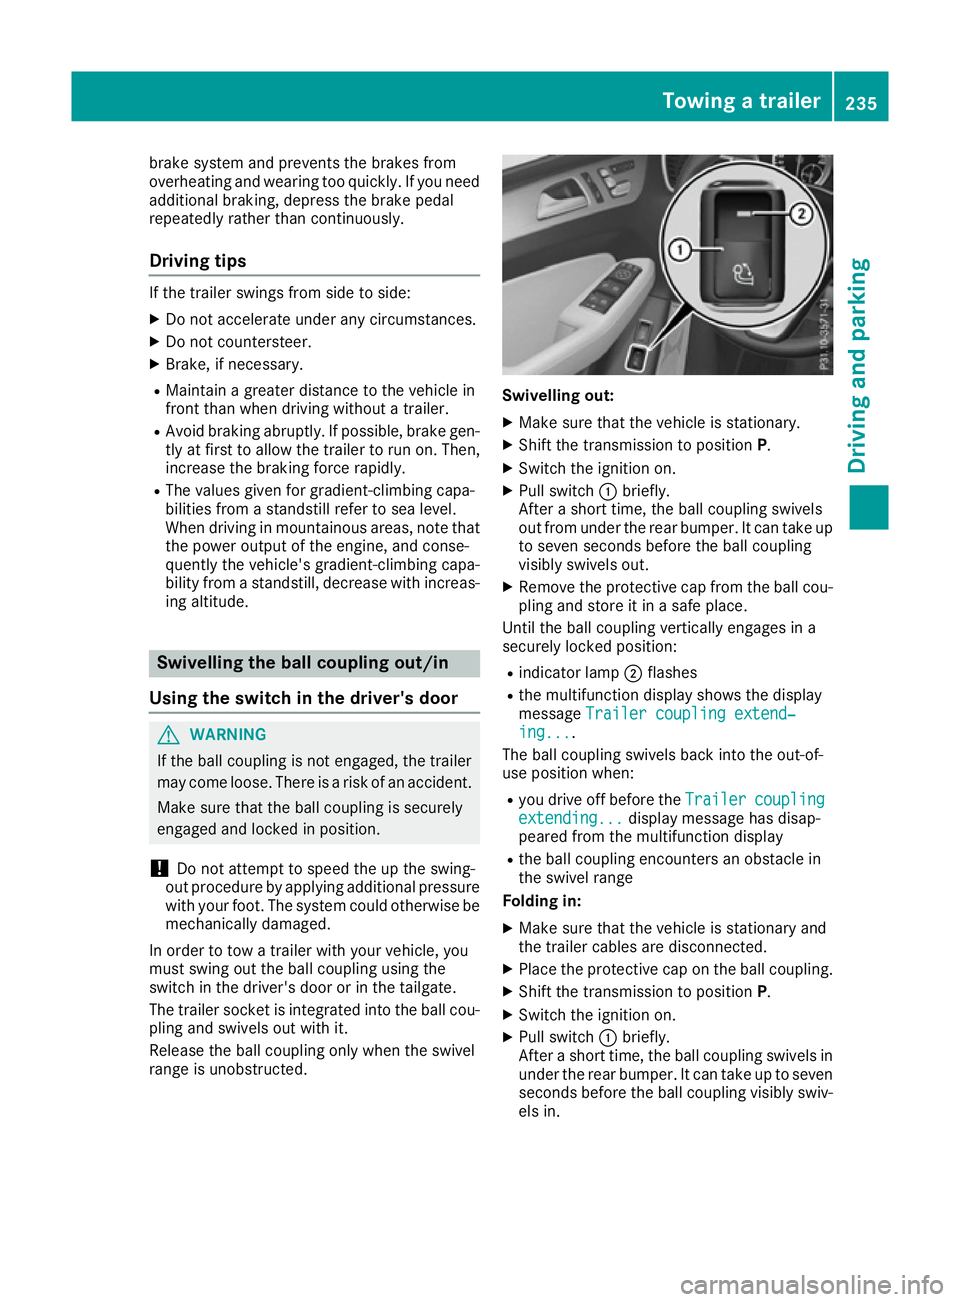
In order to tow a trailer with your vehicle, you
must swing out the ball coupling using the
switch in the driver's door or in the tailgate.
The trailer socket is integrated into the ball cou- pling and swivels out with it.
Release the ball coupling only when the swivel
range is unobstructed. Swivelling out:
X Make sure that the vehicle is stationary.
X Shift the transmission to position P.
X Switch the ignition on.
X Pull switch :briefly.
After a short time, the ball coupling swivels
out from under the rear bumper. It can take up to seven seconds before the ball coupling
visibly swivels out.
X Remove the protective cap from the ball cou-
pling and store it in a safe place.
Until the ball coupling vertically engages in a
securely locked position:
R indicator lamp ;flashes
R the multifunction display shows the display
message Trailer coupling extend‐ Trailer coupling extend‐
ing...
ing... .
The ball coupling swivels back into the out-of-
use position when:
R you drive off before the Trailer
Trailercoupling
coupling
extending...
extending... display message has disap-
peared from the multifunction display
R the ball coupling encounters an obstacle in
the swivel range
Folding in:
X Make sure that the vehicle is stationary and
the trailer cables are disconnected.
X Place the protective cap on the ball coupling.
X Shift the transmission to position P.
X Switch the ignition on.
X Pull switch :briefly.
After a short time, the ball coupling swivels in under the rear bumper. It can take up to seven
seconds before the ball coupling visibly swiv- els in. Towing a trailer
235Driving and parking Z
Page 240 of 397
Vehicles with the AIRMATIC package
!
Before beginning the journey, make sure
that the trailer support wheel is completely
raised. Otherwise, the trailer or the vehicle
could be damaged by the lowered trailer sup- port wheel during the journey.
X Shift the transmission to position P.
X Apply the electric parking brake.
X Start the engine.
X Vehicles with the Off-Road Engineering
package:
set the vehicle level to normal level
(Y page 192).
X Vehicles without the Off-Road Engineer-
ing package: select theComfortdrive pro-
gram using the DYNAMIC SELECT controller
(Y page 197).
X Switch off the engine.
X Close the doors and tailgate.
X Position the trailer horizontally behind the
vehicle.
X Couple up the trailer.
X Establish the electrical connection between
the vehicle and the trailer.
X Check that the trailer lighting system is work-
ing.
X Push the combination switch upwards and
downwards and check whether the corre-
sponding turn signal indicator on the trailer is
flashing.
A connected trailer is only detected when the
electrical connection is established correctly
and when the lighting system is working prop-
erly. The function of other systems also depends on this, for example:
R ESP ®
R Parking Assist PARKTRONIC
R Parking Pilot
R Active Blind Spot Assist
R Active Lane Keeping Assist
i Vehicles with the AIRMATIC package:
if
you couple up a trailer, the vehicle initially
remains at the selected level of the drive pro- gram set. Observe the following when cou-
pling up a trailer:
R If the normal level was not selected previ-
ously, the vehicle automatically adopts the normal level starting from a speed of 30 km/h. Even at higher speeds, it does not
drop below the normal level.
R Vehicle levels below the normal level are
not available.
R The raised level is available up to a speed of
30 km/h.
R This also applies when using accessories
that are plugged into the socket of the
trailer tow hitch (e.g. a bicycle rack).
R Before driving with a trailer, please observe
the information on the trailer support
wheel. Uncoupling a trailer
Important safety notes G
WARNING
If you uncouple a trailer with an engaged over- run brake, you could trap your hand between
the vehicle and the trailer drawbar. This poses a risk of injury.
Do not uncouple a trailer with an engaged
overrun brake. G
WARNING
Vehicles with level control:
If you disconnect the trailer cable, the vehicle is lowered. This can cause you or others to
become trapped between the vehicle body
and tyres, or underneath the vehicle. This
poses a risk of injury.
Make sure that no-one is in the immediate
vicinity of the wheel arch or underneath the
vehicle when disconnecting the trailer cable.
! Do not disconnect a trailer with an engaged
overrun brake. Otherwise, your vehicle could
be damaged by the rebounding of the overrun
brake.
! Remove the adapter cable before folding in
the ball coupling. You could otherwise dam-
age the rear bumper and the adapter cable.
Vehicles with the AIRMATIC package X
Shift the transmission to position P.
X Apply the electric parking brake. Towing a trailer
237Driving and parking Z
Page 252 of 397
X
Press the 9or: button to select the
desired name.
or X To start rapid scrolling: press and hold9
or : for longer than one second.
Rapid scrolling stops when you release the
button or reach the end of the list.
X If only one telephone number is stored for
a name: press the 6ora button to
start dialling.
or X If there is more than one number for a
particular name:press the 6ora
button to display the numbers.
X Press the 9or: button to select the
number you want to dial.
X Press the 6ora button to start dial-
ling.
or
X To exit the telephone book: press the~
or % button.
Redialling The on-board computer saves the last names or
numbers dialled in the redial memory.
X Press the =or; button on the steering
wheel to select the Tel
Tel menu.
X Press the 6button to switch to the redial
memory.
X Press the 9or: button to select the
desired name or number.
X Press the 6ora button to start dial-
ling.
or X To exit the redial memory: press the~
or % button. Assistance menu
Introduction Depending on the equipment fitted in the vehi-
cle, you have the following options in the
Assist.
Assist. menu:
R Showing the assistance graphic
(Y page 249)
R Activating/deactivating the Traffic Sign
Assist display (Y page 250) R
Activating or deactivating Steering Pilot
(Y page 250)
R Activating/deactivating Active Brake Assist
(Y page 250)
R Activating/deactivating Active Brake Assist
with cross-traffic function (Y page 250)
R Activating/deactivating ATTENTION ASSIST
(Y page 250)
R Activating/deactivating Blind Spot Assist or
Active Blind Spot Assist (Y page 250)
R Activating/deactivating Lane Keeping Assist
or Active Lane Keeping Assist (Y page 251)
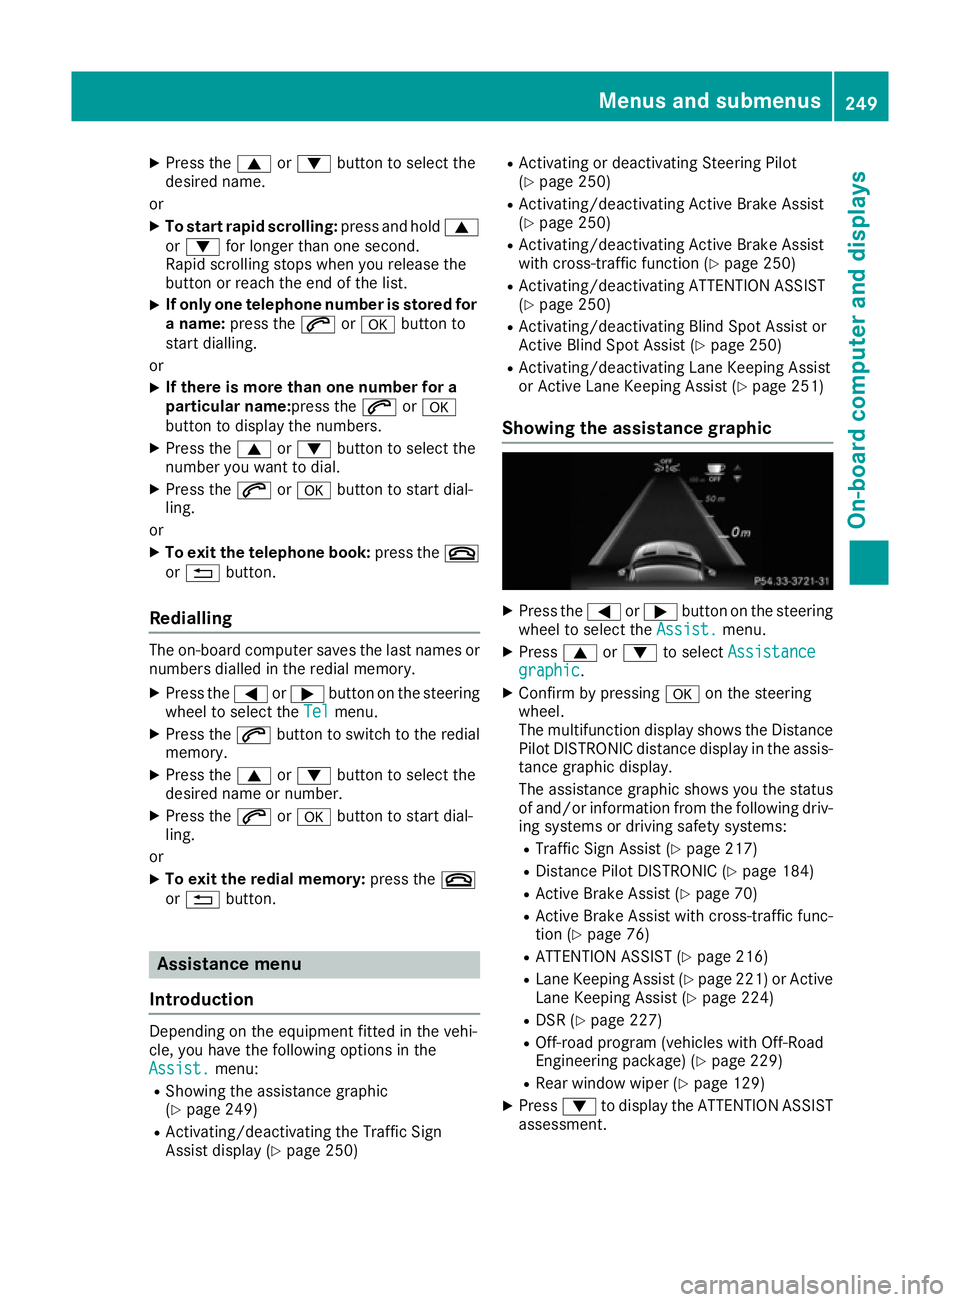
Showing the assistance graphic X
Press the =or; button on the steering
wheel to select the Assist. Assist.menu.
X Press 9or: to select Assistance
Assistance
graphic
graphic.
X Confirm by pressing aon the steering
wheel.
The multifunction display shows the Distance
Pilot DISTRONIC distance display in the assis-
tance graphic display.
The assistance graphic shows you the status
of and/or information from the following driv-
ing systems or driving safety systems:
R Traffic Sign Assist (Y page 217)
R Distance Pilot DISTRONIC (Y page 184)
R Active Brake Assist (Y page 70)
R Active Brake Assist with cross-traffic func-
tion (Y page 76)
R ATTENTION ASSIST (Y page 216)
R Lane Keeping Assist (Y page 221) or Active
Lane Keeping Assist (Y page 224)
R DSR (Y page 227)
R Off-road program (vehicles with Off-Road
Engineering package) (Y page 229)
R Rear window wiper (Y page 129)
X Press :to display the ATTENTION ASSIST
assessment. Menus and submenus
249On-board computer and displays Z