2016 MERCEDES-BENZ GLS SUV ECU
[x] Cancel search: ECUPage 15 of 397
Folding in/out (automatically
)....... 117
Folding in/out (electrically) ........... 117
Out of position (troubleshooting) ... 117
Parking position ............................. 118
Resetting ....................................... 117
Storing settings (memory func-
tion) ............................................... 118 F
Fault message see Display messages
Favourites
Overview ........................................ 304
Filler cap
see Fuel filler flap
Fire extinguisher ............................... 345
First-aid kit ......................................... 345
Fitting a wheel
Fitting a wheel ............................... 372
Lowering the vehicle ...................... 373
Preparing the vehicle ..................... 370
Raising the vehicl e......................... 371
Removing a whee l.......................... 372
Securing the vehicle against roll-
ing away ........................................ 370
Flat tyre
MOExtended tyre s......................... 347
Preparing the vehicle ..................... 346
TIREFIT kit ...................................... 348
see Emergency spare wheel
Floormat ............................................. 331
Foglamps (extended range) .............. 123
Folding the rear bench seat for-
wards/back ....................................... 315
Fording
Off-road ......................................... 175
On flooded roads ........................... 175
Frequencies
Garage door opener ....................... 328
Mobile phone ................................. 379
Two-way radio ................................ 379
Front-passenger front airbag deac-
tivation
Display message ............................ 268
Front-passenger front airbag deac-
tivation system
Operation ......................................... 50 Problems ......................................... 54
System self-test ............................... 53
Fuel
Additives ........................................ 383
Consumption statistics .................. 244
Displaying the current consump-
tion ................................................ 245
Displaying the rang e...................... 245
Driving tips .................................... 172
Fuel gaug e....................................... 35
Grade (petrol) ................................ 382
Important safety notes .................. 382
Low outside temperature s............. 384
Notes for Mercedes‑AMG vehi-
cles ................................................ 383
Problem (malfunction) ................... 165
Quality (diesel )............................... 383
Refuelling ....................................... 163
Tank content/reserve fue l............. 382
Fuel filler flap
Opening ......................................... 164
Fuel filter (white display message) .. 274
Fuel level
Calling up the range (on-board
computer) ...................................... 245
Gaug e.............................................. 35
Fuel tank
Capacity ........................................ 382
Problem (malfunction) ................... 165
Fuses
Allocation chart ............................. 359
Before changing ............................. 359
Dashboard fuse box ....................... 359
Fuse box in the engine compart-
ment .............................................. 360
Fuse box under rear bench sea t.... 360
Important safety notes .................. 359 G
Garage door opener Clearing the memory ..................... 328
Frequencies ................................... 328
General notes ................................ 326
Important safety notes .................. 326
Opening/closing the garage doo r..3 27
Problems when programming ....... .327 12
Index
Page 16 of 397
Programming (button in the rear-
view mirror) ................................... 326
Synchronising the rolling code .......3 27
Gear indicator (on-board com-
puter, Mercedes-AMG vehicles) ....... 255
Gearshift paddles
see Steering wheel gearshift paddles
Gearshift program
SETUP (on-board computer) .......... 256
Genuine Mercedes-Benz parts ........... 26
Glove compartment .......................... 313
Google™ Local Search
See also Digital Owner's Manual ... 303 H
Hazard warning lamps ......................122
Head restraints
Adjusting ....................................... 104
Adjusting (electrically) ................... 105
Adjusting (manually) ..................... .104
Adjusting (rear) .............................. 105
Fitting/removing (rear) .................. 106
Luxury ............................................ 105
Headlamp
Cleaning system (notes) ................ 387
Headlamp flasher .............................. 122
Headlamps
Misting up ...................................... 125
Topping up the cleaning system .... 336
see Automatic headlamp mode
Heating
see Climate control
High-pressure cleaners .................... 339
Hill start assist .................................. 151
HOLD function
Deactivating ................................... 196
Display message ............................ 278
Function/notes ............................ .195
Home address
See also Digital Owner's Manual ... 303
Horn ...................................................... 33 I
Ignition lock see Key positions
Immobiliser .......................................... 78 Indicator and warning lamp
Restraint system ............................ 298
Indicator and warning lamps
Coolant .......................................... 299
Engine diagnostics ......................... 298
Indicator lamps
Display message ............................ 270
see Warning and indicator lamps
Indicators
see Turn signals
Insect protection on the radiator .... 333
Instrument cluster
Overview .......................................... 35
Warning and indicator lamps ........... 35
Instrument cluster lighting .............. 241
Intelligent Light System
Activating/deactivating ................. 252
Display message ............................ 270
Overview ........................................ 123
Setting the dipped-beam head-
lamps for driving on the right/left .. 252
Interior lighting
Automatic control system .............. 125
Emergency lighting ........................ 126
General notes ................................ 125
Manual control ............................... 125
Overview ........................................ 125
Reading lamp ................................. 125
Interior motion sensor
Deactivating ..................................... 80
Function .......................................... .80
Priming ............................................ 80
Switching off .................................... 80
iPod ®
See also Digital Owner's Manual ... 303
ISOFIX child seat securing system ....59 J
Jack Declaration of conformity ................28
Storage location ............................ 345
Using ............................................. 371
Jump starting (engine) ...................... 354 Index
13
Page 27 of 397
Leaving parked up .........................1
71
Locking (in an emergency) .............. .89
Locking (key) ................................... 81
Lowering ........................................ 373
Operating safety .............................. 27
Parking .......................................... 168
Pulling away ................................... 150
Raising ........................................... 371
Registration ..................................... 30
Securing from rolling away ............ 370
Towing away .................................. 356
Transporting .................................. 358
Unlocking (in an emergency) ........... 89
Unlocking (key) ................................ 81
Vehicle data ................................... 387
Vehicle battery
see Battery (vehicle)
Vehicle data ....................................... 387
Vehicle data (off-road driving)
Approach/departure angle ............ 389
Fording depth ................................ 388
Maximum gradient climbing abil-
ity .................................................. 389
Vehicle dimensions ........................... 387
Vehicle emergency locking ................ 89
Vehicle identification number
see VIN
Vehicle identification plate .............. 380
Vehicle level
AIRMATIC ...................................... 198
Vehicle level (display message) ....... 275
Vehicle tool kit .................................. 345
Video
Operating the DVD ......................... 247
See also Digital Owner's Manua l... 303
VIN ...................................................... 380
Seat ............................................... 381
Type plate ...................................... 380 W
Warning and indicator lamps ABS ................................................ 293
Brakes ........................................... 292
Distance Pilot DISTRONIC ............. 301
Distance warning signal ................. 301
ESP ®
.............................................. 295
ESP ®
OFF ....................................... 296 Fuel tank ........................................ 298
LIM (cruise control) ........................ 181
LIM (Distance Pilot DISTRONIC) .... 185
LIM (variable limiter) ...................... 183
Overview .......................................... 35
Parking brake ................................ 298
PASSENGER AIR BAG ...................... 43
Reserve fue l................................... 298
Seat belt ........................................ 291
Tyre pressure monitor ................... 302
Warning triangle ................................ 345
Washer fluid
Display message ............................ 289
Weather display (COMAND Online)
See also Digital Owner's Manua l... 303
Wheel and tyre combinations
Tyres .............................................. 374
Wheel bolt tightening torque ........... 373
Wheel chock ...................................... 370
Wheels
Changing a wheel .......................... 369
Changing/replacing ....................... 369
Checking ........................................ 361
Cleaning ......................................... 340
Emergency spare wheel ................. 375
Fitting a new wheel ........................ 372
Fitting a wheel ............................... 370
Important safety notes .................. 361
Information on driving .................... 361
Overview ........................................ 361
Removing a wheel .......................... 372
Snow chains .................................. 364
Storing ........................................... 370
Tightening torque ........................... 373
Wheel size/tyre size ...................... 374
Windowbag
Display message ............................ 267
Operation ......................................... 49
Windows
Cleaning ......................................... 340
see Side windows
Windscreen
Demisting ...................................... 137
Windscreen washer fluid
see Windscreen washer system
Windscreen washer system
Important safety notes .................. 387
Topping up ..................................... 336 24
Index
Page 33 of 397
Complete technical documentation is available
1 in the original version
The operating instructions for the machinery/machine part are available
1 in the language of the user's country: German
In the event of modifications made to the machinery/equipment after delivery that have not been cleared with active Tools Europe GmbH, this declaration loses its validity.
Authorised representative(s) for compilation of the technical documentation, CE commissioner(s) 22.6.2015 [Name of signatory] [Stamp]
Date Signatory and details of signatory Signature
Diagnostics connection
The diagnostics connection is used for connect- ing diagnostic equipment at a qualified special-
ist workshop. G
WARNING
If you connect equipment to a diagnostics
connection in the vehicle, it may affect the
operation of vehicle systems. As a result, the operating safety of the vehicle could be affec-
ted. There is a risk of an accident.
Only connect equipment to a diagnostics con-
nection in the vehicle, which is approved for
your vehicle by Mercedes-Benz. G
WARNING
Objects in the driver's footwell may restrict
the clearance around the pedals or block a
depressed pedal. This jeopardises the oper-
ating and road safety of the vehicle. There is a risk of an accident.
Stow all objects securely in the vehicle so that
they do not get into the driver's footwell.
Always fit the floormats securely and as pre-
scribed in order to ensure that there is always sufficient room for the pedals. Do not use
loose floormats and do not place several floor- mats on top of one another.
! If the engine is switched off and equipment
on the diagnostics connection is used, the
starter battery may discharge.
Connecting equipment to the diagnostics con-
nection can lead to emissions monitoring infor-
mation being reset, for example. This may lead to the vehicle failing to meet the requirements of
the next emissions test during the main inspec- tion. Qualified specialist workshop
A qualified specialist workshop has the neces-
sary special skills, tools and qualifications to
correctly carry out any necessary work on your
vehicle. This particularly applies to work rele-
vant to safety.
Observe the notes in the Service Booklet.
Always have the following work carried out at a
qualified specialist workshop:
R work relevant to safety
R service and maintenance work
R repair work
R modifications, installations and conversions
R work on electronic components
Mercedes-Benz recommends that you use a
Mercedes-Benz Service Centre. Vehicle registration
Mercedes-Benz may ask its Service Centres to
carry out technical inspections on certain vehi-
cles. The quality or safety of the vehicle is
improved as a result of the inspection.
Mercedes-Benz can only inform you about vehi-
cle checks if it has your registration data.
It is possible that your vehicle has not yet been
registered in your name in the following cases:
R if your vehicle was not purchased at an
authorised specialist dealer
R if your vehicle has not yet been inspected at a
Mercedes-Benz Service Centre 30
Introduction
Page 34 of 397
It is advisable to register your vehicle with a
Mercedes-Benz Service Centre.
Inform Mercedes-Benz as soon as possible
about any change in address or vehicle owner-
ship. You can do this at a Mercedes-Benz Ser-
vice Centre, for example. Correct use
If you remove any warning stickers, you or oth-
ers could fail to recognise certain dangers.
Leave warning stickers in position.
Observe the following information when driving your vehicle:
R the safety notes in this manual
R the vehicle technical data
R traffic rules and regulations
R laws and safety standards pertaining to motor
vehicles Implied warranty
! Follow the instructions in this manual about
the proper operation of your vehicle as well as
about possible vehicle damage. Damage to
your vehicle that arises from culpable contra- ventions against these instructions are not
covered either by Mercedes-Benz implied
warranty or by the New or Used-Vehicle War-
ranty. QR code for rescue card
The QR code is secured in the fuel filler flap and
on the opposite side on the B-pillar. In the event
of an accident, rescue services can use the QR
code to quickly find the appropriate rescue card for your vehicle. The current rescue card con-
tains, in a compact form, the most important
information about your vehicle, e.g. the routing
of the electric cables.
You can find more information under http://
portal.aftersales.i.daimler.com/public/
content/asportal/en/communication/
informationen_fuer/QRCode.html. Data stored in the vehicle
Many of the electronic components in your vehi-
cle can store data.
These data memories temporarily or perma-
nently store technical information about:
R the vehicle's operating state
R events
R faults
In general, this technical information docu-
ments the state of a component, a module, a
system or the surroundings.
This includes, for example:
R operating conditions of system components,
e.g. fluid levels
R status messages concerning the vehicle and
its individual components, e.g. number of
wheel revolutions/speed, deceleration in
movement, lateral acceleration, accelerator
pedal position
R malfunctions and defects in important system
components, e.g. lights, brakes
R vehicle reactions and operating conditions in
special driving situations, e.g. airbag deploy-
ment, intervention of stability control sys-
tems
R ambient conditions, e.g. outside temperature
These data are of an exclusively technical nature
and can be used to:
R assist in detecting and rectifying faults and
defects
R analyse vehicle functions, e.g. after an acci-
dent
R optimise vehicle functions
The data cannot be used to trace the vehicle's
movements.
When your vehicle is serviced, technical infor-
mation can be read from the event data memory
and fault data memory.
Services include, for example:
R repair services
R service processes
R warranty events
R quality assurance
The information is read out by employees of the service network (including the manufacturer)
using special diagnostic testers. You can obtain more information there, if required. Introduction
31 Z
Page 45 of 397

Panic alarm
X
To activate: press the!button :for
approximately one second.
A visual and audible alarm is triggered if the
alarm system is primed.
X To deactivate: press the!button :
again.
or
X Insert the key into the ignition lock.
or X Press the KEYLESS-GO Start/Stop button.
The KEYLESS-GO key must be in the vehicle.
The panic alarm function is only available in cer- tain countries. Occupant safety
Introduction to the restraint system
The restraint system can reduce the risk of vehi-
cle occupants coming into contact with parts of
the vehicle's interior in the event of an accident. Furthermore, the restraint system can also
reduce the forces to which vehicle occupants
are subjected during an accident.
The restraint system includes:
R Seat belt system
R Airbags
R Child restraint system
R Child seat securing system The various components of the restraint system
work complementary to one another. They can
only perform their intended protective function
if all vehicle occupants:
R have correctly fastened their seat belt
(Y page 45)
R have correctly adjusted their seat and head
restraint (Y page 102).
As the driver, you must also ensure that the
steering wheel is correctly adjusted. Observe
the information relating to the correct driver's
seat position (Y page 102).
Additionally, you must ensure that an airbag can
deploy freely (Y page 47).
The airbag is supplementary to a correctly fas-
tened seat belt. As an additional safety device,
the airbag increases the level of protection for
vehicle occupants in the event of an accident. If the protection provided by the seat belt is suf-
ficient, the airbags do not deploy. Furthermore,
in the event of an accident, only airbags which
provide greater protection in the given accident situation deploy. However, seat belts and air-
bags generally do not protect against objects
penetrating the vehicle from the outside.
Information on how the restraint system oper-
ates can be found in "Deployment of the seat
belt tensioner and airbags" (Y page 54).
See "Children in the vehicle" for information on
infants and children traveling with you in the
vehicle restraint systems for infants and chil-
dren(Y page 57). Important safety notes
G
WARNING
If the restraint system is modified, it may no
longer work as intended. The restraint system
may then not perform its intended protective function by failing in an accident or triggering
unexpectedly, for example. There is an
increased risk of injury, possibly even fatal.
Never modify parts of the restraint system. Do not attempt to modify the wiring as well as
electronic components or their software.
If the vehicle needs to be adapted to accommo- date a person with disabilities, please contact a
specialist workshop. 42
Occupant safetySafety
Page 48 of 397
protective function. Furthermore, an incor-
rectly worn seat belt can cause additional
injuries, e.g. in the event of an accident, heavy braking or sudden changes of direction. There is an increased risk of injury, possibly even
fatal.
Always secure persons less than 1.50 mtall in
additional suitable restraint systems.
If a child younger than twelve years old and
under 1.50 min height is travelling in the vehi-
cle:
R always secure the child in a child restraint
system suitable for this Mercedes-Benz vehi-
cle. The child restraint system must be appro- priate to the age, weight and size of the child.
R always observe the instructions and safety
notes on the "Automatic front-passenger
front airbag deactivation system"
(Y page 50)
R always observe the instructions and safety
notes on "Children in the vehicle"
(Y page 57) in addition to the child restraint
system manufacturer's installation and oper-
ating instructions. G
WARNING
Seat belts cannot protect as intended, if:
R they are damaged, have been modified, are
extremely dirty, bleached or dyed
R the seat belt buckle is damaged or
extremely dirty
R modifications have been made to the belt
tensioners, belt anchorages or inertia reels
Seat belts may sustain non-visible damage in an accident, e.g. due to glass splinters. Modi-
fied or damaged seat belts can tear or fail, for example in the event of an accident. Modified
seat belt tensioners may be deployed unin-
tentionally or not function as intended. There is an increased risk of injury, possibly even
fatal.
Never modify seat belts, seat belt tensioners,
seat belt anchorages and inertia reels. Ensure that seat belts are not damaged or worn and
are clean. After an accident, have the seat
belts checked immediately at a qualified spe-
cialist workshop. Mercedes-Benz recommends that you only use
seat belts which have been approved specifi-
cally for your vehicle by Mercedes-Benz. Other-
wise, your vehicle's general operating permit
could be invalidated.
Correct seat belt use Pay attention to the safety notes about the seat
belt (Y page 44).
All vehicle occupants must fasten their seat
belts correctly before you start driving. You
must also make sure that all vehicle occupants
have fastened their seat belts correctly during
the journey.
When fastening your seat belt, always make
sure that:
R the seat belt tongue is inserted into the belt
buckle that belongs to the seat.
R the seat belt is tightened across your body.
Avoid wearing bulky clothing, e.g. a winter
coat.
R the seat belt is not twisted.
Only then can the forces which occur be dis-
tributed over the area of the belt.
R the shoulder section of the belt is always
routed across the centre of your shoulder.
The shoulder section of the belt must not
come into contact with your neck or be routed under your arm. Adjust the seat belt to the
appropriate height as necessary.
R The lap belt must be taut and as low as pos-
sible over your lap.
The lap belt must always be routed across
your hip joints and not across your abdomen.
Pregnant women must take particular care
with this. If necessary, push the lap belt down to your hip joint and pull it tight using the
shoulder section of the belt.
R The seat belt is not routed over sharp, pointed
or fragile objects.
If such objects are located on or in your cloth- ing, e.g. pens, keys, spectacles, etc. stow
these in a suitable location.
R Only one person should use each seat belt at
any one time.
Babies and children must never travel sitting
on the lap of another vehicle occupant. In the Occupant safety
45Safety Z
Page 49 of 397
event of an accident, they could be crushed
between the vehicle occupant and seat belt.
R Do not secure any objects with a seat belt if
the seat belt is being used by one of the vehi- cle's occupants.
You must also make sure that objects, e.g.
cushions, are never placed between a person
and the seat.
Seat belts are solely intended to secure and
restrain persons. To secure objects, luggage or
loads, always observe the "Loading guidelines"
(Y page 312).
Fastening and adjusting the seat belts Observe the safety notes on the seat belt
(Y
page 44) and the information on the correct
use of the seat belt (Y page 45).Basic illustration
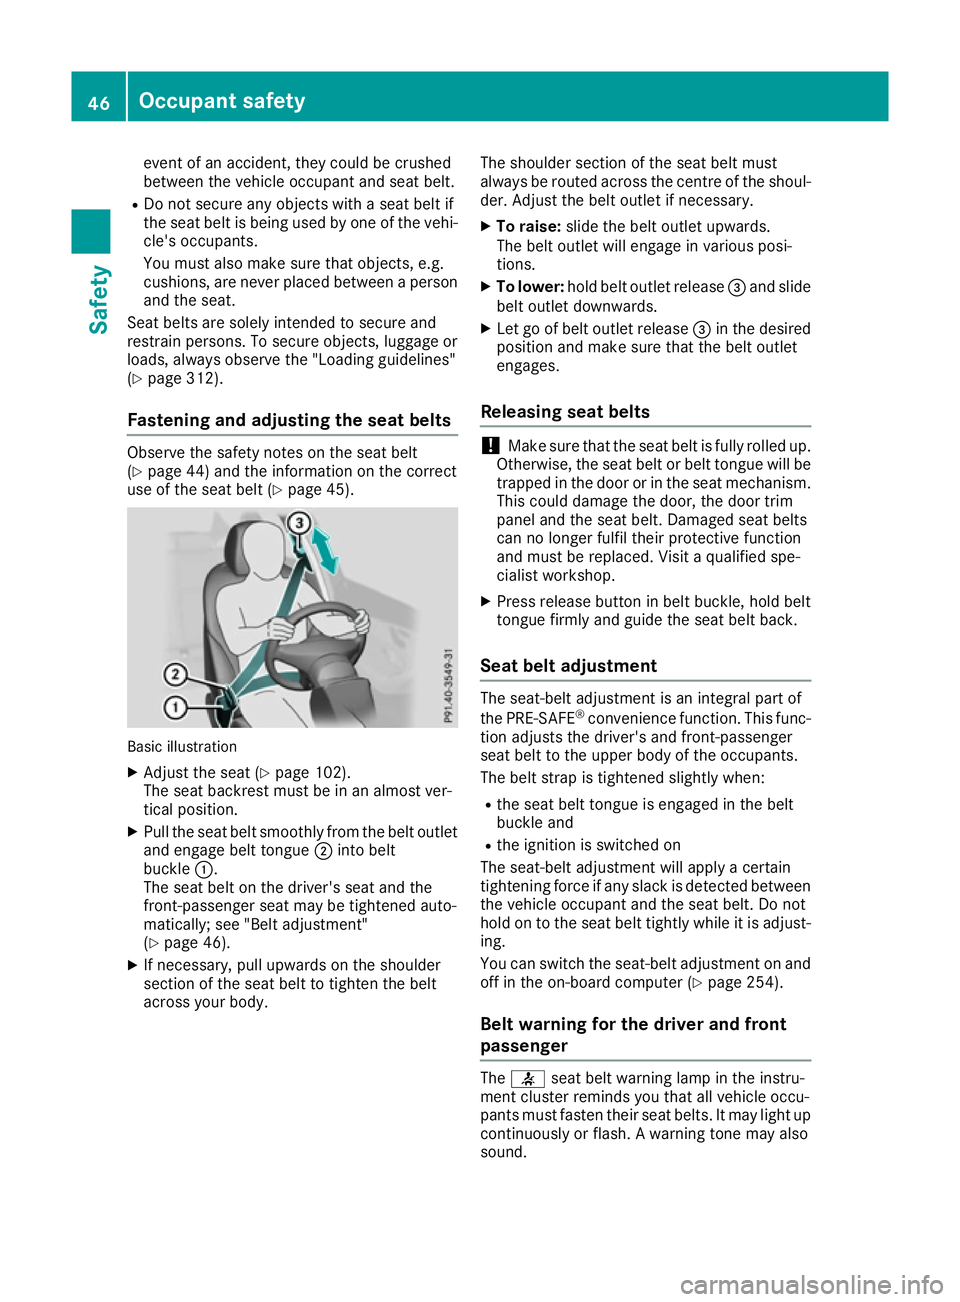
X Adjust the seat (Y page 102).
The seat backrest must be in an almost ver-
tical position.
X Pull the seat belt smoothly from the belt outlet
and engage belt tongue ;into belt
buckle :.
The seat belt on the driver's seat and the
front-passenger seat may be tightened auto-
matically; see "Belt adjustment"
(Y page 46).
X If necessary, pull upwards on the shoulder
section of the seat belt to tighten the belt
across your body. The shoulder section of the seat belt must
always be routed across the centre of the shoul-
der. Adjust the belt outlet if necessary.
X To raise: slide the belt outlet upwards.
The belt outlet will engage in various posi-
tions.
X To lower: hold belt outlet release =and slide
belt outlet downwards.
X Let go of belt outlet release =in the desired
position and make sure that the belt outlet
engages.
Releasing seat belts !
Make sure that the seat belt is fully rolled up.
Otherwise, the seat belt or belt tongue will be
trapped in the door or in the seat mechanism. This could damage the door, the door trim
panel and the seat belt. Damaged seat belts
can no longer fulfil their protective function
and must be replaced. Visit a qualified spe-
cialist workshop.
X Press release button in belt buckle, hold belt
tongue firmly and guide the seat belt back.
Seat belt adjustment The seat-belt adjustment is an integral part of
the PRE-SAFE
®
convenience function. This func-
tion adjusts the driver's and front-passenger
seat belt to the upper body of the occupants.
The belt strap is tightened slightly when:
R the seat belt tongue is engaged in the belt
buckle and
R the ignition is switched on
The seat-belt adjustment will apply a certain
tightening force if any slack is detected between
the vehicle occupant and the seat belt. Do not
hold on to the seat belt tightly while it is adjust-
ing.
You can switch the seat-belt adjustment on and
off in the on-board computer (Y page 254).
Belt warning for the driver and front
passenger The
7 seat belt warning lamp in the instru-
ment cluster reminds you that all vehicle occu-
pants must fasten their seat belts. It may light up continuously or flash. A warning tone may also
sound. 46
Occupant safetySafety