2016 MERCEDES-BENZ GLS SUV ECU
[x] Cancel search: ECUPage 191 of 397
Stopping
G
WARNING
When leaving the vehicle, even if it is braked
only by DISTRONIC PLUS, it could roll away if:
R there is a malfunction in the system or in
the voltage supply.
R DISTRONIC PLUS has been deactivated
with the cruise control lever, e.g. by a vehi-
cle occupant or from outside the vehicle.
R the electrical system in the engine com-
partment, the battery or the fuses have
been tampered with.
R the battery is disconnected.
R the accelerator pedal has been depressed,
e.g. by a vehicle occupant.
There is a risk of an accident.
If you wish to exit the vehicle, always turn off
DISTRONIC PLUS and secure the vehicle
against rolling away.
If Distance Pilot DISTRONIC detects that the
vehicle in front is stopping, it brakes your vehicle to a stop.
Once your vehicle is stationary, it remains sta-
tionary and you do not need to depress the
brake.
After a short period, the vehicle is secured by
the electric parking brake, thus relieving the
service brake.
Depending on the specified minimum distance,
your vehicle will come to a standstill at a suffi-
cient distance behind the vehicle in front. The
specified minimum distance is set using the
control on the cruise control lever.
The transmission is shifted automatically to
position P if, with Distance Pilot DISTRONIC
activated and the vehicle stationary:
R the driver's door is open and the driver's seat
belt is unfastened
R the engine is switched off, unless it is auto-
matically switched off by the ECO start/stop
function
The electric parking brake secures the vehicle
automatically if, with Distance Pilot DISTRONIC activated and the vehicle stationary:
R a system fault occurs.
R the power supply is insufficient. On steep uphill or downhill inclines or if there is
a malfunction, the transmission may also be
automatically shifted into position P.
Setting a speed Bear in mind that it may take a brief moment
until the vehicle has accelerated or braked to
the set speed.
X Press the cruise control lever up :for a
higher speed or down Afor a lower speed
X Keep the cruise control lever pressed until the
desired speed is reached.
X Release the cruise control lever.
The new speed is stored. Distance Pilot
DISTRONIC is activated and adjusts the vehi-
cle's speed to the new speed stored.
X To adjust the set speed in1 km/hincre-
ments:
briefly press the cruise control lever
up : or down Ato the pressure point.
The last stored speed increases or decreases
in 1 km/h increments.
X To adjust the set speed in10 km/hincre-
ments: briefly press the cruise control lever
up : or down Abeyond the pressure point.
The last stored speed increases or decreases
in 10 km/h increments.
i If you accelerate to overtake, Distance Pilot
DISTRONIC adjusts the vehicle's speed to the last speed stored after you have finished over-
taking.
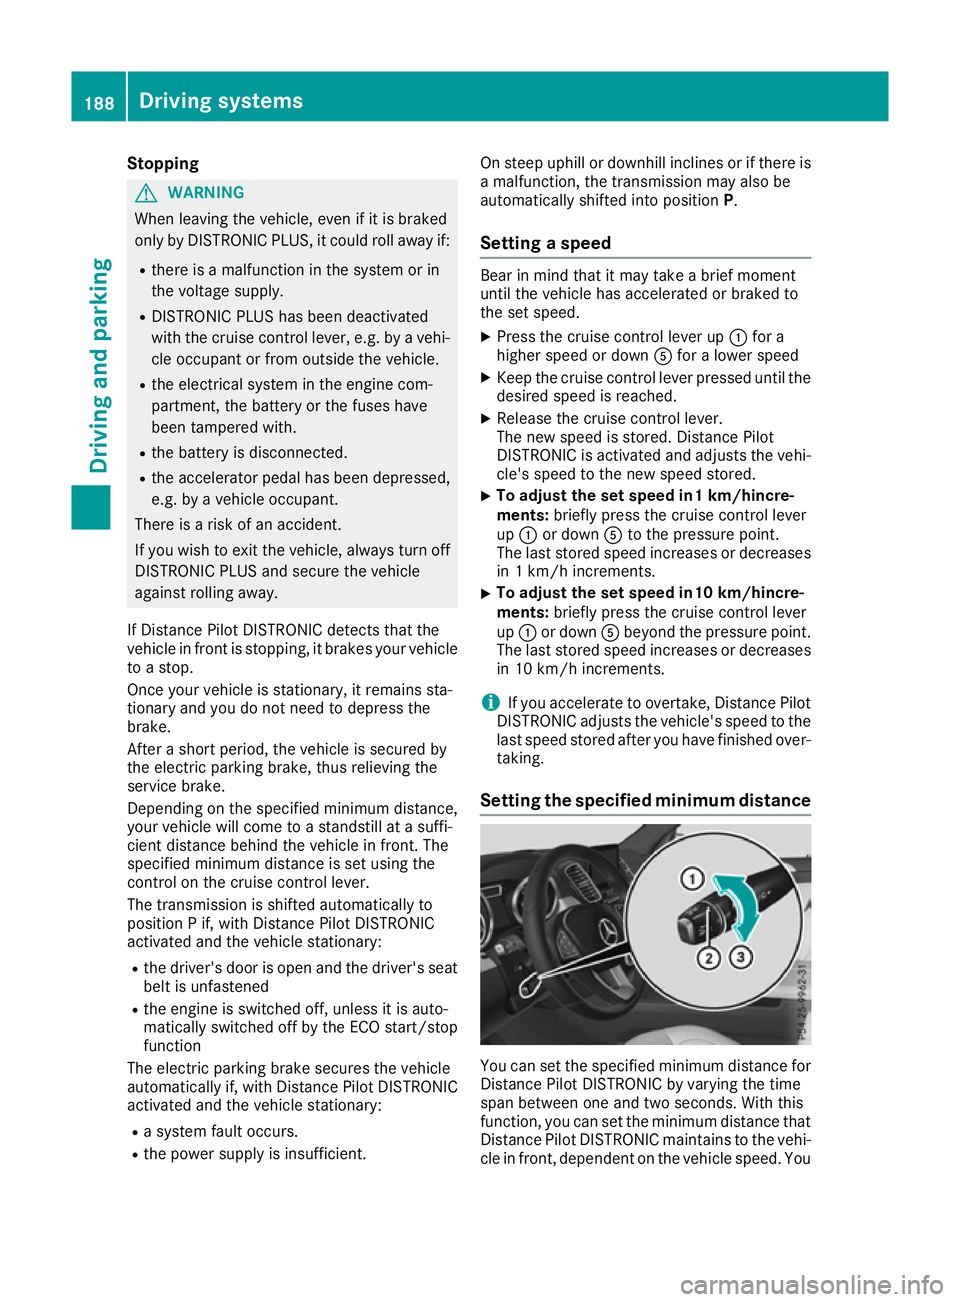
Setting the specified minimum distance You can set the specified minimum distance for
Distance Pilot DISTRONIC by varying the time
span between one and two seconds. With this
function, you can set the minimum distance that
Distance Pilot DISTRONIC maintains to the vehi- cle in front, dependent on the vehicle speed. You 188
Driving systemsDriving and parking
Page 192 of 397
can see this distance in the multifunction dis-
play (Y page 190).
X To increase: turn control;in direction =.
Distance Pilot DISTRONIC then maintains a
greater distance between your vehicle and
the vehicle in front.
X To decrease: turn control;in direction :.
Distance Pilot DISTRONIC then maintains a
shorter distance between your vehicle and
the vehicle in front.
i Make sure that you maintain a sufficient and
safe distance from the vehicle in front. Adjust the distance to the vehicle in front if neces-
sary.
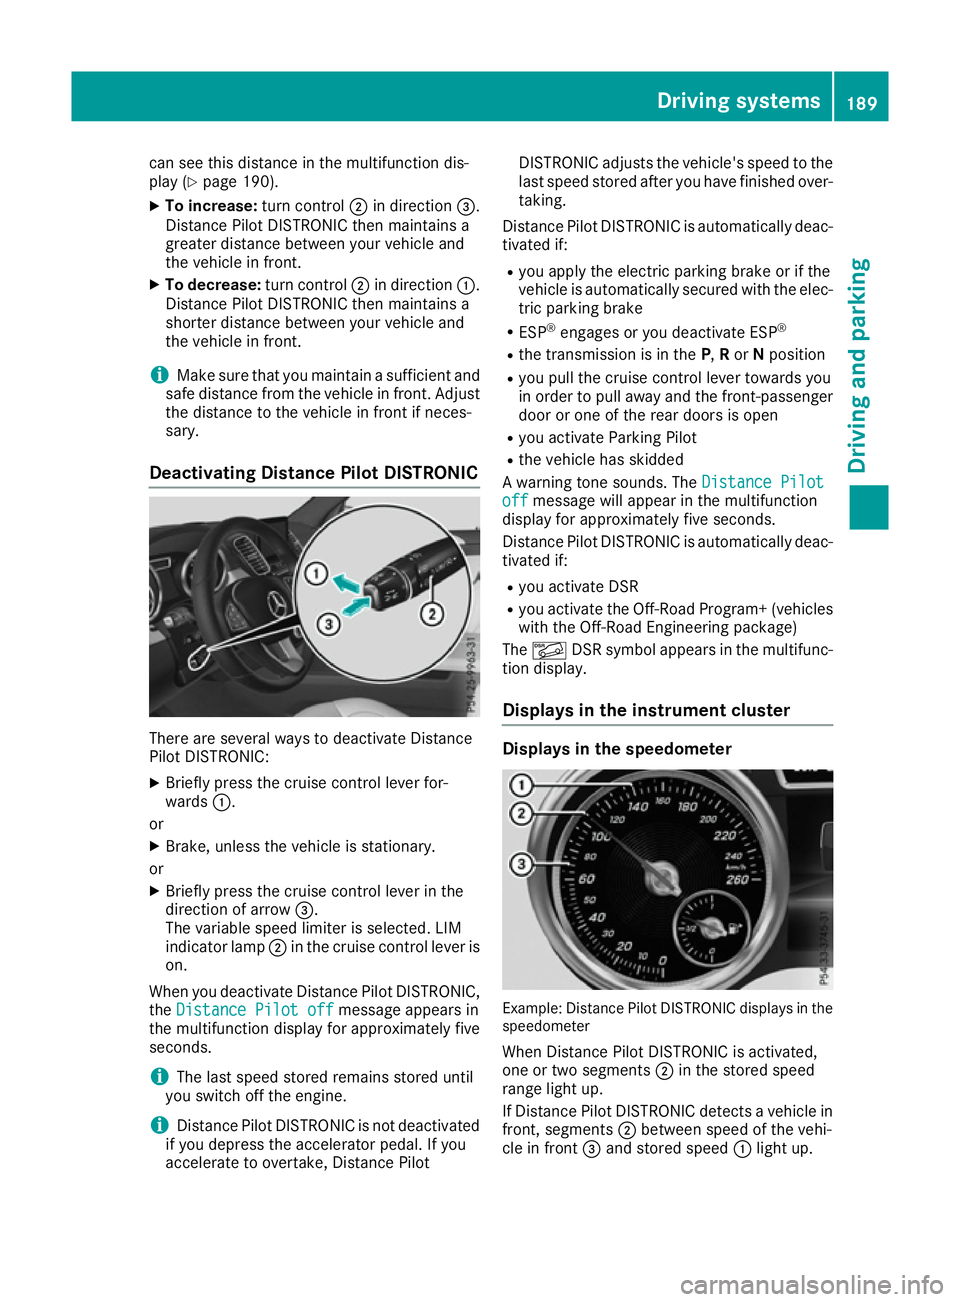
Deactivating Distance Pilot DISTRONIC There are several ways to deactivate Distance
Pilot DISTRONIC:
X Briefly press the cruise control lever for-
wards :.
or X Brake, unless the vehicle is stationary.
or X Briefly press the cruise control lever in the
direction of arrow =.
The variable speed limiter is selected. LIM
indicator lamp ;in the cruise control lever is
on.
When you deactivate Distance Pilot DISTRONIC, the Distance Pilot off
Distance Pilot off message appears in
the multifunction display for approximately five
seconds.
i The last speed stored remains stored until
you switch off the engine.
i Distance Pilot DISTRONIC is not deactivated
if you depress the accelerator pedal. If you
accelerate to overtake, Distance Pilot DISTRONIC adjusts the vehicle's speed to the
last speed stored after you have finished over-
taking.
Distance Pilot DISTRONIC is automatically deac- tivated if:
R you apply the electric parking brake or if the
vehicle is automatically secured with the elec-
tric parking brake
R ESP ®
engages or you deactivate ESP ®
R the transmission is in the P,Ror Nposition
R you pull the cruise control lever towards you
in order to pull away and the front-passenger
door or one of the rear doors is open
R you activate Parking Pilot
R the vehicle has skidded
A warning tone sounds. The Distance Pilot
Distance Pilot
off off message will appear in the multifunction
display for approximately five seconds.
Distance Pilot DISTRONIC is automatically deac- tivated if:
R you activate DSR
R you activate the Off-Road Program+ (vehicles
with the Off-Road Engineering package)
The à DSR symbol appears in the multifunc-
tion display.
Displays in the instrument cluster Displays in the speedometer
Example: Distance Pilot DISTRONIC displays in the
speedometer
When Distance Pilot DISTRONIC is activated,
one or two segments ;in the stored speed
range light up.
If Distance Pilot DISTRONIC detects a vehicle in
front, segments ;between speed of the vehi-
cle in front =and stored speed :light up. Driving systems
189Driving and parking Z
Page 198 of 397
If you press the
%ora button on the
multifunction steering wheel, the message will
disappear.
i Up to offroad level 2, you can hide the mes-
sages using the %ora button on the
multifunction steering wheel.
While the adjustment from offroad level 2 to off-
road level 3 is taking place, you will see a mes-
sage such as the following in the multifunction
display: Vehicle rising Max. speed
Vehicle rising Max. speed
20 km/h 20 km/h.
The Max. Max. speed
speed 20
20km/h
km/h message draws your
attention to the maximum speed permitted for
offroad level 3.
If you drive above 20 km/h at offroad level 3,
you will see the following message shown in red
in the multifunction display: Lowering Max. Lowering Max.
speed 20 km/h
speed 20 km/h.
i You cannot clear these messages.
You also hear a warning tone. The vehicle is low-
ered and offroad level 3 is cancelled.
If you continue to increase your speed, the red
message continues to be shown in the multi-
function display. The newly set level is not dis-
played until the vehicle has been set to a level
suitable for the current speed.
Lowering the vehicle If you drive faster than 20 km/h while the vehi-
cle is being lowered, you will see the following
message shown in white in the multifunction
display: Lowering Max. speed 20 km/h Lowering Max. speed 20 km/h.
The vehicle is lowered to offroad level 2.
You will see a message in the multifunction dis- play, for example: Lowering
Lowering.
Off-road level 2 is cancelled and the vehicle is
lowered to offroad level 1 if you:
R drive at speeds above 80 km/h or
R drive at speeds between 65 km/h and
80 km/h for longer than 20 seconds
Off-road level 1 is cancelled. Depending on the
vehicle's speed and the selected drive program,
the vehicle is automatically lowered to normal
level or low level if you:
R drive at speeds above 115 km/h or
R drive at speeds between 100 km/h and
115 km/h for longer than 20 seconds HOLD function
General notes The HOLD function can assist you if required in
the following situations:
R
when pulling away, especially on steep
slopes.
R when manoeuvring on steep slopes.
R when waiting in traffic.
The vehicle is kept stationary without the driver having to depress the brake pedal.
The braking effect is cancelled and the HOLD
function is deactivated when you depress the
accelerator pedal to pull away.
i Do not use the HOLD function when driving
off-road, on steep uphill or downhill gradients or on slippery or loose surfaces. The HOLD
function cannot hold the vehicle on such sur- faces.
Important safety notes G
WARNING
When leaving the vehicle, it can still roll away despite being braked by the HOLD function if:
R there is a malfunction in the system or in
the voltage supply
R the HOLD function is deactivated by the
accelerator pedal being depressed, e.g. by
a vehicle occupant
R the electrical system in the engine com-
partment, the battery or the fuses are tam-
pered with
R the battery is disconnected
There is a risk of an accident.
Before leaving the vehicle, always deactivate
the HOLD function and secure the vehicle
from rolling away.
! When DISTRONIC PLUS or the HOLD func-
tion is activated, the vehicle brakes automat- ically in certain situations.
To avoid damage to the vehicle, deactivate
DISTRONIC PLUS and the HOLD function in
the following or similar situations:
R when towing away
R in a car wash Driving systems
195Driving and parking Z
Page 199 of 397
Deactivate the HOLD function (Y
page 196).
Activation conditions You can activate the HOLD function if:
R the vehicle is stationary
R the engine is running or if it has been auto-
matically switched off by the ECO start/stop
function
R the driver's door is closed or if your seat belt
is fastened
R the electric parking brake is released
R the transmission is in position D,Ror N
R Distance Pilot DISTRONIC is deactivated
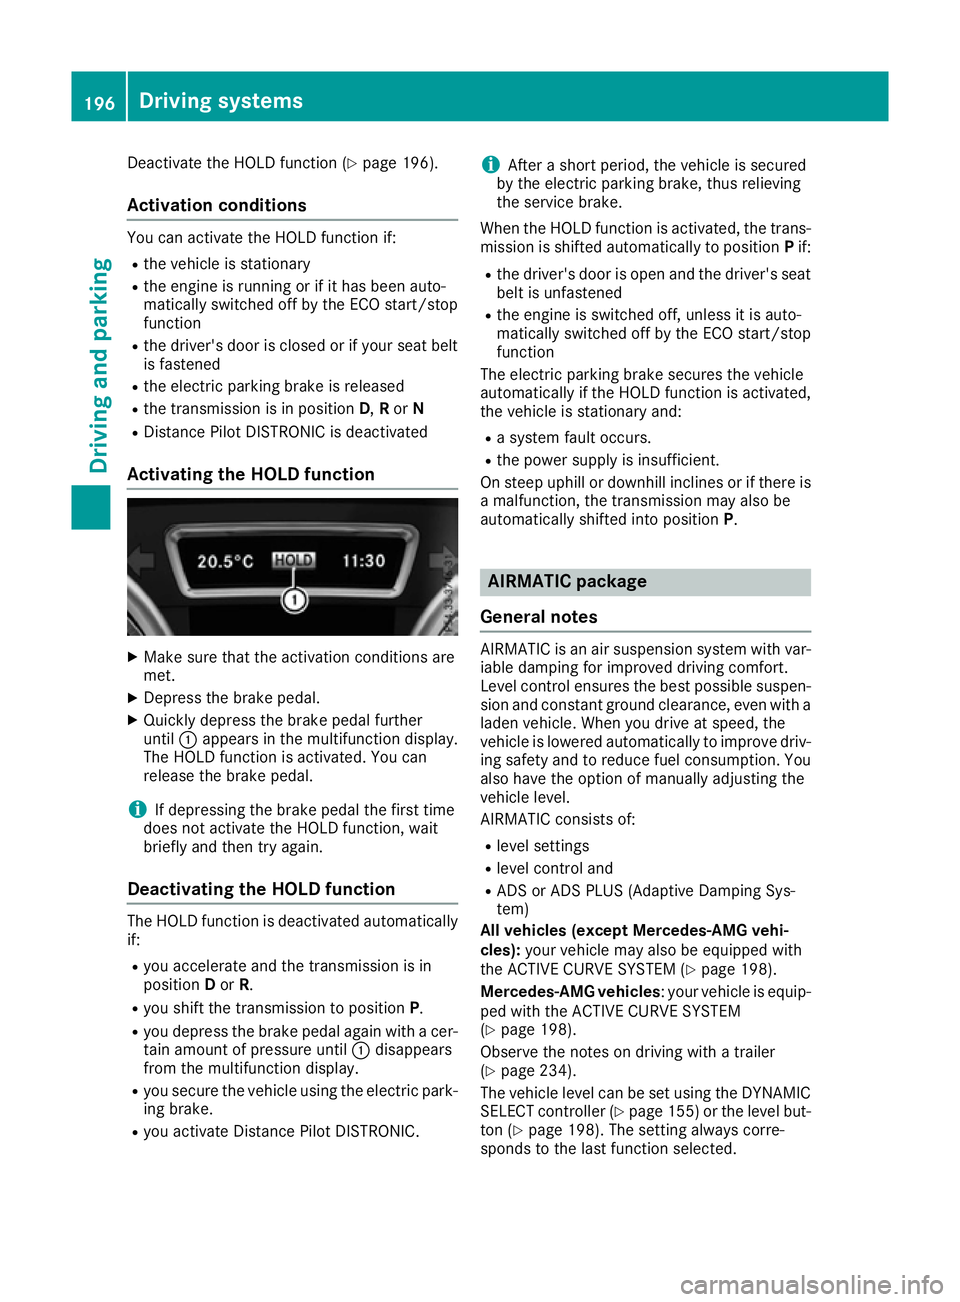
Activating the HOLD function X
Make sure that the activation conditions are
met.
X Depress the brake pedal.
X Quickly depress the brake pedal further
until :appears in the multifunction display.
The HOLD function is activated. You can
release the brake pedal.
i If depressing the brake pedal the first time
does not activate the HOLD function, wait
briefly and then try again.
Deactivating the HOLD function The HOLD function is deactivated automatically
if:
R you accelerate and the transmission is in
position Dor R.
R you shift the transmission to position P.
R you depress the brake pedal again with a cer-
tain amount of pressure until :disappears
from the multifunction display.
R you secure the vehicle using the electric park-
ing brake.
R you activate Distance Pilot DISTRONIC. i
After a short period, the vehicle is secured
by the electric parking brake, thus relieving
the service brake.
When the HOLD function is activated, the trans-
mission is shifted automatically to position Pif:
R the driver's door is open and the driver's seat
belt is unfastened
R the engine is switched off, unless it is auto-
matically switched off by the ECO start/stop
function
The electric parking brake secures the vehicle
automatically if the HOLD function is activated,
the vehicle is stationary and:
R a system fault occurs.
R the power supply is insufficient.
On steep uphill or downhill inclines or if there is
a malfunction, the transmission may also be
automatically shifted into position P. AIRMATIC package
General notes AIRMATIC is an air suspension system with var-
iable damping for improved driving comfort.
Level control ensures the best possible suspen- sion and constant ground clearance, even with a laden vehicle. When you drive at speed, the
vehicle is lowered automatically to improve driv-
ing safety and to reduce fuel consumption. You
also have the option of manually adjusting the
vehicle level.
AIRMATIC consists of:
R level settings
R level control and
R ADS or ADS PLUS (Adaptive Damping Sys-
tem)
All vehicles (except Mercedes-AMG vehi-
cles): your vehicle may also be equipped with
the ACTIVE CURVE SYSTEM (Y page 198).
Mercedes-AMG vehicles : your vehicle is equip-
ped with the ACTIVE CURVE SYSTEM
(Y page 198).
Observe the notes on driving with a trailer
(Y page 234).
The vehicle level can be set using the DYNAMIC
SELECT controller (Y page 155)or the level but-
ton (Y page 198). The setting always corre-
sponds to the last function selected. 196
Driving systemsDriving and parking
Page 208 of 397
Parking Pilot does not assist you parking in
spaces at a right angle to the direction of travel
if:
R two parking spaces are located directly next
to one another
R the parking space is directly next to a low
obstacle such as a low kerb
R you forward-park
Parking Pilot does not assist you parking in
spaces parallel with or at a right angle to the
direction of travel if:
R the parking space is on a kerb
R the system reads the parking space as being
blocked, such as by foliage or grass paving
blocks
R the area is too small for the vehicle to
manoeuvre into
R the parking space is bordered by an obstacle,
e.g. a tree, a post or a trailer :
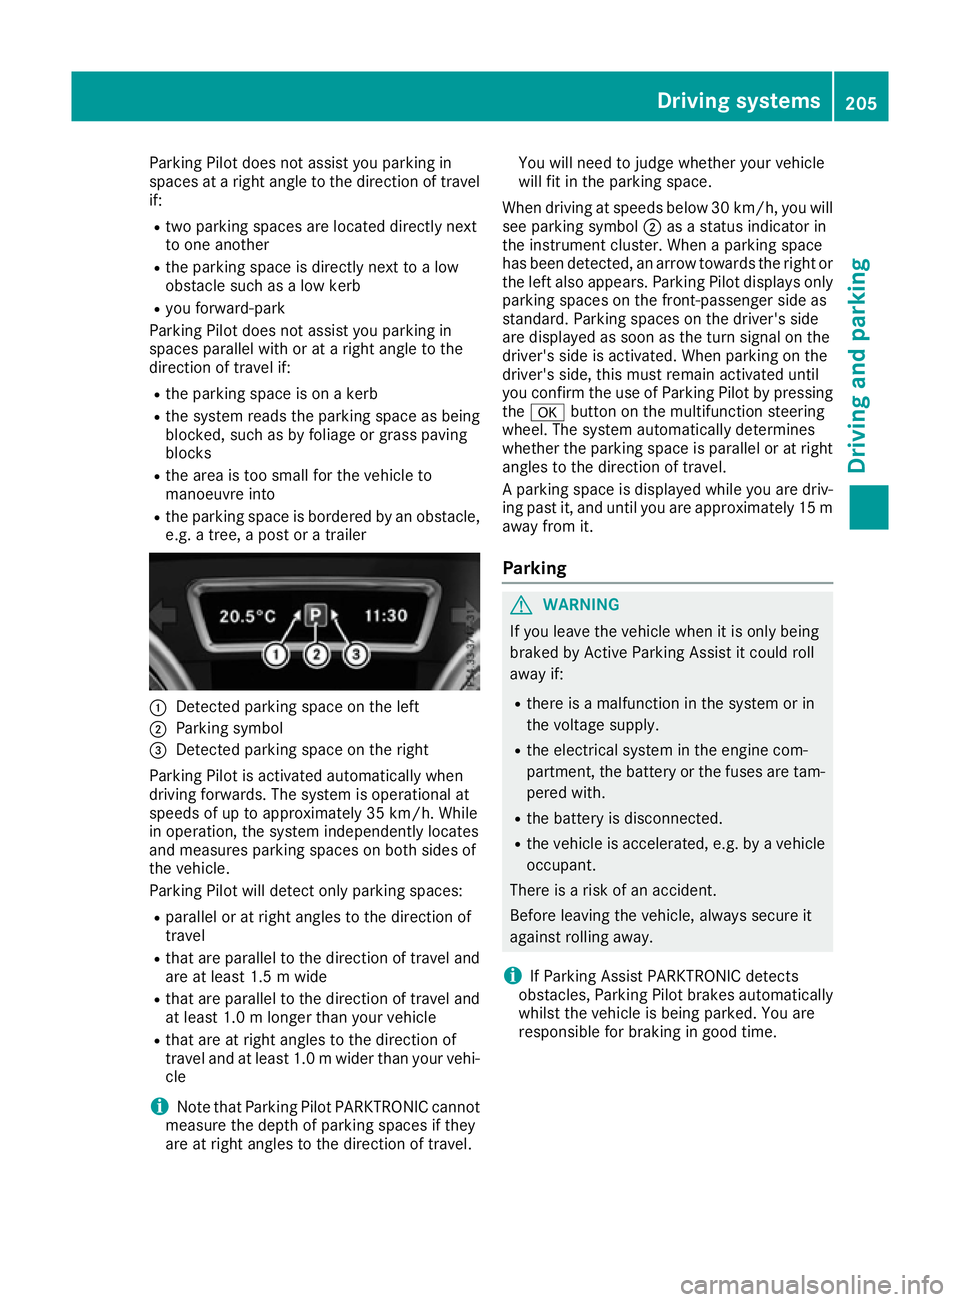
Detected parking space on the left
; Parking symbol
= Detected parking space on the right
Parking Pilot is activated automatically when
driving forwards. The system is operational at
speeds of up to approximately 35 km/h. While
in operation, the system independently locates
and measures parking spaces on both sides of
the vehicle.
Parking Pilot will detect only parking spaces:
R parallel or at right angles to the direction of
travel
R that are parallel to the direction of travel and
are at least 1.5 m wide
R that are parallel to the direction of travel and
at least 1.0 m longer than your vehicle
R that are at right angles to the direction of
travel and at least 1.0 mwider than your vehi-
cle
i Note that Parking Pilot PARKTRONIC cannot
measure the depth of parking spaces if they
are at right angles to the direction of travel. You will need to judge whether your vehicle
will fit in the parking space.
When driving at speeds below 30 km/h, you will
see parking symbol ;as a status indicator in
the instrument cluster. When a parking space
has been detected, an arrow towards the right or the left also appears. Parking Pilot displays only
parking spaces on the front-passenger side as
standard. Parking spaces on the driver's side
are displayed as soon as the turn signal on the
driver's side is activated. When parking on the
driver's side, this must remain activated until
you confirm the use of Parking Pilot by pressing the a button on the multifunction steering
wheel. The system automatically determines
whether the parking space is parallel or at right
angles to the direction of travel.
A parking space is displayed while you are driv- ing past it, and until you are approximately 15 m
away from it.
Parking G
WARNING
If you leave the vehicle when it is only being
braked by Active Parking Assist it could roll
away if:
R there is a malfunction in the system or in
the voltage supply.
R the electrical system in the engine com-
partment, the battery or the fuses are tam-
pered with.
R the battery is disconnected.
R the vehicle is accelerated, e.g. by a vehicle
occupant.
There is a risk of an accident.
Before leaving the vehicle, always secure it
against rolling away.
i If Parking Assist PARKTRONIC detects
obstacles, Parking Pilot brakes automatically whilst the vehicle is being parked. You are
responsible for braking in good time. Driving systems
205Driving and parking Z
Page 238 of 397
brake system and prevents the brakes from
overheating and wearing too quickly. If you need
additional braking, depress the brake pedal
repeatedly rather than continuously.
Driving tips If the trailer swings from side to side:
X Do not accelerate under any circumstances.
X Do not countersteer.
X Brake, if necessary.
R Maintain a greater distance to the vehicle in
front than when driving without a trailer.
R Avoid braking abruptly. If possible, brake gen-
tly at first to allow the trailer to run on. Then,
increase the braking force rapidly.
R The values given for gradient-climbing capa-
bilities from a standstill refer to sea level.
When driving in mountainous areas, note that
the power output of the engine, and conse-
quently the vehicle's gradient-climbing capa-
bility from a standstill, decrease with increas- ing altitude. Swivelling the ball coupling out/in
Using the switch in the driver's door G
WARNING
If the ball coupling is not engaged, the trailer
may come loose. There is a risk of an accident. Make sure that the ball coupling is securely
engaged and locked in position.
! Do not attempt to speed the up the swing-
out procedure by applying additional pressure
with your foot. The system could otherwise be
mechanically damaged.
In order to tow a trailer with your vehicle, you
must swing out the ball coupling using the
switch in the driver's door or in the tailgate.
The trailer socket is integrated into the ball cou- pling and swivels out with it.
Release the ball coupling only when the swivel
range is unobstructed. Swivelling out:
X Make sure that the vehicle is stationary.
X Shift the transmission to position P.
X Switch the ignition on.
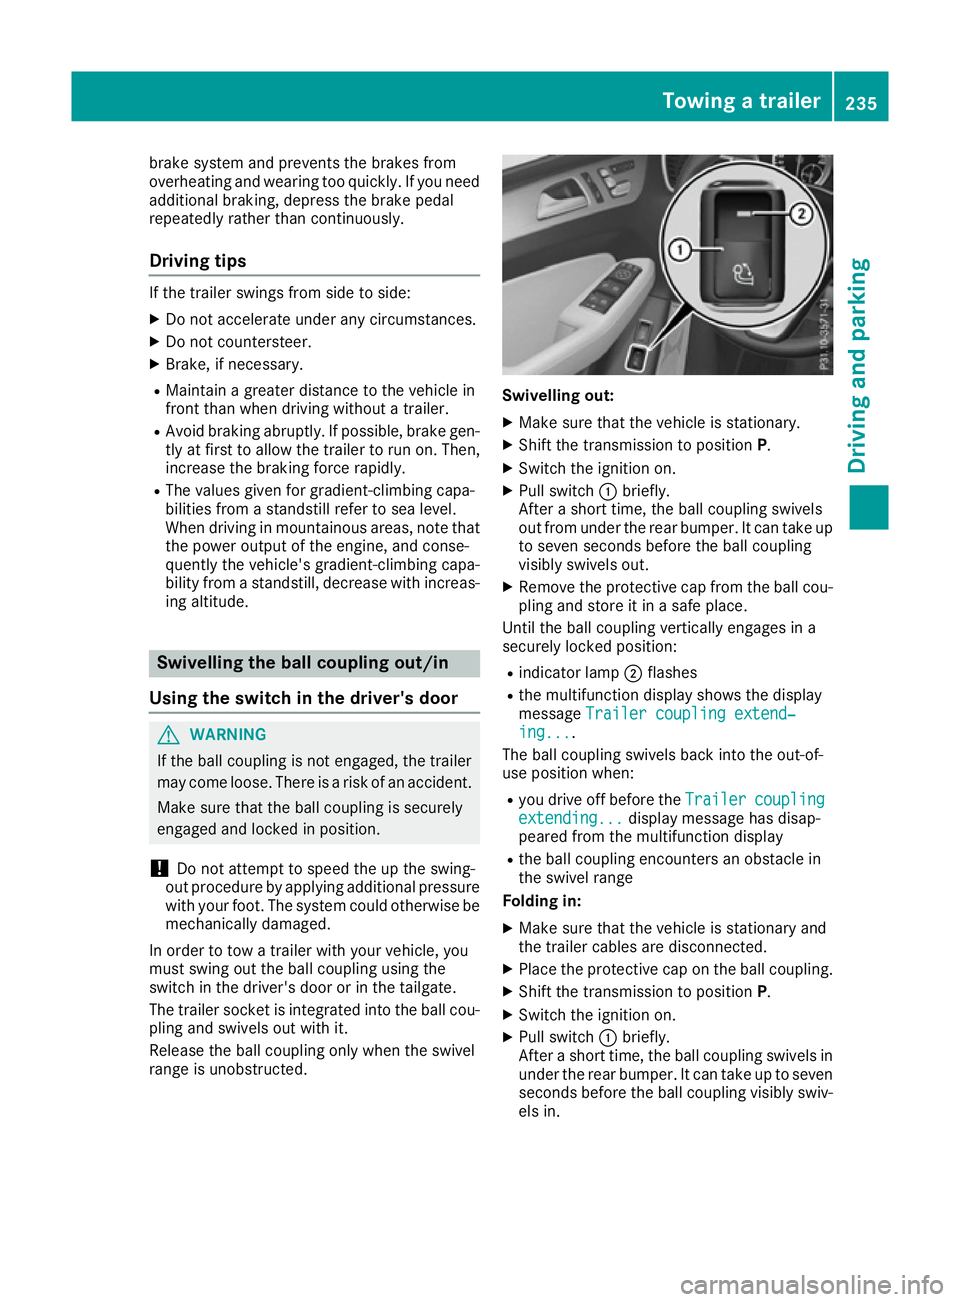
X Pull switch :briefly.
After a short time, the ball coupling swivels
out from under the rear bumper. It can take up to seven seconds before the ball coupling
visibly swivels out.
X Remove the protective cap from the ball cou-
pling and store it in a safe place.
Until the ball coupling vertically engages in a
securely locked position:
R indicator lamp ;flashes
R the multifunction display shows the display
message Trailer coupling extend‐ Trailer coupling extend‐
ing...
ing... .
The ball coupling swivels back into the out-of-
use position when:
R you drive off before the Trailer
Trailercoupling
coupling
extending...
extending... display message has disap-
peared from the multifunction display
R the ball coupling encounters an obstacle in
the swivel range
Folding in:
X Make sure that the vehicle is stationary and
the trailer cables are disconnected.
X Place the protective cap on the ball coupling.
X Shift the transmission to position P.
X Switch the ignition on.
X Pull switch :briefly.
After a short time, the ball coupling swivels in under the rear bumper. It can take up to seven
seconds before the ball coupling visibly swiv- els in. Towing a trailer
235Driving and parking Z
Page 239 of 397
Until the ball coupling engages in a securely
locked position under the bumper:
R indicator lamp ;flashes
R the multifunction display shows the display
message Trailer coupling extend‐
Trailer coupling extend‐
ing...
ing...
The ball coupling swivels back into the out-of-
use position when:
R you drive off before the Trailer
Trailer coupling
coupling
extending...
extending... display message has disap-
peared from the multifunction display
R the ball coupling encounters an obstacle in
the swivel range
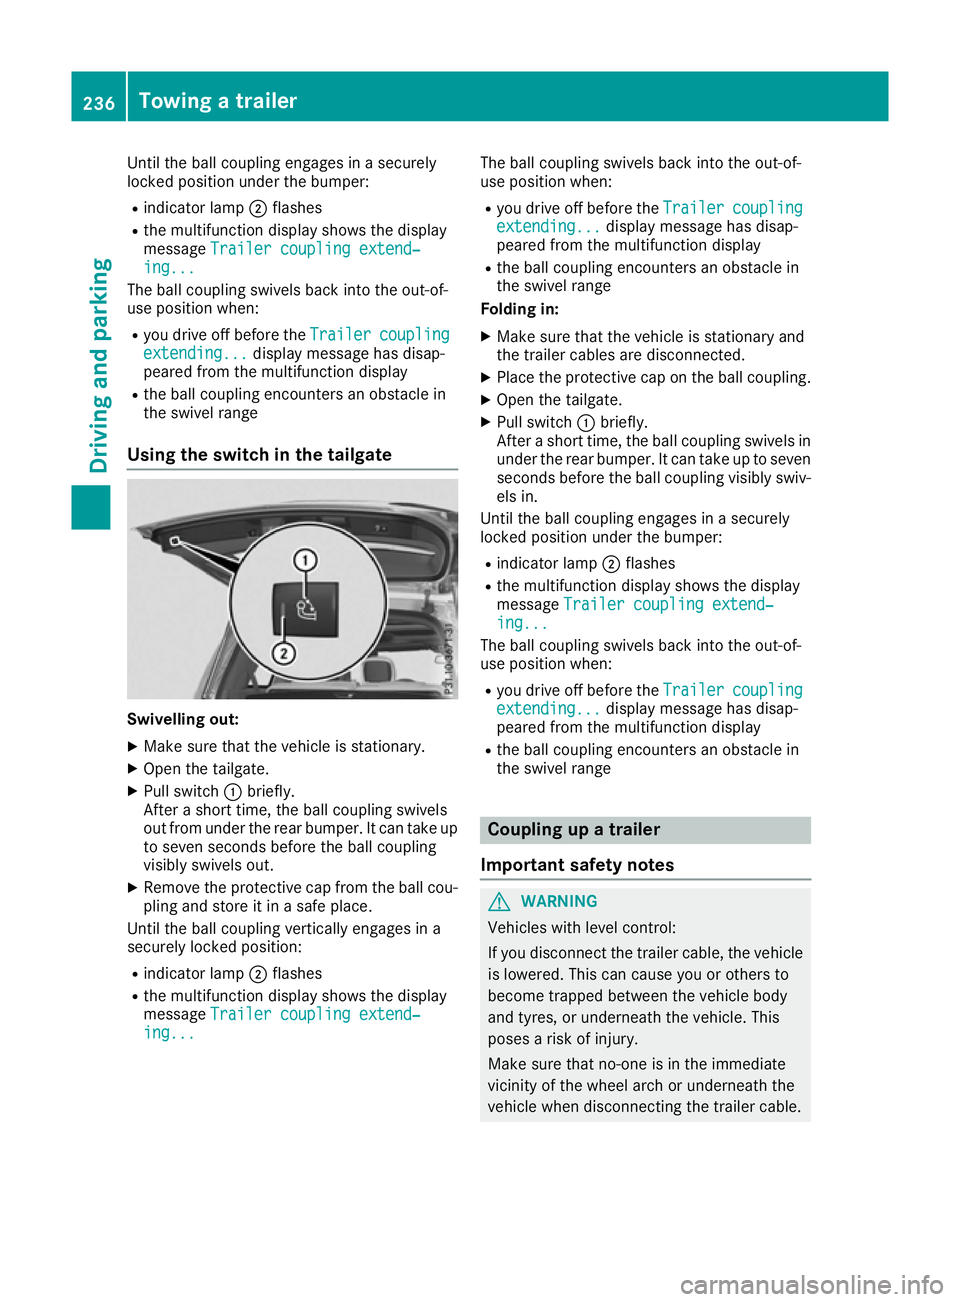
Using the switch in the tailgate Swivelling out:
X Make sure that the vehicle is stationary.
X Open the tailgate.
X Pull switch :briefly.
After a short time, the ball coupling swivels
out from under the rear bumper. It can take up to seven seconds before the ball coupling
visibly swivels out.
X Remove the protective cap from the ball cou-
pling and store it in a safe place.
Until the ball coupling vertically engages in a
securely locked position:
R indicator lamp ;flashes
R the multifunction display shows the display
message Trailer coupling extend‐
Trailer coupling extend‐
ing... ing... The ball coupling swivels back into the out-of-
use position when:
R you drive off before the Trailer
Trailercoupling
coupling
extending...
extending... display message has disap-
peared from the multifunction display
R the ball coupling encounters an obstacle in
the swivel range
Folding in:
X Make sure that the vehicle is stationary and
the trailer cables are disconnected.
X Place the protective cap on the ball coupling.
X Open the tailgate.
X Pull switch :briefly.
After a short time, the ball coupling swivels in under the rear bumper. It can take up to sevenseconds before the ball coupling visibly swiv-
els in.
Until the ball coupling engages in a securely
locked position under the bumper:
R indicator lamp ;flashes
R the multifunction display shows the display
message Trailer coupling extend‐ Trailer coupling extend‐
ing...
ing...
The ball coupling swivels back into the out-of-
use position when:
R you drive off before the Trailer
Trailercoupling
coupling
extending...
extending... display message has disap-
peared from the multifunction display
R the ball coupling encounters an obstacle in
the swivel range Coupling up a trailer
Important safety notes G
WARNING
Vehicles with level control:
If you disconnect the trailer cable, the vehicle is lowered. This can cause you or others to
become trapped between the vehicle body
and tyres, or underneath the vehicle. This
poses a risk of injury.
Make sure that no-one is in the immediate
vicinity of the wheel arch or underneath the
vehicle when disconnecting the trailer cable. 236
Towing a trailerDriving and parking
Page 241 of 397
X
Start the engine.
X Close the doors and tailgate.
X Secure the trailer against rolling away.
X Remove the trailer cable and decouple the
trailer.
X Switch off the engine. Trailer power supply
! You can connect accessories with a power
rating of up to 180 W to the permanent power
supply and with a power rating of up to 180 W to the power supply that is switched on via the ignition lock.
The trailer battery may not be charged from
the power supply.
When it leaves the factory, your vehicle's trailer
socket is equipped with a permanent power
supply and a power supply that is switched on
via the ignition lock.
The permanent power supply is supplied via
trailer socket pin 9.
The power supply that is switched on via the
ignition lock is supplied via trailer socket pin 10.
The trailer's permanent power supply is
switched off in the event of low vehicle supply
voltage and after six hours at the latest.
You can find more information about fitting the
trailer electrics at a qualified specialist work-
shop.
X To switch the connected power supply on
or off: turn the key to position 2or0respec-
tively (Y page 148). Failure check for LEDs
If LED lamps are fitted in the trailer, a malfunc-
tion message may appear in the multifunction
display even if there is no fault. The reason for
the error message may be that the current has
fallen below the minimum of 50 mA. To ensure reliable indication of the failure, each
LED chain in the trailer lighting must be guaran-
teed a minimum current of 50 mA. Trailer with 7-pin connector
General notes Trailer with 7-pin connector:
you can connect
to the 13-pin socket on the ball coupling using
an adapter or, if necessary, an adapter cable.
Both can be obtained at a qualified specialist
workshop.
Fitting the adapter !
Make sure that there is sufficient cable play
so that the cable cannot become detached
when cornering.
! Remove the adapter cable before folding in
the ball coupling. You could otherwise dam-
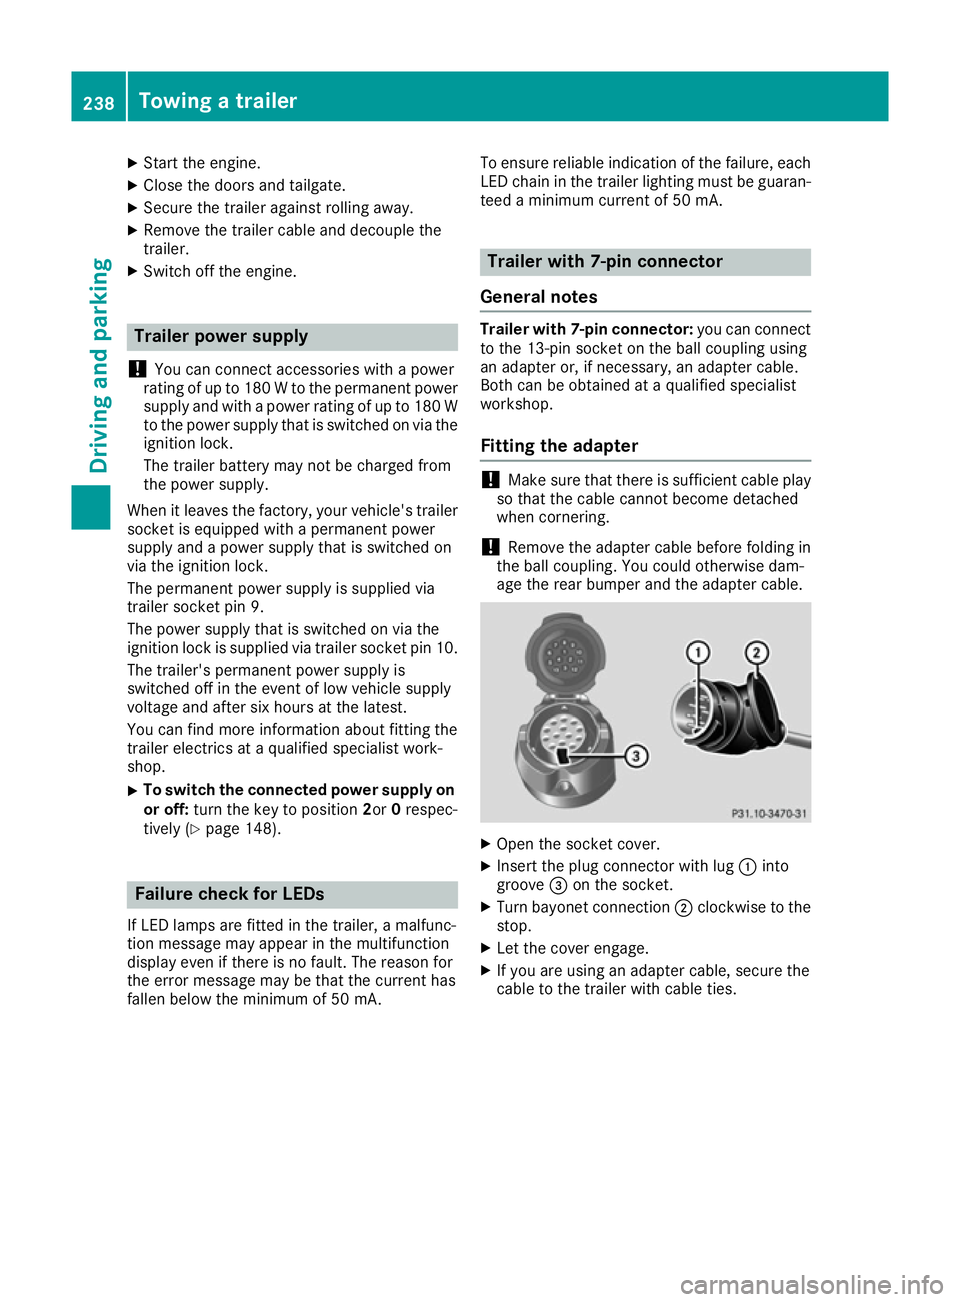
age the rear bumper and the adapter cable. X
Open the socket cover.
X Insert the plug connector with lug :into
groove =on the socket.
X Turn bayonet connection ;clockwise to the
stop.
X Let the cover engage.
X If you are using an adapter cable, secure the
cable to the trailer with cable ties. 238
Towing a trailerDriving and parking