2016 MERCEDES-BENZ GLS SUV ECU
[x] Cancel search: ECUPage 291 of 397
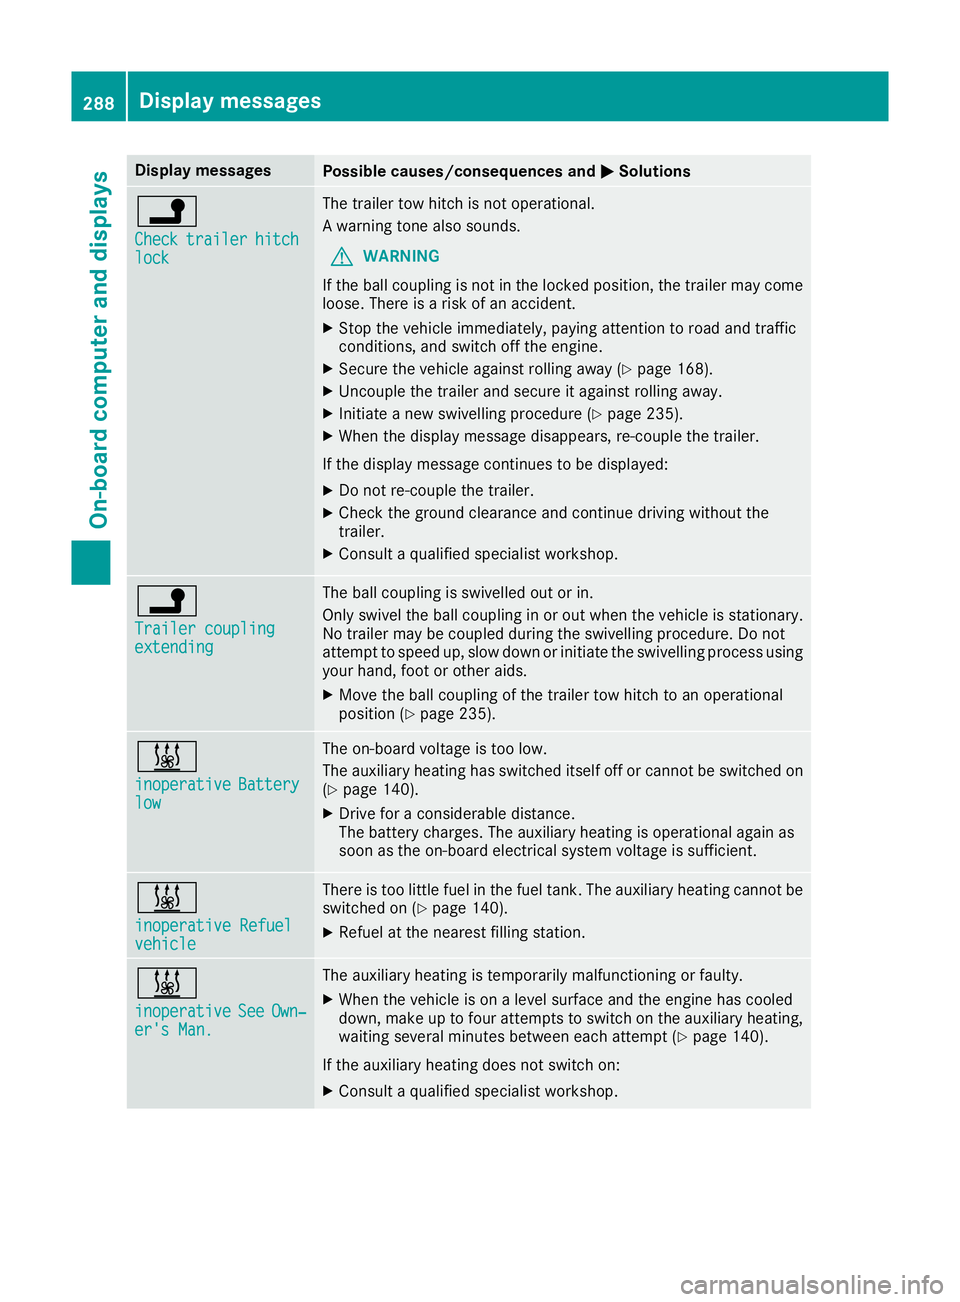
Display messages
Possible causes/consequences and
M
MSolutions j
Check Check
trailer
trailer hitch
hitch
lock
lock The trailer tow hitch is not operational.
A warning tone also sounds.
G WARNING
If the ball coupling is not in the locked position, the trailer may come
loose. There is a risk of an accident.
X Stop the vehicle immediately, paying attention to road and traffic
conditions, and switch off the engine.
X Secure the vehicle against rolling away (Y page 168).
X Uncouple the trailer and secure it against rolling away.
X Initiate a new swivelling procedure (Y page 235).
X When the display message disappears, re-couple the trailer.
If the display message continues to be displayed: X Do not re-couple the trailer.
X Check the ground clearance and continue driving without the
trailer.
X Consult a qualified specialist workshop. j
Trailer coupling Trailer coupling
extending extending The ball coupling is swivelled out or in.
Only swivel the ball coupling in or out when the vehicle is stationary.
No trailer may be coupled during the swivelling procedure. Do not
attempt to speed up, slow down or initiate the swivelling process using your hand, foot or other aids.
X Move the ball coupling of the trailer tow hitch to an operational
position (Y page 235). &
inoperative inoperative
Battery
Battery
low
low The on-board voltage is too low.
The auxiliary heating has switched itself off or cannot be switched on
(Y page 140).
X Drive for a considerable distance.
The battery charges. The auxiliary heating is operational again as
soon as the on-board electrical system voltage is sufficient. &
inoperative Refuel inoperative Refuel
vehicle vehicle There is too little fuel in the fuel tank. The auxiliary heating cannot be
switched on (Y page 140).
X Refuel at the nearest filling station. &
inoperative inoperative
See
SeeOwn‐
Own‐
er's Man.
er's Man. The auxiliary heating is temporarily malfunctioning or faulty.
X When the vehicle is on a level surface and the engine has cooled
down, make up to four attempts to switch on the auxiliary heating,
waiting several minutes between each attempt (Y page 140).
If the auxiliary heating does not switch on: X Consult a qualified specialist workshop. 288
Display
messagesOn-board computer and displays
Page 293 of 397
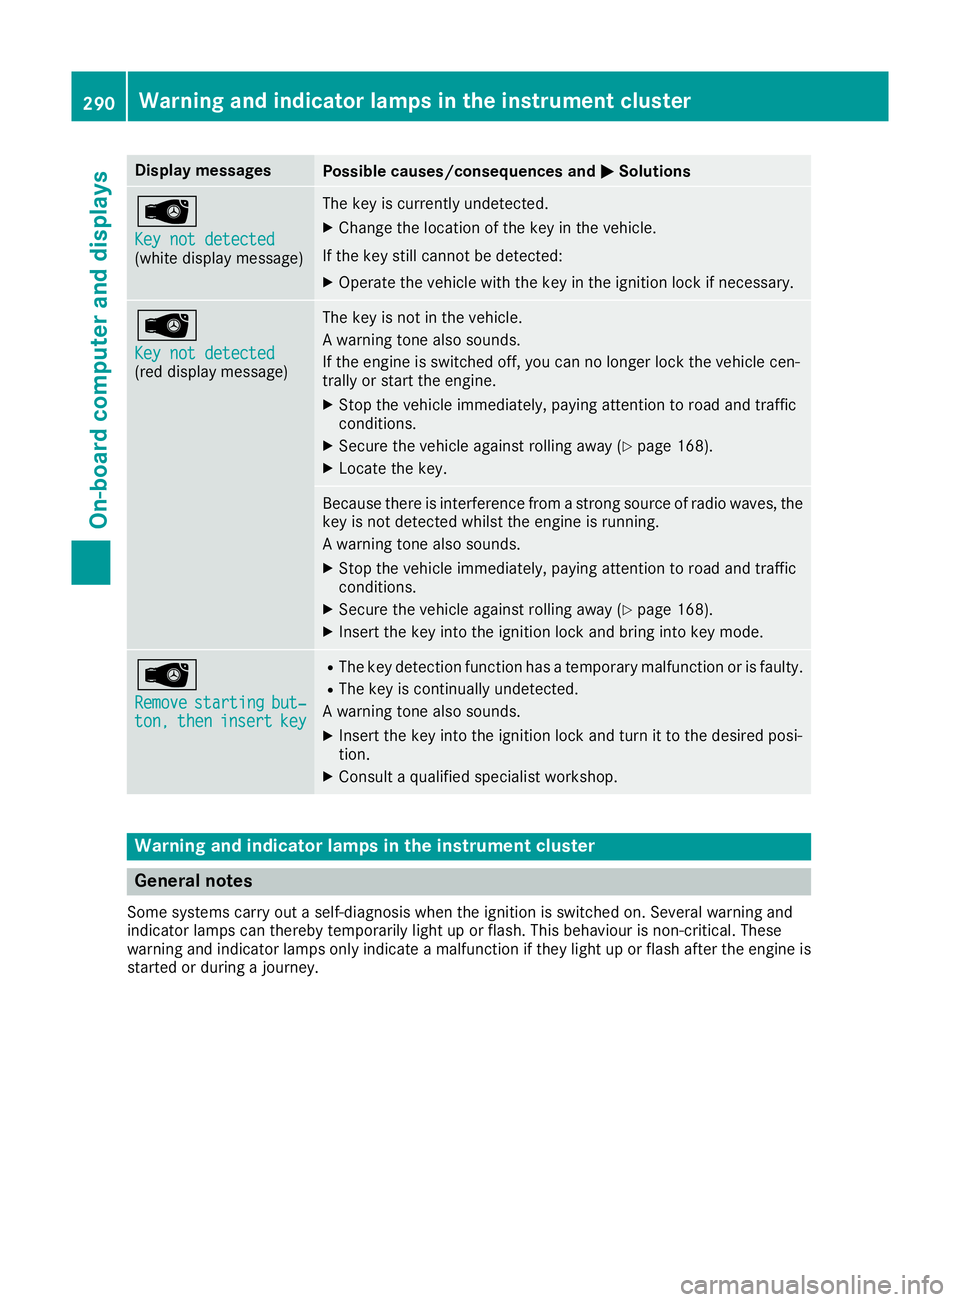
Display messages
Possible causes/consequences and
M
MSolutions Â
Key not detected Key not detected
(white display message) The key is currently undetected.
X Change the location of the key in the vehicle.
If the key still cannot be detected:
X Operate the vehicle with the key in the ignition lock if necessary. Â
Key not detected Key not detected
(red display message) The key is not in the vehicle.
A warning tone also sounds.
If the engine is switched off, you can no longer lock the vehicle cen-
trally or start the engine.
X Stop the vehicle immediately, paying attention to road and traffic
conditions.
X Secure the vehicle against rolling away (Y page 168).
X Locate the key. Because there is interference from a strong source of radio waves, the
key is not detected whilst the engine is running.
A warning tone also sounds.
X Stop the vehicle immediately, paying attention to road and traffic
conditions.
X Secure the vehicle against rolling away (Y page 168).
X Insert the key into the ignition lock and bring into key mode. Â
Remove Remove
starting
starting but‐
but‐
ton,
ton, then
theninsert
insert key
key R
The key detection function has a temporary malfunction or is faulty.
R The key is continually undetected.
A warning tone also sounds.
X Insert the key into the ignition lock and turn it to the desired posi-
tion.
X Consult a qualified specialist workshop. Warning and indicator lamps in the instrument cluster
General notes
Some systems carry out a self-diagnosis when the ignition is switched on. Several warning and
indicator lamps can thereby temporarily light up or flash. This behaviour is non-critical. These
warning and indicator lamps only indicate a malfunction if they light up or flash after the engine is started or during a journey. 290
Wa
rning and indi cator lamps in the instrument clusterOn-board computer and displays
Page 294 of 397

Safety
Seat belts Warning/
indicator
lamp
N N
Signal type
Possible causes/consequences and M
MSolutions ü
N
Only for certain countries: the red seat belt warning lamp lights up for 6 seconds
after the engine starts.
The seat belt warning lamp reminds the driver and front passenger to fasten their
seat belts.
X Fasten your seat belt (Y page 46).ü
N
Only for certain countries: the red seat belt warning lamp lights up after the
engine starts. In addition, a warning tone sounds for up to 6 seconds.
The driver's seat belt is not fastened.
X Fasten your seat belt (Y page 46).
The warning tone ceases. ü
N
The red seat belt warning lamp lights up after the engine starts, as soon as the
driver's or the front-passenger door is closed.
The driver or passenger has not fastened their seat belt.
X Fasten your seat belt (Y page 46).
The warning lamp goes out.
There are objects on the front-passenger seat.
X Remove the objects from the front-passenger seat and stow them in a secure
place.
The warning lamp goes out. ü
N
The red seat belt warning lamp flashes and an intermittent audible warning
sounds.
The driver or passenger has not fastened their seat belt. At the same time, you are
driving faster than 25 km/h or have briefly driven faster than 25 km/h.
X Fasten your seat belt (Y page 46).
The warning lamp goes out and the intermittent warning tone ceases.
There are objects on the front-passenger seat. At the same time, you are driving
faster than 25 km/h or have briefly driven faster than 25 km/h.
X Remove the objects from the front-passenger seat and stow them in a secure
place.
The warning lamp goes out and the intermittent warning tone ceases. Warning and indicator lamps in the instrument cluster
291On-board computer and displays Z
Page 295 of 397
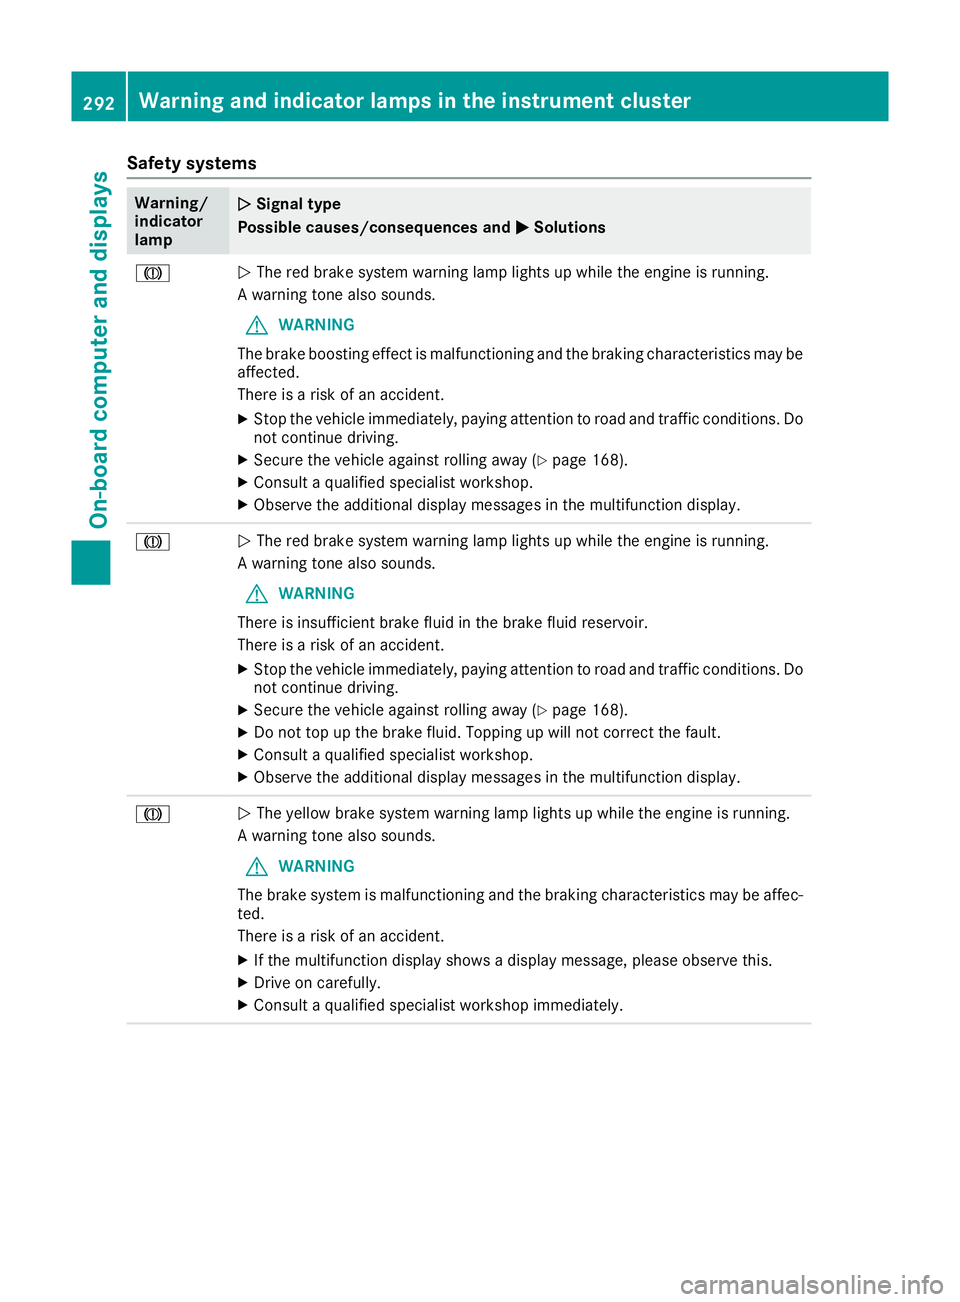
Safety systems
Warning/
indicator
lamp
N N
Signal type
Possible causes/consequences and M
MSolutions J
N
The red brake system warning lamp lights up while the engine is running.
A warning tone also sounds.
G WARNING
The brake boosting effect is malfunctioning and the braking characteristics may be
affected.
There is a risk of an accident.
X Stop the vehicle immediately, paying attention to road and traffic conditions. Do
not continue driving.
X Secure the vehicle against rolling away (Y page 168).
X Consult a qualified specialist workshop.
X Observe the additional display messages in the multifunction display. J
N
The red brake system warning lamp lights up while the engine is running.
A warning tone also sounds.
G WARNING
There is insufficient brake fluid in the brake fluid reservoir.
There is a risk of an accident.
X Stop the vehicle immediately, paying attention to road and traffic conditions. Do
not continue driving.
X Secure the vehicle against rolling away (Y page 168).
X Do not top up the brake fluid. Topping up will not correct the fault.
X Consult a qualified specialist workshop.
X Observe the additional display messages in the multifunction display. J
N
The yellow brake system warning lamp lights up while the engine is running.
A warning tone also sounds.
G WARNING
The brake system is malfunctioning and the braking characteristics may be affec- ted.
There is a risk of an accident.
X If the multifunction display shows a display message, please observe this.
X Drive on carefully.
X Consult a qualified specialist workshop immediately. 292
Warning and indicator lamps in the instrument clusterOn-board computer and displays
Page 310 of 397
Searching for and authorising (connect-
ing) a mobile phone Before using your mobile phone with the multi-
media system for the first time, you will need to
search for the phone and then authorise (con-
nect) it. Depending on the mobile phone, author- isation takes place by means of Secure Simple
Pairing or by entering a passkey. The multimedia
system automatically makes the procedure that is relevant for your mobile phone available. The
mobile phone is always connected automati-
cally after authorisation. Further information on using a mobile phone with the multimedia sys-
tem (see the Digital Owner's Manual).
If the multimedia system does not detect your
mobile phone, this may be due to particular
security settings on your mobile phone (see the
manufacturer's operating instructions).
Only one mobile phone can be connected to the multimedia system at any one time.
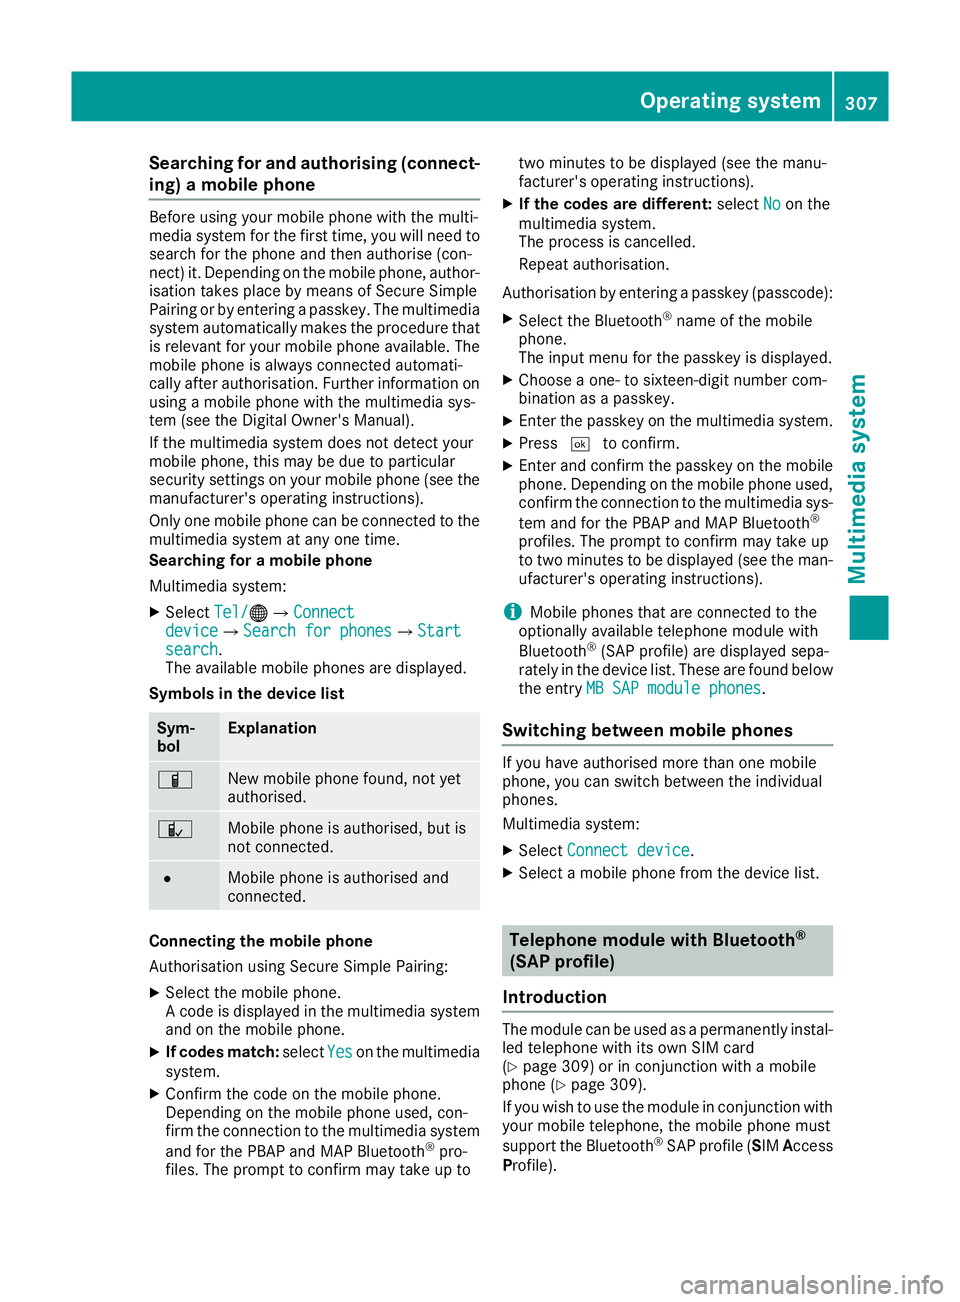
Searching for a mobile phone
Multimedia system:
X Select Tel/
Tel/®QConnect Connect
device deviceQSearch for phones Search for phonesQStart Start
search
search.
The available mobile phones are displayed.
Symbols in the device list Sym-
bol Explanation
Ï
New mobile phone found, not yet
authorised.
Ñ
Mobile phone is authorised, but is
not connected. #
Mobile phone is authorised and
connected.
Connecting the mobile phone
Authorisation using Secure Simple Pairing:
X Select the mobile phone.
A code is displayed in the multimedia system
and on the mobile phone.
X If codes match: selectYes Yeson the multimedia
system.
X Confirm the code on the mobile phone.
Depending on the mobile phone used, con-
firm the connection to the multimedia system
and for the PBAP and MAP Bluetooth ®
pro-
files. The prompt to confirm may take up to two minutes to be displayed (see the manu-
facturer's operating instructions).
X If the codes are different: selectNo
No on the
multimedia system.
The process is cancelled.
Repeat authorisation.
Authorisation by entering a passkey (passcode): X Select the Bluetooth ®
name of the mobile
phone.
The input menu for the passkey is displayed.
X Choose a one- to sixteen-digit number com-
bination as a passkey.
X Enter the passkey on the multimedia system.
X Press ¬to confirm.
X Enter and confirm the passkey on the mobile
phone. Depending on the mobile phone used,
confirm the connection to the multimedia sys-
tem and for the PBAP and MAP Bluetooth ®
profiles. The prompt to confirm may take up
to two minutes to be displayed (see the man- ufacturer's operating instructions).
i Mobile phones that are connected to the
optionally available telephone module with
Bluetooth ®
(SAP profile) are displayed sepa-
rately in the device list. These are found below
the entry MB SAP module phones
MB SAP module phones.
Switching between mobile phones If you have authorised more than one mobile
phone, you can switch between the individual
phones.
Multimedia system:
X Select Connect device
Connect device.
X Select a mobile phone from the device list. Telephone module with Bluetooth
®
(SAP profile)
Introduction The module can be used as a permanently instal-
led telephone with its own SIM card
(Y page 309) or in conjunction with a mobile
phone (Y page 309).
If you wish to use the module in conjunction with
your mobile telephone, the mobile phone must
support the Bluetooth ®
SAP profile (SIM Access
Profile). Operating system
307Multimedia system Z
Page 315 of 397
Stowage areas
Loading guidelines
G
WARNING
If objects, luggage or loads are not secured or not secured sufficiently, they could slip, tip
over or be flung around and thereby hit vehicle
occupants. There is a risk of injury, especially when braking or abruptly changing directions.
Always store objects so that they cannot be
flung around. Secure objects, luggage or
loads against slipping or tipping before the
journey. G
WARNING
Combustion engines emit poisonous exhaust
gases such as carbon monoxide. If the tailgate is open when the engine is running, particu-
larly if the vehicle is moving, exhaust fumes
could enter the passenger compartment.
There is a risk of poisoning.
Turn off the engine before opening the tail-
gate. Never drive with the tailgate open. G
WARNING
The exhaust tail pipe and tail pipe trim can
become very hot. If you come into contact
with these parts of the vehicle, you could burn
yourself. There is a risk of injury.
Always be particularly careful around the
exhaust tail pipe and the tail pipe trim. Allow
these components to cool down before touch-
ing them.
The handling characteristics of a laden vehicle
are dependent on the distribution of the load
within the vehicle. For this reason, you should
observe the following notes when transporting a
load:
R never exceed the maximum permissible gross
vehicle weight or the permissible axle loads
for the vehicle (including occupants).
R the luggage compartment is the preferred
place to store objects.
R position heavy loads as far forwards as pos-
sible and as low down in the load compart-
ment as possible. R
the load must not protrude above the upper
edge of the seat backrests.
R always place the load against the rear or front
seat backrests. Make sure that the seat
backrests are securely locked into place.
R always place the load behind unoccupied
seats if possible.
R use the lashing eyelets and the luggage nets
to transport loads and luggage.
R only use lashing eyelets and fastening com-
ponents that are suitable for the weight and
size of the load.
R secure the load with sufficiently strong and
wear-resistant lashing material. pad sharp
edges for protection.
i Load restraints are available at any qualified
specialist workshop, e.g. a Mercedes-Benz
Service Centre. Stowage compartments
Important safety notes G
WARNING
If you transport objects in the vehicle interior and these are not adequately secured, they
could slip or be flung around and thereby
strike vehicle occupants. In addition, cup
holders, open stowage spaces and mobile
phone brackets may not always be able to
hold the objects placed in them in the event of an accident. There is a risk of injury, particu-
larly in the event of sharp braking or sudden
changes of direction.
R Always stow objects in such a way that they
cannot be tossed about in these or similar
situations.
R Always make sure that objects do not proj-
ect from stowage spaces, luggage nets or
stowage nets.
R Ensure that closable stowage spaces are
shut before beginning your journey.
R Always stow and secure heavy, hard, poin-
ted, sharp-edged, fragile or outsize objects
in the load compartment.
Observe the loading guidelines (Y page 312).312
Stowage areasStowing and features
Page 318 of 397
:
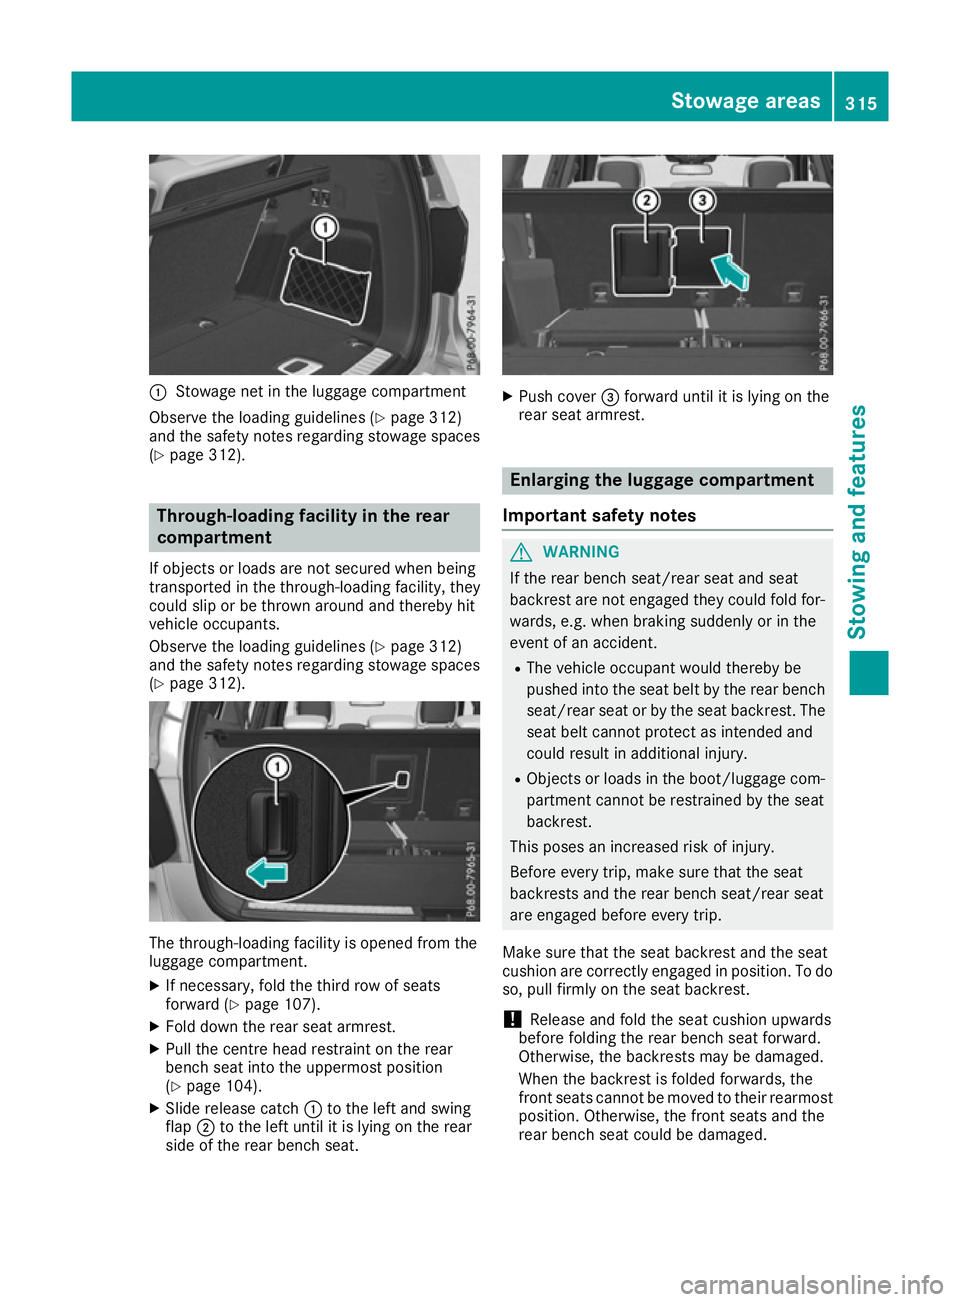
Stowage net in the luggage compartment
Observe the loading guidelines (Y page 312)
and the safety notes regarding stowage spaces
(Y page 312). Through-loading facility in the rear
compartment
If objects or loads are not secured when being
transported in the through-loading facility, they
could slip or be thrown around and thereby hit
vehicle occupants.
Observe the loading guidelines (Y page 312)
and the safety notes regarding stowage spaces
(Y page 312). The through-loading facility is opened from the
luggage compartment.
X If necessary, fold the third row of seats
forward (Y page 107).
X Fold down the rear seat armrest.
X Pull the centre head restraint on the rear
bench seat into the uppermost position
(Y page 104).
X Slide release catch :to the left and swing
flap ;to the left until it is lying on the rear
side of the rear bench seat. X
Push cover =forward until it is lying on the
rear seat armrest. Enlarging the luggage compartment
Important safety notes G
WARNING
If the rear bench seat/rear seat and seat
backrest are not engaged they could fold for- wards, e.g. when braking suddenly or in the
event of an accident.
R The vehicle occupant would thereby be
pushed into the seat belt by the rear bench
seat/rear seat or by the seat backrest. The
seat belt cannot protect as intended and
could result in additional injury.
R Objects or loads in the boot/luggage com-
partment cannot be restrained by the seat
backrest.
This poses an increased risk of injury.
Before every trip, make sure that the seat
backrests and the rear bench seat/rear seat
are engaged before every trip.
Make sure that the seat backrest and the seat
cushion are correctly engaged in position. To do
so, pull firmly on the seat backrest.
! Release and fold the seat cushion upwards
before folding the rear bench seat forward.
Otherwise, the backrests may be damaged.
When the backrest is folded forwards, the
front seats cannot be moved to their rearmost
position. Otherwise, the front seats and the
rear bench seat could be damaged. Stowage areas
315Stowing and features Z
Page 319 of 397
!
The backrest is heavy. Therefore, exercise
care when folding it down. Make sure that the
head restraints are pushed all the way in so
that the backrests and seat cushions are not
damaged.
Observe the loading guidelines (Y page 312).
The left-hand and right-hand backrests in the
2nd row of seats can be folded forwards sepa-
rately to increase the luggage compartment
capacity.
On vehicles with a third row of seats, you must
fold down the 3rd row of seats beforehand
(Y page 107) to obtain maximum luggage com-
partment enlargement.
Folding the rear bench seat forwards If the driver's or front-passenger seat is set for a
larger person, it may not be possible to fold the
rear bench seat forwards. In this case, move the front seats as far forward as possible.
X Move the head restraints to the lowest posi-
tion (Y page 105).
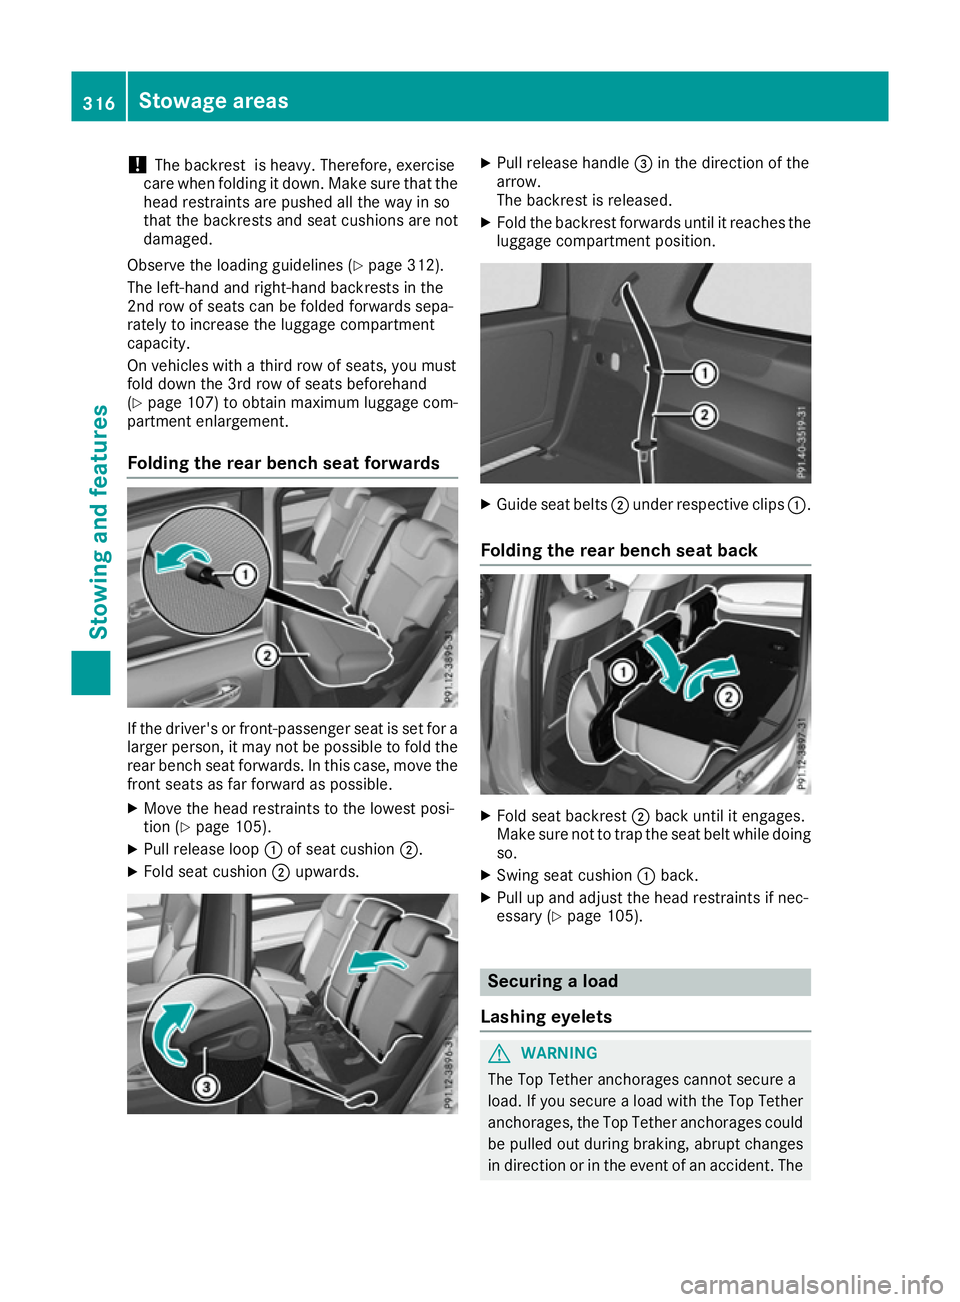
X Pull release loop :of seat cushion ;.
X Fold seat cushion ;upwards. X
Pull release handle =in the direction of the
arrow.
The backrest is released.
X Fold the backrest forwards until it reaches the
luggage compartment position. X
Guide seat belts ;under respective clips :.
Folding the rear bench seat back X
Fold seat backrest ;back until it engages.
Make sure not to trap the seat belt while doing so.
X Swing seat cushion :back.
X Pull up and adjust the head restraints if nec-
essary (Y page 105). Securing a load
Lashing eyelets G
WARNING
The Top Tether anchorages cannot secure a
load. If you secure a load with the Top Tether
anchorages, the Top Tether anchorages could be pulled out during braking, abrupt changes
in direction or in the event of an accident. The 316
Stowage areasStowing and features