2016 MERCEDES-BENZ GLS SUV differential
[x] Cancel search: differentialPage 12 of 397
Daytime driving lights
Display message ............................ 270
Function/notes ............................ .121
Switching on/off (on-board com-
puter) ............................................. 252
Dealership
see Qualified specialist workshop
Declarations of conformity ................. 28
Diagnostics connection ......................30
Differential lock (display mes-
sage) .................................................. .277
Digital speedometer ......................... 245
Dipped-beam headlamps
Display message ............................ 270
Replacing bulbs ............................ .127
Setting for driving abroad (sym-
metrical) ........................................ 120
Setting for driving on the right/
left ................................................. 252
Switching on/off ........................... 121
DIRECT SELECT lever
Automatic transmission ................. 156
Display message
Driving systems ............................ .275
KEYLESS-GO .................................. 289
Display messages
ASSYST PLUS ................................ 336
Calling up (on-board computer) ..... 258
Engine ............................................ 271
General information ....................... 258
Hiding (on-board computer) ........... 258
Key ................................................ 289
Lights ............................................. 270
Safety systems .............................. 259
Tyres .............................................. 283
Vehicle .......................................... .285
Distance Pilot DISTRONIC
Activating ....................................... 186
Activation conditions ..................... 186
Cruise control lever ....................... 185
Deactivating ................................... 189
Display Message ............................ 280
Displays in the instrument cluster .. 190 Driving tips ................................... .190
Function/notes ............................ .184
Important safety notes .................. 184
Selecting ........................................ 186 Setting the specified minimum
distance ......................................... 188
Stopping ........................................ 188
Warning lamp ................................. 301
Distance warning function
Function/notes ................................ 70
Warning lamp ................................. 301
Distance warning signal (warning
lamp) ................................................. .301
Door
Automatic locking (on-board com-
puter) ............................................. 253
Automatic locking (switch) .............. .88
Central locking/unlocking (key) ...... 81
Control panel .................................. .41
Display message ............................ 287
Emergency locking ........................... 89
Emergency unlocking ....................... 89
Important safety note s.................... 87
Opening (from the inside) ................ 87
Power closing .................................. 88
Doors
Overview .......................................... 87
Drive program
Off-Road program (vehicles with-
out Off-Road Engineering pack-
age) ............................................... 228
Off-road programs (vehicles with
Off-Road Engineering package) ...... 229
Drive programs
Automatic transmission ................. 159
Display (DIRECT SELECT lever) ...... 158
Driver's door
see Door
Driving
Important safety notes .................. 147
Driving abroad
Mercedes-Benz Service ................. 337
Symmetrical dipped beam ............. 120
Driving Assistance Plus package ..... 222
Driving assistance, crosswind ........... 75
Driving in mountainous terrain
Approach/departure angle ............ 179
Driving off-road
see Off-road driving
Driving safety system
Active Brake Assist .......................... 70 Index
9
Page 180 of 397
twigs can gather between the underbody and
the underbody panelling. If these materials
come in contact with hot parts of the exhaust
system, they can catch fire.
In such situations, have the vehicle checked
and repaired immediately at a qualified spe-
cialist workshop. If on continuing your jour-
ney you notice that driving safety is impaired, pull over and stop the vehicle immediately,
paying attention to road and traffic condi-
tions. In such cases, consult a qualified spe-
cialist workshop.
When driving off-road, substances such as sand,
mud and water or water mixed with oil may get
into the brakes. This may lead to a reduction in
braking performance or total brake failure as a
result of increased wear. The braking charac-
teristics will vary depending on the substances
that get into the brakes. Clean the brakes after
driving off-road. If you notice grinding noises or a reduction in braking performance, have the
brake system checked at a qualified specialist
workshop immediately. Adapt your driving style
to the altered braking characteristics.
Driving off-road increases the possibility of dam- age to the vehicle, which may cause assemblies
or systems to fail. Adapt your driving style to the conditions of the terrain. Drive carefully. Have
vehicle damage rectified immediately at a quali-
fied specialist workshop.
Do not shift into transmission position Nwhen
driving off-road. You could lose control of the
vehicle if you attempt to brake the vehicle using
the service brake. If the gradient is too steep for your vehicle, back up in reverse gear.
General notes H
Environmental note
Protection of the environment is of primary
importance. Treat nature with respect.
Observe all prohibiting signs.
Read this section before driving your vehicle off- road. Practise by driving over more gentle off-
road terrain first. The following driving systems are specially
adapted to off-road driving:
R the Offroad drive program (vehicles without
Off-Road Engineering package)
(Y page 228)
R Offroad andOffroad Plus drive programs
(vehicles with Off-Road Engineering package) (Y page 229)
R LOW RANGE offroad gear (vehicles with the
Off-Road Engineering package)
(Y page 230)
R Differential lock (vehicles with the Off-Road
Engineering package) (Y page 230)
R Off-road ABS (Y page 69)
R Off-road 4ETS (Y page 72)
R Off-road ESP ®
(Y page 74)
R AIRMATIC package (vehicle level)
(Y page 196)
R DSR (Downhill Speed Regulation)
(Y page 227)
Observe the following notes:
R Stop the vehicle before driving off-road. If
necessary, select the offroad program
(Y page 229) or shift to the LOW RANGE off-
road gear (Y page 230).
R Select a vehicle level suitable for the off-road
terrain. To avoid damaging the vehicle, ensure
sufficient ground clearance at all times.
R Make sure that items of luggage and loads are
stowed safely and are well secured
(Y page 316).
R Always keep the engine running and in gear
when driving on a downhill gradient. Activate
DSR (Y page 227).
R Drive slowly and evenly, if necessary at walk-
ing pace.
R Ensure that the wheels are in contact with the
ground at all times.
R Drive with extreme care on unknown off-road
routes where visibility is poor. For safety rea-
sons, get out of the vehicle first and survey
the off-road route.
R Look out for obstacles such as rocks, holes,
tree stumps and furrows.
R Take care when turning on an uphill or down-
hill slope or when driving across a slope. The
vehicle could otherwise tip over.
R Always keep the doors, the tailgate and the
sliding sunroof closed while the vehicle is in
motion. Driving
tips
177Driving an d parking Z
Page 233 of 397
The vehicle is raised by 30 mm.
The vehicle changes from the Offroaddrive pro-
gram to the Comfortdrive program if you drive
faster than 110 km/h.
The Please Please reduce
reducespeed
speedmessage appears in
the multifunction display.
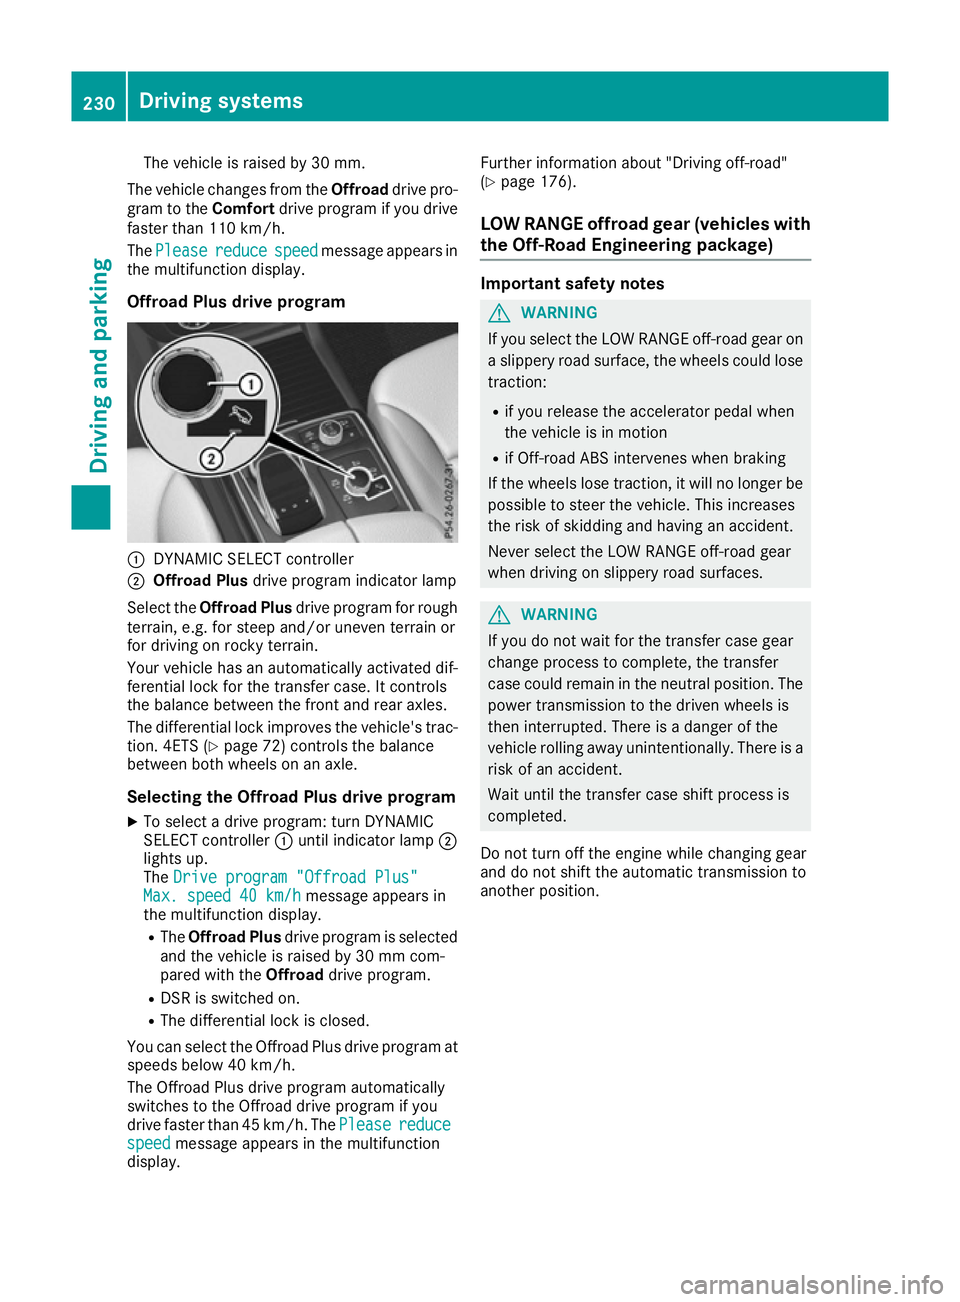
Offroad Plus drive program :
DYNAMIC SELECT controller
; Offroad Plus drive program indicator lamp
Select the Offroad Plus drive program for rough
terrain, e.g. for steep and/or uneven terrain or
for driving on rocky terrain.
Your vehicle has an automatically activated dif-
ferential lock for the transfer case. It controls
the balance between the front and rear axles.
The differential lock improves the vehicle's trac-
tion. 4ETS (Y page 72) controls the balance
between both wheels on an axle.
Selecting the Offroad Plus drive program X To select a drive program: turn DYNAMIC
SELECT controller :until indicator lamp ;
lights up.
The Drive program "Offroad Plus"
Drive program "Offroad Plus"
Max. speed 40 km/h
Max. speed 40 km/h message appears in
the multifunction display.
R The Offroad Plus drive program is selected
and the vehicle is raised by 30 mm com-
pared with the Offroaddrive program.
R DSR is switched on.
R The differential lock is closed.
You can select the Offroad Plus drive program at speeds below 40 km/h.
The Offroad Plus drive program automatically
switches to the Offroad drive program if you
drive faster than 45 km/h. ThePlease
Please reduce reduce
speed
speed message appears in the multifunction
display. Further information about "Driving off-road"
(Y
page 176).
LOW RANGE offroad gear (vehicles with
the Off-Road Engineering package) Important safety notes
G
WARNING
If you select the LOW RANGE off-road gear on a slippery road surface, the wheels could lose traction:
R if you release the accelerator pedal when
the vehicle is in motion
R if Off-road ABS intervenes when braking
If the wheels lose traction, it will no longer be
possible to steer the vehicle. This increases
the risk of skidding and having an accident.
Never select the LOW RANGE off-road gear
when driving on slippery road surfaces. G
WARNING
If you do not wait for the transfer case gear
change process to complete, the transfer
case could remain in the neutral position. The power transmission to the driven wheels is
then interrupted. There is a danger of the
vehicle rolling away unintentionally. There is a
risk of an accident.
Wait until the transfer case shift process is
completed.
Do not turn off the engine while changing gear
and do not shift the automatic transmission to
another position. 230
Driving systemsDriving and parking
Page 235 of 397
Messages in the multifunction display
If a gear change process has not been successful, the following messages may be displayed in the
multifunction display: Display messages
Possible causes/consequences and
M
MSolutions LOW RANGE Max.
LOW RANGE Max.
speed 40 km/h speed 40 km/h You have been driving faster than 40 km/h. Additionally, the indicator
lamp on the button in the centre console blinks.
X Drive more slowly to carry out the gear change process. LOW RANGE Shift to
LOW RANGE Shift to
position N briefly position N briefly The transmission is in position
Dand you are driving at below
40 km/h.
X Shift the transmission to Nto complete the gear change process. LOW RANGE Shifting
LOW RANGE Shifting
cancelled Please cancelled Please
reactivate reactivate The gear change process was not carried out.
X Maintain all gear change conditions and carry out the gear change
process again. LOW RANGE Stop
LOW RANGE Stop
Apply parking brake Apply parking brake A warning tone also sounds. The gear change process has not been
completed. LOW RANGE is in the neutral position. There is no con-
nection between the engine and the drive wheels.
! Do not drive any further. You could otherwise damage the vehi-
cle’s drive train.
X Stop the vehicle. Take into account the road and traffic conditions
when doing so.
X Apply the electric parking brake (Y page 170).
X Repeat the gear change process.
If the gear change process has been carried out, the LOW RANGE LOW RANGE
Stop Apply parking brake
Stop Apply parking brake message disappears.Driving dynamics display in the
COMAND display (vehicles with the Off-
Road Engineering-package) General notes
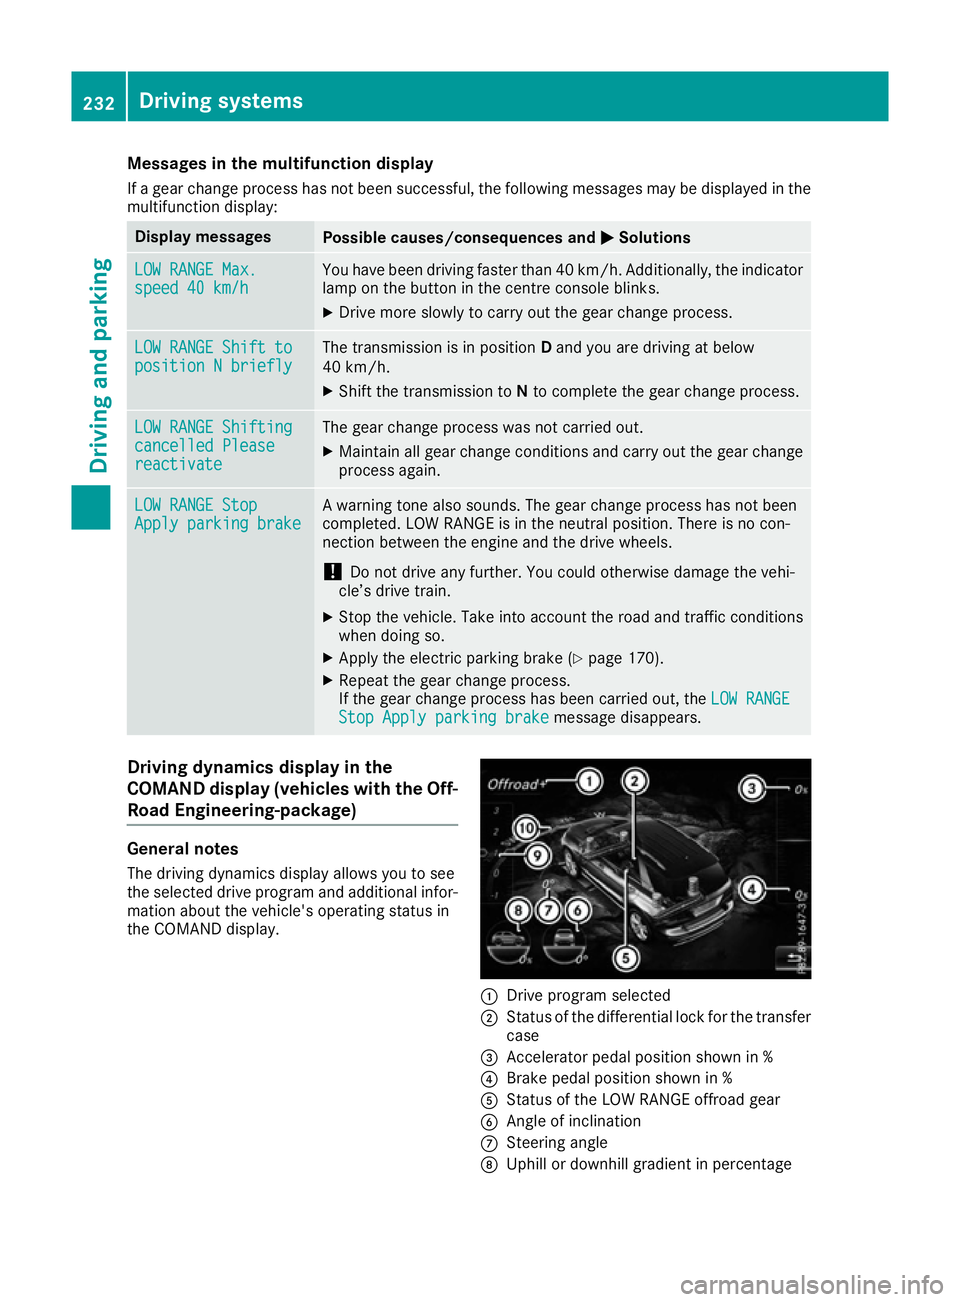
The driving dynamics display allows you to see
the selected drive program and additional infor-
mation about the vehicle's operating status in
the COMAND display. :
Drive program selected
; Status of the differential lock for the transfer
case
= Accelerator pedal position shown in %
? Brake pedal position shown in %
A Status of the LOW RANGE offroad gear
B Angle of inclination
C Steering angle
D Uphill or downhill gradient in percentage 232
Driving systemsDriving and parking
Page 280 of 397
Display messages
Possible causes/consequences and
M
MSolutions ACTIVE
ACTIVE
CURVE
CURVESYSTEM
SYSTEM
malfunctioning see
malfunctioning see
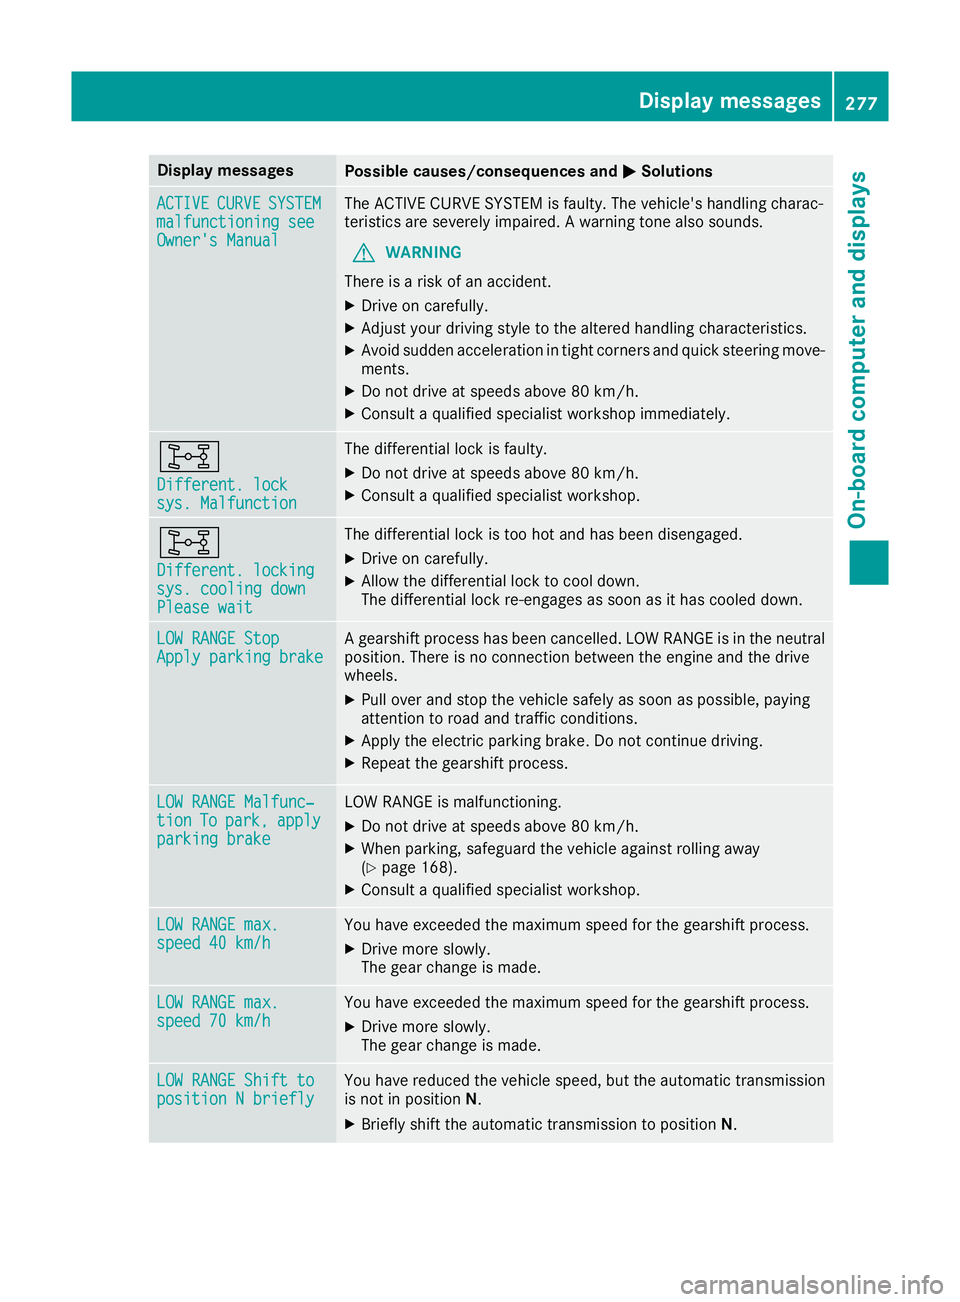
Owner's Manual Owner's Manual The ACTIVE CURVE SYSTEM is faulty. The vehicle's handling charac-
teristics are severely impaired. A warning tone also sounds.
G WARNING
There is a risk of an accident.
X Drive on carefully.
X Adjust your driving style to the altered handling characteristics.
X Avoid sudden acceleration in tight corners and quick steering move-
ments.
X Do not drive at speeds above 80 km/h.
X Consult a qualified specialist workshop immediately. 8
Different. lock Different. lock
sys. Malfunction sys. Malfunction The differential lock is faulty.
X Do not drive at speeds above 80 km/h.
X Consult a qualified specialist workshop. 8
Different. locking Different. locking
sys. cooling down sys. cooling down
Please wait Please wait The differential lock is too hot and has been disengaged.
X Drive on carefully.
X Allow the differential lock to cool down.
The differential lock re-engages as soon as it has cooled down. LOW RANGE Stop LOW RANGE Stop
Apply parking brake Apply parking brake A gearshift process has been cancelled. LOW RANGE is in the neutral
position. There is no connection between the engine and the drive
wheels.
X Pull over and stop the vehicle safely as soon as possible, paying
attention to road and traffic conditions.
X Apply the electric parking brake. Do not continue driving.
X Repeat the gearshift process. LOW RANGE Malfunc‐
LOW RANGE Malfunc‐
tion tion
To
Topark,
park, apply
apply
parking brake
parking brake LOW RANGE is malfunctioning.
X Do not drive at speeds above 80 km/h.
X When parking, safeguard the vehicle against rolling away
(Y page 168).
X Consult a qualified specialist workshop. LOW RANGE max. LOW RANGE max.
speed 40 km/h speed 40 km/h You have exceeded the maximum speed for the gearshift process.
X Drive more slowly.
The gear change is made. LOW RANGE max. LOW RANGE max.
speed 70 km/h speed 70 km/h You have exceeded the maximum speed for the gearshift process.
X Drive more slowly.
The gear change is made. LOW RANGE Shift to LOW RANGE Shift to
position N briefly position N briefly You have reduced the vehicle speed, but the automatic transmission
is not in position N.
X Briefly shift the automatic transmission to position N. Display
messages
277On-board computer and displays Z
Page 360 of 397
tance a distance so that the tow rope does
not sag.
R Do not use steel cables or chains to tow
your vehicle. You could otherwise damage
the vehicle.
! Do not use the trailer tow hitch for recovery
or towing. Do not use the towing eye for
recovery. This could damage the vehicle. If in doubt, have the vehicle recovered using a
crane.
! When towing, pull away slowly and
smoothly. Pull the towed vehicle as straight as possible and not at an acute angle. If the trac-
tive power is too high, the vehicles could be
damaged.
When towing, it is preferable to use a rigid tow- ing bar as opposed to a tow rope. A rigid towing
bar helps to keep the tractive power low.
! To tow vehicles with KEYLESS-GO, use the
key instead of the Start/Stop button. The
automatic transmission may otherwise
switch to position Pwhen you open the driv-
er's or front-passenger door which could
damage the transmission.
! Vehicles with differential locks: make sure
the differential locks are in automatic mode.
When towing, the differential locks must not
be switched on. The transmission may other- wise be damaged.
! You may tow the vehicle for a maximum of
50km. A towing speed of 50 km/h must not
be exceeded.
For towing distances over 50 km, the entire
vehicle must be lifted up and transported.
Observe the legal requirements for the relevant countries when towing.
It is better to have the vehicle transported than
to have it towed.
If the vehicle has suffered transmission damage, have it transported on a transporter or trailer.
The automatic transmission must be in position
N when the vehicle is being towed.
The battery must be connected and charged.
Otherwise, you:
R cannot turn the key to position 2in the igni-
tion lock
R cannot release the electric parking brake
R cannot shift the automatic transmission to
position N Deactivate the automatic locking feature before
towing the vehicle (Y page 253). You could oth-
erwise be locked out when pushing or towing
the vehicle.
Deactivate tow-away protection before the vehi-
cle is towed away (Y page 79). Fitting/removing the towing eye
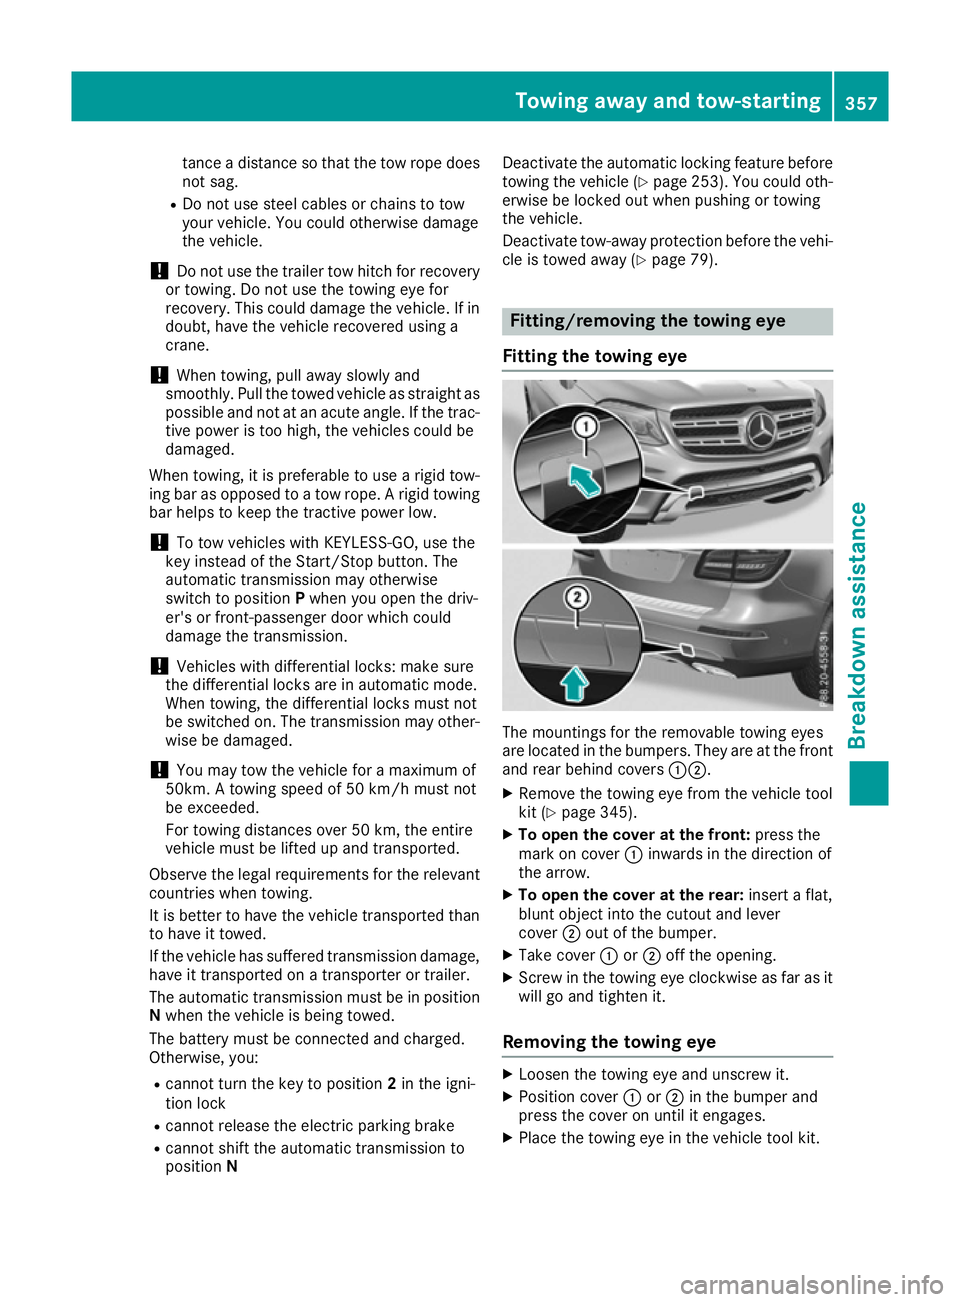
Fitting the towing eye The mountings for the removable towing eyes
are located in the bumpers. They are at the front and rear behind covers :;.
X Remove the towing eye from the vehicle tool
kit (Y page 345).
X To open the cover at the front: press the
mark on cover :inwards in the direction of
the arrow.
X To open the cover at the rear: insert a flat,
blunt object into the cutout and lever
cover ;out of the bumper.
X Take cover :or; off the opening.
X Screw in the towing eye clockwise as far as it
will go and tighten it.
Removing the towing eye X
Loosen the towing eye and unscrew it.
X Position cover :or; in the bumper and
press the cover on until it engages.
X Place the towing eye in the vehicle tool kit. Towing away and tow-starting
357Breakdown assistance Z