2016 MERCEDES-BENZ GLS SUV fog light
[x] Cancel search: fog lightPage 211 of 397

vehicle with guide lines in the multimedia sys-
tem.
The area behind the vehicle is displayed as a
mirror image, as in the rear-view mirror.
i The text shown in the multimedia system
display depends on the language setting. The following are examples of reversing camera
messages in the multimedia system.
Important safety notes The reversing camera is only an aid. It is not a
substitute for your attention to the immediate
surroundings. The responsibility for safe
manoeuvring and parking remains with you.
Make sure that there are no persons, animals or objects in range while manoeuvring and parking.
Under the following circumstances, the revers-
ing camera will not function, or will function in a limited manner:
R if the boot lid is open
R in heavy rain, snow or fog
R at night or in very dark places
R if the camera is exposed to very bright light
R if the area is lit by fluorescent bulbs or LED
lighting (the display may flicker)
R If there is a sudden change in temperature,
e.g. when driving into a heated garage in win- ter
R if the camera lens is dirty or obstructed.
Observe the notes on cleaning
(Y page 341)
R if the rear of your vehicle is damaged. In this
case, have the camera position and setting
checked at a qualified specialist workshop.
The field of vision and other functions of the
reversing camera may be restricted due to addi-
tional accessories on the rear of the vehicle (e.g. licence plate holder, bicycle rack).
For technical reasons, leaving the standard
height can result in inaccuracies in the guide
lines on vehicles with a height-adjustable chas-
sis.
i The reversing camera is protected from rain-
drops and dust by a flap. When the reversing
camera is activated, this flap opens.
The flap closes again when:
R you have finished the manoeuvring process
R you switch off the engine
R you open the luggage compartment See the notes on cleaning (Y
page 341).
For technical reasons, the flap may remain
open briefly after the reversing camera has
been deactivated.
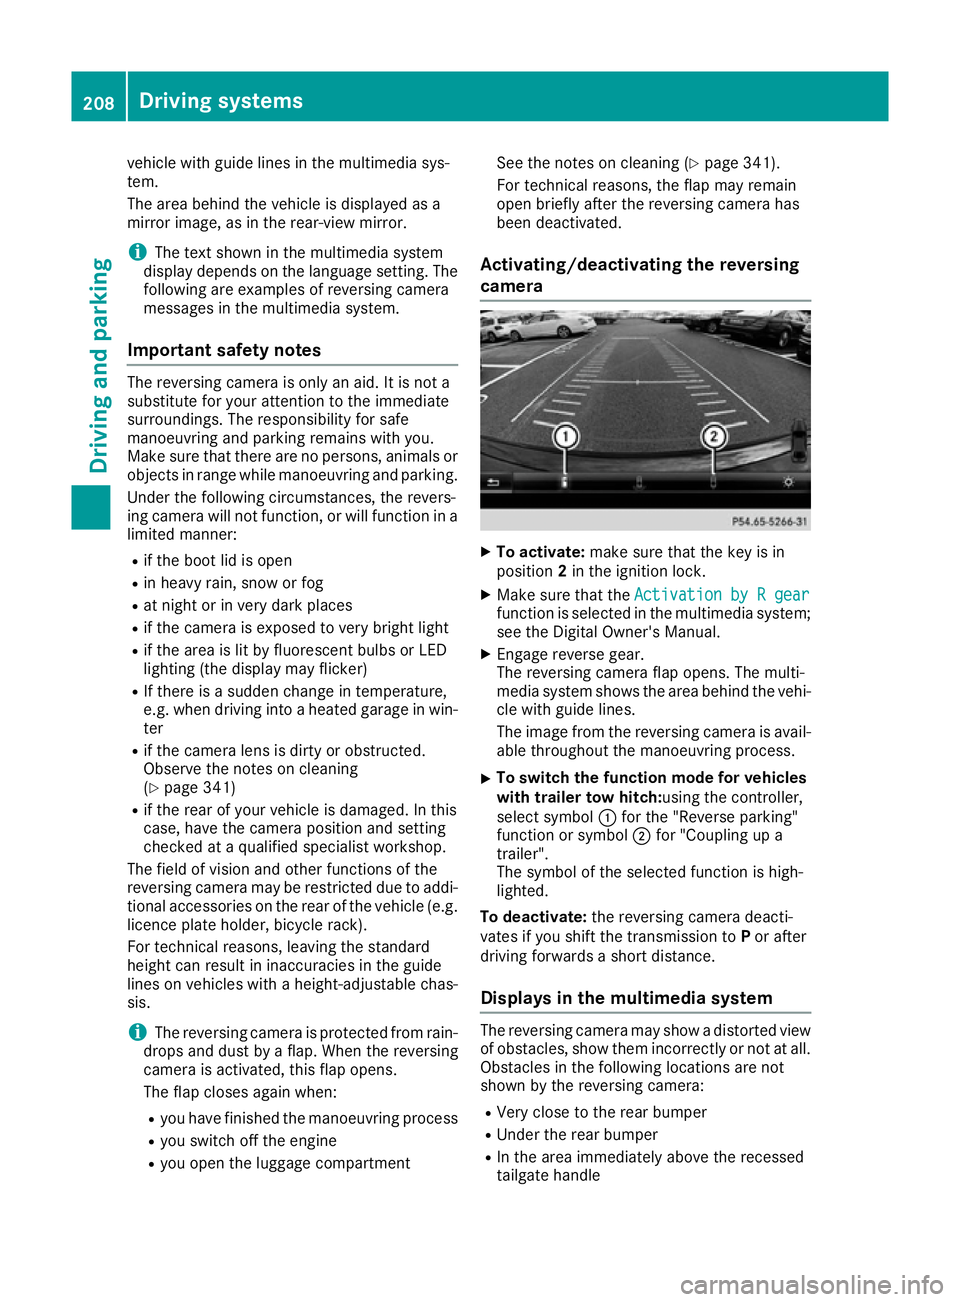
Activating/deactivating the reversing
camera X
To activate: make sure that the key is in
position 2in the ignition lock.
X Make sure that the Activation by R gear Activation by R gear
function is selected in the multimedia system; see the Digital Owner's Manual.
X Engage reverse gear.
The reversing camera flap opens. The multi-
media system shows the area behind the vehi-
cle with guide lines.
The image from the reversing camera is avail-
able throughout the manoeuvring process.
X To switch the function mode for vehicles
with trailer tow hitch: using the controller,
select symbol :for the "Reverse parking"
function or symbol ;for "Coupling up a
trailer".
The symbol of the selected function is high-
lighted.
To deactivate: the reversing camera deacti-
vates if you shift the transmission to Por after
driving forwards a short distance.
Displays in the multimedia system The reversing camera may show a distorted view
of obstacles, show them incorrectly or not at all. Obstacles in the following locations are not
shown by the reversing camera:
R Very close to the rear bumper
R Under the rear bumper
R In the area immediately above the recessed
tailgate handle 208
Driving systemsDriving and parking
Page 216 of 397

The flap closes again when:
R you have finished the manoeuvring process
R you switch off the engine
R you open the luggage compartment
See the notes on cleaning (Y page 341).
For technical reasons, the flap may remain
open briefly after the camera has been deac- tivated.
Important safety notes The 360° camera is only an aid and may show a
distorted view of obstacles, show them incor-
rectly or not at all. The 360° camera is not a
substitute for attentive driving.
The responsibility for safe manoeuvring and
parking remains with you. Make sure that there
are no persons, animals or objects in range
while manoeuvring and parking.
You are responsible for safety at all times and
must always pay attention to your surroundings when parking and manoeuvring. This applies to
the areas behind, in front of and beside the vehi- cle. You could otherwise endanger yourself and
others.
The 360° camera will not function or will func-
tion only to a limited extent:
R If the doors are open
R If the exterior mirrors are folded in
R If the tailgate is open
R In heavy rain, snow or fog
R At night or in very dark places
R If the cameras are exposed to very bright light
R If the area is lit by fluorescent bulbs or LED
lighting (the display may flicker)
R If there is a sudden change in temperature,
e.g. when driving into a heated garage in win- ter
R If the camera lenses are dirty or covered
R If the vehicle components in which the cam-
eras are fitted are damaged. In this event,
have the camera position and setting checked
at a qualified specialist workshop
Do not use the 360° camera under such cir-
cumstances. You could otherwise injure others
or damage objects when parking the vehicle.
Guide lines are always shown at road level. In
trailer mode, the guide lines are shown at the
level of the trailer coupling. The field of vision and other functions of the
camera system may be restricted due to addi-
tional accessories on the rear of the vehicle (e.g.
licence plate holder, bicycle rack).
On vehicles with height-adjustable suspension,
due to the technical conditions, leaving the
standard height can result in the following:
R Inaccuracies in the guide lines
R Inaccuracies in the display of generated
images (top view)
Activation conditions The 360° camera image can be displayed if:
R your vehicle is equipped with a 360° camera
R the key is in position 2in the ignition lock
R the multimedia system is switched on
Activating the 360° camera X
Press the Øbutton in the centre console
for longer than two seconds.
The following appears depending on whether transmission position Dor Ris selected:
R a split screen with top view and the image
from the front camera or
R a split screen with top view and the image
from the reversing camera
or
X Press the Øbutton in the centre console.
The vehicle menu appears.
X Select 360°
360° camera camera and press 7to confirm.
The following appears depending on whether transmission position Dor Ris selected:
R a split screen with top view and the image
from the front camera or
R a split screen with top view and the image
from the reversing camera
Switching on the 360° camera using
reverse gear You can show images from the 360° camera
automatically by engaging reverse gear. Driving systems
213Driving and parking Z
Page 228 of 397

Important safety notes
If you fail to adapt your driving style, Active Lane
Keeping Assist can neither reduce the risk of an accident nor override the laws of physics. ActiveLane Keeping Assist cannot take into account
road, weather or traffic conditions. Active Lane
Keeping Assist is only an aid. You are responsi-
ble for the distance to the vehicle in front, for
vehicle speed, for braking in good time and for
staying in lane.
Active Lane Keeping Assist cannot continuously
keep your vehicle in its lane. G
WARNING
Active Lane Keeping Assist cannot always
clearly detect lane markings.
In such cases, Active Lane Keeping Assist
can:
R give an unnecessary warning and then
make a course-correcting brake application
to the vehicle
R neither give a warning nor intervene
There is a risk of an accident.
Always pay particular attention to the traffic
situation and keep within the lane, especially
if Active Lane Keeping Assist alerts you. Ter-
minate the intervention in a non-critical driv-
ing situation.
The system may be impaired or may not function if:
R there is poor visibility, e.g. due to insufficient
illumination of the road, or due to snow, rain,fog or spray
R there is glare, e.g. from oncoming traffic, the
sun or reflection from other vehicles (e.g. if
the road surface is wet)
R the windscreen is dirty, misted up, damaged
or covered, for instance by a sticker, in the
vicinity of the camera
R no or several, unclear lane markings are pres-
ent for one lane, e.g. in a construction area
R the lane markings are worn away, dark or cov-
ered up, e.g. by dirt or snow
R the distance to the vehicle in front is too small
and the lane markings thus cannot be detec-
ted
R the lane markings change quickly, e.g. lanes
branch off, cross one another or merge R
the road is narrow and winding
R there are highly variable shade conditions on
the roadway
R no vehicle is detected in the adjacent lane and
there are broken lane markings
Warning vibration through the steering
wheel A warning may be given if a front wheel passes
over a lane marking. It will warn you by means of intermittent vibration in the steering wheel for
up to 1.5 seconds.
In order that you are warned only when neces-
sary and in good time if you cross the lane mark-
ing, the system detects certain conditions and
warns you accordingly.
The warning vibration occurs earlier if:
R you approach the outer lane marking on a
bend
R the road has very wide lanes, e.g. a motorway
R the system detects solid lane markings
The warning vibration occurs later if:
R the road has narrow lanes
R you cut the corner on a bend
Lane-correcting brake application G
WARNING
A lane-correcting brake application cannot
always bring the vehicle back into the original lane. There is a risk of an accident.
Always steer, brake or accelerate yourself,
especially if Active Lane Keeping Assist warns
you or makes a lane-correcting brake appli-
cation. G
WARNING
Active Lane Keeping Assist does not detect
traffic conditions or road users. In very rare
cases, the system may make an inappropriate brake application, e.g. after intentionally driv-
ing over a solid lane marking. There is a risk of an accident.
An inappropriate brake application may be
interrupted at any time if you steer slightly in
the opposite direction. Always make sure that
there is sufficient distance to the side for
other traffic or obstacles. Driving systems
225Driving and parking Z
Page 255 of 397
![MERCEDES-BENZ GLS SUV 2016 Owners Manual X
Press the :or9 button to select the
Permanent display:
Permanent display: function.
The current setting, outside temperature
outside temperature
or Dig. speedo [mph]:
Dig. speedo [mph]:, appears.
X MERCEDES-BENZ GLS SUV 2016 Owners Manual X
Press the :or9 button to select the
Permanent display:
Permanent display: function.
The current setting, outside temperature
outside temperature
or Dig. speedo [mph]:
Dig. speedo [mph]:, appears.
X](/manual-img/4/55577/w960_55577-254.png)
X
Press the :or9 button to select the
Permanent display:
Permanent display: function.
The current setting, outside temperature
outside temperature
or Dig. speedo [mph]:
Dig. speedo [mph]:, appears.
X To change the setting: pressaagain.
Light submenu Setting the daytime driving lights
The Daytime driving lights
Daytime driving lights function can
only be switched on with the engine turned off.
X Press the =or; button on the steering
wheel to select the Settings
Settings menu.
X Press the :or9 button to select the
Lights
Lights submenu.
X Press ato confirm.
X Press the :or9 button to select the
Daytime driving lights
Daytime driving lights function.
If the Daytime
Daytime driving
drivinglights
lightsfunction has
been switched on, the cone of light and the
W symbol in the multifunction display are
shown in orange.
X Press the abutton to save the setting.
Further information on daytime driving lights
(Y page 121).
Switching the Intelligent Light System
on/off
X Press the =or; button on the steering
wheel to select the Settings
Settings menu.
X Press the :or9 button to select the
Lights Lights submenu.
X Press ato confirm.
X Press the :or9 button to select the
Intell. Light System
Intell. Light System function.
If the Intell. Light System
Intell. Light System function has
been switched on, the cone of light and the
L symbol in the multifunction display are
shown in orange.
X Press the abutton to save the setting.
When you switch the Intell. Light System Intell. Light System
function on, you activate the following func-
tions:
R Motorway mode
R Active light function
R Cornering light function
R Extended range foglamps
R Off-road lights
If you set the dipped-beam headlamps for driv-
ing on the right/left, the multifunction display shows the
Intell. Light System: System
Intell. Light System: System
inoperative Inactive for left-side inoperative Inactive for left-side
traffic traffic orIntell.
Intell. Light
LightSystem:
System: System
System
inoperative Inactive for right-side
inoperative Inactive for right-side
traffic
traffic display message instead of the
Intell. Light Sys.
Intell. Light Sys. function in theLights
Lights
submenu (Y page 252). This display message
will only appear if the setting for driving on the
left/right is set opposite to your vehicle's coun-
try version.
Further information on the Intelligent Light Sys-
tem (Y page 123).
Setting the dipped-beam headlamps for
driving on the left/right
This function is only available in vehicles with
the Intelligent Light System.
You can use this function to switch between
symmetrical and asymmetrical dipped beam
(Y page 120).
X Press the =or; button on the steering
wheel to select the Settings
Settings menu.
X Press the :or9 button to select the
Lights Lights submenu.
X Press ato confirm.
X Press the :or9 button to select the
Dipped beams Setting for:
Dipped beams Setting for: function.
You will see the selected setting: Right-
Right-
side traffic
side traffic orLeft-side traffic
Left-side traffic.
X Press the abutton to save the setting.
If you change the setting, conversion does not take place until the next time the vehicle is
stationary.
If you set the dipped-beam headlamps for driv-
ing on the right/left, then motorway mode and
the extended range foglamps are unavailable.
These are only deactivated if the setting for driv-
ing on the left/right is set opposite to your vehi- cle's country version.
A qualified specialist workshop can set the
dipped-beam headlamps for driving on the left/
right.
Vehicle submenu Setting the permanent speed limiter
X Press the =or; button on the steering
wheel to select the Settings
Settings menu.
X Press the :or9 button to select the
Vehicle Vehicle submenu.
X Press ato confirm. 252
Menus and submenusOn-board computer and displays
Page 274 of 397

Display messages
Possible causes/consequences and
M
MSolutions b
Switch on headlamps Switch on headlamps You are driving without dipped-beam headlamps.
X
Turn the light switch to the Lorà position. Adaptive Highbeam Adaptive Highbeam
Assist Plus cur‐ Assist Plus cur‐
rently unavailable rently unavailable
See Owner's Manual See Owner's Manual Adaptive Highbeam Assist Plus is deactivated and temporarily inop-
erative.
Possible causes:
R The windscreen is dirty in the camera's field of vision.
R Visibility is impaired due to heavy rain, snow or fog.
X Clean the windscreen.
If the system detects that the camera is fully operational again, the Adaptive Highbeam Assist Plus available again Adaptive Highbeam Assist Plus available again message is
displayed.
Adaptive Highbeam Assist Plus is operational again. Adaptive Highbeam Adaptive Highbeam
Assist Plus inoper‐ Assist Plus inoper‐
ative ative Adaptive Highbeam Assist Plus is faulty.
X Consult a qualified specialist workshop. Engine
Display messages
Possible causes/consequences and
M
MSolutions +
Top up coolant See Top up coolant See
Owner's Manual Owner's Manual The coolant level is too low.
! Avoid making long journeys with too little coolant in the engine
cooling system. The engine will otherwise be damaged.
X Top up the coolant, observing the warning notes before doing so
(Y page 335).
If you have to top up the coolant frequently: X Contact a qualified specialist workshop and have the engine cooling
system checked. ? The fan motor is faulty.
X If the coolant temperature is below 120 †, continue driving to the
nearest qualified specialist workshop.
X Avoid heavy loads on the engine as you do so, e.g. driving in moun-
tainous terrain and stop-start traffic. Display
messages
271On-board computer and displays Z