Page 49 of 222

XTo enter the 4-digit PIN and select¬:
turn and press the controller.
You will be prompted to enter the PIN
again.
XEnter the PIN again and select ¬.
The PIN prompt now protects your personal
data from unwanted export.
iIf you deactivate your PIN protection, you
will first be prompted to enter your PIN. If
you have forgotten your PIN, an authorized
Mercedes-Benz Center can deactivate your
PIN protection for you. Alternatively, you
can deactivate PIN protection by resetting
your personal COMAND data
(
Ypage 48).
Importing/exporting data
XInsert the SD memory card (Ypage 182).
or
XConnect a USB device (e.g. a USB memory
stick) (
Ypage 182).
XPress the Øbutton.
or
XPress Vehiclein the main function bar.
The vehicle menu is displayed.
XTo select SystemSettings: slide6and
press the controller.
A menu appears.
XTo select Data Import/Export: turn and
press the controller.
XSelect Import DataorExport Data.
iIf you import data such as address data,
the existing data on COMAND is overwrit-
ten. You will see a message to this effect.
COMAND is restarted after the data import.
If PIN protection is activated, a PIN prompt
appears when you select Export Data
.
XTo enter the PIN: turn the controller and
press¬to confirm.
PIN protection is deactivated.
XTo select Memory Card,USB 1or USB 2:
turn and press the controller.
This function exports all the data to the
selected disc.
A window appears with the message that
the data has been exported.
You can export address data, bookmarks,
system settings that you have made and radio
station lists, for example.
Personal music files in the MEDIA REGISTER
cannot be saved and imported again using
this function.
Mercedes-Benz is not liable for any loss of
data.
Importing/exporting data47
System settings
Z
Page 50 of 222

Reset function
You can reset COMAND to the factory set-
tings. Amongst other things, this will delete all
personal COMAND data. Example:
RStation presets
REntries in the destination memory
REntries in the list of previous destinations in
the navigation system
REntries in the address book
RAuthorized telephone
In addition, an activated PIN protection,
which you have used to protect your data
against unwanted export, will be deactivated.
Resetting is recommended before selling or
transferring ownership of your vehicle, for
example.
Data on the internal hard drive, e.g. music
files in the MEDIA REGISTER, will be deleted.
Mercedes-Benz is not liable for any loss of
data.
XPress the Øbutton.
or
XPress Vehiclein the main function bar.
The vehicle menu is displayed.
XTo select System Settings: slide6,
turn and press the controller to confirm.
A menu appears.
XTo select Reset: turn and press the con-
troller.
A prompt appears asking whether you wish
to reset.
XSelect YesorNo.
If you select No
the process is canceled.
If you select Yes
a prompt will appear again
asking whether you really wish to reset.
XSelect YesorNo.
If you select Yes
a message will be shown.
COMAND is reset to the factory settings
and restarted.
If you select No
the process is canceled.
48Reset function
System settings
Page 51 of 222
Your COMAND equipment..................50
Important safet ynotes ...................... .50
Vehicle settings .................................. .50
360° camer a........................................ 52
Rea rview camer a................................ 53
Climat econtro lsettings .................... .54
DYNAMIC SELECT ................................ 57
49
Vehicle functions
Page 52 of 222

Your COMANDequipment
i
These operatin ginstruction sdescribe all
th estandar dan doptional equipmen tof
your COMAN Dsystem, as available at th e
time of going to print .Country-specifi cdif -
ference sare possible. Bear in min dthat
your vehicle may no tfeature all function s
described here. Thi salso applies to safety-
relevant systems an dfunctions.
iRead th einformation on qualified special-
ist workshop sin th evehicle Operator's
Manual.
Important safet ynotes
GWARNING
If you operat emobile communication equip-
men twhil edriving, you will be distracted from
traffic conditions. You could also los econtro l
of th evehicle. There is aris kof an accident.
Only operat ethis equipment when th evehicle
is stationary.
You mus tobserv eth elega lrequirements fo r
th ecountry in whic hyou are currentl ydrivin g
when operatin gmobile communication s
equipmen tin th evehicle.
Vehicl esettings
Calling up vehicle settings
XPress th eØ button.
or
XPress Vehicl ein themain function bar .
The vehicle men uis displayed.
XTo selec tVehicl eSettings:press th e
controller .
The Vehicl eSettings
men uis active .
XTo selec tth edesire dvehicle setting :turn
an dpress th econtroller .
The main are awit hth esetting elemen tis
active . Selecting
adifferent vehicle setting:
XTo activat eth emen ufo rselecting th evehi-
cl e setting :slid e5 thecontroller .
Exiting th evehicle settings :
XTo select&: slide6 andpress th econ-
troller.
Ambien tlighting
General notes
You can set th efollowin gfo rth eambien t
lighting :
RBrightness
Thissetting makes an additional change to
th ebrightness of th eambien tlighting .
RColor
Thi ssetting changes th ecolor of th eambi-
en tlighting .
Setting th ebrightness
XCall up VehicleSettings(Ypage 50).
XTo selec tAmbien tLigh tBrightness:
turn an dpress th econtroller .
The setting elemen tis active .The bright -
ness valu eis displayed.
XTo change th ebrightness value: turn th e
controller .
You can fin dfurther information on th einte -
rio rlighting in th evehicle Operator's Manual.
Setting th ecolor
XCall up VehicleSettings(Ypage 50).
XTo selec tAmbien tLightColor:turn an d
press th econtroller .
The setting elemen tis active .
XTo selec t acolor :turn th econtroller .
You can fin dfurther information on th einte -
rio rlighting in th evehicle Operator's Manual.
50Vehicle settings
Vehicle functions
Page 53 of 222
.
XTo select Easy Entry/Exit: turn and
press the controller.
The se")
Setting the EASY-ENTRY/EXIT feature
This function makes getting in and out of your
vehicle easier.
XCall upVehicle Settings(Ypage 50).
XTo select Easy Entry/Exit: turn and
press the controller.
The setting element is active.
XTo change the setting: press the controller.
You can find further information on the EASY-
ENTRY/EXIT feature in the vehicle Operator's
Manual.
Activating/deactivating the acoustic
locking confirmation
You can also set an audible signal to confirm
that the vehicle has been locked.
XCall up Vehicle Settings(Ypage 50).
XTo select Acoustic Lock Feedback: turn
and press the controller.
The function switches on or off, depending
on the previous setting.
You can find further information on the lock-
ing feature in the vehicle Operator's Manual.
Activating/deactivating the seat-belt
adjustment function
The Belt Adjustmentfunction adjusts the
driver's and front-passenger seat belt to the
upper body of the occupants.
XCall up Vehicle Settings(Ypage 50).
XTo select Belt Adjustment: turn and
press the controller.
The function switches on or off, depending
on the previous setting.
You can find further information on seat-belt
adjustment in the vehicle Operator's Manual.
Activating/deactivating the auto-
matic folding mirror function
When the AutomaticMirrorFoldingfunc-
tion is activated, the exterior mirrors fold in
automatically as soon as you lock the vehicle
from the outside. The exterior mirrors fold out
automatically again as soon as you unlock the vehicle.
XCall up Vehicle Settings(Ypage 50).
XTo select Automatic Mirror Folding:
turn and press the controller.
The function switches on or off, depending
on the previous setting.
You can find further information on the auto-
matic folding mirror function in the vehicle
Operator's Manual.
Switching locator lighting on/off
If you switch on the LocatorLightingfunc-
tion, the exterior lighting is switched on for a
short time when it is dark. The light switch
must be set to Ã(see the vehicle Opera-
tor's Manual).
The exterior lighting remains on for
40 seconds after the vehicle is unlocked.
When you start the engine, the locator light-
ing is switched off and automatic headlamp
mode is activated.
XCall up Vehicle Settings(Ypage 50).
XTo select Locator Lighting: turn and
press the controller.
XPress the controller.
The function is switched on or off, depend-
ing on the previous status.
You can find further information on the loca-
tor lighting in the vehicle Operator's Manual.
Switching the automatic locking fea-
ture on/off
The vehicle is locked automatically when the
ignition is switched on and the vehicle is trav-
eling faster than walking pace.
Vehicle settings51
Vehicle functions
Z
Page 54 of 222
.
XTo select Automatic Locking: turn and
press the controller.
The function switches on or off, depending
on the previous setting.
You can find further information on")
XCallupVehicle Settings(Ypage 50 ).
XTo select Automatic Locking: turn and
press the controller.
The function switches on or off, depending
on the previous setting.
You can find further information on the lock-
ing feature inthe vehicle Operator's Manual.
Setting the delayed switch-off time
Interior lighting delayed switch-off
The interior lighting isactivated for the dura-
tion of the delayed switch-off time when the
Sm artKey isremoved from the ignition lock.
XCall upVehicle Settings(Ypage 50 ).
XTo select Interior Lighting Delayed
Switch-off: turn and press the controller.
The setting element isactive.
XTo change the delayed switch-off time: turn
the controller.
You can find further information on the inte-
rior lighting inthe vehicle Operator's Manual.
Exterior lighting delayed switch-off
Ifyou switch on the Exterior Lighting
Delayed Switch-offfunction, the exterior
lighting is switched on for a short time after
the engine is switched off. The light switch
must beset to Ã(see the vehicle Opera-
tor's Manual).
The exterior lighting remains on for
60 seconds after the engine is switched off. If
you close all the doors and the tailgate, the
exterior lighting switches off after the set
time.
XCall upVehicle Settings(Ypage 50 ).
XTo select Exterior Lighting Delayed
Switch-off: turn and press the controller.
The setting element isactive.
XTo change the delayed switch-off time: turn
the controller.
360° camera
General notes
The 360° camera surveys the veh iclesur-
roundings and assists you, for example when
parking or at exit swit h reduced visibility.
The 360° camera isonly an aid. It isnot a
replacement for your attention to your imme-
diate surroundin gs. You are always responsi-
ble for safe maneuvering and parking. Make
sure that no persons or animals are inthe
maneuvering range.
For more information on the 360° camera see the veh icleOperator's Manual.
Displaying the 360° camera image
The 360° camera image can bedisplayed if:
Ryour vehicle isequipped with a 360° cam-
era
Rthe 360° Camerafunction isswitched on;
see the vehicle Operator's Manual.
XPress the Øbutton.
or
XPress Vehicleinthe main function bar.
The vehicle menu is displayed.
XTo select 360°Camera: turn and press the
controller.
The 360° camera image appears insplit-
screen mode.
You willsee the previo usview on the display
if, when the function isswitched on:
Ryou turn the SmartKey to position 1in the
ignit ion lock
Ryou select transmission position P
Rwhen you aredriving at moderate speeds
Switching the display off manually
XTo select &: slide 6and press the con-
troller.
52360° camera
Vehicle functions
Page 55 of 222
.
Switching the 360° camera auto-
matic mode on/off
This function activates")
Switching the display on automatically
XYou can automatically switch the 360 cam-
era display using reverse gear
(
Ypage 53).
Switching the 360° camera auto-
matic mode on/off
This function activates the 360° camera
when reverse gear is engaged.
XPress theØbutton.
or
XPress Vehiclein the main function bar.
The vehicle menu is displayed.
XTo switch to the menu bar: slide6the
controller.
XTo select System Settings: turn and
press the controller.
XTo select 360°Camera: turn and press the
controller.
The 360° Camera
menu appears.
XSelect Activation by R gear.
The function is switched on Oor off ª,
depending on the previous status.
Opening the camera cover for clean-
ing
XTo select OpenCameraCoverin the 360°
camera menu: turn the controller and press
to confirm.
The Please
Wait...message appears for
approximately three seconds.
The camera cover opens.
The camera cover closes automatically if:
Rthe ignition is switched off
Rthe vehicle exceeds a moderate speed
Rear view camera
General notes
The rear view camera covers the immediate
surroundings of the vehicle and assists you
when parking.
The rear view camera is only an aid. It is not a
replacement for your attention to your imme-
diate surroundings. You are always responsi- ble for safe maneuvering and parking. When
maneuvering or parking, make sure that there
are no persons, animals or objects in the area in which you are maneuvering.
You can find further information about the
rear view camera in the vehicle Operator's
Manual.
Switching the rear view camera auto-
matic mode on/off
This function activates the rear view camera
when reverse gear is engaged.
XPress the Øbutton.
or
XPress Vehiclein the main function bar.
The vehicle menu is displayed.
XSlide 6the controller.
XTo select System Settings: turn and
press the controller.
XSelect Rear View Camera.
The Rear View Camera
menu appears.
XSelect Activation by R gear.
The function is switched on Oor off ª,
depending on the previous status.
When you start the vehicle and engage
reverse gear, the camera cover opens auto-
matically if the function is activated. The
area behind the vehicle is shown with guide
lines in the display (see the vehicle Opera-
tor's Manual).
For further information on the rear view cam- era (see the vehicle Operator's Manual).
Rear view camera53
Vehicle functions
Z
Page 56 of 222

Object detection
The rear view camera can detect moving and
stationary objects. If, for example, a pedes-
trian or another vehicle is detected, these
objects are marked with bars. The system is
able to detect and mark stationary objects
when your vehicle is moving. Moving objects
will always be detected and marked.
Switching object detection on/off
XTo select Object Detectionin the rear
view camera menu: turn and press the con-
troller.
The function is switched on Oor off ª,
depending on the previous status.
Opening the camera cover for clean-
ing
XTo select Open Camera Coverin the rear
view camera menu: turn and press the con-
troller.
The Please
Wait...message appears for
approximately three seconds.
The camera cover opens.
The camera cover closes automatically if:
Rthe ignition is switched off
Rthe vehicle pulls away
Climate control settings
Overview
You can adjust the climate control settings
using the climate control bar (
Ypage 54) or
the climate control menu (
Ypage 55).
You can set the most important climate con-
trol functions, such as temperature
(
Ypage 54), airflow (Ypage 55) and air
distribution (
Ypage 55) using the climate
control bar. The climate control bar is visible
in most displays.
You can find all available climate control func-
tions in the climate control menu. You can use the climate control bar (
Ypage 54) to
switch to the climate control menu.
Settings in the climate control bar
Overview
:Adjusts temperature and air distribution
on the left and displays the current setting
;Calls up the climate control menu, dis-
plays the current cooling and climate
mode setting
=Adjusts temperature and air distribution
on the right and displays the current set-
ting
Calling up the climate control bar
XPress the Øbutton.
or
XPress Vehiclein the main function bar.
The vehicle menu is displayed.
XSlide 6the controller repeatedly until the
climate control bar is activated.
Setting the temperature
54Climate control settings
Vehicle functions
 1
1 2
2 3
3 4
4 5
5 6
6 7
7 8
8 9
9 10
10 11
11 12
12 13
13 14
14 15
15 16
16 17
17 18
18 19
19 20
20 21
21 22
22 23
23 24
24 25
25 26
26 27
27 28
28 29
29 30
30 31
31 32
32 33
33 34
34 35
35 36
36 37
37 38
38 39
39 40
40 41
41 42
42 43
43 44
44 45
45 46
46 47
47 48
48 49
49 50
50 51
51 52
52 53
53 54
54 55
55 56
56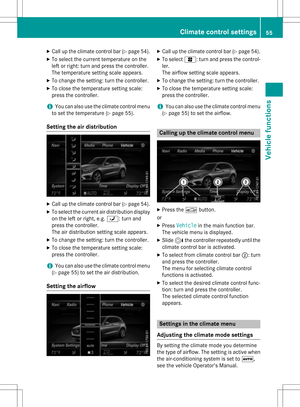 57
57 58
58 59
59 60
60 61
61 62
62 63
63 64
64 65
65 66
66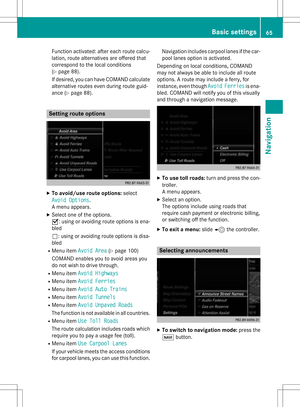 67
67 68
68 69
69 70
70 71
71 72
72 73
73 74
74 75
75 76
76 77
77 78
78 79
79 80
80 81
81 82
82 83
83 84
84 85
85 86
86 87
87 88
88 89
89 90
90 91
91 92
92 93
93 94
94 95
95 96
96 97
97 98
98 99
99 100
100 101
101 102
102 103
103 104
104 105
105 106
106 107
107 108
108 109
109 110
110 111
111 112
112 113
113 114
114 115
115 116
116 117
117 118
118 119
119 120
120 121
121 122
122 123
123 124
124 125
125 126
126 127
127 128
128 129
129 130
130 131
131 132
132 133
133 134
134 135
135 136
136 137
137 138
138 139
139 140
140 141
141 142
142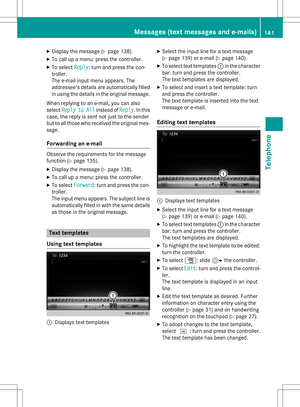 143
143 144
144 145
145 146
146 147
147 148
148 149
149 150
150 151
151 152
152 153
153 154
154 155
155 156
156 157
157 158
158 159
159 160
160 161
161 162
162 163
163 164
164 165
165 166
166 167
167 168
168 169
169 170
170 171
171 172
172 173
173 174
174 175
175 176
176 177
177 178
178 179
179 180
180 181
181 182
182 183
183 184
184 185
185 186
186 187
187 188
188 189
189 190
190 191
191 192
192 193
193 194
194 195
195 196
196 197
197 198
198 199
199 200
200 201
201 202
202 203
203 204
204 205
205 206
206 207
207 208
208 209
209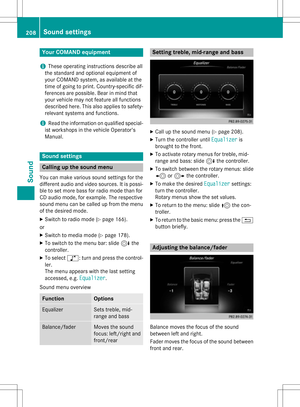 210
210 211
211 212
212 213
213 214
214 215
215 216
216 217
217 218
218 219
219 220
220 221
221