Page 81 of 222

If the fuel tank reserve level is displayed, you
will see theReserve Fuel Would you
liketostartasearchforsurround‐
ing gas stations?message.
XTo selectYesorNo: turn and press the con-
troller.
If you select Yes
, the gas station search
starts. When the search is complete, a list
of the gas stations available along the route
or in the vicinity is displayed.
If you select No
, the search is canceled.
XSelect the gas station.
The address of the gas station is displayed.
XTo selectStart: press the controller.
The selected gas station is entered into
position 1 of the intermediate destinations
menu. Route guidance begins.
If the intermediate destinations menu
already contains four intermediate desti-
nations, a prompt will be displayed, asking
you whether you wish to enter the gas sta-
tion into position 1. If you select Yes
, the
gas station is transferred into the list and
intermediate destination 4 is deleted.
Entering a destination from
Mercedes-Benz Apps
Requirement (USA): mbrace is activated for
the Mercedes-Benz Apps (
Ypage 146).
Requirement (Canada): a mobile phone must be connected via Bluetooth
®(Ypage 112) or
USB (
Ypage 198) with COMAND.
XTo switch to navigation mode: press the
Ø button.
XTo show the menu: slide6the control-
ler.
XTo select Destination: turn and press the
controller.
XSelect From Mercedes-Benz Apps.
The list of Mercedes-Benz Apps appears
(
Ypage 155).
Using geo-coordinates
XTo switch to navigation mode: press the
ß button.
XTo show the menu: slide6the control-
ler.
XTo select Destination: turn and press the
controller.
XSelect Using Geo-Coordinates.
Geo-coordinates (longitude and latitude)
are entered in degrees, minutes and sec-
onds.
XTo enter geo-coordinates: turn the con-
troller.
The value for degree, minute or second
changes.
XTo move the selection within the line: slide
1 the controller.
XTo move the selection between lines: slide
4the controller.
XTo confirm the value: press the controller.
XTo store geo-coordinates: selectSaveby
turning and pressing the controller.
The destination with the geo-coordinates
can be stored as:
Ra home address in the address book
Ra navigable address book contact
For further information on the address
book, see (
Ypage 125).
Ra personal destination on the SD memory
card (
Ypage 95)
XTo start route calculation: selectStart
Route Guidanceby turning and pressing
the controller.
Personal POIs and routes
General notes
The use of personal POIs for displaying traffic surveillance equipment is not permitted in
every country. Please observe the country-
specific regulations and always drive at a suit-
able speed.
Personal POIs and routes79
Navigation
Z
Page 82 of 222
 that
you have imported via the online functions
(
Ypage")
Personal POIs are filed in categories:
RNot Classified
Standard entry for personal POIs
RMercedes-Benz Apps
Personal POIs (destinations, routes) that
you have imported via the online functions
(
Ypage 156)
RCategories which you have created your-
self, e.g. on your PC
Personal routes are not categorized.
Settings for personal POIs
Displaying on the map
Requirements: an SD memory card with per-
sonal POIs is inserted (
Ypage 182).
The SD memory card is formatted using the
FAT file system (e.g. FAT32).
All personal POIs of the selected category are
displayed on the map with a corresponding
symbol.
If the "Alert when approaching" function is
activated (
Ypage 80) the symbols are dis-
played up to a map scale of 2 km.
XTo switch to navigation mode: press the
ß button.
XTo show the menu: slide6the control-
ler.
XTo select Options, turn and press the con-
troller.
XSelect Personal POIs.
XSelectDisplay on the Map.
The menu displays the categories available
on the SD memory card.
XTo select a category: turn the controller
and press to confirm.
All personal POIs in the selected category
are displayed Oor not displayed ª,
depending on the previous status.
Alert when approaching
Requirements: an SD memory card with per-
sonal POIs is inserted (
Ypage 182).
The SD memory card is formatted using the
FAT file system (e.g. FAT32).
If the vehicle is approaching a personal POI,
this is highlighted on the map and/or an audi- ble signal sounds.
For this purpose both the corresponding func-
tion Approaching POI Cue
, and the cate-
gory containing the personal POI must be
activated.
XTo switch to navigation mode: press the
ß button.
XTo show the menu: slide6the control-
ler.
XTo select Options, turn and press the con-
troller.
XSelect Personal POIs.
XSelectApproaching POI Cue.
The menu displays the categories available
on the SD memory card.
80Personal POIs and routes
Navigation
Page 83 of 222

XSelectAudibleorOptical.
The function is switched on Oor off ª,
depending on the previous status.
XTo select a category: turn the controller
and press to confirm.
The function is switched on Oor off ª, for
all personal POIs of this category, depend-
ing on the previous setting.
Saving personal POIs and routes
General notes
Personal POIs and routes are geodata which
are saved in the open GPX ( GPS Exchange)
format on the SD memory card.
Requirement: the SD memory card is format-
ted using the FAT file system (e.g. FAT32).
Personal POI from current vehicle posi-
tion or crosshair position
XInsert the SD memory card (Ypage 182).
XTo switch to navigation mode: press the
ß button.
XWhen the map is displayed, press the con-
troller until a message appears.
The current vehicle position is saved to the
Not
Classifiedcategory on the SD mem-
ory card and also stored in the "Last desti-
nations" memory (
Ypage 96).
If the "Move map" function is selected
(
Ypage 64), the crosshair position is saved.
iIf no SD memory card is inserted, the per-
sonal POI will only be stored in the "Last
destinations" memory.
Personal POI from destination address
XInsert the SD memory card (Ypage 182).
XTo switch to navigation mode: press the
ß button.
XCall up the address entry menu and enter
the destination address (
Ypage 67).
XSelect Saveby sliding 6the controller.
XTurn and press the controller.
XTo select ToMemoryCard: turn and press
the controller.
XEnter the name.
XSelect a category.
The current address is saved as a personal
point of interest on the SD memory card.
iYou can select a destination from the
From Previous Destinations
or From
Contactsmemories and save it on the SD
memory card.
RFrom Previous Destinations
(Ypage 72)
RFrom Contacts(Ypage 72)
Personal route from a tour including
intermediate destinations
XInsert the SD memory card (Ypage 182).
XTo switch to navigation mode: press the
ß button.
XEnter a destination, e.g. by address
(
Ypage 67).
XStart route calculation (Ypage 69).
XEnter an intermediate destination
(
Ypage 76).
XSelect Save As Personal Routein the
intermediate destinations menu.
The route is saved in the Personal
Routes
folder on the SD memory card.
Importing personal destinations and
routes via Mercedes-Benz Apps
You can use Mercedes-Benz Apps (e .g. Down-
load POI, Local Search) to import destinations
to navigation (
Ypage 155). These have their
own symbol and are filed in the Mercedes-
Benz Appscategory.
You can save the imported destinations and
routes as personal POIs and routes
(
Ypage 81).
Personal POIs and routes81
Navigation
Z
Page 84 of 222

When importing routes, please note:
RThe Mercedes-Benz Apps may generate a
route based on a different map from the
one used by COMAND. Points on the route
may therefore be situated off the digital
roads. For this reason an imported route
commenced in COMAND may deviate from
the original route from the Mercedes-Benz
Apps.
RThe Mercedes-Benz Apps minimize the
number of route points offered. For this
reason an imported route commenced in
COMAND may deviate from the original
route from the Mercedes-Benz Apps.
Selecting and editing personal POIs
and routes
Selecting
The example shows a personal POI.
XInsert the SD memory card (Ypage 182).
XTo switch to navigation mode: press the
ß button.
XTo show the menu: slide6the control-
ler.
XTo select Destination: turn and press the
controller.
XSelect From Memory Card.
The menu displays the categories available
on the SD memory card.
XTo select a category or Personal Routes:
turn and press the controller.
The available personal POIs or route entries
are displayed.
XSelect personal POI or personal route.
The address of the personal POI appears or
the personal route is displayed in the map.
If a large number of entries are stored, a reg-
ister for quick selection appears. Personal
POIs and routes can be saved and sorted with
different character sets (e. g. Latin, Cyrillic,
Arabic).
XTo select a register: slide9 the con-
troller.
XTo select a character: turn and press the
controller.
XTo select a character set for sorting:
slide 9 the controller to select B.
XPress the controller.
The available character sets are displayed.
The#dot indicates the current setting.
XTurn and press the controller.
Editing
The example shows a personal route.
XSelect personal POI or personal route
(
Ypage 82).
XTo explore a personal POI or personal
route: turn and press the controller to
select Map
.
The map with the crosshair appears and
shows the destination.
XScroll the map (Ypage 64).
82Personal POIs and routes
Navigation
Page 85 of 222
.
XTo switch to the menu: press the%but-
ton.
XTo call the personal POI: turn and press
the controller to select Call
.
If a mobile phone is connected to COMAND
and the te")
XSet the map scale (Ypage 96).
XTo switch to the menu: press the%but-
ton.
XTo call the personal POI: turn and press
the controller to select Call
.
If a mobile phone is connected to COMAND
and the telephone number is available, the
call is connected (
Ypage 118).
XTo save a personal POI: turn and press the
controller to select Save
.
XTo continue saving (Ypage 94).
XTo edit the name and symbol: turn and
press the controller to select Edit
.
XSelectChange NameorEdit Icon.
XCharacter entry (Ypage 31).
XSelect a symbol.
XTo delete a personal POI or route: turn
and press the controller to select Delete
.
A prompt will appear.
XSelect YesorNo.
If you select Yes
, the personal destination
or personal route is deleted.
XTo select the outward and return
routes: turn and press the controller to
select Swap
.
The starting and destination positions of
your personal route, and thus the direction
for route guidance, are switched round.
One-way streets or restricted intersections
are taken into consideration. Therefore, the outward and return routes may differ from
each other.
XTo start route guidance: turn and press
the controller to select Start
.
Recording the route
General notes
Routes are recorded on the SD memory card.
Requirement: the SD memory card is format-
ted using the FAT file system (e.g. FAT32). When recording the route, bear in mind the
following:
Rif the SD memory card is inserted, it must
not be removed during recording.
Rif route recording is started manually, it
must be finished manually before COMAND
is switched off (e
.g. when the engine is
switched off).
RCOMAND minimizes the number of route
points recorded. Therefore when the recor-
ded route is subsequently commenced, it
may differ from the route that was originally
recorded.
Starting/finishing route recording
XInsert the SD memory card (Ypage 182).
XTo switch to navigation mode: press the
ß button.
XTo show the menu: slide6the control-
ler.
XTo select Destination, turn and press the
controller.
XSelect From Memory Card.
XSelectStart Route Recording.
The route is recorded and REC appears at
the bottom edge of the screen.
XTo stop recording, select End Route
Recordingfrom the menu.
The route is stored under Personal
Routes.
Displaying/editing the recorded route
XInsert the SD memory card (Ypage 182).
XTo switch to navigation mode: press the
ß button.
XTo show the menu: slide6the control-
ler.
XTo select Destination: turn and press the
controller.
XSelect From Memory Card.
Personal POIs and routes83
Navigation
Z
Page 86 of 222

XSelectPersonal Routes.
Previously recorded routes are displayed.
XTo select a route, turn and press the con-
troller.
The map appears with a menu. The recor-
ded route is shown on the map in blue.
XTo calculate a route: selectStart.
XTo change the name and symbol: select
Edit
.
XSelect Change NameorEdit Icon.
XCharacter entry (Ypage 31).
XSelect a symbol.
Route guidance
General notes
COMAND calculates the route to the destina-
tion without taking account of the following,
for example:
Rtraffic lights
Rstop and yield signs
Rparking or stopping restrictions
Rroad narrowing
Rtemporary traffic rules and regulations
The navigation system can give differing driv-
ing recommendations if the actual street/
traffic situation does not correspond with the
digital map's data. For example, if the road
layout or the direction of a one-way street has
been changed.
For this reason, you must always observe
road and traffic rules and regulations during
your journey. Road and traffic rules and reg-
ulations always have priority over system
driving recommendations.
Route guidance begins once a route has been
calculated (
Ypage 69).
COMAND guides you to your destination by
means of navigation announcements in the
form of audible navigation announcements
and route guidance displays.
The route guidance displays can be seen if
navigation mode is switched on. If you do not follow the navigation announce-
ments or if you leave the calculated route,
COMAND automatically calculates a new
route to the destination.
If the digital map contains the corresponding
information, the following applies:
Rduring route guidance, COMAND tries to
a
void roads with restricted access. Those
roads, for example, that are closed to
through-traffic.
Rroads that have time restrictions (e.g.
closed on Sundays and public holidays) are considered for route guidance on days
when they are open. For this purpose, the
relevant times must be correctly stored in
the database.
Change of direction
Overview
Changes of direction have three phases:
RPreparation phase
RAnnouncement phase
RChange-of-direction phase
Changes in direction are also shown in the
multifunction display of the instrument clus-
ter (see the vehicle Operator's Manual).
Preparation phase
COMAND prepares you for the upcoming
change of direction, e.g. with the announce-
ment "Prepare to turn right". You see the full- screen map.
84Route guidance
Navigation
Page 87 of 222

=Change of direction (turn right here)
?Distanc eto th ene xt chang eof direction
COMAND anno")
Announcement phase
:Nextroad or direction
;Poin tat whic hth echang eof direction
takes plac e(whit edot )
=Change of direction (turn right here)
?Distanc eto th ene xt chang eof direction
COMAND announce sth eimminent chang eof
direction .The chang eof direction is
announce dahead of time, suc has wit hth e
announcemen t"Turn right in 20 0meters".
The display is no wsplit int otwo sectors .The
map is shown on th elef tside of th edisplay,
and adetailed imag eof th eintersection or a
3D imag eof th eimminent chang eof direction
is shown on th eright side of th edisplay.
Change-of-directi onphase
COMAND announce san imminent chang eof
direction .The chang eof direction is
announce dahead of time, e.g. wit hth e
announcemen t"Now tur nright".
The display is split in two lik ein th eannounce -
men tphase.
The chang eof direction is performed when
th elight-color bar on th eright drops down to 0
ft and th ecurren tvehicl eposition symbol
has reached th ewhit echange-of-direction
point.
When th echang eof direction is completed,
th emap will appear in full scree nmod eagain .
Display onhighways
The imag eshows an exampl eof rout eguid-
anc eat ahighway intersection when driving
on ahighway.
Lane rec ommendations
Display on multi-lane roads
:Lanes no trecommended (dar kgray)
;Possible lan e(ligh tgray)
=Recommended lanes (white)
If th edigital map contain sth erelevan tdata,
COMAND can display lan erecommendation s
on multi-lane road sfor th ene xt chang eof
direction .
Lane notrecommended ::you will no tbe
able to complete th ene xtchang eof direction
if you stay in this lane.
Route guidance85
Navigation
Z
Page 88 of 222

Possible lane;: you will only be able to com-
plete the next change of direction in this lane.
Recommended lane =: in this lane you will
be able to complete the next change of direc-
tion and the one after that.
COMAND shows the lane recommendations
for the next two changes of direction. Lane
recommendations are also shown in the mul- tifunction display of the instrument cluster
(see the vehicle Operator's Manual).
Approaching new lanes
:Approaching new lane
During the change of direction, new lanes
may be added. These will be shown in the dis-
play of lane recommendations with a lower
boundary line.
Highway information
Display mode
Requirement: the Highway Information
map content must be enabled (Ypage 98).
While driving on the highway, gas stations,
rest stops, rest areas and highway exits are displayed along with their immediate distan-
ces from the current vehicle position.
Calling up the selection mode
XWhen highway information is displayed,
slide
9 the controller.
The marker is on the highway information.
The associated position is highlighted on
the map.
XTo select the desired rest stop/freeway
exit: turn and press the controller.
The available POIs are displayed.
Starting route guidance to a POI
XTo select a POI: turn the controller and
press to confirm.
The POI details are displayed.
You can perform the following functions:
Rstore in the address book (Ypage 94)
Rview on the map (Ypage 99)
Rcall if a phone is connected and a phone
number is available (
Ypage 118).
Rselect for route guidance and a route to it
calculated (
Ypage 69).
86Route guidance
Navigation
 1
1 2
2 3
3 4
4 5
5 6
6 7
7 8
8 9
9 10
10 11
11 12
12 13
13 14
14 15
15 16
16 17
17 18
18 19
19 20
20 21
21 22
22 23
23 24
24 25
25 26
26 27
27 28
28 29
29 30
30 31
31 32
32 33
33 34
34 35
35 36
36 37
37 38
38 39
39 40
40 41
41 42
42 43
43 44
44 45
45 46
46 47
47 48
48 49
49 50
50 51
51 52
52 53
53 54
54 55
55 56
56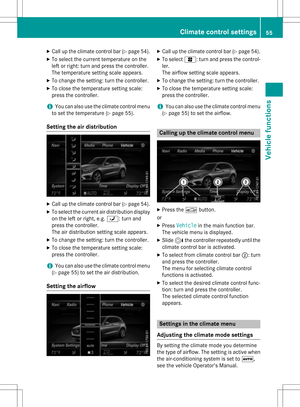 57
57 58
58 59
59 60
60 61
61 62
62 63
63 64
64 65
65 66
66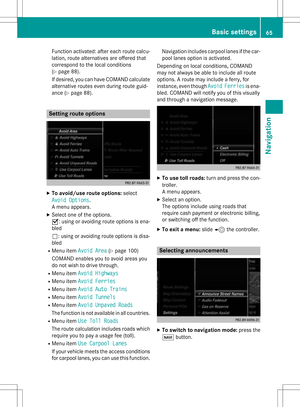 67
67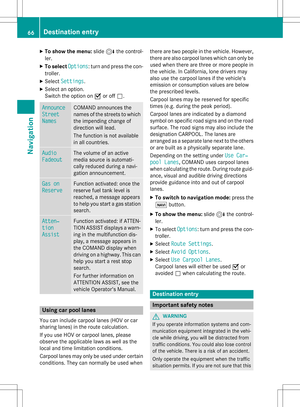 68
68 69
69 70
70 71
71 72
72 73
73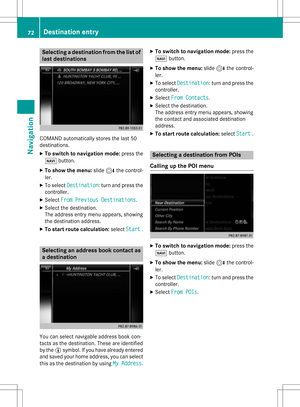 74
74 75
75 76
76 77
77 78
78 79
79 80
80 81
81 82
82 83
83 84
84 85
85 86
86 87
87 88
88 89
89 90
90 91
91 92
92 93
93 94
94 95
95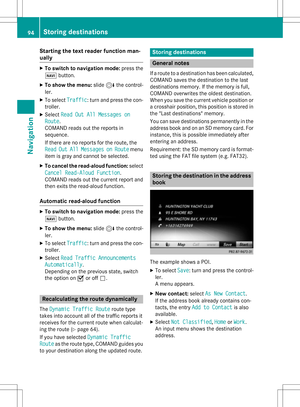 96
96 97
97 98
98 99
99 100
100 101
101 102
102 103
103 104
104 105
105 106
106 107
107 108
108 109
109 110
110 111
111 112
112 113
113 114
114 115
115 116
116 117
117 118
118 119
119 120
120 121
121 122
122 123
123 124
124 125
125 126
126 127
127 128
128 129
129 130
130 131
131 132
132 133
133 134
134 135
135 136
136 137
137 138
138 139
139 140
140 141
141 142
142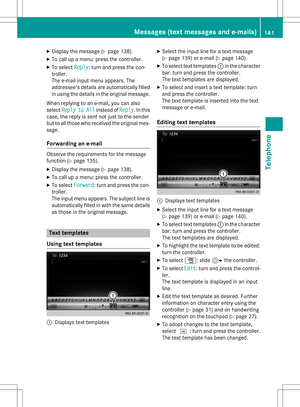 143
143 144
144 145
145 146
146 147
147 148
148 149
149 150
150 151
151 152
152 153
153 154
154 155
155 156
156 157
157 158
158 159
159 160
160 161
161 162
162 163
163 164
164 165
165 166
166 167
167 168
168 169
169 170
170 171
171 172
172 173
173 174
174 175
175 176
176 177
177 178
178 179
179 180
180 181
181 182
182 183
183 184
184 185
185 186
186 187
187 188
188 189
189 190
190 191
191 192
192 193
193 194
194 195
195 196
196 197
197 198
198 199
199 200
200 201
201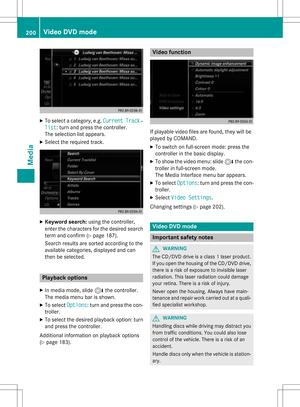 202
202 203
203 204
204 205
205 206
206 207
207 208
208 209
209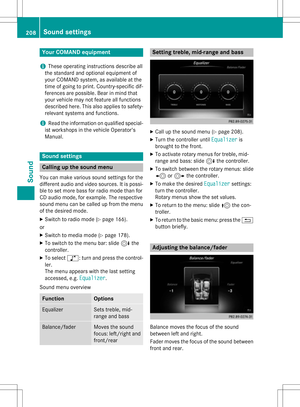 210
210 211
211 212
212 213
213 214
214 215
215 216
216 217
217 218
218 219
219 220
220 221
221