Page 137 of 222

XTo highlight a memory position for the
speed dial: turn the controller.
If you highlight an entry that already existsin the speed dial list, this is overwritten with
the new entry.
XTo select G: slide 9the controller.
XSelect Assign Speed Dial Preset.
The phone book is displayed.
XSearch for a contact (Ypage 122).
XTo select a contact: turn and press the con-
troller.
The phone number has been saved as a
speed dial.
Deleting
Deleting a speed dial preset
XTo call up the telephone menu: press the
% button.
XTo call up the menu bar: slide 6the con-
troller.
XTo select Call Lists: turn and press the
controller.
XSelect Speed Dial Preset List.
The speed dial list is displayed.
XTo highlight the memory position you want
to delete: turn the controller.
XTo select G: slide 9the controller.
XTo select Delete Speed Dial Preset:
turn and press the controller.
XTo select Yes: turn and press the controller.
The speed dial preset has been deleted.
or
XTo select No: turn and press the controller.
The process is canceled.
Deleting all speed dial presets
XTo call up the telephone menu: press the
% button.
XTo call up the menu bar: slide 6the con-
troller.
XTo select Call Lists: turn and press the
controller.
XSelect Speed Dial Preset List.
The speed dial list is displayed.
XTo highlight the desired memory position:
turn the controller.
XTo select G: slide 9the controller.
XTo select Delete All Speed Dial Pre‐
sets: turn and press the controller.
XTo selectYes: turn and press the controller.
All speed dials are deleted.
or
XTo select No: turn and press the controller.
The process is canceled.
Messages (text messages and e-
mails)
General notes
New messages are identified by an audible
signal and the /symbol in the COMAND
display. Once you have read all the messages,
the symbol is no longer displayed.
COMAND displays the 100 newest text mes-
sages and e-mails.
The ú symbol is displayed when the
mobile phone's message memory is full. The
symbol is no longer displayed if you delete
messages on the mobile phone.
Function restrictions
Text messages cannot be written while the
vehicle is in motion.
Prerequisites
To use the message functions, the connected mobile phone must support the MAP Blue-
tooth
®profile. The prompt for the MAP Blue-
tooth®profile may have to be confirmed on
the mobile phone.
Messages (text messages and e-mails)135
Telephone
Z
Page 138 of 222
. The messages are displayed the
next time you connect to COMAND.")
With some mobile phones, some settings still
have to be made after connecting to
COMAND (see the manufacturer's operating
instructions). The messages are displayed the
next time you connect to COMAND.
An e-mail account must be set up on the
mobile phone for the e-mail function (see the
manufacturer’s operating instructions).
To read and write e-mails in COMAND, the e-
mail account first needs to be configured
(
Ypage 137).
Some mobile phones with the MAP Blue-
tooth
®profile:
Ronly show new text messages.
Rdo not support the deleting or editing of
text messages.
Rdo not support the drafts folder for text
messages.
Rdo not support the sending of text mes-
sages.
Rdo not support the e-mail function.
Rdo not send messages in a locked status.
Not all mobile phones available on the market are equally suitable. You can obtain further
information about settings and supported
functions of Bluetooth
®-capable mobile
phones on the Internet at
www.mercedes-benz-mobile.com .
Or call the Mercedes-Benz Customer Assis-
tance Center at 1-800-FOR-MERCedes
(1-800-367-6372)( for the USA) or Customer
Relations at 1-800-387-0100 (for Canada).
Settings
Calling up the settings menu for mes-
sages
XTo call up the telephone menu: press the
% button.
XTo switch to the menu bar: slide 6the
controller.
XTo select 1: turn and press the controller.
The message menu is displayed.
XTo switch to the menu bar: slide 6the
controller.
XTo select Settings: turn and press the
controller.
The text message settings and the available
e-mail accounts of the connected mobile
phone will be displayed.
Configuring the text messages dis-
played
XCall up the settings menu for messages
(
Ypage 136).
XTo highlight Text Message: turn the con-
troller.
XTo select G: slide 9the controller.
A menu with the following options is shown:
RAll Messages
All the messages are displayed.
RNew Messages
Only the messages that are new on the
mobile phone are displayed. You can also
display the last 100 text messages using
136Messages (text messages and e-mails)
Telephone
Page 139 of 222

theDownloadoption in the message
menu.
ROff
The messages are not displayed auto-
matically. You can display the 100 new-
est text messages from the mobile phone
using the Download
option in the mes-
sage menu.
XTo select the required option: turn and
press the controller.
Configuring the e-mails displayed
XCall up the settings menu for messages
(
Ypage 136).
XTo highlight an e-mail account: turn the
controller.
XTo select G: slide 9the controller.
A menu with the following options is shown:
RAll Messages
All the messages are displayed.
RNew Messages
Only the messages that are new on the
mobile phone are displayed. You can also
display the last 100 text messages using
the Download
option in the message
menu.
ROff
The messages are not displayed auto-
matically. You can display the last 100
text messages using the Download
option in the message menu.
Configuring an e-mail account
XCall up the settings menu for messages
(
Ypage 136).
XTo select an e-mail account: turn and press
the controller.
The e-mail account is now configured. E-
mails can now be received and sent in
COMAND.
Deactivating the e-mail function
XCall up the settings menu for messages
(
Ypage 136).
XTo selectE-Mail Off: turn and press the
controller.
E-mail reception is deactivated.
Changing the displayed name of the e-
mail account
Some mobile phones:
Rdo not support the changing of the dis-
played name
Rsupport only the email address of the email
account
XCall up the settings menu for messages
(
Ypage 136).
XTo highlight an e-mail account: turn the
controller.
XTo select G: slide 9the controller.
XTo select Own E-Mail Address: turn and
press the controller.
The input menu for entering your own e-
mail address is displayed.
Downloading messages manually
XTo call up the telephone menu: press the
% button.
XTo switch to the menu bar: slide 6the
controller.
XTo select 1: turn and press the controller.
The message menu is displayed.
XTo switch to the menu bar: slide 6the
controller.
XTo select Download: turn and press the
controller.
Downloading text messages and e-mails
from the phone
XSelect From the Phone.
The messages are downloaded. If you have
selected Automatic Download
in the e-
Messages (text messages and e-mails)137
Telephone
Z
Page 140 of 222

mail settings, manual downloading is not
possible.
Updating from the e-mail server by the
mobile phone
XSelect From the E-Mail Server.
The e-mails in the mobile phone are upda-
ted.
This function is not supported by all mobile
phones.
Reading messages
In the message menu
The message menu contains all the unread
text messages and e-mails. If the correspond- ing folder is called up, the messages are dis-
played sorted by text messages and e-mails.
XTo call up the telephone menu: press the
% button.
XTo switch to the menu bar: slide 6the
controller.
XTo select 1: turn and press the controller.
The message menu is displayed with the
unread messages.
XTo select the message: turn and press the
controller.
The message text is displayed.
XTo close the message text: press the %
button.
If you want to read messages that have
already been read again, you have to call up
the corresponding message folder
(
Ypage 138).
In the message folder
XTo call up the telephone menu: press the
% button.
XTo switch to the menu bar: slide 6the
controller.
XTo select 1: turn and press the controller.
The message menu is displayed.
XTo switch to the menu bar: slide 6the
controller.
XTo select Folder: turn and press the con-
troller.
XTo select Text MessageorE-Mail: turn
and press the controller.
The selected folder is displayed.
XTo select the message: turn and press the
controller.
The message is displayed.
XTo scroll through the message or select
phone numbers in the text: turn the con-
troller.
The display scrolls up or down line by line,
or skips to the next or previous telephone
number and automatically highlights it.
XTo return to the list: press %.
The following sub-folders can be selected
for text messages and e-mails:
RInbox
This folder contains all the incoming mes-
sages.
ROutbox
This folder contains all the outgoing mes-
sages.
RDrafts
138Messages (text messages and e-mails)
Telephone
Page 141 of 222

This folder contains all the messages that
you have saved as a draft.
iFolders cannot be selected if they are
empty.
Depending on the mobile phone used, the
sub-folder function may be available.
Read-aloud function for messages
XTo start the read-aloud function: press the
controller when the message is displayed.
XTo select Read Aloud: turn and press the
controller.
COMAND reads out the message.
XTo cancel the read-aloud function: press
the 8 button.
or
XPress the controller, select Cancel Read-
Aloud Functionand press the controller
again.
You can set the language (
Ypage 45) and the
speed (
Ypage 41) of the read-aloud function.
Displaying details and phone numbers
COMAND can also show a shortened sender
display in full.
XTo call up the telephone menu: press the
% button.
XTo switch to the menu bar: slide 6the
controller.
XTo select 1: turn and press the controller.
The message menu is displayed.
XTo switch to the menu bar: slide 6the
controller.
XTo select Folder: turn and press the con-
troller.
XTo select Text MessageorE-Mail: turn
and press the controller.
The selected folder is displayed.
XTo highlight the desired message: turn the
controller.
XTo select G: slide 9the controller.
XTo select Details: turn and press the con-
troller.
The detailed view appears.
XTo close the detailed display: slide8
the controller.
XTo return to the telephone menu: press
the k button.
Writing text messages
Writing a new text message
Observe the requirements for the message
function (
Ypage 135).
XTo call up the telephone menu: press the
% button.
XTo switch to the menu bar: slide 6the
controller.
XTo select 1: turn and press the controller.
The message menu is displayed.
XTo switch to the menu bar: slide 6the
controller.
XTo select New: turn and press the controller.
XTo select Text Message: turn and press
the controller.
The text message input menu is displayed.
The To:
input line is selected.
Entering a recipient
XEnter characters using the controller
(
Ypage 31) or the touchpad (Ypage 27).
or
Messages (text messages and e-mails)139
Telephone
Z
Page 142 of 222
.
The number is copied t")
XTo enter a phone number from the phone
book: selectÆ.
The contacts from the address book which
have a phone number are displayed.
XSearch for and select an entry
(
Ypage 122).
The number is copied to the recipient line.
Entering text and sending text messages
XTo select an input line for text: select 5in
the character bar.
XEnter characters.
COMAND contains templates which you
can use when writing your messages
(
Ypage 141).
XTo send the text message: select OK.
Answering a text message
Observe the requirements for the message
function (
Ypage 135).
XDisplay the message (Ypage 138).
XPress the controller.
XTo selectReply: turn and press the con-
troller.
The text message input menu is displayed.
The addressee's details are automatically
filled in using the details in the original
message.
Writing e-mails
Writing a new e-mail
Observe the requirements for the message
function (
Ypage 135).
XTo call up the telephone menu: press the
% button.
XTo switch to the menu bar: slide 6the
controller.
XTo select 1: turn and press the controller.
The message menu is displayed.
XTo switch to the menu bar: slide 6the
controller.
XTo select New: turn and press the controller.
XTo select E-Mail: turn and press the con-
troller.
The e-mail input menu appears. The To:
input line is selected.
Entering a recipient
XEnter characters using the controller
(
Ypage 31) or the touchpad (Ypage 27).
or
XTo insert an e-mail address from the
address book: select Æ.
The contacts from the address book which
have an e-mail address are displayed.
XSearch for and select an entry
(
Ypage 122).
The e-mail address is copied to the addres-
see line.
Entering the subject
XTo select the Subject:input line: select
5 in the character bar.
XEnter characters.
Entering text and sending e-mails
XTo select an input line for text: select 5in
the character bar.
XEnter characters.
COMAND contains templates which you
can use when writing your messages
(
Ypage 141).
XTo send the e-mail: select OK.
Answering an e-mail
Observe the requirements for the message
function (
Ypage 135).
140Messages (text messages and e-mails)
Telephone
Page 143 of 222
.
XTo call up a menu: press the controller.
XTo selectReply: turn and press the con-
troller.
The e-mail input menu appears. The
addressees details are automatically f")
XDisplay the message (Ypage 138).
XTo call up a menu: press the controller.
XTo selectReply: turn and press the con-
troller.
The e-mail input menu appears. The
addressee's details are automatically filled
in using the details in the original message.
When replying to an e-mail, you can also
select Reply
toAllinstead of Reply. In this
case, the reply is sent not just to the sender
but to all those who received the original mes- sage.
Forwarding an e-mail
Observe the requirements for the message
function (
Ypage 135).
XDisplay the message (Ypage 138).
XTo call up a menu: press the controller.
XTo select Forward: turn and press the con-
troller.
The input menu appears. The subject line is automatically filled in with the same details
as those in the original message.
Text templates
Using text templates
:Displays text templates
XSelect the input line for a text message
(
Ypage 139) or e-mail (Ypage 140).
XTo select text templates :in the character
bar: turn and press the controller.
The text templates are displayed.
XTo select and insert a text template: turn
and press the controller.
The text template is inserted into the text
message or e-mail.
Editing text templates
:Displays text templates
XSelect the input line for a text message
(
Ypage 139) or e-mail (Ypage 140).
XTo select text templates :in the character
bar: turn and press the controller.
The text templates are displayed.
XTo highlight the text template to be edited: turn the controller.
XTo select G: slide 9the controller.
XTo select Edit: turn and press the control-
ler.
The text template is displayed in an input
line.
XEdit the text template as desired. Further
information on character entry using the
controller (
Ypage 31) and on handwriting
recognition on the touchpad (
Ypage 27).
XTo adopt changes to the text template,
select ¬: turn and press the controller.
The text template has been changed.
Messages (text messages and e-mails)141
Telephone
Z
Page 144 of 222
.
XTo call up a menu: press the controller.
XTo selectCallSender: turn and press the
controller.
The call is made.
Using a phone number in")
Calling a text message sender
XDisplay the message (Ypage 138).
XTo call up a menu: press the controller.
XTo selectCallSender: turn and press the
controller.
The call is made.
Using a phone number in the text
Numbers in text messages that are highligh-
ted can be used.
XTo select a usable phone number while the
message is displayed: turn and press the
controller.
XTo select Callnumber: turn and press the
controller.
The call is made.
iIt is possible that a highlighted numerical
sequence may not contain a telephone
number.
iYou can use the "New entry" or "Add no."
functions to save this telephone number or
to add it to an existing entry.
Storing a sender as a new entry in the
address book
Storing the sender of a text message
XTo call up the menu when a text message is
displayed: press the controller.
XTo select SaveNumber: turn and press the
controller.
XTo select New Entry: turn and press the
controller.
XSelect a number category, e.g. Home.
XSelect a telephone category, e.g. Mobile
Phone.
XSelectContinue.
The input line for the name of the new con-
tact is displayed. The input line for the tele-
phone number is filled in automatically.
XEnter characters using the controller
(
Ypage 31) or the touchpad (Ypage 27).
XTo finish the entry: select OK.
The new contact has been created.
Saving the sender of an e-mail
XTo call up the menu when an e-mail is dis-
played: press the controller.
XTo select Save Sender's E-Mail
Address: turn and press the controller.
XTo selectNew Entry: turn and press the
controller.
The input line for the name of the new con-
tact is displayed. The input line for the e-
mail address is filled in automatically.
XEnter characters using the controller
(
Ypage 31) or the touchpad (Ypage 27).
XTo finish the entry: select OK.
The new contact has been created.
Adding the sender to an address book
entry
Storing the sender of a text message
XTo call up the menu when a text message is
displayed: press the controller.
XTo select SaveNumber: turn and press the
controller.
XTo select Add Phone No.: turn and press
the controller.
XTo select a category for the number, e.g.
Home
: turn the controller and press to con-
firm.
XTo select a telephone category, e.g.
Mobile Phone
: turn the controller and
press to confirm.
XTo select Continue: turn and press the
controller.
The address book is displayed.
XSearch for the desired entry (Ypage 126).
XPress the controller when you have finished
searching.
The telephone number has been added.
142Messages (text messages and e-mails)
Telephone
 1
1 2
2 3
3 4
4 5
5 6
6 7
7 8
8 9
9 10
10 11
11 12
12 13
13 14
14 15
15 16
16 17
17 18
18 19
19 20
20 21
21 22
22 23
23 24
24 25
25 26
26 27
27 28
28 29
29 30
30 31
31 32
32 33
33 34
34 35
35 36
36 37
37 38
38 39
39 40
40 41
41 42
42 43
43 44
44 45
45 46
46 47
47 48
48 49
49 50
50 51
51 52
52 53
53 54
54 55
55 56
56 57
57 58
58 59
59 60
60 61
61 62
62 63
63 64
64 65
65 66
66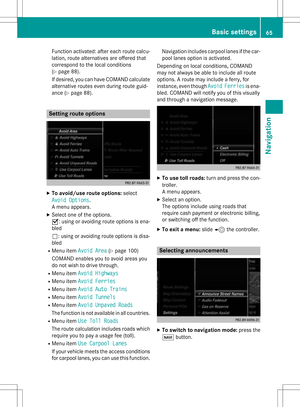 67
67 68
68 69
69 70
70 71
71 72
72 73
73 74
74 75
75 76
76 77
77 78
78 79
79 80
80 81
81 82
82 83
83 84
84 85
85 86
86 87
87 88
88 89
89 90
90 91
91 92
92 93
93 94
94 95
95 96
96 97
97 98
98 99
99 100
100 101
101 102
102 103
103 104
104 105
105 106
106 107
107 108
108 109
109 110
110 111
111 112
112 113
113 114
114 115
115 116
116 117
117 118
118 119
119 120
120 121
121 122
122 123
123 124
124 125
125 126
126 127
127 128
128 129
129 130
130 131
131 132
132 133
133 134
134 135
135 136
136 137
137 138
138 139
139 140
140 141
141 142
142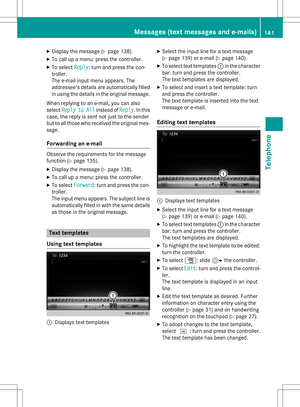 143
143 144
144 145
145 146
146 147
147 148
148 149
149 150
150 151
151 152
152 153
153 154
154 155
155 156
156 157
157 158
158 159
159 160
160 161
161 162
162 163
163 164
164 165
165 166
166 167
167 168
168 169
169 170
170 171
171 172
172 173
173 174
174 175
175 176
176 177
177 178
178 179
179 180
180 181
181 182
182 183
183 184
184 185
185 186
186 187
187 188
188 189
189 190
190 191
191 192
192 193
193 194
194 195
195 196
196 197
197 198
198 199
199 200
200 201
201 202
202 203
203 204
204 205
205 206
206 207
207 208
208 209
209 210
210 211
211 212
212 213
213 214
214 215
215 216
216 217
217 218
218 219
219 220
220 221
221