2016 MERCEDES-BENZ GL steering
[x] Cancel search: steeringPage 384 of 462
X
Before cleaning the display, make sure that
it is switched off and has cooled down. X
Clean the display surface using a commer-
cially available microfiber cloth and
TFT/LCD display cleaner. X
Dry the display surface using a dry micro-
fiber cloth.
Cleaning Night View Assist Plus
! Never clean the camera lens. When clean-
ing the field of vision of the driving systems,
make sure that you do not spray glass
cleaner on the camera lens. If the camera
lens is dirty, visit a qualified specialist work-
shop.
X
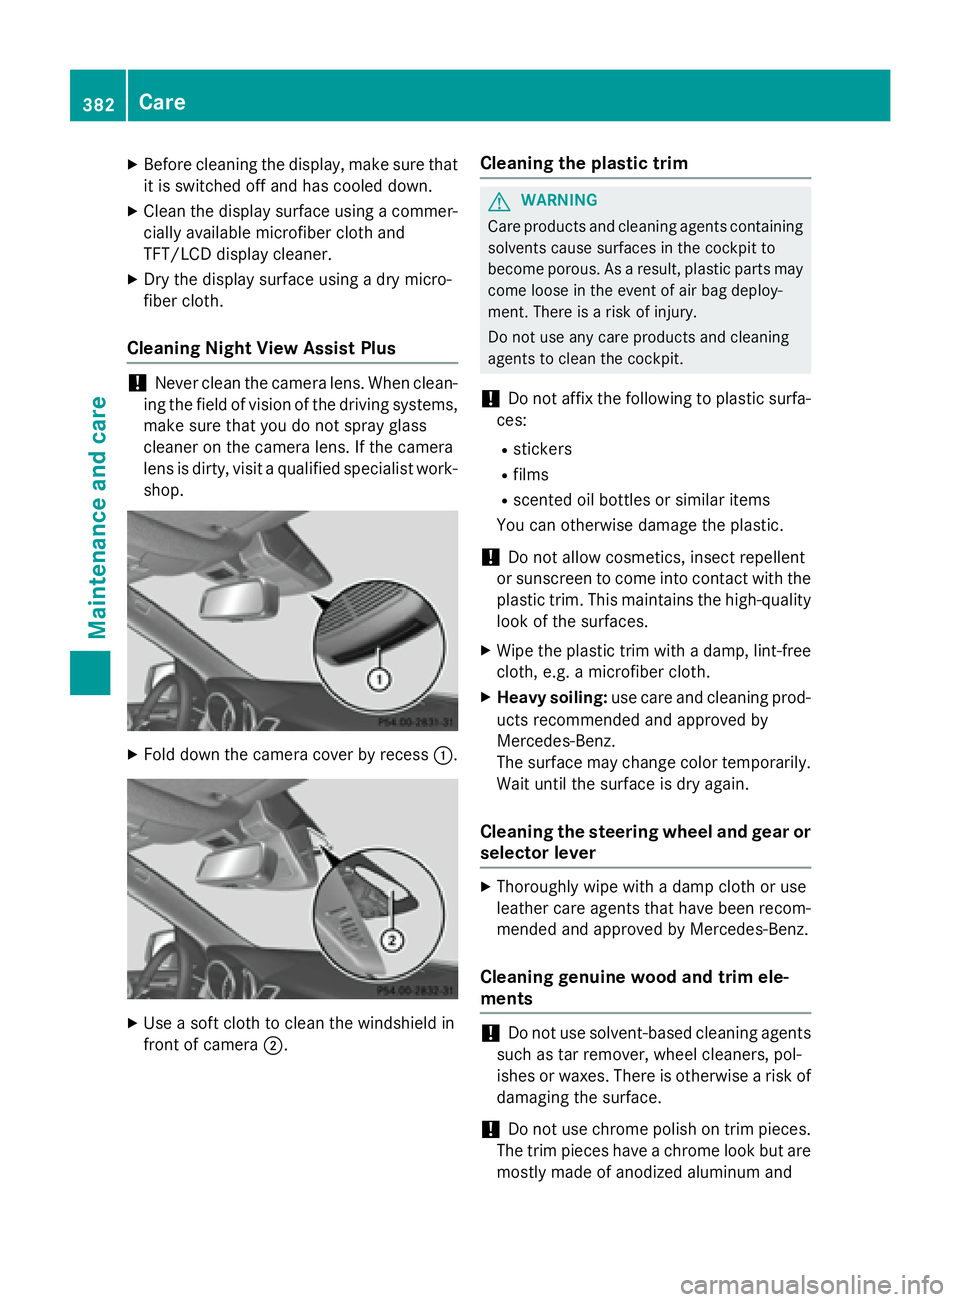
Fold down the camera cover by recess �C .
X
Use a soft cloth to clean the windshield in
front of camera �D . Cleaning the plastic trim
G WARNING
Care products and cleaning agents containing
solvents cause surfaces in the cockpit to
become porous. As a result, plastic parts may
come loose in the event of air bag deploy-
ment. There is a risk of injury.
Do not use any care products and cleaning
agents to clean the cockpit.
! Do not affix the following to plastic surfa-
ces: R
stickers R
films R
scented oil bottles or similar items
You can otherwise damage the plastic.
! Do not allow cosmetics, insect repellent
or sunscreen to come into contact with the
plastic trim. This maintains the high-quality
look of the surfaces. X
Wipe the plastic trim with a damp, lint-free
cloth, e.g. a microfiber cloth. X
Heavy soiling: use care and cleaning prod-
ucts recommended and approved by
Mercedes-Benz.
The surface may change color temporarily.
Wait until the surface is dry again.
Cleaning the steering wheel and gear or
selector lever X
Thoroughly wipe with a damp cloth or use
leather care agents that have been recom-
mended and approved by Mercedes-Benz.
Cleaning genuine wood and trim ele-
ments
! Do not use solvent-based cleaning agents
such as tar remover, wheel cleaners, pol-
ishes or waxes. There is otherwise a risk of
damaging the surface.
! Do not use chrome polish on trim pieces.
The trim pieces have a chrome look but are
mostly made of anodized aluminum and382
Care
Maintenance and care
Page 390 of 462
If a pressure loss warning message
appears in the multifunction display: R
observe the instructions in the display mes-
sages ( Y
page 318).R
check the tire for damage. R
if driving on, observe the following notes.
The driving distance possible in run-flat mode
is approximately 50 miles (80 km) when the
vehicle is partially laden and approximately
18 miles (30 km ) when the vehicle is fully
laden.
In addition to the vehicle load, the driving dis-
tance possible depends upon: R
vehicle speed R
road condition R
outside temperature
The driving distance possible in run-flat mode
may be reduced by extreme driving condi-
tions or maneuvers, or it can be increased
through a moderate style of driving.
The driving distance possible in run-flat mode
is counted from the moment the tire pressure
loss warning appears in the multifunction dis-
play.
You must not exceed a maximum speed of
50 mph (80 km/h).
i When replacing one or all tires, please
observe the following specifications for
your vehicle's tires: R
size R
type and R
the "MOExtended" mark
If a tire has gone flat and cannot be
replaced with a MOExtended tire, a stand-
ard tire may be used as a temporary meas-
ure. Make sure that you use the proper size
and type (summer or winter tire).
i Vehicles equipped with MOExtended tires
are not equipped with a TIREFIT kit at the
factory. It is therefore recommend ed that
you additionally equip your vehicle with a
TIREFIT kit if you mount tires that do not
feature run-flat properties, e.g. winter tires. A TIREFIT kit may be obtained from a quali-
fied specialist workshop.
Important safety notes
G WARNING
When driving in emergency mode, the driving
characteristics deteriorate, e.g. when corner-
ing, accelerating quickly and when braking.
There is a risk of an accident.
Do not exceed the stated maximum speed.
Avoid abrupt steering and driving maneuvers,
and driving over obstacles (curbs, potholes,
off-road). This applies in particular to a laden
vehicle.
Stop driving in emergency mode if: R
you hear banging noises. R
the vehicle starts to shake. R
you see smoke and smell rubber. R
ESP ®
is intervening constantly. R
there are tears in the sidewalls of the tire.
After driving in emergency mode, have the
wheel rims checked at a qualified specialist
workshop with regard to their further use. The
defective tire must be replaced in every case.
TIREFIT kit
Important safety notes
TIREFIT is a tire sealant.
You can use TIREFIT to seal punctures of up to
0.16 in (4 mm), particularly those in the tire
tread. You can use TIREFIT at outside tem-
peratures down to �
Page 394 of 462
fore have all work involving the battery car-
ried out at a qualified specialist workshop.
G WARNING
Work carried out incorrectly on the battery
can lead, for example, to a short circuit and
thus damage the vehicle electronics. This can
lead to function restrictions applying to
safety-relevant systems, e.g the lighting sys-
tem, the ABS (anti-lock braking system) or the
ESP ®
(Electronic Stability Program). The oper-
ating safety of your vehicle may be restricted.
You could lose control of the vehicle, for
example: R
when braking R
in the event of abrupt steering maneuvers
and/or when the vehicle's speed is not
adapted to the road conditions
There is a risk of an accident.
In the event of a short circuit or a similar inci-
dent, contact a qualified specialist workshop
immediately. Do not drive any further. You
should have all work involving the battery car-
ried out at a qualified specialist workshop.
i For further information about ABS and
ESP ®
, see ( Y
page 68) and ( Y
page 73).
G WARNING
Electrostatic build-up can lead to the creation
of sparks, which could ignite the highly explo-
sive gases of a battery. There is a risk of an
explosion.
Before handling the battery, touch the vehicle
body to remove any existing electrostatic
build-up.
The highly flammable gas mixture forms when
charging the battery as well as when jump-
starting. Always make sure that neither you nor the
battery is electrostatically charged. A build-
up of electrostatic charge can be caused, for
example: R
by wearing clothing made from synthetic
fibers R
due to friction between clothing and seats R
if you push or pull the battery across the
carpet or other synthetic materials R
if you wipe the battery with a cloth
G WARNING
During the charging process, a battery produ-
ces hydrogen gas. If a short circuit occurs or
sparks are created, the hydrogen gas can
ignite. There is a risk of an explosion. R
Make sure that the positive terminal of a
connected battery does not come into con-
tact with vehicle parts. R
Never place metal objects or tools on a bat-
tery. R
It is important that you observe the descri-
bed order of the battery terminals when
connecting and disconnecting a battery. R
When jump-starting, make sure that the
battery poles with identical polarity are
connected. R
It is particularly important to observe the
described order when connecting and dis-
connecting the jumper cables. R
Never connect or disconnect the battery
terminals while the engine is running.
G WARNING
Battery acid is caustic. There is a risk of injury.
Avoid contact with skin, eyes or clothing. Do
not inhale any battery gases. Do not lean over
the battery. Keep children away from batter-
ies. Wash away battery acid immediately with
plenty of clean water and seek medical atten-
tion.392
Battery (vehicle)
Breakdown assistance
Page 401 of 462
The brackets for the screw-in towing eyes are
located in the bumpers. They are at the front
and at the rear, behind the covers. X
Remove the towing eye from the vehicle
tool kit ( Y
page 386).X
To open the cover at the front: press the
mark on cover �C inwards in the direction
of the arrow. X
To open the cover at the rear: insert a
flat, blunt object into the cutout and lever
cover �D out of the bumper.X
Take cover �C or �D off the opening.X
Screw in the towing eye clockwise as far as
it will go and tighten it.
Removing the towing eye X
Unscrew and remove the towing eye. X
Attach cover �C or �D to the bumper and
press until it engages. X
Place the towing eye in the vehicle tool kit.
Towing a vehicle with both axles on
the ground
It is important that you observe the safety
instructions when towing away your vehicle
( Y
page 397).
The automatic transmission automatically
shifts to position P when you open the driver's
or front-passenger door or when you remove
the SmartKey from the ignition lock.
In order to ensure that the automatic trans-
mission stays in position N when towing the
vehicle, you must observe the following
points: X
Make sure that the vehicle is stationary and
the SmartKey in the ignition lock is in posi-
tion 0 .X
Turn the SmartKey to position 2 in the igni-
tion lock.
On vehicles with KEYLESS-GO, use the
SmartKey instead of the Start/Stop button
( Y
page 165). X
Depress and hold the brake pedal. X
Shift the automatic transmission to posi-
tion N . X
Release the brake pedal. X
Release the electric parking brake. X
Leave the SmartKey in position 2 in the
ignition lock. X
Switch on the hazard warning lamps
( Y
page 133).
i In order to signal a change of direction
when towing the vehicle with the hazard
warning lamps switched on, use the com-
bination switch as usual. In this case, only
the indicator lamps for the direction of
travel flash. After resetting the combina-
tion switch, the hazard warning lamp starts
flashing again.
Transporting the vehicle
! You may only secure the vehicle by the
wheels, not by parts of the vehicle such as
axle or steering components. Otherwise,
the vehicle could be damaged.
The towing eye can be used to pull the vehicle
onto a trailer or transporter for transporting
purposes. X
Turn the SmartKey to position 2 in the igni-
tion lock. X
Shift the automatic transmission to posi-
tion N .
As soon as the vehicle has been loaded: X
Prevent the vehicle from rolling away by
applying the electric parking brake. X
Shift the automatic transmission to posi-
tion P . X
Turn the SmartKey to position 0 in the igni-
tion lock and remove it. X
Secure the vehicle.Towing and tow-starting 399
Breakdown assistance Z
Page 414 of 462
The tire pressure monitor is not able to warn
you of a sudden loss of pressure, e.g. if the
tire is penetrated by a foreign object. In the
event of a sudden loss of pressure, bring the
vehicle to a halt by braking carefully. Avoid
abrupt steering maneuvers.
The function of the tire pressure loss warning
system is limited or delayed if: R
snow chains are mounted on your vehicle's
tires. R
road conditions are wintry. R
you are driving on sand or gravel. R
you adopt a very sporty driving style (cor-
nering at high speeds or driving with high
rates of acceleration). R
you are towing a very heavy or large trailer. R
you are driving with a heavy load (in the
vehicle or on the roof).
Restarting the tire pressure loss warn-
ing system Restart the tire pressure loss warning system
if you have: R
changed the tire pressure R
changed the wheels or tires R
mounted new wheels or tires X
Before restarting, make sure that the tire
pressures are set properly on all four tires
for the respective operating conditions.
The recommended tire pressures can be
found on the Tire and Loading Information
placard on the B-pillar on the driver's side
or the tire pressure table on the fuel filler
flap.
The tire pressure loss warning system can
only give reliable warnings if you have set
the correct tire pressure. If an incorrect tire
pressure is set, these incorrect values will
be monitored. X
Also observe the notes in the section on tire
pressures ( Y
page 408).X
Make sure that the SmartKey is in position
2 in the ignition lock ( Y
page 165). X
Press the �Y or �e button on the steer-
ing wheel to select the Service
menu.X
Press the �c or �d button to select
Tire Pressure
. X
Press the �v button.
The Run Flat Indicator Active
Press 'OK' to Restart message
appears in the multifunction display.
If you wish to confirm the restart: X
Press the �v button.
The Tire Pressure Now OK?
message
appears in the multifunction display. X
Press the �c or �d button to select
Yes
. X
Press the �v button.
The Run Flat Indicator Restarted
message appears in the multifunction dis-
play.
After a teach-in period, the tire pressure
loss warning system will monitor the set
tire pressures of all four tires.
If you wish to cancel the restart: X
Press the �8 button.
or X
When the Tire Pressure Now OK? mes-
sage appears, press the �c or �d but-
ton to select Cancel . X
Press the �v button.
The tire pressure values stored at the last
restart will continue to be monitored.
Tire pressure monitor
General notes
If a tire pressure monitor is installed, the vehi-
cle's wheels have sensors that monitor the
tire pressures in all four tires. The tire pres-
sure monitor warns you if the pressure drops
in one or more of the tires. The tire pressure
monitor only functions if the corresponding
sensors are installed in all wheels.
Information on tire pressures is displayed in
the multifunction display. After a few minutes412
Tire pressure
Wheels and tires
Page 416 of 462
The tire pressure monitor is not able to warn
you of a sudden loss of pressure, e.g. if the
tire is penetrated by a foreign object. In the
event of a sudden loss of pressure, bring the
vehicle to a halt by braking carefully. Avoid
abrupt steering maneuvers.
The tire pressure monitor has a yellow warn-
ing lamp in the instrument cluster for indicat-
ing pressure loss or a malfunction. Whether
the warning lamp flashes or lights up indi-
cates whether a tire pressure is too low or the
tire pressure monitor is malfunctioning: R
if the warning lamp is lit continuously, the
tire pressure on one or more tires is signif-
icantly too low. The tire pressure monitor is
not malfunctioning. R
if the warning lamp flashes for around a
minute and then remains lit constantly, the
tire pressure monitor is malfunctioning.
In addition to the warning lamp, a message
appears in the multifunction display. Observe
the information on display messages
( Y
page 318).
It may take up to ten minutes for a malfunc-
tion of the tire pressure monitor to be indica-
ted. A malfunction will be indicated by the tire
pressure warning lamp flashing for approx-
imately one minute and then remaining lit.
When the malfunction has been rectified, the
tire pressure warning lamp goes out after a
few minutes of driving.
The tire pressure values indicated by the on-
board computer may differ from those meas-
ured at a gas station with a pressure gage.
The tire pressures shown by the on-board
computer refer to those measured at sea
level. At high altitudes, the tire pressure val-
ues indicated by a pressure gage are higher
than those shown by the on-board computer.
In this case, do not reduce the tire pressures.
The operation of the tire pressure monitor can
be affected by interference from radio trans-
mitting equipment (e.g. radio headphones,
two-way radios) that may be being operated
in or near the vehicle. Checking the tire pressure electroni-
cally X
Make sure that the SmartKey is in position
2 in the ignition lock ( Y
page 165).X
Press the �Y or �e button on the steer-
ing wheel to select the Service
menu.X
Press the �c or �d button to select
Tire Pressure
. X
Press the �v button.
The current tire pressure of each tire is
shown in the multifunction display.
If the vehicle has been parked for longer than
20 minutes, the Tire pressure will be
displayed after driving a few
minutes message appears.
After a teach-in process, the tire pressure
monitor automatically detects new wheels or
new sensors. As long as a clear allocation of
the tire pressure value to the individual
wheels is not possible, the Tire Pressure
Monitor Active display message is shown
instead of the tire pressure display. The tire
pressures are already being monitored.
i If an emergency spare wheel is mounted,
the system may continue to show the tire
pressure of the wheel that has been
removed for a few minutes. If this occurs,
note that the value displayed for the posi-
tion where the spare wheel is mounted is
not the same as the current tire pressure of
the emergency spare wheel.
Tire pressure monitor warning mes-
sages
If the tire pressure monitor detects a pressure
loss in one or more tires, a warning message
is shown in the multifunction display and the
yellow tire pressure monitor warning lamp
comes on. R
If the Please Correct Tire Pressure
message appears in the multifunction dis-
play, the tire pressure in at least one tire is414
Tire pressure
Wheels and tires
Page 418 of 462
Loading the vehicle
Instruction labels for tires and loads
G WARNING
Overloaded tires can overheat, causing a
blowout. Overloaded tires can also impair the
steering and driving characteristics and lead
to brake failure. There is a risk of accident.
Observe the load rating of the tires. The load
rating must be at least half of the GAWR of
your vehicle. Never overload the tires by
exceeding the maximum load.
Two instruction labels on your vehicle show
the maximum possible load.
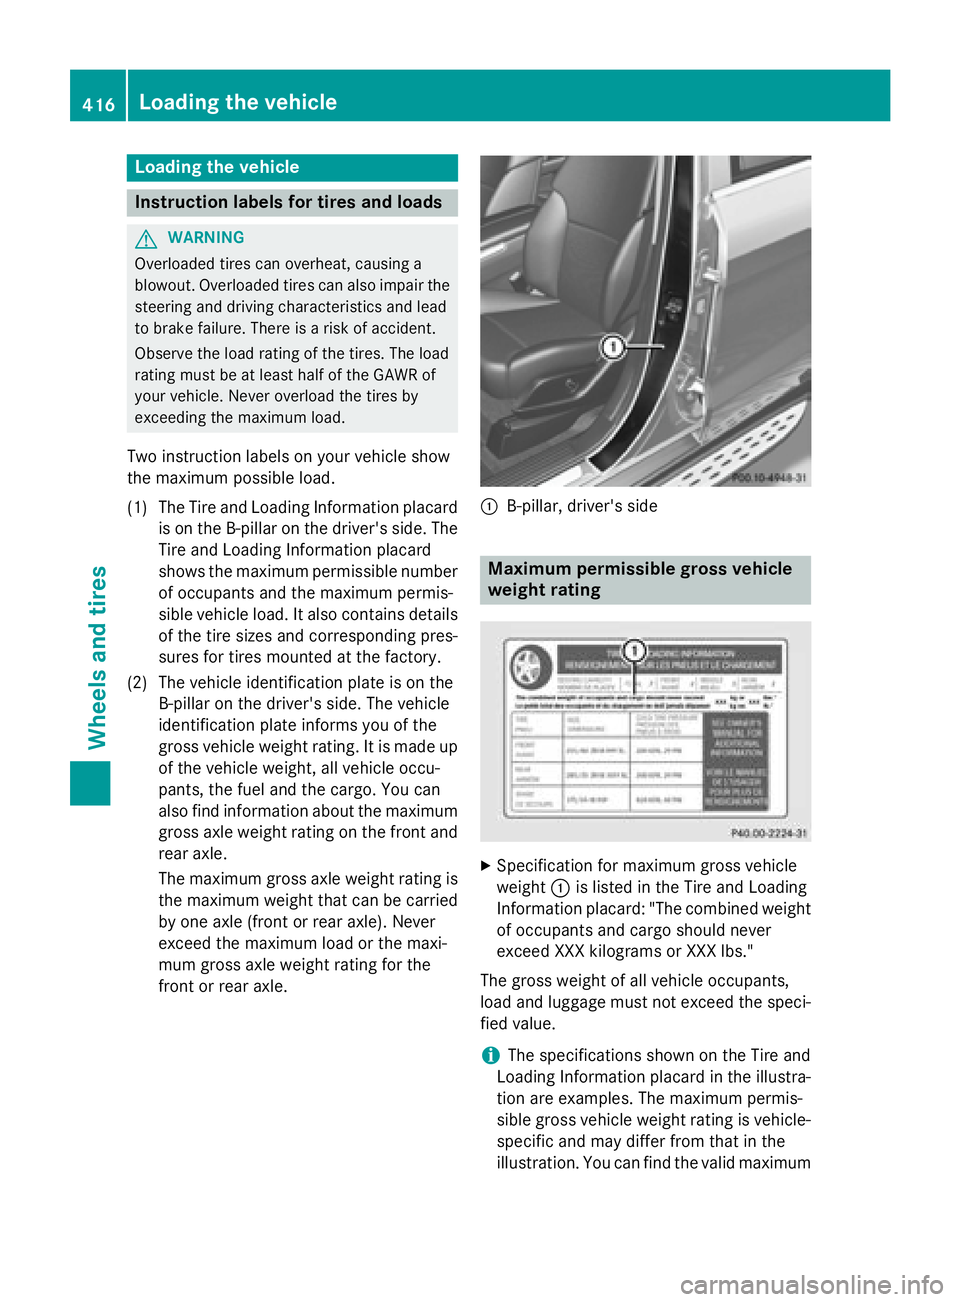
(1) The Tire and Loading Information placard
is on the B-pillar on the driver's side. The
Tire and Loading Information placard
shows the maximum permissible number
of occupants and the maximum permis-
sible vehicle load. It also contains details
of the tire sizes and corresponding pres-
sures for tires mounted at the factory.
(2) The vehicle identification plate is on the
B-pillar on the driver's side. The vehicle
identification plate informs you of the
gross vehicle weight rating. It is made up
of the vehicle weight, all vehicle occu-
pants, the fuel and the cargo. You can
also find information about the maximum
gross axle weight rating on the front and
rear axle.
The maximum gross axle weight rating is
the maximum weight that can be carried
by one axle (front or rear axle). Never
exceed the maximum load or the maxi-
mum gross axle weight rating for the
front or rear axle. �C
B-pillar, driver's side
Maximum permissible gross vehicle
weight rating
X
Specification for maximum gross vehicle
weight �C is listed in the Tire and Loading
Information placard: "The combined weight
of occupants and cargo should never
exceed XXX kilograms or XXX lbs."
The gross weight of all vehicle occupants,
load and luggage must not exceed the speci-
fied value.
i The specifications shown on the Tire and
Loading Information placard in the illustra-
tion are examples. The maximum permis-
sible gross vehicle weight rating is vehicle-
specific and may differ from that in the
illustration. You can find the valid maximum416
Loading the vehicle
Wheels and tires