2016 MERCEDES-BENZ G-CLASS SUV lights
[x] Cancel search: lightsPage 57 of 261
4ETS (Electronic Traction System)
i
Observ
ethe "Important safety notes" sec-
tion (Y page 52).
4ETS traction control is part of ESP ®
.
4ETS traction control is no longer active above a
speed of approximately 60 km/h.
Traction control brakes the drive wheels indi-
vidually if they spin. This enables you to pull
awaya nd accelerate on slippery surfaces, e.g. if
the road surface is slippery on one side. In addi-
tion, more drive torque is transferred to the
wheel or wheels with traction.
Traction control remains active if you deactivate
ESP ®
.
Important safety notes i
Observe the "Important safety notes" sec-
tion (Y page 52). G
WARNING
If ESP ®
is malfunctioning, ESP ®
is unable to
stabilise the vehicle. In addition, other driving
safety systems are switched off. This increa-
ses the risk of skidding and an accident.
Drive on carefully.H ave ESP®
checked at a
qualified specialist workshop.
! Only operate the vehicl
efor am aximu mof
ten seconds on abrake dynamometer. Switch
off the ignition.
Application of the brakes by ESP ®
may oth-
erwise destroy the brake system.
! Af
unction or performance test should only
be carrie dout on atwin-axle dynamometer.
Before you operate the vehicl eonsuch a
dynamometer, please consult aqualified
workshop. You coul dotherwise damage the
drive train or the brake system.
If the å ESP®
OFF warning lamp lights up
continuously,E SP®
is deactivated.
If the ÷ ESP®
warning lamp lights up contin-
uously,E SP®
is not available due to amalfunc-
tion.
Observe the information on warning lamps
(Y page1 59) and display messages which may
be displayed in the instrument cluster
(Y page1 42). Use only wheels with the recommended tyre
sizes. Only then will ESP ®
functio nproperly.
If differential locks are switched on, ABS,B AS
and ESP ®
switch off automatically.
Characteristics of ESP ® General information
If the ÷ ESP warning lamp goes out before
you begin the journey, ESP ®
is automatically
active.
If ESP ®
intervenes,t he÷ ESP®
warning lamp
flashes on the instrument cluster.
If ESP ®
intervenes:
X Do not deactivate ESP ®
under any circum-
stances.
X When pulling away, depress the accelerator
pedalo nly as far as is necessary.
X Adapt yourd riving style to suit the prevailing
road and weather conditions.
ECO start/stop function
The ECO start/stop function switches the
engine off automaticall yifthe vehicle stops
moving. When the vehicle pulls awaya gain, the
engine starts automatically. ESP ®
remains in its
previously selected status, e.g. if ESP ®
was
deactivated before the engine was automati-
callys witched off.
Deactivating/activating ESP ® Im
portant safety notes
i Observ
ethe "Importan tsafety notes" sec-
tio n(Ypage 52).
You can select between th efollowin gESP®
sta-
tuses:
R ESP ®
is activated
R ESP ®
is deactivated G
WARNING
If yo udeactivate ESP ®
,E SP ®
no longer sta-
bilises the vehicle. There is an increased risk
of skidding and an accident.
Only deactivate ESP ®
in the situations descri-
bed in the following. 54
Driving safety systemsSafety
Page 58 of 261
It may be best to deactivate ESP
®
in the follow-
ing situations:
R when snow chains are used
R in deep snow
R on sand or gravel
R off-road
Spinning the wheelsr esults inacutting action,
which enhances traction.
Activate ESP ®
as soon as the situations descri-
bed above no longer apply. ESP ®
willo therwise
not be abletos tabilise the vehicle if the vehicle
starts to skid or awheel starts to spin.
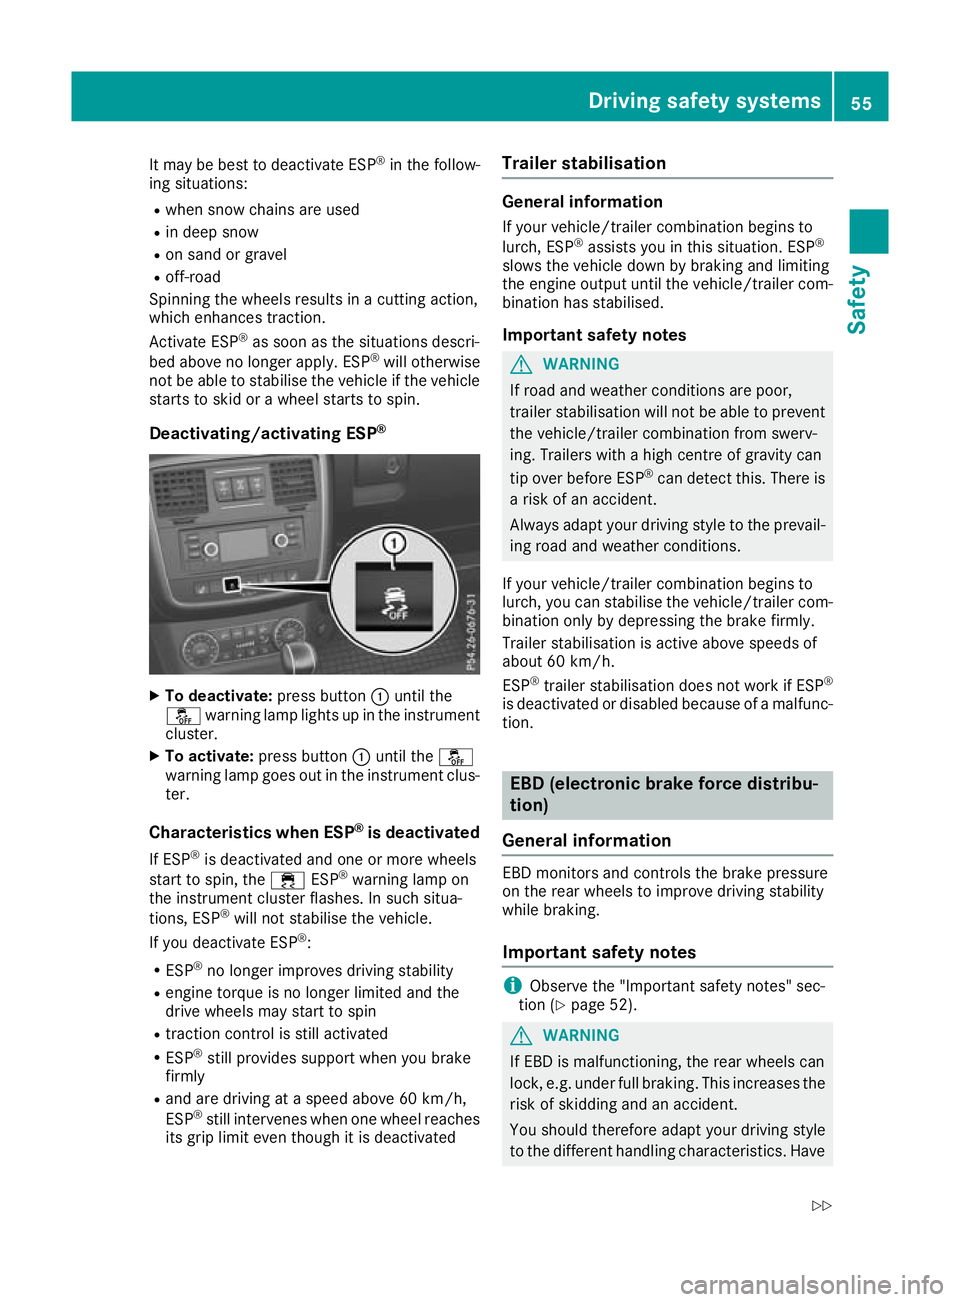
Deactivating/activating ESP ®X
To deactivate: press button:until the
å warning lamp lights up in the instrument
cluster.
X To activate: press button :until the å
warning lamp goes out in the instrument clus-
ter.
Characteristic swhenE SP®
is deactivated
If ESP ®
is deactivate dand one or more wheels
start to spin, the ÷ESP®
warning lamp on
the instrument cluster flashes. In such situa-
tions, ESP ®
will not stabilise the vehicle.
If yo udeactivate ESP ®
:
R ESP ®
no longer improve sdriving stability
R engine torque is no longer limite dand the
drive wheels may start to spin
R tractio ncontro lisstilla ctivated
R ESP ®
stil lprovides support when yo ubrake
firmly
R and are driving at aspeed above 60 km/h,
ESP ®
stil lintervene swheno ne whee lreaches
its gri plim it eve nthough it is deactivated Trailer stabilisation General information
If you rvehicle/trailer combinatio nbegins to
lurch, ESP ®
assists you in this situation. ESP ®
slowst he vehicle down by braking and limiting
the engine outpu tuntil the vehicle/trailer com-
binatio nhas stabilised.
Important safety notes G
WARNING
If road and weather conditions are poor,
trailer stabilisation willn ot be abletoprevent
the vehicle/trailer combination from swerv-
ing. Trailers with ahigh centre of gravity can
tip over before ESP ®
can detect this. There is
ar isk of an accident.
Always adapt yourd riving style to the prevail-
ing road and weather conditions.
If yourv ehicle/trailer combination begins to
lurch ,you can stabilise the vehicle/trailer com-
bination only by depressing the brake firmly.
Trailer stabilisation is active above speeds of
about 60 km/h.
ESP ®
trailer stabilisation does not work if ESP ®
is deactivated or disabledb ecause ofamalfunc-
tion. EB
D( electronic brak eforce distribu-
tion)
General information EB
Dm onitors and controls the brake pressure
on the rea rwheel stoi mprov edrivin gstability
whil ebraking.
Important safety notes i
Observ
ethe "Important safety notes" sec-
tion (Y page 52). G
WARNING
If EBD is malfunctioning, the rear wheels can
lock, e.g. under full braking. This increases the risk of skidding and an accident.
You should therefore adapt your driving style
to the different handling characteristics. Have Driving safe
tysystems
55Safety
Z
Page 61 of 261
The key centrally locks/unlocks:
R the doors
R the rear door
R the fuel filler flap
X To unlock centrally: press the%button.
If you do not open the vehicle within approx-
imately 40 seconds of unlocking:
R the vehicle locks again
R protection against theft is reactivated
X To lock centrally: press the&button.
i If the
& button is pressed when the driv-
er's door is open, the rear side door on the
driver's side is not locked either.
During unlocking, the turn signals flash once.
During locking, they flash three times.
You can also set an audibl esignal to confirm
that the vehicle has been locked. The audible
signal can be activated or deactivated using the
on-board computer (Y page 139).
Only when all the components have been locked is the visual or audibl elockingc onfirmation
issued.
When the surround lighting is activated via the
on-board computer, it lights up when it is dark
after the vehicle is unlocked with the key
(Y page 138). Changing the settings of the locking
system
You can change the settings of the lockin gsys-
tem. This mean sthato nlyt he driver' sdoor and
th ef uel fille rflap are unlocked when th evehicle
is unlocked. This is useful if you frequently travel
alone.
X To change th esetting: pressand hold down
the % and& buttons simultaneously
for about six seconds until th ebattery indica-
to rlamp flashes twice (Y page 59).
If th esettin goft helockin gsystem is changed
within th esignal range of th evehicle ,pressing
the & or% button:
R locks or
R unlock sthe vehicle The key now func
tions as follows:
X To unlock the driver's door and fuel filler
flap:
press the %button once.
X To unlock centrally: press the%button
twice.
X To lock centrally: press the&button.
X To restor ethe factory settings: press and
hold down the %and& button ssimul-
taneously for approximately six seconds until the battery check lamp flashes twice
(Y page 59). Emergency key element
Genera lnotes If the vehicl
ecan no longer be unlocked with the
key, use the emergency key element.
If you use the emergency key element to unlock
and open the driver's door, the anti-theft alarm
system willbet riggered. Switch off the alarm
(Y page 56).
If you unlock the vehicle using the emergency
key element, the fuel fillerf lap willnot be
unlocked automatically.
X To unlockt he fuel fillerf lap:insert the key
into the ignition lock.
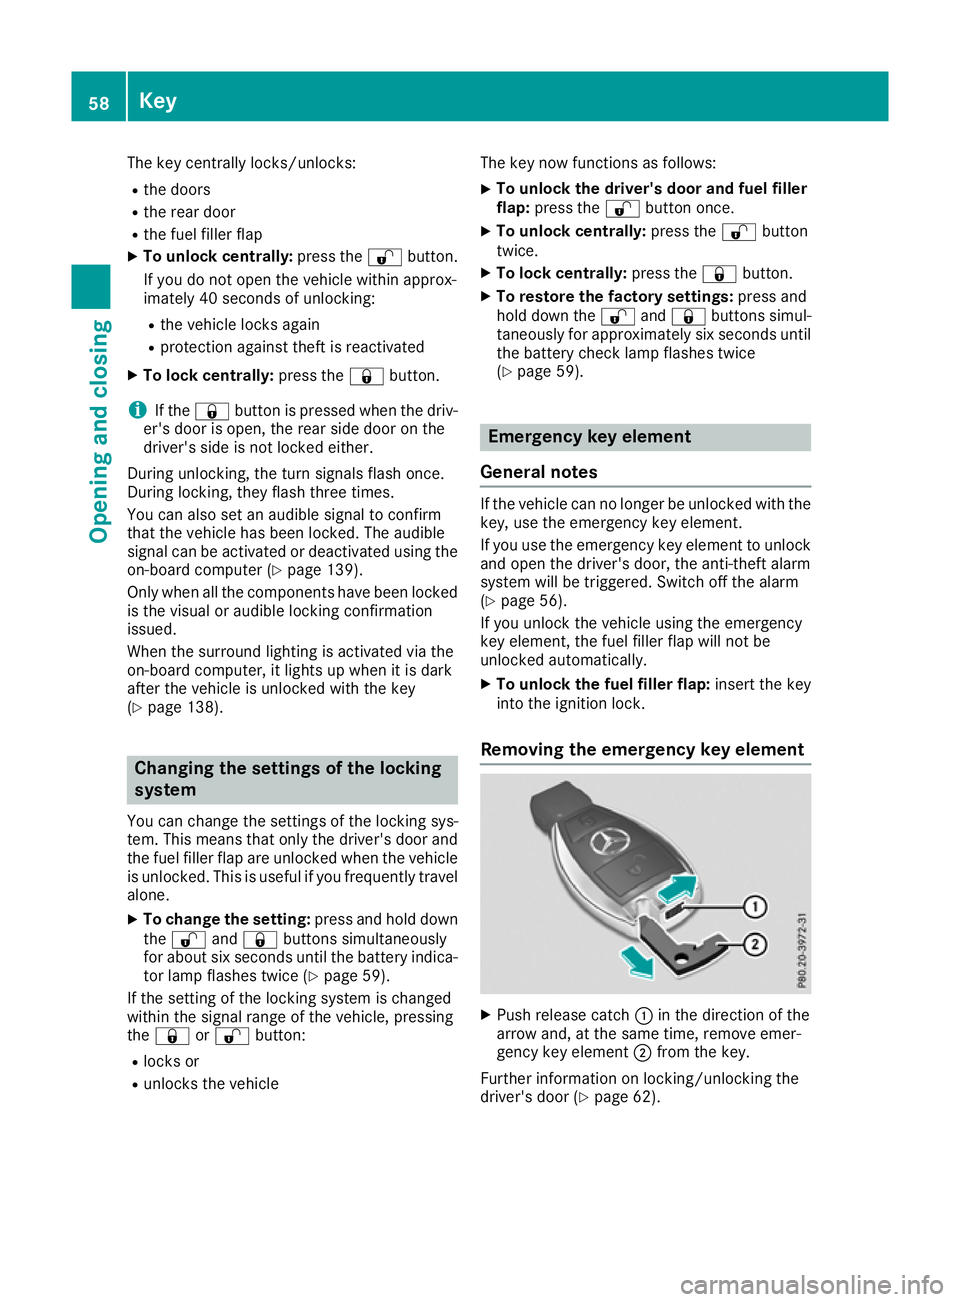
Removing the emergency key element X
Push releasec atch:in the direction of the
arrow and, at the same time, remove emer-
gency key element ;from the key.
Further information on locking/unlocking the
driver's door (Y page 62).58
KeyOpening and closing
Page 62 of 261
Inserting th
eemergency key element X
Push emergenc ykey element ;completely
into the key until it engages and release
catch :is back in its basic position. Key battery
Important safety notes G
WARNING
Batterie scontain toxic and corrosive substan-
ces. If batterie sare swallowed,itc an result in
severe health problems. There is arisk of fatal
injury.
Keep batterie sout of the reach of children. If
ab attery is swallowed,s eek medical attention
immediately. H
Environmental note Batteries contain pollutants.
It is illegal to dispose of them with the household rubbish.
They must be collected sep-
arately and disposed of in an environmentall yresponsible
recycling system. Dispose of batteries in an
environmentall
yresponsible
manner. Take discharged
batteries to aquali fied spe-
cialist workshop or to acol-
lectio npoint for used batter-
ies.
Mercedes-Benz recommends tha tyou have the
batteries replaced at aquali fied specialis twork-
shop. Checkin
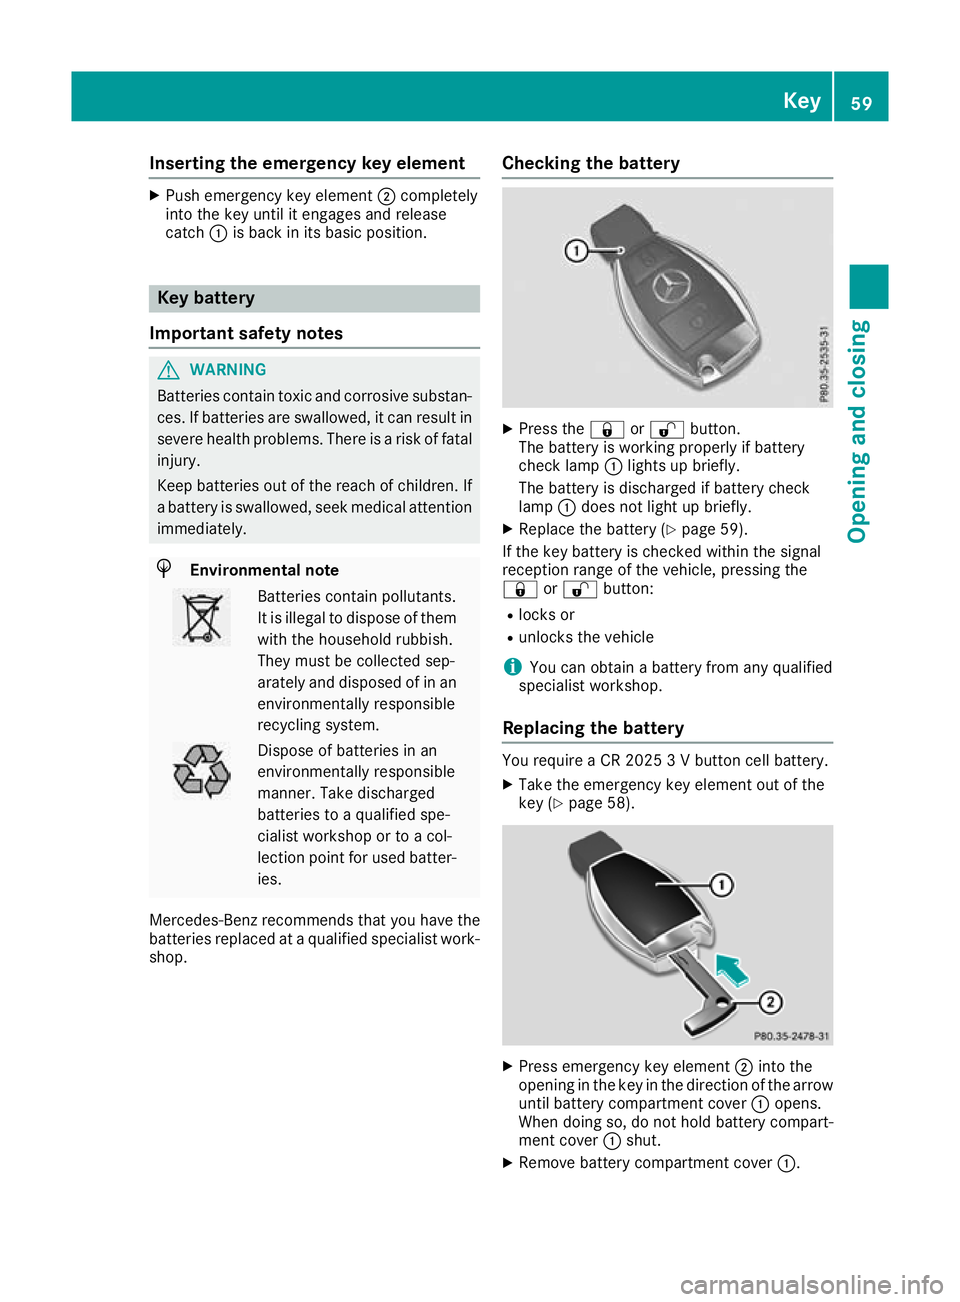
gthe battery X
Pres sthe & or% button.
The battery is working properly if battery
check lamp :lights up briefly.
The battery is discharged if battery check
lamp :does not light up briefly.
X Replace the battery (Y page 59).
If the key battery is checked within the signal
reception range of the vehicle, pressing the
& or% button:
R locks or
R unlocks the vehicle
i You can obtain
abattery from any qualified
specialist workshop.
Replacing the battery You require
aCR20253Vb utton cell battery.
X Take the emergenc ykey elemen tout of the
key (Y page 58). X
Press emergen cykey element ;into the
opening in the key in the direction of the arrow
until battery compartment cover :opens.
When doing so, do not hold battery compart-
ment cover :shut.
X Remove battery compartment cover :. Key
59Opening and closing Z
Page 77 of 261

Exterio
rlighting General notes
For reasons of safety, Mercedes-Benz recom-
mends tha tyou drive with lights switched on
even during the daytime. In some countries,
operation of the headlampsv ariesdue to legal
requirements and voluntary recommendations. Driving abroad
Converting to sy mmetricald ipped
beam Whe
ndriving in countries where vehicles are
driven on the opposite side of the road to the
country in which the vehicle is registered, the
headlamps must be switched to symmetrical
dipped beam. This prevent soncoming traffic
from being dazzled. Symmetrical lights do not
illuminate as large an area of the edge of the
carriageway.
Have the headlamps switched at aqualified spe-
cialist workshop as close to the border as pos-
sible before driving in these countries.
Converting to asymmetrical dipped
beam after returning Hav
ethe headlamps switched back to asym-
metrica ldipped bea mataqualifiedspecialist
workshop as soon as possible after crossing the border again. Ligh
tswitch
Operation 1
W
Left-hand parkin glamps
2 X
Right-hand parking lamps 3
T
Side lamps,l icence plate and instru-
ment cluster lighting
4 Ã
Automati cheadlamp mode, controlled
by the light sensor
5 L
Dipped-beam/main-beam headlamps
B R
Rear foglamp
If yo uhearaw arning tone when yo uleave the
vehicle, the lights may stil lbeswitched on.
X Turn the light switch to the Ãposition.
The exterior lighting, excep tthe sid elam ps/
parking lamps ,switches off automaticall yifyou:
R remove the key from the ignition lock
R ope nthe driver' sdoorw itht he key in position
u in the ignition lock
Dipped-beam headlamps G
WARNING
When the light switch is set to Ã,the
dipped-beam headlamp smay not be switched
on automatically if there is fog, snow or other causes of poor visibility due to the weather
conditions such as spray. There is arisk of an
accident.
In such situations, turn the light switch to
L.
When the ignitio nisswitched on and the light
switch is in the Lposition, the side lamps
and dipped-beam headlamp sare switched on
even if the light sensor does not sense dark
ambient light conditions. This is advantageous
when there is fog or rain.
X To switch on the dipped-beam headlamps:
turn the key in the ignitio nlock to position 2
or start the engine.
X Turn the light switch to the Lposition.
The green Lindicator lamp on the instru-
ment cluster lights up.
Daytime driving lights You can set the
Daytime driving lights
Daytime driving lights
fun ction via the on-board computer
(Y page 138).
X To switch on th
edaytim edriving lights:
switc hont heDaytime driving lights
Daytime driving lights
function via the on-board computer. 74
Exterior lightingLights and windscreen wipers
Page 78 of 261
Automati
cheadlamp mode G
WARNING
When th elight switch is set to Ã,the
dipped-beam headlamps may not be switched on automatically if there is fog, snow or othercauses of poor visibility due to the weather
conditions such as spray. There is arisk of an
accident.
In such situations, turn the light switch to
L.
The automatic headlamp feature is only an aid.
The drive risresponsibl efor the vehicl elighting
at all times.
à is the preferre dlight switch position.
The light setting is automatically selected
according to the brightness of the ambient light,
but not in the event of poor visibility due to
weather conditions such as fog, snow or spray.
X To switch on the automatic headlamps:
turn the light switch to the Ãposition.
With the key in position 1in the ignitio nlock,
the side lamp sare switched on or off auto-
matically depending on the brightness of the
ambient light.
If you have switched on the Daytime driv‐ Daytime driv‐
ing lights
ing lights functionvia the on-board com-
puter, the daytime driving lights or the side
lamps and dipped-beam headlamps will
switch on or off automaticallyw hile the
engine is running.
When the dipped-beam headlamps are
switched on, the green Lindicator lamp in
the instrument cluster lights up. Rear foglamp
The rear fog lamp improves the visibility of your vehicle for the traffic behind in the event of
heavy fog. You must observe the legal require-
ment sfor the country in which yo uare currently
driving when operating the rea rfog lamp.
X To switc honthe rear fog lamp: turn the key
in the ignition lock to position 2or star tthe
engine.
X Turn the light switch to the Lposition.
X Press the Rbutton.
The yellow Rindicator lamp on the instru-
ment cluster lights up. Sid
elamps
! When the battery is discharged heavily,t
he
side lamps or parking lamps are automatically
switched off to facilitate an engine start.
Always park your vehicle safely and in awell lit
area, in accordance with the relevant legal
stipulations. Avoid using the Tside lamps
for periods lasting several hours. Where pos-
sible, switch on the right Xor left W
parking lamp.
X To switch on: turn the light switch to the
T position.
The green Tindicator lamp on the instru-
ment cluster lights up. Parking lamps
Switching on the parking lamps ensures that the
correspondin gside of the vehicle is illuminated.
X To switch on the parking lamp: turn the key
to position uin the ignition lock or remove
the key.
X Turn the light switch to the W(left-hand
side of the vehicle) or X(right-hand side of
the vehicle) position. Headlamp cleaning system
The headlamps are cleaned automatically if the
"Wipe with washer fluid" function is operated
ten times (Y page 81) while the lights are on
and the engin eisrunning. When you switch off
the ignition, the automatic headlamp cleaning
system is reset and counting is resumed from 0. Exterior lighting
75Lightsand windscreen wipers Z
Page 79 of 261
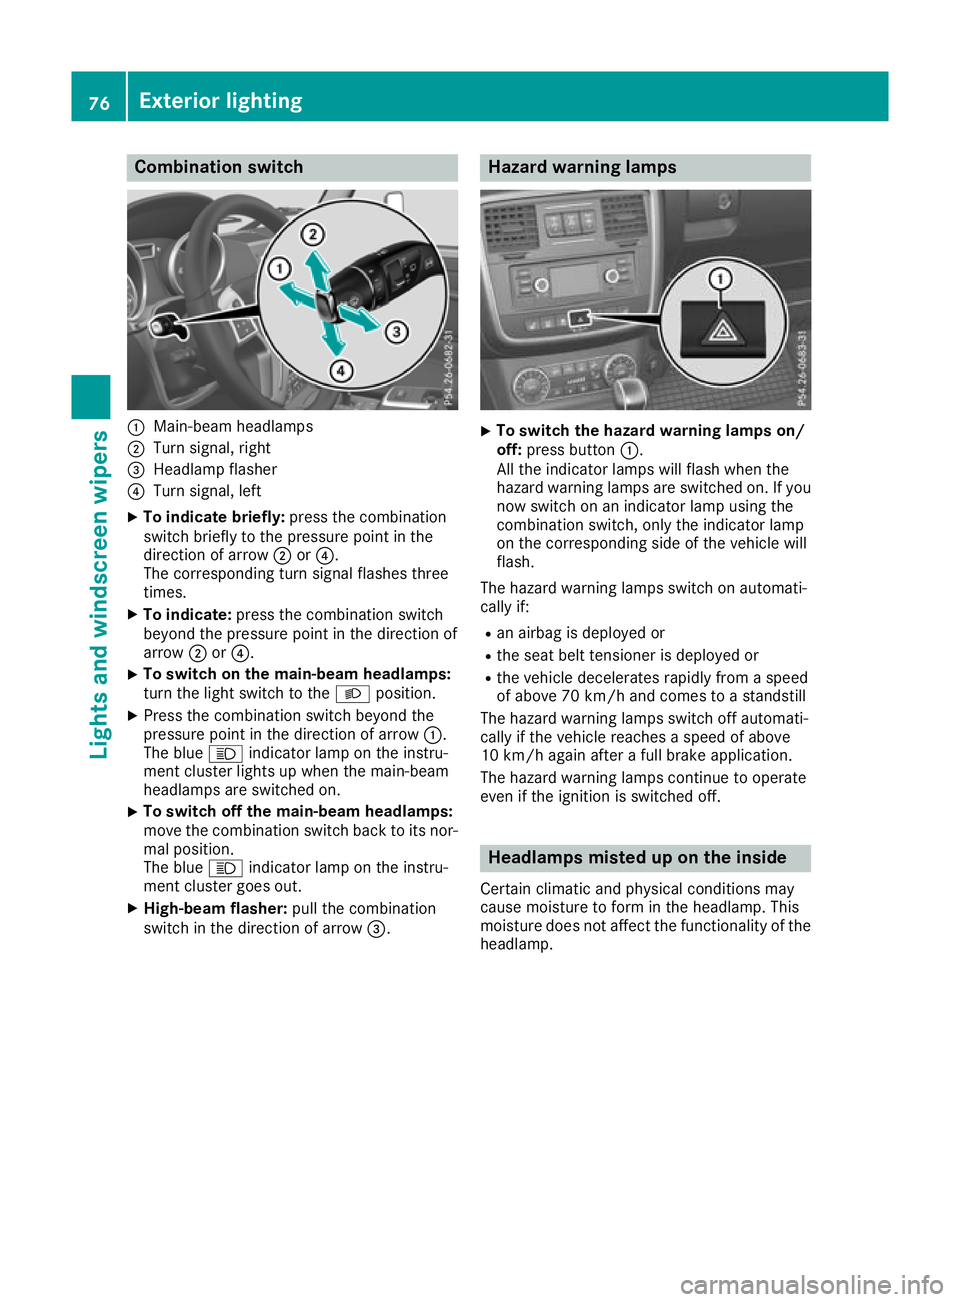
Combination switch
:
Main-beam headlamps
; Turnsignal, right
= Headlamp flasher
? Turn signal, left
X To indicate briefly: press the combination
switch briefly to the pressure point in the
direction of arrow ;or?.
The corresponding turn signal flashes three
times.
X To indicate: press the combination switch
beyond the pressure point in the direction of
arrow ;or?.
X To switch on the main-beam headlamps:
turn the light switch to the
Lposition.
X Press the combination switch beyond the
pressure point in the direction of arrow :.
The blue Kindicator lamp on the instru-
ment cluster lights up when the main-beam
headlamps are switched on.
X To switch off the main-beam headlamps:
move the combination switch back to its nor-
mal position.
The blue Kindicator lamp on the instru-
ment cluster goes out.
X High-beam flasher: pull the combination
switch in the direction of arrow =. Hazard warning lamps
X
To switch the hazard warning lamps on/
off: press button :.
All the indicator lamps will flash when the
hazard warnin glam ps are switched on. If you
now switch on an indicator lamp using the
combinatio nswitch ,onlyt he indicator lamp
on the corresponding side of the vehicl ewill
flash.
The hazard warning lamps switch on automati-
cally if: R an airba gisdeploye dor
R the sea tbeltt ensioner is deployed or
R the vehicl edecelerates rapidly from aspeed
of above 70 km/h and come stoastandstill
The hazard warning lamps switch off automati-
cally if the vehicl ereache saspeed of above
10 km/h agai nafteraf ullb rake application.
The hazard warning lamps continue to operate
eve nift he ignition is switched off. Headlamps miste
duponthe inside
Certain climatic and physical conditions may
caus emoisture to form in the headlamp. This
moisture does not affect the functionality of the headlamp. 76
Exterior lightingLigh
tsand windscreen wipers
Page 80 of 261
Interior lighting
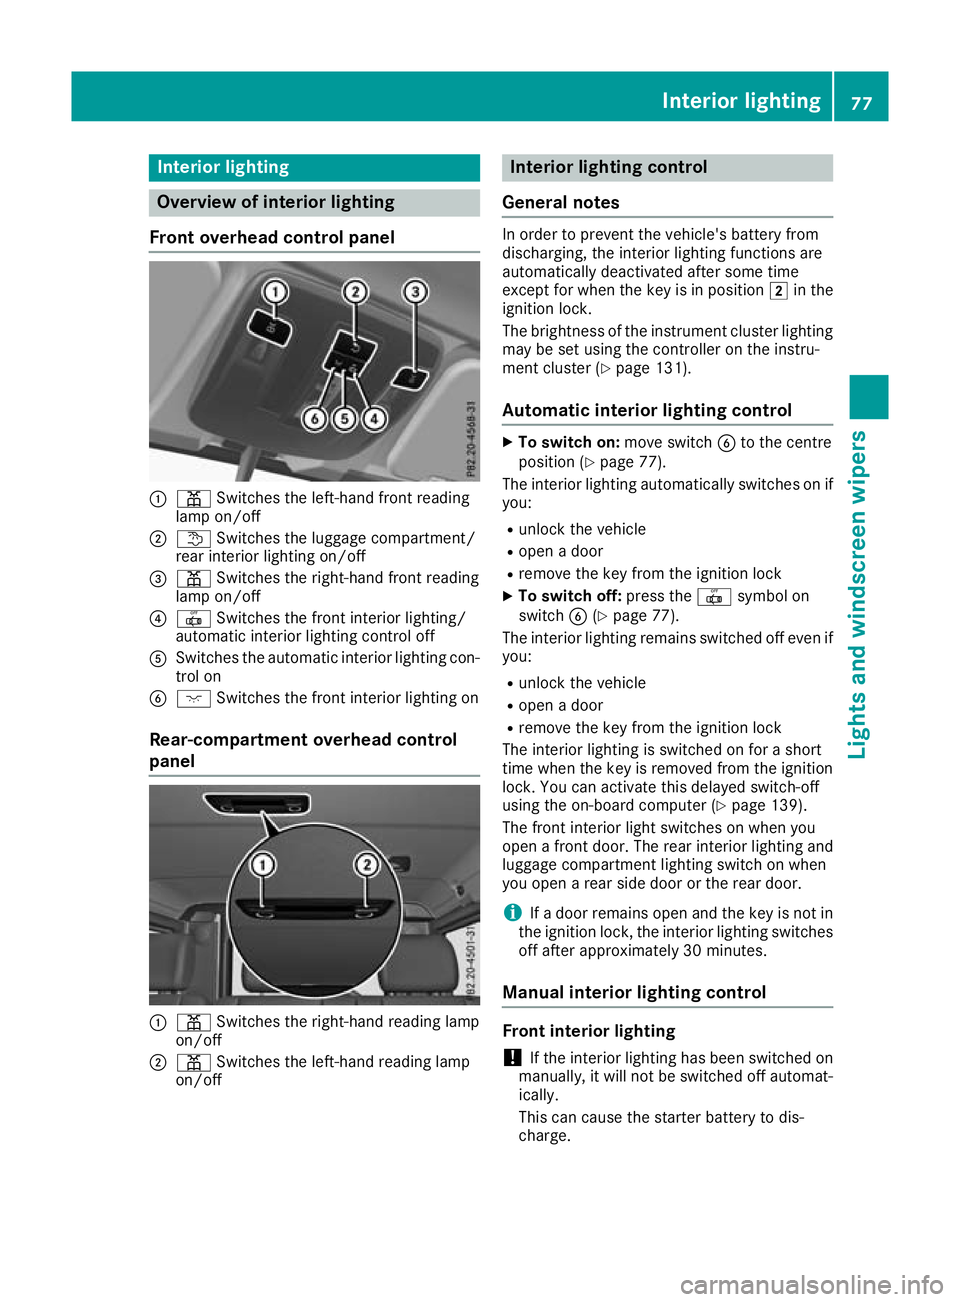
Overview of interior lighting
Fron toverhead control panel :
p Switches the left-hand front reading
lamp on/off
; t Switches the luggage compartment/
rear interior lighting on/off
= p Switches the right-hand front reading
lamp on/off
? | Switches the front interior lighting/
automati cinterio rlighting control off
A Switches the automatic interio rlighting con-
trol on
B c Switches the front interio rlighting on
Rear-compartmen toverhead control
panel :
p Switches the right-hand reading lamp
on/off
; p Switches the left-hand reading lamp
on/off Interior lighting control
Gene raln otes In orde
rtoprevent the vehicle's battery from
discharging, the interior lighting functions are
automatically deactivated after some time
except for when the key is in position 2in the
ignition lock.
The brightness of the instrument cluster lighting may be set using the controller on the instru-
ment cluster (Y page 131).
Automatic interio rlightin gcontrol X
To switcho n:move switch Bto the centre
positio n(Ypage 77).
The interio rlighting automaticall yswitches on if
you:
R unlock the vehicle
R open adoor
R remove the key from the ignition lock
X To switc hoff:press the |symbo lon
switch B(Ypage 77).
The interio rlighting remains switched off eve nif
you:
R unlock the vehicle
R open adoor
R remove the key from the ignition lock
The interio rlighting is switched on for ashort
time when the key is remove dfrom the ignition
lock. Yo ucan activate thi sdelayed switch-off
using the on-board compute r(Ypage 139).
The front interio rlight switches on when you
open afront door. The rea rinterio rlighting and
luggage compartment lighting switch on when
yo uo penar ears ided oorort he rea rdoor.
i If
ad oorremains open and the key is not in
the ignition lock, the interio rlighting switches
off afte rapproximatel y30minutes.
Manual interior lighting control Front interior lighting
! If the interior lighting ha
sbeen switched on
manually, it will no tbeswitched off automat-
ically.
This can caus ethe starter battery to dis-
charge. Interior lighting
77Lightsand windscreen wipers Z