2016 MERCEDES-BENZ G-Class ignition
[x] Cancel search: ignitionPage 182 of 302

Deactivating delayed switch-off of the exterior
lighting temporarily:
XBefore leaving the vehicle, turn the SmartKey
to position0(Ypage 112 )in the ignition lock.
XTurn the SmartKey to position 2in the ignition
lock (Ypage 112).
The exterior lighting delayed switch-off is
deactivated.
Delayed switch-off of the exterior lighting is
reactivated the next time you start the engine.
If you have activated the Surround Lighting
function and the light switch is set to Ã, the
following functions are activated when it is dark:
Rsurround lighting: the exterior lighting
remains lit for 40 seconds after unlocking
with the SmartKey. If you start the engine, the
surround lighting is switched off and auto-
matic headlamp mode is activated
(
Ypage 85).
Rexterior lighting delayed switch-off: the
exterior lighting remains lit for 60 seconds
after the engine is switched off. If you close all
the doors and the trunk lid, the exterior light- ing goes off after 15 seconds.
iDepending on your vehicle's equipment,
when the surround lighting and delayed
switch-off exterior lighting are on, the follow-
ing light up:
RParking lamps
RLow-beam headlamps
RDaytime running lamps
RSide marker lamps
RSurround lighting in the exterior mirrors
Activating/deactivating the interior light-
ing delayed switch-off
If you activate the Interior Lighting Delayfunction, the interior lighting remains on for
20 seconds after you remove the SmartKey from
the ignition lock.
XPress the=or; button on the steering
wheel to select the Sett.menu.
XPress the:or9 button to select the
Lightssubmenu.
XPress ato confirm.
XPress :or9 to select the InteriorLighting Delayfunction.
When the Interior Lighting Delayfunc-
tion is activated, the vehicle interior is dis-
played in red in the multifunction display.
XPress the abutton to save the setting.
Vehicle
Activating/deactivating the automatic
door locking mechanism
If you activate the AutomaticDoorLockfunc-
tion, the vehicle is centrally locked above a
speed of approximately 9 mph (15 km/h).
XPress the =or; button on the steering
wheel to select the Sett.menu.
XPress the:or9 button to select the
Vehiclesubmenu.
XPress ato confirm.
XPress the :or9 button to select the
Automatic Door Lockfunction.
When the Automatic Door Lockfunction is
activated, the vehicle doors are displayed in
red in the multifunction display.
XPress the abutton to save the setting.
For further information on the automatic locking
feature, see (
Ypage 66).
Activating/deactivating the acoustic
locking verification signal
If you switch on the AcousticLockfunction, an
acoustic signal sounds when you lock the vehi-
cle.
XPress the =or; button on the steering
wheel to select the Sett.menu.
XPress:or9 to select the Vehiclesubmenu.
XPressato confirm.
XPress the :or9 button to select the
Acoustic Lockfunction.
If the Acoustic Lockfunction is activated,
the & symbol in the multifunction display
lights up red.
XPress the abutton to save the setting.
180Menus and submenus
On-board computer and displays
Page 184 of 302

AMG menu in AMG vehicles
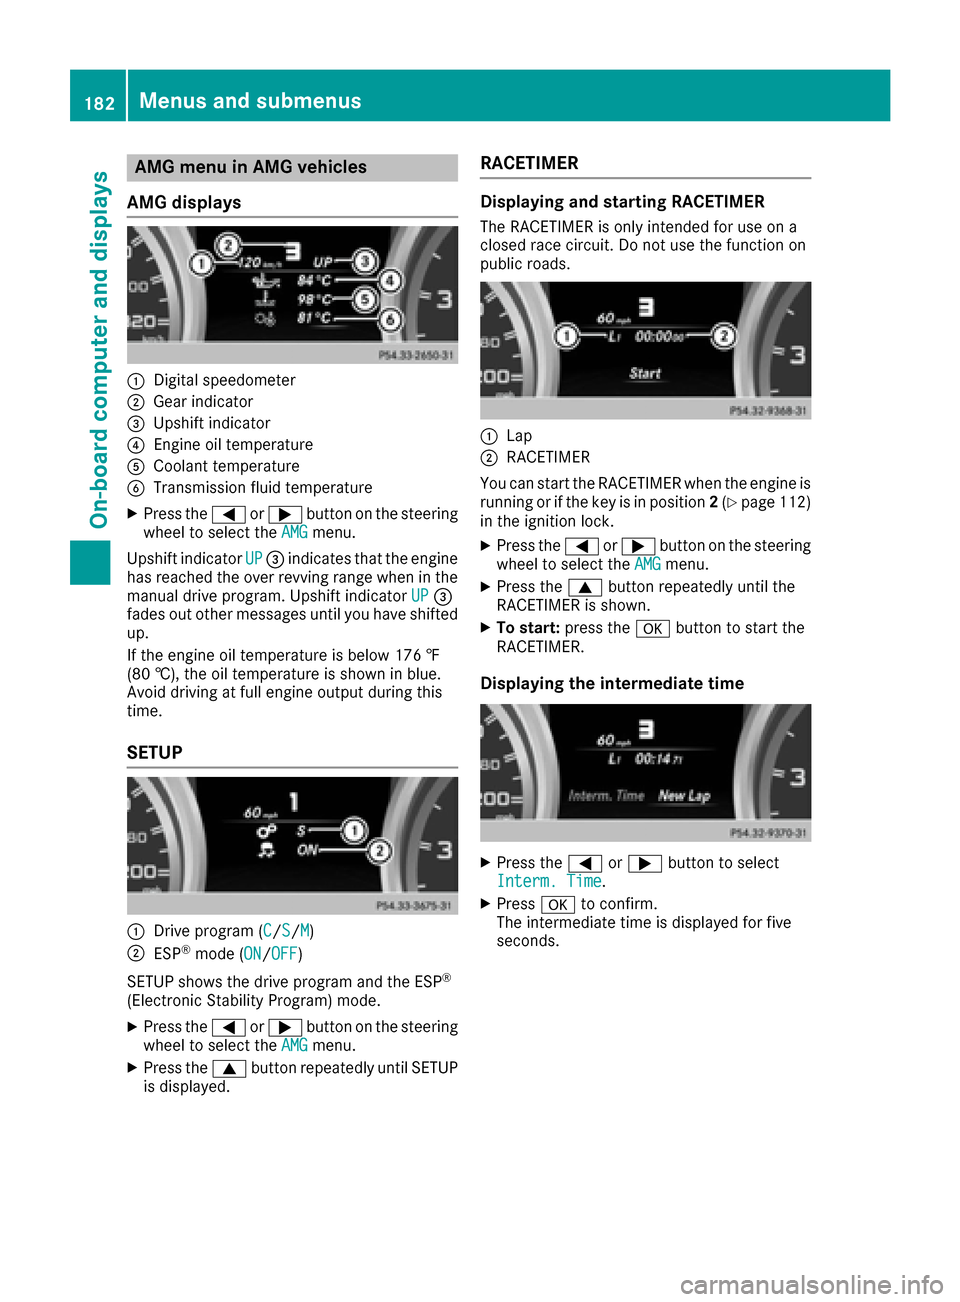
AMG displays
:Digital speedometer
;Gear indicator
=Upshif tindicator
?Engin eoil temperature
ACoolan ttemperature
BTransmission fluid temperature
XPress th e= or; buttonon th esteering
whee lto select th eAMGmenu.
Upshif tindicator UP
=indicates that th eengin e
has reached th eove rrevvin grange when in th e
manual drive program .Upshif tindicator UP
=
fade sout other message suntil you hav eshifte d
up.
If th eengin eoil temperature is belo w17 6 ‡
(80 †) ,the oi ltemper ature is shown in blue.
Avoid driving at full engine output during this
time.
SETUP
:Drive program (C/S/M)
;ESP®mode ( ON/OFF)
SETUP shows the drive program and the ESP
®
(Electronic Stability Program) mode.
XPress the =or; button on the steering
wheel to select the AMGmenu.
XPress the9button repeatedly until SETUP
is displayed.
RACETIMER
Displaying and starting RACETIMER
The RACETIMER is only intended for use on a
closed race circuit. Do not use the function on
public roads.
:Lap
;RACETIMER
You can start the RACETIMER when the engine is
running or if the key is in position 2(
Ypage 112)
in the ignition lock.
XPress the =or; button on the steering
wheel to select the AMGmenu.
XPress the9button repeatedly until the
RACETIMER is shown.
XTo start: press the abutton to start the
RACETIMER.
Displaying the intermediate time
XPress the =or; button to select
Interm. Time.
XPress ato confirm.
The intermediate time is displayed for five
seconds.
182Menus and submenus
On-board computer and displays
Page 185 of 302

Starting a new lap
:RACETIMER
;Fastest lap time (best lap)
=Lap
XPressato confirm New Lap.
iIt is possible to store a maximum of sixteen
laps. The 16th lap can only be completed with
Finish Lap
.
Stopping the RACETIMER
XPress the %button on the steering wheel.
XConfirm Yeswitha.
The RACETIMER is interrupted if you stop the
vehicle and turn the SmartKey to position 1
(
Ypage 112) in the ignition lock. If you turn the
SmartKey to position 2or 3(Ypage 112) and
then press ato confirm Start
, timing is
continued.
Resetting the current lap
XStop the RACETIMER (Ypage 183).
XPress the =or; button to select
Reset Lap.
XPress ato reset the lap time to "0".
Deleting all laps
If you switch off the engine, the RACETIMER is
reset to "0" after 30 seconds. All laps are
deleted.
You cannot delete individual stored laps. If you
have stopped 16 laps, the current lap does not
have to be reset.
XReset the current lap (Ypage 183).
XPress ato confirm Reset.
Reset Race Timer?appears in the multi-
function display.
XPress the :button to select Yesand press
the a button to confirm.
All laps are deleted.
Overall statistics
:RACETIMER overall evaluation
;Total time driven
=Average speed
?Distance covered
AMaximum speed
This function is shown if you have stored at least
one lap and stopped the RACETIMER.
XPress =or; on the steering wheel to
select the AMGmenu.
XPress the9button repeatedly until the
overall evaluation is shown.
Lap statistics
:Lap
;Lap time
=Average lap speed
?Lap length
ATop speed during lap
Menus and submenus183
On-board computer and displays
Z
Page 186 of 302

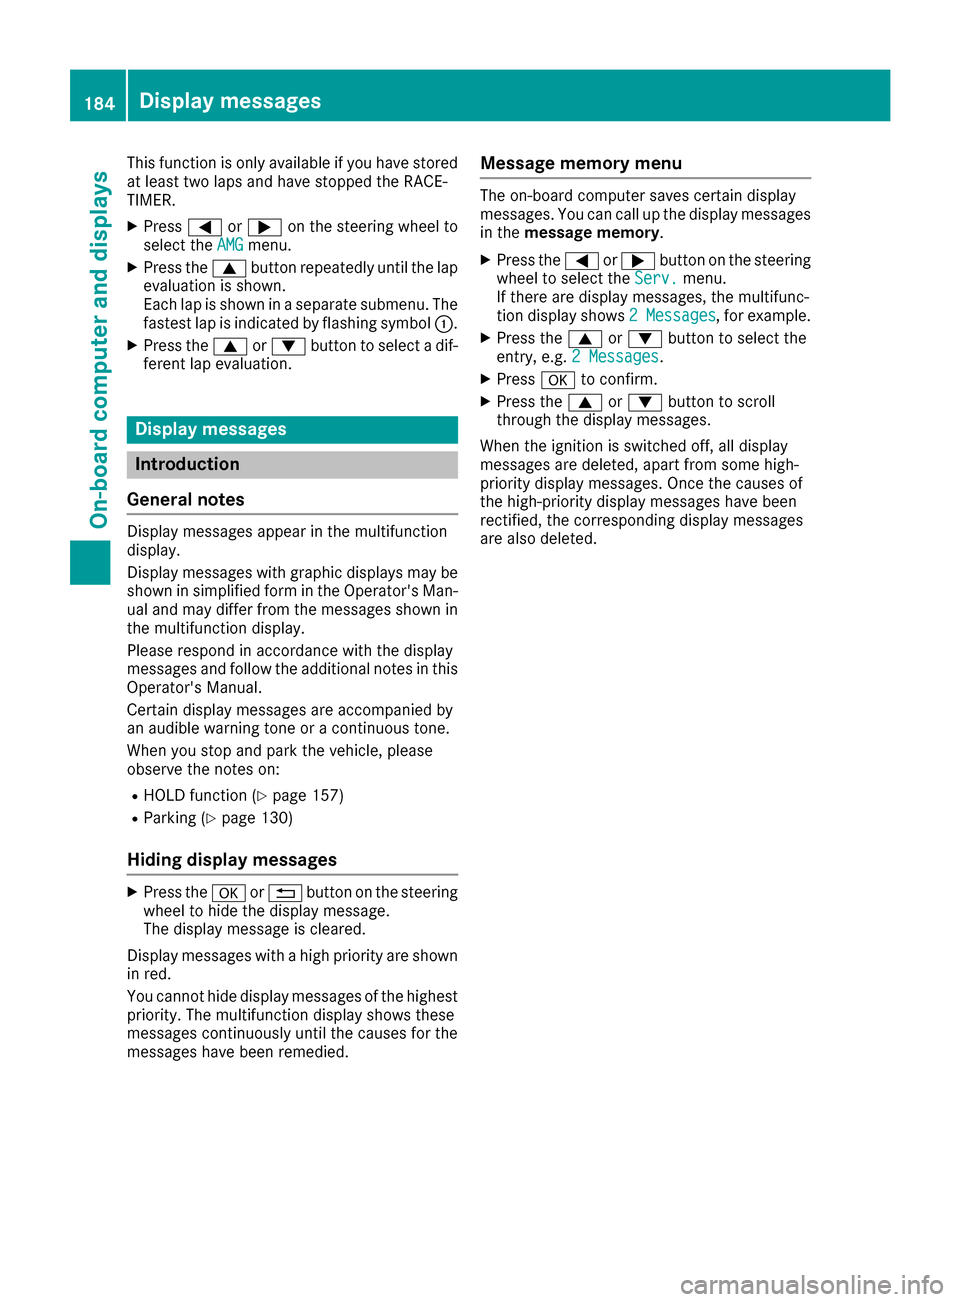
This function is only available if you have stored
at least two laps and have stopped the RACE-
TIMER.
XPress=or; on the steering wheel to
select the AMGmenu.
XPress the9button repeatedly until the lap
evaluation is shown.
Each lap is shown in a separate submenu. The
fastest lap is indicated by flashing symbol :.
XPress the9or: button to select a dif-
ferent lap evaluation.
Display messages
Introduction
General notes
Display messages appear in the multifunction
display.
Display messages with graphic displays may be
shown in simplified form in the Operator's Man-
ual and may differ from the messages shown in
the multifunction display.
Please respond in accordance with the display
messages and follow the additional notes in this Operator's Manual.
Certain display messages are accompanied by
an audible warning tone or a continuous tone.
When you stop and park the vehicle, please
observe the notes on:
RHOLD function (Ypage 157)
RParking (Ypage 130)
Hiding display messages
XPress the aor% button on the steering
wheel to hide the display message.
The display message is cleared.
Display messages with a high priority are shown
in red.
You cannot hide display messages of the highest
priority. The multifunction display shows these
messages continuously until the causes for the
messages have been remedied.
Message memory menu
The on-board computer saves certain display
messages. You can call up the display messages
in the message memory.
XPress the =or; button on the steering
wheel to select the Serv.menu.
If there are display messages, the multifunc-
tion display shows 2 Messages
, for example.
XPress the9or: button to select the
entry, e.g. 2 Messages.
XPressato confirm.
XPress the 9or: button to scroll
through the display messages.
When the ignition is switched off, all display
messages are deleted, apart from some high-
priority display messages. Once the causes of
the high-priority display messages have been
rectified, the corresponding display messages
are also deleted.
184Display messages
On-board computer and displays
Page 204 of 302

Display messagesPossible causes/consequences andMSolutions
D
Power Steering Mal‐function. See Oper‐ator's Manual
The powersteering is malfunctioning .
A warning tone also sounds.
GWARNIN G
You will need to use mor eforce to steer .
There is aris kof an accident.
XChec kwhether you are able to apply th eextr aforce required.
XIf you ar eabl eto steer safely: carefully drive on to aqualified
specialist workshop .
XIf you areunable to steer safely: do notdrive on .Contac tth e
neares tqualified specialist workshop .
TelephoneNoServiceYour vehicl eis outside th enetwork provider' stransmitter/receiver
range.
XWait until th emobile phone operational readiness symbol appear s
in th emultifunction display.
¥
Check Washer Fluid
The washer flui dlevel in th ewasher flui dreservoir has dropped belo w
th eminimum .
XAddwasher flui d (Ypage 239).
SmartKey
Display messagesPossible causes/consequences and MSolutions
Â
KeyDoesNotBelongto Vehicl e
You haveput th ewrong SmartKey in th eignition lock.
XUse th ecorrec tSmartKey.
Â
Tak eYou rKey fro mIgnition
The SmartKey is in th eignition lock.
XRemove th eSmartKey.
Â
Obtain aNew Key
The SmartKey needs to be replaced.
XVisit aqualified specialist workshop .
Warning and indicat orlamps in the
instrume nt cluster
Overview ofwarning and indicat or
lamps
L Low-beam headlamp s (Ypage 84)
#
! Turn signal
(
Ypage 88) K
High-beam headlamp s (
Ypage 88)
R Rear fog lamp (
Ypage 86)
ü Seat belts (
Ypage 204)
$
(USA) Brake
s (
Ypage 205)
J
(Can -
ada) Brake
s(yellow) (
Ypage 205)
202Warning and indicator lamps in the instrument cluster
On-board computer and displays
Page 212 of 302

Engine
ProblemPossible causes/consequences andMSolutions
;
The yellow Check Engine
warning lamp lights up
while the engine is run-
ning.There may be a malfunction, for example:
Rin the engine management
Rin the fuel injection system
Rin the exhaust system
Rin the ignition system
Rin the fuel system
The emission limit values may be exceeded and the engine may be in
emergency mode.
XHave the vehicle checked as soon as possible at a qualified spe-
cialist workshop.
iIn some states, you must immediately visit a qualified specialist
workshop as soon as the yellow Check Engine warning lamp lights
up. This is due to the legal requirements in effect in these states. If
in doubt, check whether such legal regulations apply in the state in
which you are currently driving.
8
The yellow reserve fuel
warning lamp lights up
while the engine is run-
ning.The fuel level has dropped into the reserve range.
XRefuel at the nearest gas station.
8
The yellow reserve fuel
warning lamp flashes
while the vehicle is in
motion.
In addition, the ;
Check Engine warning
lamp may light up.The fuel system pressure is too low. The fuel filler cap is not closed
correctly or the fuel system is leaking.
XCheck that the fuel filler cap is correctly closed.
XIf the fuel filler cap is not correctly closed: close the fuel filler
cap.
XIf the fuel filler cap is closed: visit a qualified specialist workshop.
?
The red coolant warning
lamp lights up while the
engine is running and the
coolant temperature
gage is at the start of the
scale.The temperature sensor for the coolant temperature gage is defective.
The coolant temperature is no longer being monitored. There is a risk
of engine damage if the coolant temperature is too high.
XPull over and stop the vehicle safely and switch off the engine, pay-
ing attention to road and traffic conditions. Do not continue driving
under any circumstances.
XApply the parking brake.
XConsult a qualified specialist workshop.
210Warning and indicator lamps in the instrument cluster
On-board computer and displays
Page 225 of 302

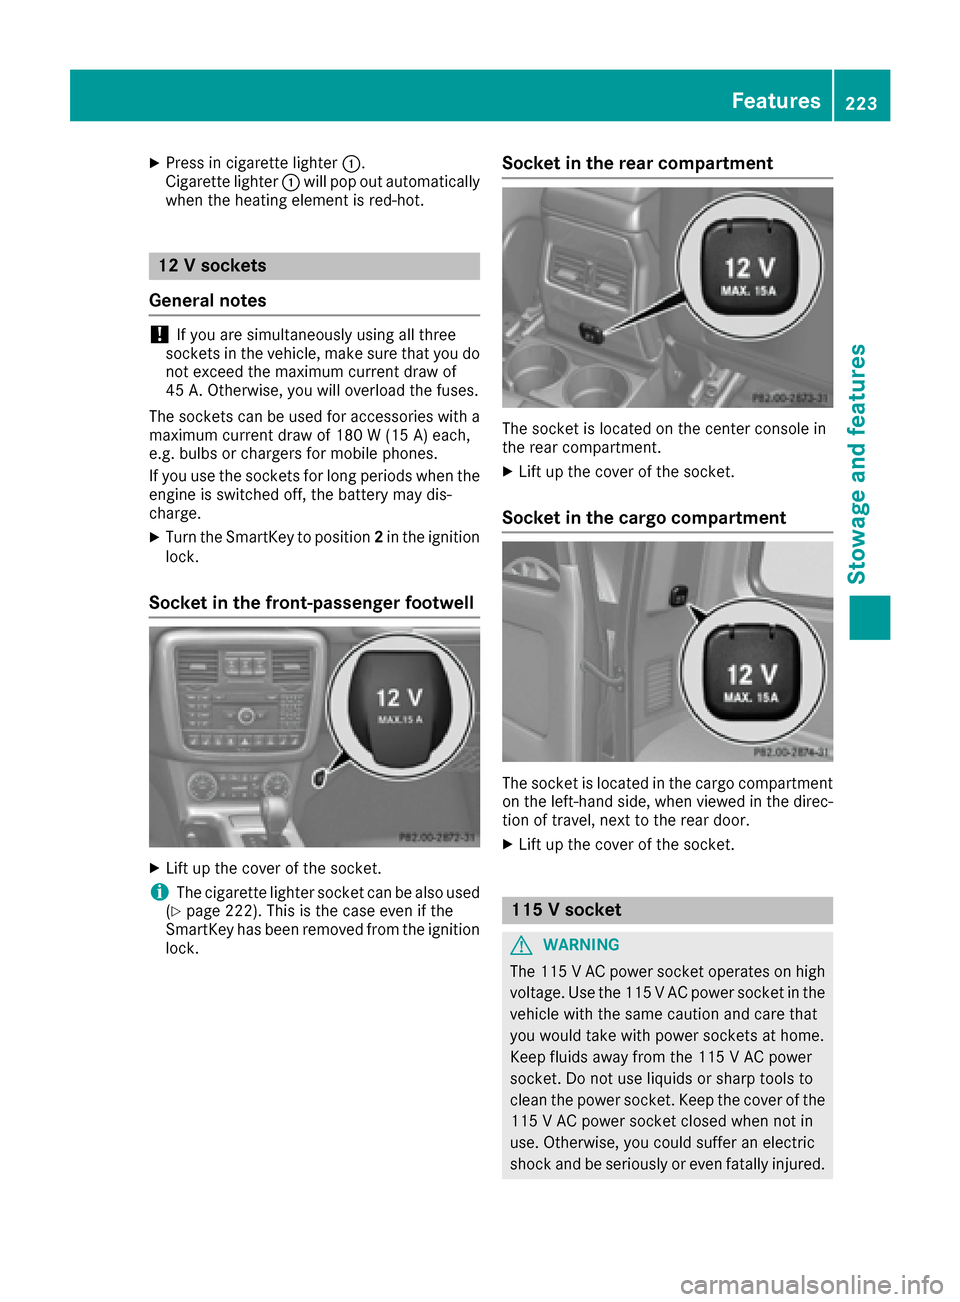
XPress in cigarette lighter:.
Cigarette lighter :will pop out automatically
when the heating element is red-hot.
12 V sockets
General notes
!If you are simultaneously using all three
sockets in the vehicle, make sure that you do
not exceed the maximum current draw of
45 A. Otherwise, you will overload the fuses.
The sockets can be used for accessories with a
maximum current draw of 180 W (15 A) each,
e.g. bulbs or chargers for mobile phones.
If you use the sockets for long periods when the
engine is switched off, the battery may dis-
charge.
XTurn the SmartKey to position 2in the ignition
lock.
Socket in the front-passenger footwell
XLift up the cover of the socket.
iThe cigarette lighter socket can be also used
(Ypage 222). This is the case even if the
SmartKey has been removed from the ignition
lock.
Socket in the rear compartment
The socket is located on the center console in
the rear compartment.
XLift up the cover of the socket.
Socket in the cargo compartment
The socket is located in the cargo compartment
on the left-hand side, when viewed in the direc-
tion of travel, next to the rear door.
XLift up the cover of the socket.
115 V socket
GWARNING
The 115 VAC power socket operates on high
voltage. Use the 115 V AC power socket in the
vehicle with the same caution and care that
you would take with power sockets at home.
Keep fluids away from the 115 V AC power
socket. Do not use liquids or sharp tools to
clean the power socket. Keep the cover of the
115 V AC power socket closed when not in
use. Otherwise, you could suffer an electric
shock and beseriously or even fat allyinjured.
Features223
Stowage and features
Z
Page 226 of 302

GWARNING
Any device that you connect must have a suit-
able plug and meet U.S. standards. Never pull at a cable to disconnect a plug from a 115 V
AC power socket. Never use a damaged con-
nection cable. The 115 V AC power socket
must never be connected to another 115 V AC power source. Do not use a converter with an
earthed plug for the 115 V AC power socket.
This could cause serious injury to you and/or
other people.
GWARNING
If the 115 V AC power socket is damaged or
pulled out of the trim, do not use or touch the
115 VAC power socket. The use of a 115 VAC
power socket that has been damaged or
pulled out of the trim could cause serious
injury to you or others.
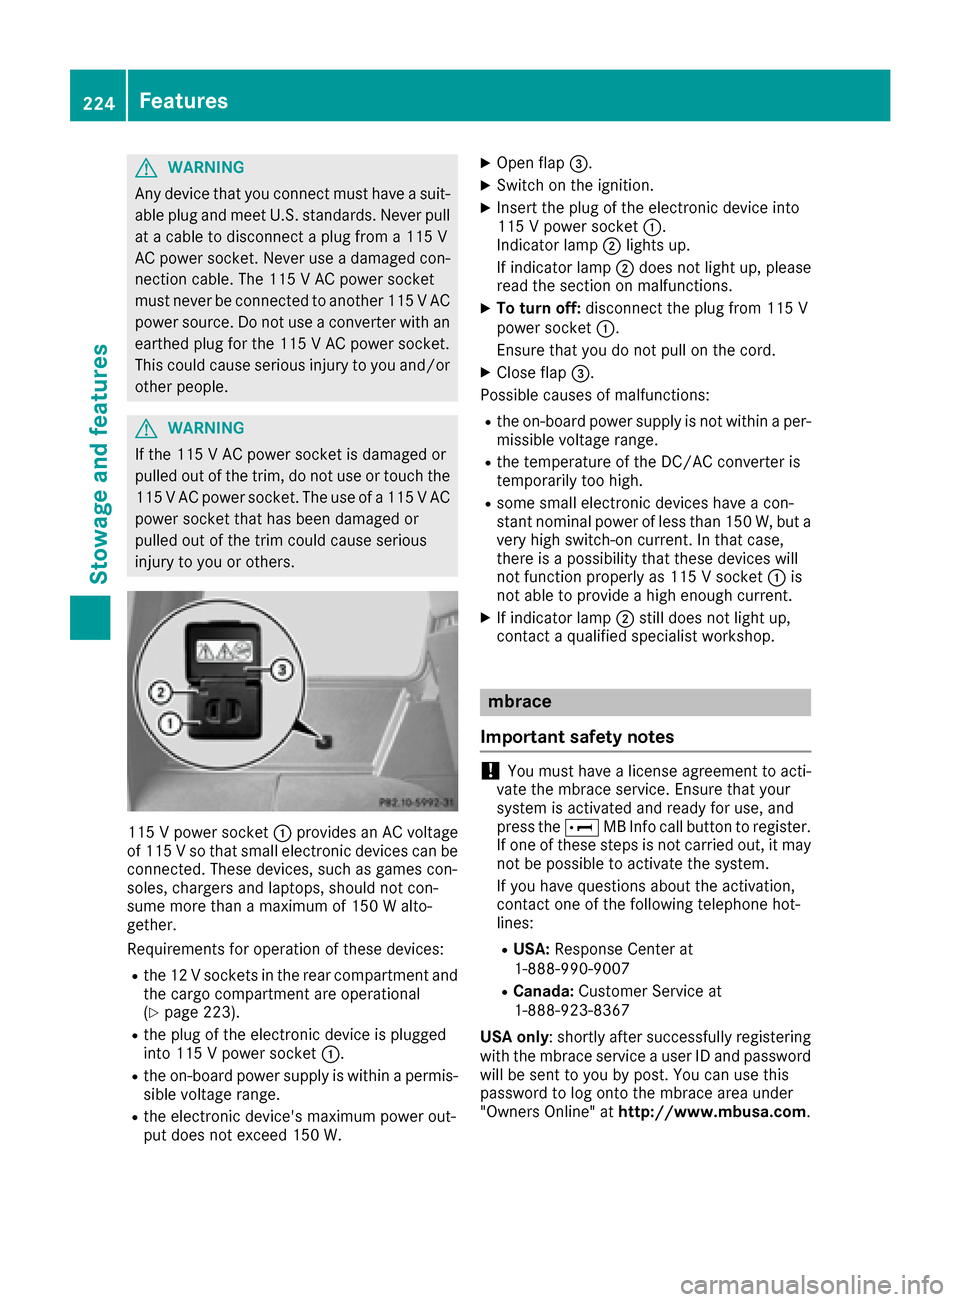
115 V power socket :provides an AC voltage
of 115 Vso that small electronic devices can be
connected. These devices, such as games con-
soles, chargers and laptops, should not con-
sume more than a maximum of 150 W alto-
gether.
Requirements for operation of these devices:
Rthe 12 V sockets in the rear compartment and
the cargo compartment are operational
(
Ypage 223).
Rthe plug of the electronic device is plugged
into 115 V power socket :.
Rthe on-board power supply is within a permis-
sible voltage range.
Rthe electronic device's maximum power out-
put does not exceed 150 W.
XOpen flap =.
XSwitch on the ignition.
XInsert the plug of the electronic device into
115 V power socket :.
Indicator lamp ;lights up.
If indicator lamp ;does not light up, please
read the section on malfunctions.
XTo turn off: disconnect the plug from 115 V
power socket :.
Ensure that you do not pull on the cord.
XClose flap =.
Possible causes of malfunctions:
Rthe on-board power supply is not within a per-
missible voltage range.
Rthe temperature of the DC/AC converter is
temporarily too high.
Rsome small electronic devices have a con-
stant nominal power of less than 150 W, but a
very high switch-on current. In that case,
there is a possibility that these devices will
not function properly as 115 V socket :is
not able to provide a high enough current.
XIf indicator lamp ;still does not light up,
contact a qualified specialist workshop.
mbrace
Important safety notes
!You must have a license agreement to acti-
vate the mbrace service. Ensure that your
system is activated and ready for use, and
press the EMB Info call button to register.
If one of these steps is not carried out, it may not be possible to activate the system.
If you have questions about the activation,
contact one of the following telephone hot-
lines:
RUSA: Response Center at
1-888-990-9007
RCanada: Customer Service at
1-888-923-8367
USA only : shortly after successfully registering
with the mbrace service a user ID and password
will be sent to you by post. You can use this
password to log onto the mbrace area under
"Owners Online" at http://www.mbusa.com.
224Features
Stowage and features