2016 MERCEDES-BENZ G-Class oil change
[x] Cancel search: oil changePage 113 of 302
Useful information
i
This Operator's Manual describes all models
and all standard and optional equipment of
your vehicle available at the time of publica-
tion of the Operator's Manual. Country-spe-
cific differences are possible. Please note
that your vehicle may not be equipped with all
features described. This also applies to
safety-related systems and functions.
iRead the information on qualified specialist
workshops: (Ypage 23).
Notes on breaking-in a new vehicle
Important safety notes
New and replaced brake pads and discs only
reach their optimum braking effect after several
hundred kilometers of driving. Compensate for
this by applying greater force to the brake pedal.
The first 1000 miles (1500 km)
The more you look after the engine when it is
new, the more satisfied you will be with its per-
formance in the future.
RYou should therefore drive at varying vehicle
and engine speeds for the first 1,000 miles
(1,500 km).
RAvoid heavy loads, e.g. driving at full throttle, during this period.
RChange gear in good time, before the tach-
ometer needle is Ôof the way to the red area
of the tachometer.
RDo not manually shift to a lower gear to brake
the vehicle.
RTry to avoid depressing the accelerator pedal
beyond the point of resistance (kickdown).
ROnly select shift ranges 3,2or 1when driving
slowly, e.g. in mountainous terrain.
After 1,000 miles (1,500 km), you can increase
the engine speed gradually and bring the vehicle
to full speed.
Additional breaking-in notes for AMG vehicles:
RDo not drive faster than 85 mph (140 km/ h)
for the first 1,000 miles (1,500 km).
ROnly allow the engine to reach a maximum
engine speed of 4,500 rpm briefly.
RChange gear in good time.
RAvoid driving off-road before the differential
oil change at 2,000 miles (3,000 km).
RIdeally, for the first 1,000 miles (1,500 km),
drive in program C.
iYou should also observe these breaking-in
notes if the engine or parts of the drive train
on your vehicle have been replaced.
iAlways observe the respective speed limits.
AMG vehicles with self-locking rear
axle differential
Change the oil after a breaking-in period of
2,000 mile s(3,000 km) to improve protection of
the differential. This oil change prolongs the ser-
vice life of the differential. Have the oil change
carried out at a qualified specialist workshop.
Mercedes-Benz recommends that you use an
authorized Mercedes-Benz Center for this pur-
pose.
Driving
Important safety notes
GWARNING
Objects in the driver's footwell can restrict the pedal travel or obstruct a depressed pedal.
The operating and road safety of the vehicle is
jeopardized. There is a risk of an accident.
Make sure that all objects in the vehicle are
stowed correctly, and that they cannot enter
the driver's footwell. Install the floormats
securely and as specified in order to ensure
sufficient clearance for the pedals. Do not use
loose floormats and do not place floormats on
top of one another.
GWARNING
Unsuitable footwear can hinder correct usage of the pedals, e.g.:
Rshoes with thick soles
Rshoes with high heels
Rslippers
There is a risk of an accident.
Driving111
Driving and parking
Z
Page 139 of 302

GWARNING
If you activate the LOW off-road gear while
driving on a slippery road surface, the wheels
may lose traction:
Rif you remove your foot from the accelera-
tor pedal when driving
Rif off road ABS intervenes when braking
If the wheels lose traction. the vehicle can no
longer be steered. There is an increased dan- ger of skidding and accidents.
Never activate the LOW off-road gear while
driving on a slippery road surface.
Drive particularly carefully on slippery road sur-
faces. Avoid sudden acceleration, steering and
braking maneuvers. Do not use cruise control.
If the vehicle threatens to skid or cannot be
stopped when moving at low speed:
XShift the transmission to position N.
XTry to bring the vehicle under control using
corrective steering.
The outside temperature indicator is not
designed to serve as an ice-warning device and
is therefore unsuitable for that purpose.
Changes in the outside temperature are dis-
played after a short delay.
Indicated temperatures just above the freezing
point do not guarantee that the road surface is
free of ice. The road may still be icy, especially in
wooded areas or on bridges. You should pay
special attention to road conditions when tem-
peratures are around the freezing point.
For more information on driving with snow
chains, see (
Ypage 264).
Off-road driving
Important safety notes
GWARNING
Do not load items on the basic carrier bars. It
may cause instability during some maneuvers
which could result in an accident.
Drive slowly in unknown terrain. This will
make it easier to recognize unexpected obsta-
cles and avoid damage to the vehicle.
To help avoid the vehicle rolling over, never
turn it around on steep inclines. If the vehicle cannot complete the attempted climb, back it
down in reverse gear.
Do not drive along the side of a slope. The
vehicle might otherwise rollover. If in doing so
the vehicle begins to show a tendency to roll,immediately steer into a line of gravity
(straight up or downhill).
Never let the vehicle roll backwards in idle.
You may lose control of the vehicle if you use
only the service brake. For information on
driving downhill, see "Driving downhill".
When driving off-road, sand, mud and water,
possibly mixed with oil, for example, could get
into the brakes. This could result in a reduced
braking effect or in total brake failure and also in
increased wear and tear. The braking charac-
teristics change depending on the material
ingressing the brakes. Clean the brakes after
driving off-road. If you detect a reduced braking
effect or grinding noises, have the brake system checked in a qualified specialist workshop as
soon as possible. Adapt your driving style to the
different braking characteristics.
Driving off-road increases the likelihood of dam-
age to the vehicle, which, in turn, can lead to
failure of the mechanical assembly or systems.
Adapt your driving style to suit the terrain con-
ditions. Drive carefully. Have damage to the
vehicle rectified immediately at a qualified spe-
cialist workshop.
General notes
HEnvironmental note
Protection of the environment is of primary
importance. Treat nature with respect.
Observe all prohibiting signs.
Read this section carefully before driving your
vehicle off-road. Practice by driving over more
gentle off-road terrain first.
Familiarize yourself with the characteristics of
your vehicle and the gear shift operation before driving through difficult terrain.
Driving tips137
Driving and parking
Z
Page 243 of 302

Ruseinmountainous terrain or on poor road
surfaces
Rif the engine isoften left idling for long periods
Under these or similar conditions, have, for
example, the air filter, engine oil and oil filter
replaced or changed more frequently. Under
arduous operating conditions, the tires must be
checked more often. Further information can be
obtained at a qualified specialist workshop,e.g.
an authorized Mercedes-Benz Center.
Fuel/water separator
HEnvironmental note
Dispose of service products inan environ-
mentally responsible manner.
!Ifyou continue drivingwithout having the
fuel/water separator serviced, th iscould
cause damage to the engine. Any resulting
damage isnot covered bythe warranty.
If the fuel/water separator needs servicing, the
fol lowin g message appears inthe multifunction
displ ay:
Youwillalso hear a brief warning tone.
XVisit a qualified specialist workshop as soon
as possible.
Care
General notes
GWAR NING
Many cleaning products can behazardous.
So me are poisonous, others are flammable.
Alwa ys follow the instructions on the particu-
lar container. Always open your veh icle's
doors or windows when cleaning the ins ide.
Never use fluids or solvents that are not
designed for cleaning your veh icle.
Always lock away cleaning products and keep
them out of reach of children.
!For cleaning your vehicle, donot use any of
the following:
Rdry, rough or hard cloths
Rabrasive cleaning agents
Rsolvents
Rcleaning agents containing solvents
Do not scrub.
Do not touch the surfaces or protective films
wit h hard objects, e.g. a ring or ice scraper.
You could otherwise scratch or damage the
surfaces and protective film.
!Do not park the vehicle for an extended
period straight after cleaning it, particularly
after having cleaned the wheels with wheel
cleaner. Wheel cleaners could cause
increased corrosion of the brake discs and
brake pads/linings. For this reason, you
should drive for a few minutes after cleaning.
Braking heats the brake discs and the brake
pads/linings, thus drying them. The vehicle
can then beparked.
HEnvironmental note
Dispose of empty packaging and cleaning
cloths in an environmentally responsible man-
ner.
Regular care of your vehicle isa condition for
retaining the quality in the long term.
Use care products and cleaning agents recom-
mended and approved by Mercedes-Benz.
Exterior care
Automatic car wash
GWARNING
Braking efficiency is reduced after washing
the vehicle. There is a risk of an accident.
After the vehicle has been washed, brake
carefully while paying attention to the traffic
conditions until full braking power is restored.
!Never clean your vehicle ina Touchless
Automat icCar Wash as these use special
Care241
Maintenance and care
Z
Page 247 of 302
Impurities combined with the effects of road grit
and corrosive environmental factors may causeflash rust to form on the surface. You can
restore the original shine of the chrome parts by
cleaning them regularly, especially in winter and
after washing.
XClean the chrome parts with a chrome care
product tested and approved by Mercedes-
Benz.
Cleaning the trailer coupling
HEnvironmental note
Dispose of rags soaked in oil and grease in an
environmentally responsible manner.
!Do not clean the ball coupling with a power
washer. Do not use solvents.
!Please note the care instructions in the
trailer coupling manufacturer's operating
instructions.
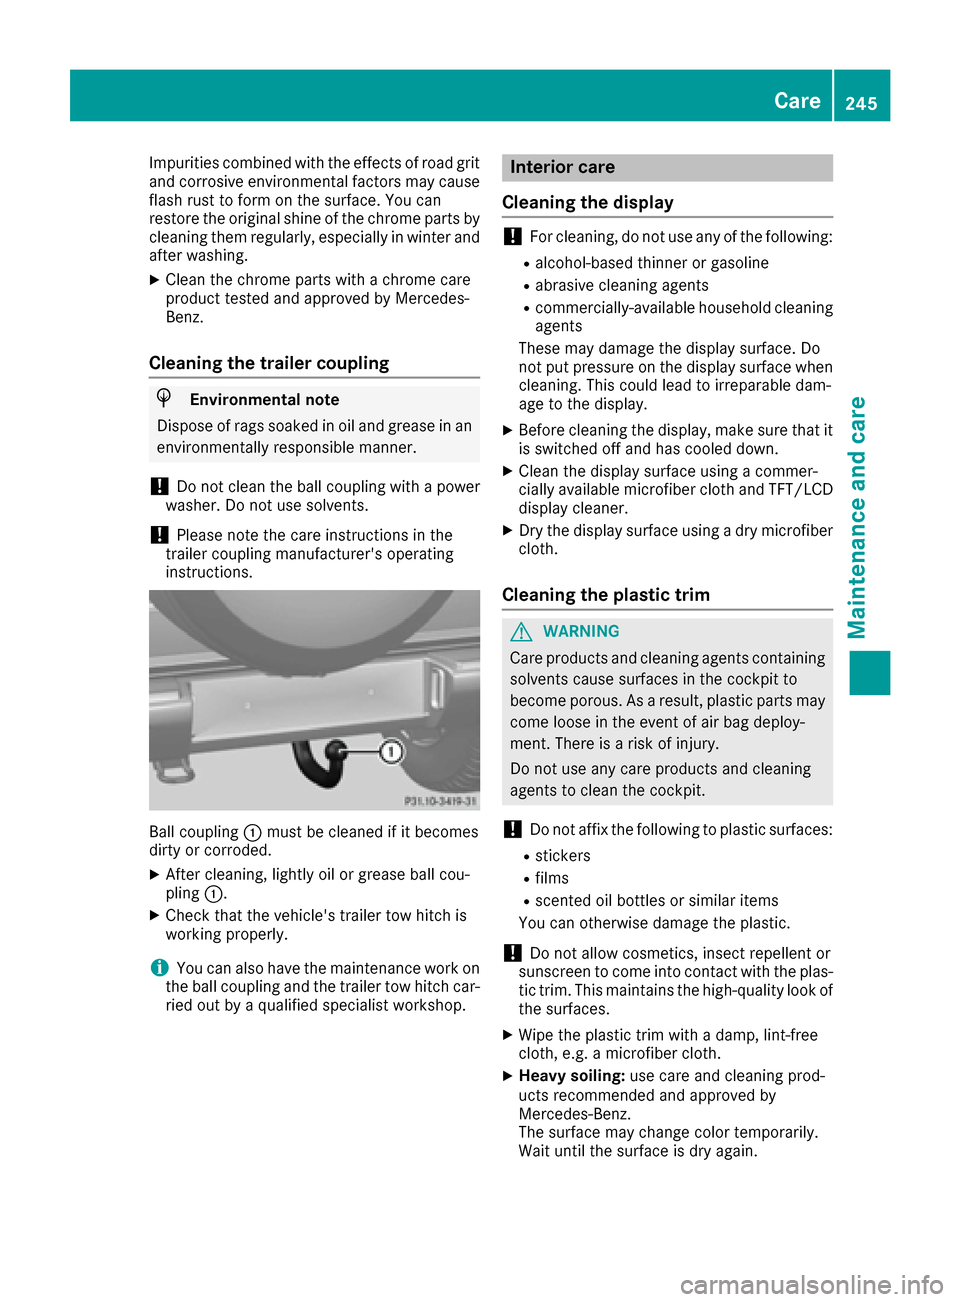
Ball coupling :must be cleaned if it becomes
dirty or corroded.
XAfter cleaning, lightly oil or grease ball cou-
pling :.
XCheck that the vehicle's trailer tow hitch is
working properly.
iYou can also have the maintenance work on
the ball coupling and the trailer tow hitch car-
ried out by a qualified specialist workshop.
Interior care
Cleaning the display
!For cleaning, do not use any of the following:
Ralcohol-based thinner or gasoline
Rabrasive cleaning agents
Rcommercially-available household cleaning
agents
These may damage the display surface. Do
not put pressure on the display surface when cleaning. This could lead to irreparable dam-
age to the display.
XBefore cleaning the display, make sure that it
is switched off and has cooled down.
XClean the display surface using a commer-
cially available microfiber cloth and TFT/LCD
display cleaner.
XDry the display surface using a dry microfiber
cloth.
Cleaning the plastic trim
GWARNING
Care products and cleaning agents containing solvents cause surfaces in the cockpit to
become porous. As a result, plastic parts may
come loose in the event of air bag deploy-
ment. There is a risk of injury.
Do not use any care products and cleaning
agents to clean the cockpit.
!Do not affix the following to plastic surfaces:
Rstickers
Rfilms
Rscented oil bottles or similar items
You can otherwise damage the plastic.
!Do not allow cosmetics, insect repellent or
sunscreen to come into contact with the plas-
tic trim. This maintains the high-quality look of
the surfaces.
XWipe the plastic trim with a damp, lint-free
cloth, e.g. a microfiber cloth.
XHeavy soiling: use care and cleaning prod-
ucts recommended and approved by
Mercedes-Benz.
The surface may change color temporarily.
Wait until the surface is dry again.
Care245
Maintenance and care
Z
Page 284 of 302

ted. Check the tire pressure and reactivate the
tire pressure monitor (Ypage 268)if necessary.
Direction of rotation
Tires with a specified direction of rotation have
additional benefits, e.g. if there is a risk of hydro-
planing. You will only gain these benefits if the
correct direction of rotation is observed.
An arrow on the sidewall of the tire indicates its
correct direction of rotation.
You may mount the spare wheel against the
direction of rotation. Adhere to the time restric-
tion on use as well as the speed limitation speci-
fied on the spare wheel.
Storing wheels
Store tires that are not being used in a cool, dry
and preferably dark place. Protect the tires from
oil, grease, gasoline and diesel.
Mounting a wheel
Preparing the vehicle
GWARNING
When you remove the spare wheel from the
spare wheel bracket, the vehicle’s weight dis-
tribution changes. If the vehicle is already
raised, the jack could tip over. There is a risk
of injury.
Remove the spare wheel from the spare wheel
bracket before lifting the vehicle.
XPrepare the vehicle as described
(Ypage 250).
XRemove the vehicle tool kit and the jack
(Ypage 248).
XSecure the vehicle to prevent it from rolling
away.
XRemove the spare wheel from the spare wheel
bracket (Ypage 249).
iVehicles without a spare wheel or emer-
gency spare wheel are not equipped with a
tire-change tool kit at the factory. For more
information on which tools are required to
perform a wheel change on your vehicle e.g. lug wrench or jack, consult an authorized
Mercedes-Benz Center.
Securing the vehicle to prevent it from
rolling away
XOn level ground:
place chocks or other suit-
able items under the front and rear of the
wheel that is diagonally opposite the wheel
you wish to change.
XOn downhill gradients: place chocks or
other suitable items in front of the wheels of
the front and rear axle.
Raising the vehicle
GWARNING
If you do not position the jack correctly at the
appropriate jacking point of the vehicle, the
jack could tip over with the vehicle raised.
There is a risk of injury.
Only position the jack at the appropriate jack-
ing point of the vehicle. The base of the jack
must be positioned vertically, directly under
the jacking point of the vehicle.
!The jack is designed exclusively for jacking
up the vehicle at the jacking points. Other-
wise, your vehicle could be damaged.
Observe the following when raising the vehicle:
RTo raise the vehicle, only use the vehicle-spe-
cific jack that has been tested and approved
by Mercedes-Benz. If used incorrectly, the
jack could tip over with the vehicle raised.
RThe jack is designed only to raise and hold the
vehicle for a short time while a wheel is being
changed. It is not suited for performing main-
tenance work under the vehicle.
RAvoid changing the wheel on uphill and down- hill slopes.
RBefore raising the vehicle, secure it from roll-
ing away by applying the parking brake and
inserting wheel chocks. Do not disengage the
parking brake while the vehicle is raised.
RThe jack must be placed on a firm, flat and
non-slip surface. On a loose surface, a large,
load-bearing underlay must be used. On a
slippery surface, a non-slip underlay must be
used, e.g. rubber mats.
RDo not use wooden blocks or similar objects
as a jack underlay. Otherwise, the jack will not
282Changing a wheel
Wheels and tires
Page 286 of 302

Mounting a new wheel
GWARNING
Oiled or greased wheel bolts/wheel nuts and
damaged wheel bolt/wheel nut/wheel hub
threads can cause wheel bolts/wheel nuts to
come loose. As a result, you could lose a
wheel while driving. There is a risk of an acci-
dent.
Never oil or grease wheel bolts/wheel nuts. In
the event of damage to the threads, contact a
qualified specialist workshop immediately.
Have the damaged wheel bolts/wheel nuts or
hub threads replaced/renewed. Do not con-
tinue driving.
GWARNING
If you tighten the wheel bolts or wheel nuts
when the vehicle is raised, the jack could tip
over. There is a risk of injury.
Only tighten the wheel bolts or wheel nuts
when the vehicle is on the ground.
!To prevent damage to the paintwork, hold
the wheel securely against the wheel hub
while screwing in the first wheel bolt.
Always pay attention to the instructions and
safety notes in the "Changing a wheel" section
(
Ypage 281).
XClean the wheel and wheel hub contact sur-
faces.
XPlace the new wheel on the wheel hub and
push it on.
XTighten the wheel bolts until they are finger-
tight.
Lowering the vehicle
GWARNING
The wheels could work loose if the wheel nuts and bolts are not tightened to the specified
tightening torque. There is a risk of accident.
Have the tightening torque immediately
checked at a qualified specialist workshop
after a wheel is changed.
XOpen the pressure release screw on the jack
using the pump lever (Ypage 282) by approx-
imately one turn.
XLower the vehicle until it is once again stand-
ing firmly on the ground.
XPlace the jack to one side.
XTighten the wheel bolts evenly in a crosswise pattern in the sequence indicated (: toA).
The specified tightening torque is 96 lb-ft
(130 Nm).
XDisassemble the pump lever.
XPush the jack piston back in and close the
drain plug.
XUse the bolts to secure the faulty wheel to the
spare wheel bracket (Ypage 249).
XStow the jack and the vehicle tools in the
vehicle again.
XCheck the tire pressure of the newly installed
wheel and adjust it if necessary.
A table with the tire pressures for your vehicle can be found on the B-pillar on the driver's
side.
Wheel and tire combinations
General notes
GWARNING
If wheels and tires of the wrong size are used, the wheel brakes or suspension components
may be damaged. There is a risk of an acci-
dent.
Always replace wheels and tires with those
that fulfill the specifications of the original
part.
284Wheel and tire combinations
Wheels and tires
Page 294 of 302
The vehicle will use more fuel than usual in the
following situations:
Rat very low outside temperatures
Rin city traffic
Ron short journeys
Rin mountainous terrain
Rwhen towing a trailer
Engine oil
General notes
!Never use engine oil or an oil filter of a spec-
ification other than is necessary to fulfill the
prescribed service intervals. Do not change
the engine oil or oil filter in order to achieve
longer replacement intervals than those pre-
scribed. You could otherwise cause engine
damage or damage to the exhaust gas after-
treatment.
Follow the instructions in the service interval display regarding the oil change. Otherwise,
you may damage the engine and the exhaust
gas aftertreatment.
When handling engine oil, observe the important
safety notes on service products (
Ypage 289).
The engine oils are matched to the performance
of Mercedes-Benz engines and service intervals.
For this reason, only use engine oils and oil fil-
ters that are approved for vehicles with a service
system.
For a list of approved engine oils and oil filters,
consult an authorized Mercedes-Benz Center or
go to the Internet site
http://bevo.mercedes-benz.com (USA only).
The table shows which engine oils have been
approved for your vehicle.
ModelMB-Freigabe or MB
Approval
G 550229.3 / 229.5
G 63 AMG229.5
iThe MB-Freigabe or MB Approval is stated
on the oil containers.
Filling capacities
The following values refer to an oil change
including the oil filter.
Vehicle modelCapacity including oil filter
G 5502.4 US gal (9.0 l)
G 63 AMG2.25 US gal (8.5 l)
Additives
!Do not use any additives in the engine oil.
This could damage the engine.
Engine oil viscosity
Viscosity describes the flow characteristics of a
fluid. If an engine oil has a high viscosity, this
means that it is thick; a low viscosity means that it is thin.
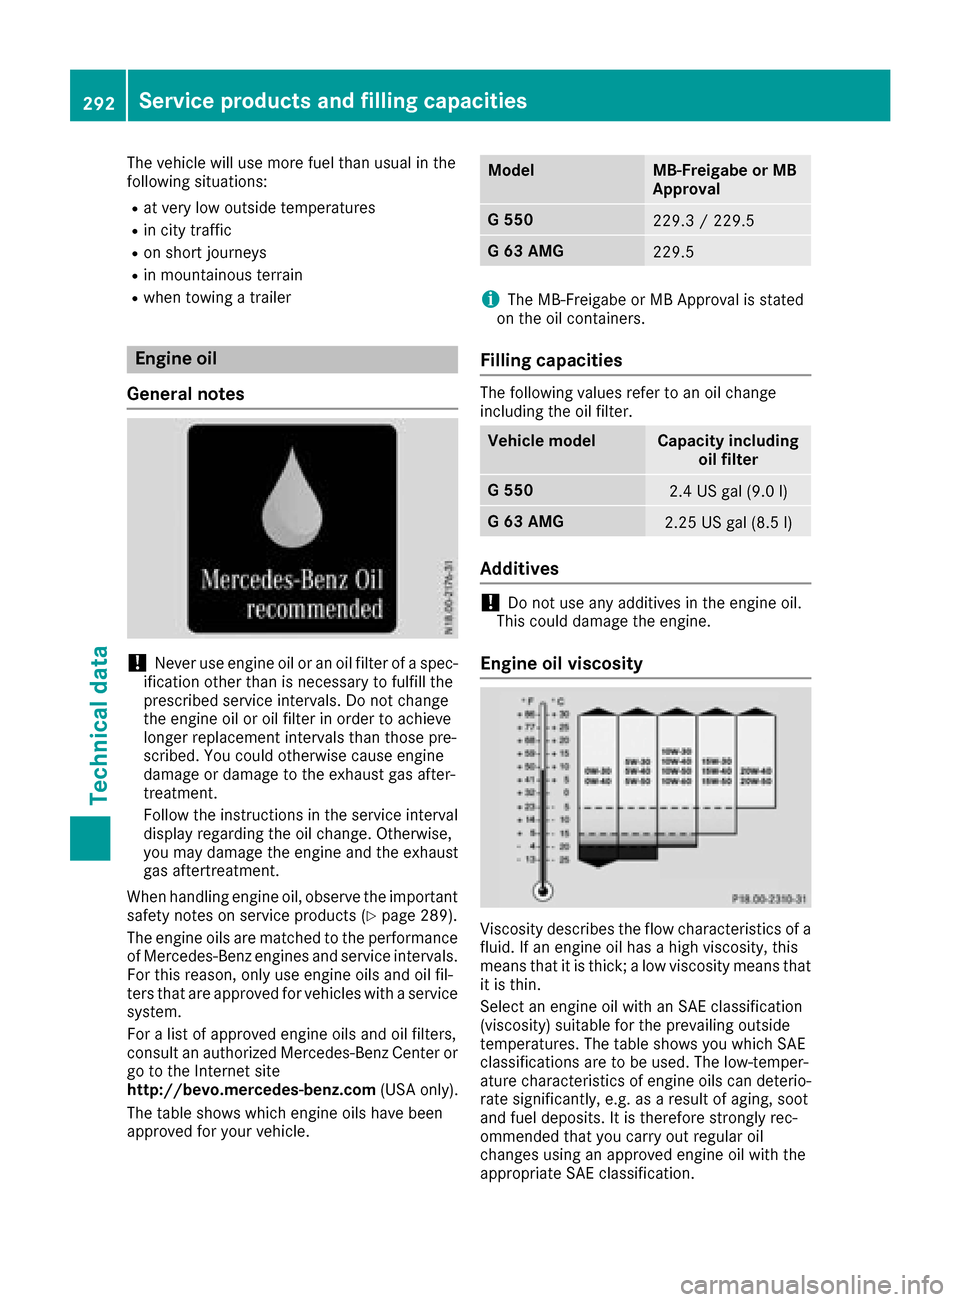
Select an engine oil with an SAE classification
(viscosity) suitable for the prevailing outside
temperatures. The table shows you which SAE
classifications are to be used. The low-temper-
ature characteristics of engine oils can deterio-
rate significantly, e.g. as a result of aging, soot
and fuel deposits. It is therefore strongly rec-
ommended that you carry out regular oil
changes using an approved engine oil with the
appropriate SAE classification.
292Service products and filling capacities
Technical data
Page 295 of 302

Climate control system refrigerant
Important safety notes
The climate control system of your vehicle is fil-
led with refrigerant R‑ 134a.
The instruction label regarding the refrigerant
type used can be found on the radiator cross
member.
!Only the refrigerant R ‑134a and the PAG oil
approved by Mercedes-Benz may be used.
The approved PAG oil may not be mixed with
any other PAG oil that is not approved for
R-134a refrigerant. Otherwise, the climate
control system may be damaged.
Service work, such as topping up refrigerant or
replacing components, may only be carried out
by a qualified specialist workshop. All applicable
regulations must be adhered to, SAE standard
J639 included.
Always have work on the climate control system
carried out at a qualified specialist workshop.
Refrigerant instruction label
Example :refrigeran tinstruction label
:
Warning symbol
;Refrigerant filling capacity
=Applicable standards
?PAG oil part number
AType of refrigerant
Warning symbol :advises you about:
Rpossible dangers
Rhaving service work carried out at a qualified
specialist workshop
Filling capacities
Missing values were not available at time of
going to print.
AMG vehiclesCapacity
Refrigerant
PAG oil
All other modelsCapacity
Refrigerant
PAG oil
Brake fluid
GWARNING
The brake fluid constantly absorbs moisture
from the air. This lowers the boiling point of
the brake fluid. If the boiling point of the brake
fluid is too low, vapor pockets may form in the
brake system when the brakes are applied
hard. This would impair braking efficiency.
There is a risk of an accident.
You should have the brake fluid renewed at
the specified intervals.
When handling brake fluid, observe the impor-
tant safety notes on service products
(
Ypage 289).
The brake fluid change intervals can be found in
the Maintenance Booklet.
Only use brake fluid approved by Mercedes-
Benz according to MB-Freigabe or MB Approval
331.0.
Information about approved brake fluid can be
obtained at any qualified specialist workshop or on the Internet at
http://bevo.mercedes-benz.com.
iHave the brake fluid regularly replaced at a
qualified specialist workshop and the replace-
ment confirmed in the Maintenance Booklet.
Service products and filling capacities293
Technical data
Z