2016 MERCEDES-BENZ G-Class rear view mirror
[x] Cancel search: rear view mirrorPage 13 of 302

Mechanical keyFunction/notes ................................ 61
General notes .................................. 61
Removing .........................................6 1
Memory card (audio) ......................... 176
Memory function ................................. 82
Message memory (on-board com-
puter) .................................................. 184
Messages
see Display messages
Mirrors
Sun visor ........................................ 221
see Exterior mirrors
see Rear-view mirror
Mobile phone
Menu (on-board computer) ............ 177
Mounting wheels
Mounting a new wheel ................... 284
Raising the vehicle ......................... 282
Removing a wheel .......................... 283
Securing the vehicle against roll-
ing away ........................................ 282
MP3
Operation ....................................... 176
see separate operating instructions
Multifunction display
Function/notes ............................. 173
Permanent display ......................... 179
Multifunction steering wheel
Back button ................................... 172
Operating the on-board compute r..1 72
Overview .......................................... 29
N
Navigation
Menu (on-board computer) ............ 174
see separate operating instructions
NECK-PRO head restraints
Operation ......................................... 45
Resetting triggered .......................... 45
NECK-PRO luxury head restraints
Important safety notes .................... 45
Operation ......................................... 45
Resetting when triggered ................. 46
Notes on breaking-in a new vehi-
cle ....................................................... 111
O
Occupant safety
Automatic measures after an acci-
dent ................................................. 46
BabySmart™ air bag deactivation
system ............................................. 50
Children in the vehicle ..................... 46
Important safety notes .................... 35
Introduction to the restraint sys-
tem ............................................ 34, 47
PASSENGER AIR BAG indicator
lamps ............................................... 35
Pets in the vehicle ........................... 55
Restraint system warning lamp ........3 5
Off-road
Differential locks ........................... .164
Off-road ABS ....................................5 6
Off-road driving
Checklist ....................................... .138
Driving on sand .............................. 139
Important safety notes .................. 137
Traveling uphill ............................... 140
Off-road fording ................................. 135
Off-road system
Permanent all-wheel drive ............. 157
Oil
see Engine oil
On-board computer
AMG menu ..................................... 182
Assistance menu ........................... 178
Audio menu ................................... 176
Convenience submenu .................. 181
Display messages .......................... 184
DISTRONIC PLUS ........................... 151
Factory settings submenu ............. 181
Important safety notes .................. 170
Instrument cluster submenu .......... 179
Lighting submenu .......................... 179
Menu overview .............................. 173
Message memory .......................... 184
Navigation menu ............................ 174
Operation ....................................... 172
RACETIMER ................................... 182
Service menu ................................. 178
Settings menu ............................... 178
Standard display ............................ 173
Telephone menu ............................ 177
Index11
Page 15 of 302

Switching on/off .............................. 86
Rear lamps
see Lights
Rear seat bench
Folding into an upright position ..... 218
Rear view camera
Function/notes ............................. 161
Rear view camera (cleaning
instructions) ...................................... 244
Rear window defroster
Problem (malfunction) ................... 107
Switching on/off ........................... 107
Rear window wiper
Switching on/off .............................. 97
Rear-view mirror
Dipping (automatic) ......................... 81
Refrigerant (air-conditioning sys-
tem)
Important safety notes .................. 293
Refueling
Fuel gauge ..................................... 171
Important safety notes .................. 127
Refueling process .......................... 128
see Fuel
Remote control
Programming (garage door
opener) .......................................... 231
Replacing bulbs
Important safety notes .................... 92
Overview of bulb types .................... 93
Reporting safety defects .................... 23
Rescue card ......................................... 24
Reserve (fuel tank)
see Fuel
Reserve fuel
Display message ............................ 194
Warning lamp ................................. 210
see Fuel
Residual heat
Switching on/off ........................... 108
Restraint system
Display message ............................ 187
Introduction ..................................... 34
Warning lamp ................................. 209
Warning lamp (function) ................... 35
Reversing lamps (display mes-
sage) ................................................... 191 Roadside Assistance (breakdown)
.... 21
Roof lining and carpets (cleaning
guidelines) ......................................... 247
Route (navigation)
see Route guidance (navigation)
Route guidance (navigation) ............ 174
S
Safety
Children in the vehicle ..................... 46
Safety system
see Driving safety systems
Seat backrest
Folding back .................................. 217
Seat belts
Adjusting the height ......................... 38
center rear-compartment seat ......... 38
Cleaning ......................................... 246
Correct usage .................................. 37
Fastening ......................................... 38
Important safety guidelines ............. 36
Introduction ..................................... 36
Releasing ......................................... 39
Warning lamp ................................. 204
Warning lamp (function) ................... 40
Seat heating
Indicator lamp (malfunction) ............ 77
Seat ventilation
Indicator lamp (malfunction) ............ 77
Seats
Adjusting (electrically) ..................... 74
Adjusting the 4-way lumbar sup-
port .................................................. 76
Adjusting the head restraint ............ 74
Cleaning the cover ......................... 246
Correct driver's seat position ........... 72
Important safety notes .................... 72
Overview .......................................... 72
Storing settings (memory func-
tion) ................................................. 82
Switching seat heating on/off ......... 76
Switching seat ventilation on/off .... 77
Sensors (cleaning instructions) ....... 244
Service interval display
Displaying a service message (on-
board computer) ............................ 240
Index13
Page 34 of 302
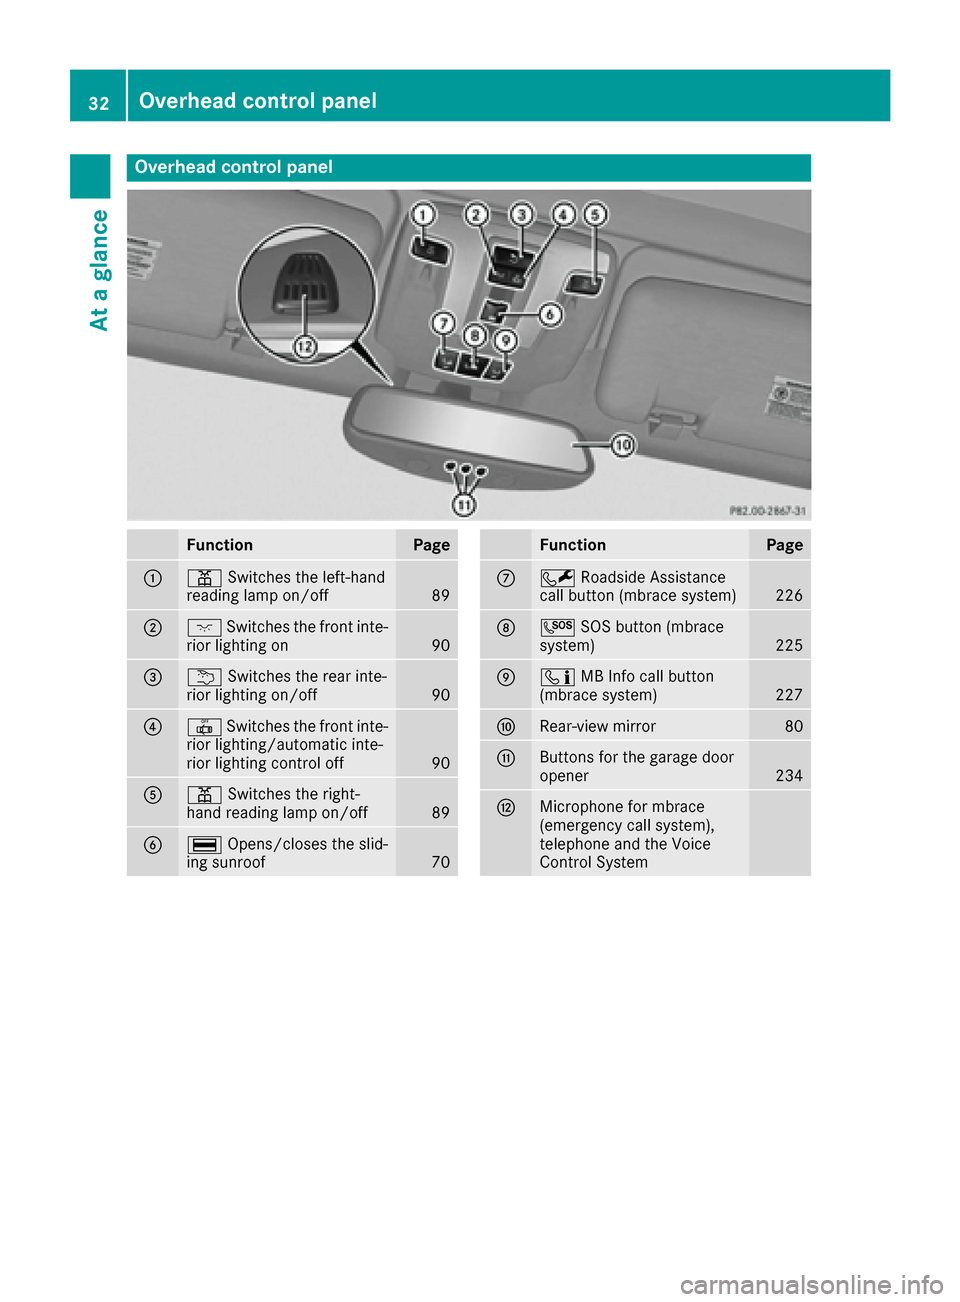
Overhead control panel
FunctionPage
:pSwitches the left-hand
reading lamp on/off89
;c Switches the front inte-
rior lighting on90
=u Switches the rear inte-
rior lighting on/off90
?| Switches the front inte-
rior lighting/automatic inte-
rior lighting control off
90
Ap Switches the right-
hand reading lamp on/off89
B¡ Opens/closes the slid-
ing sunroof70
FunctionPage
CF Roadside Assistance
call button (mbrace system)226
DG SOS button (mbrace
system)225
Eï MB Info call button
(mbrace system)227
FRear-view mirror80
GButtons for the garage door
opener234
HMicrophone for mbrace
(emergency call system),
telephone and the Voice
Control System
32Overhead control panel
At a glance
Page 74 of 302
Useful information
i
This Operator's Manual describes all models
and all standard and optional equipment of
your vehicle available at the time of publica-
tion of the Operator's Manual. Country-spe-
cific differences are possible. Please note
that your vehicle may not be equipped with all
features described. This also applies to
safety-related systems and functions.
iRead the information on qualified specialist
workshops: (Ypage 23).
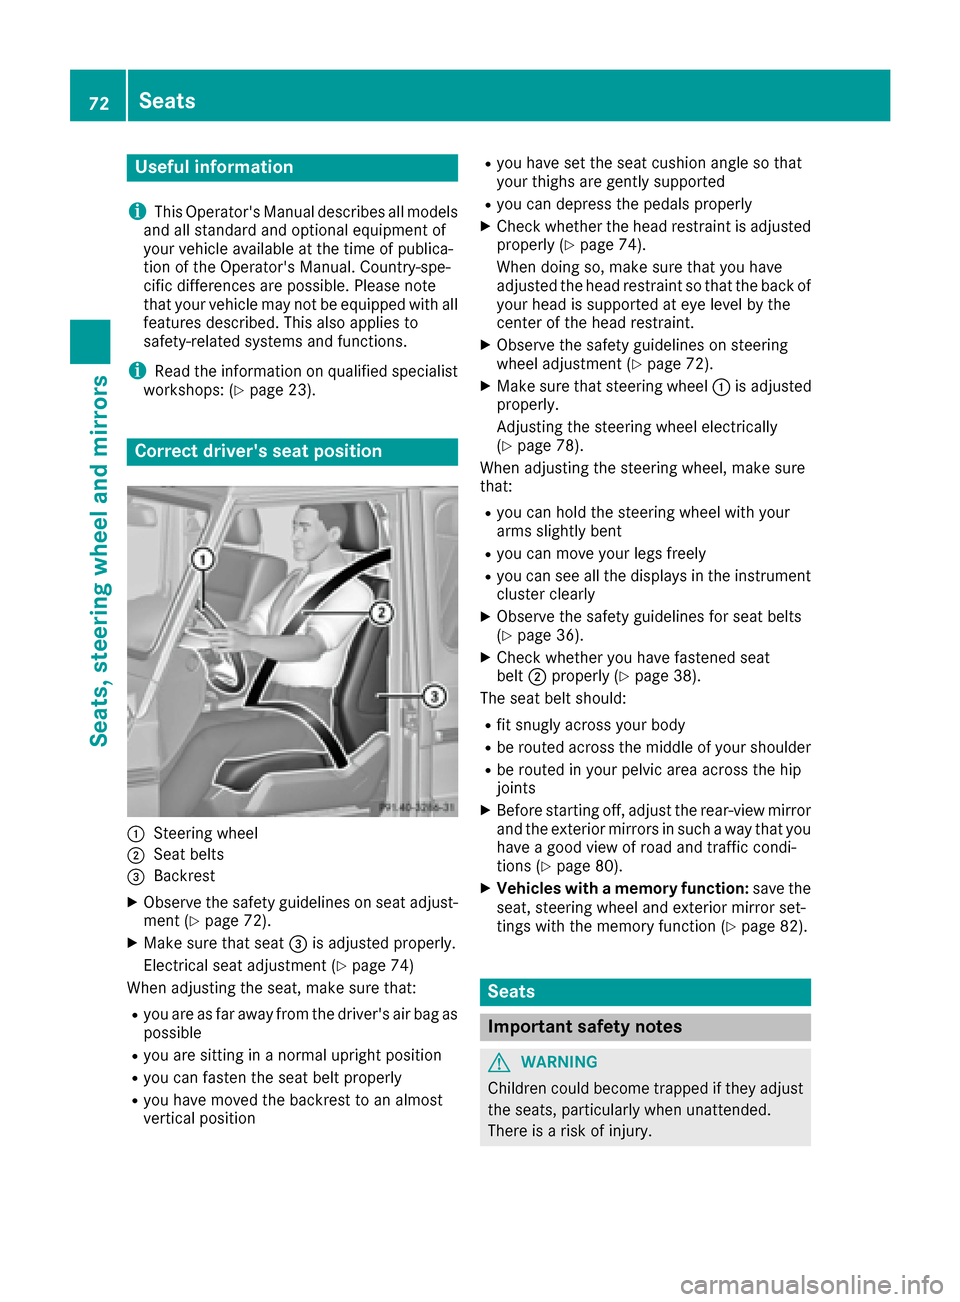
Correct driver's seat position
:Steering wheel
;Seat belts
=Backrest
XObserve the safety guidelines on seat adjust-
ment (Ypage 72).
XMake sure that seat =is adjusted properly.
Electrical seat adjustment (
Ypage 74)
When adjusting the seat, make sure that:
Ryou are as far away from the driver's air bag as
possible
Ryou are sitting in a normal upright position
Ryou can fasten the seat belt properly
Ryou have moved the backrest to an almost
vertical position
Ryou have set the seat cushion angle so that
your thighs are gently supported
Ryou can depress the pedals properly
XCheck whether the head restraint is adjusted
properly (Ypage 74).
When doing so, make sure that you have
adjusted the head restraint so that the back of
your head is supported at eye level by the
center of the head restraint.
XObserve the safety guidelines on steering
wheel adjustment (Ypage 72).
XMake sure that steering wheel :is adjusted
properly.
Adjusting the steering wheel electrically
(
Ypage 78).
When adjusting the steering wheel, make sure
that:
Ryou can hold the steering wheel with your
arms slightly bent
Ryou can move your legs freely
Ryou can see all the displays in the instrument
cluster clearly
XObserve the safety guidelines for seat belts
(Ypage 36).
XCheck whether you have fastened seat
belt ;properly (Ypage 38).
The seat belt should:
Rfit snugly across your body
Rbe routed across the middle of your shoulder
Rbe routed in your pelvic area across the hip
joints
XBefore starting off, adjust the rear-view mirror
and the exterior mirrors in such a way that you
have a good view of road and traffic condi-
tions (
Ypage 80).
XVehicles with a memory function: save the
seat, steering wheel and exterior mirror set-
tings with the memory function (
Ypage 82).
Seats
Important safety notes
GWARNING
Children could become trapped if they adjust
the seats, particularly when unattended.
There is a risk of injury.
72Seats
Seats, steering wheel and mirrors
Page 77 of 302
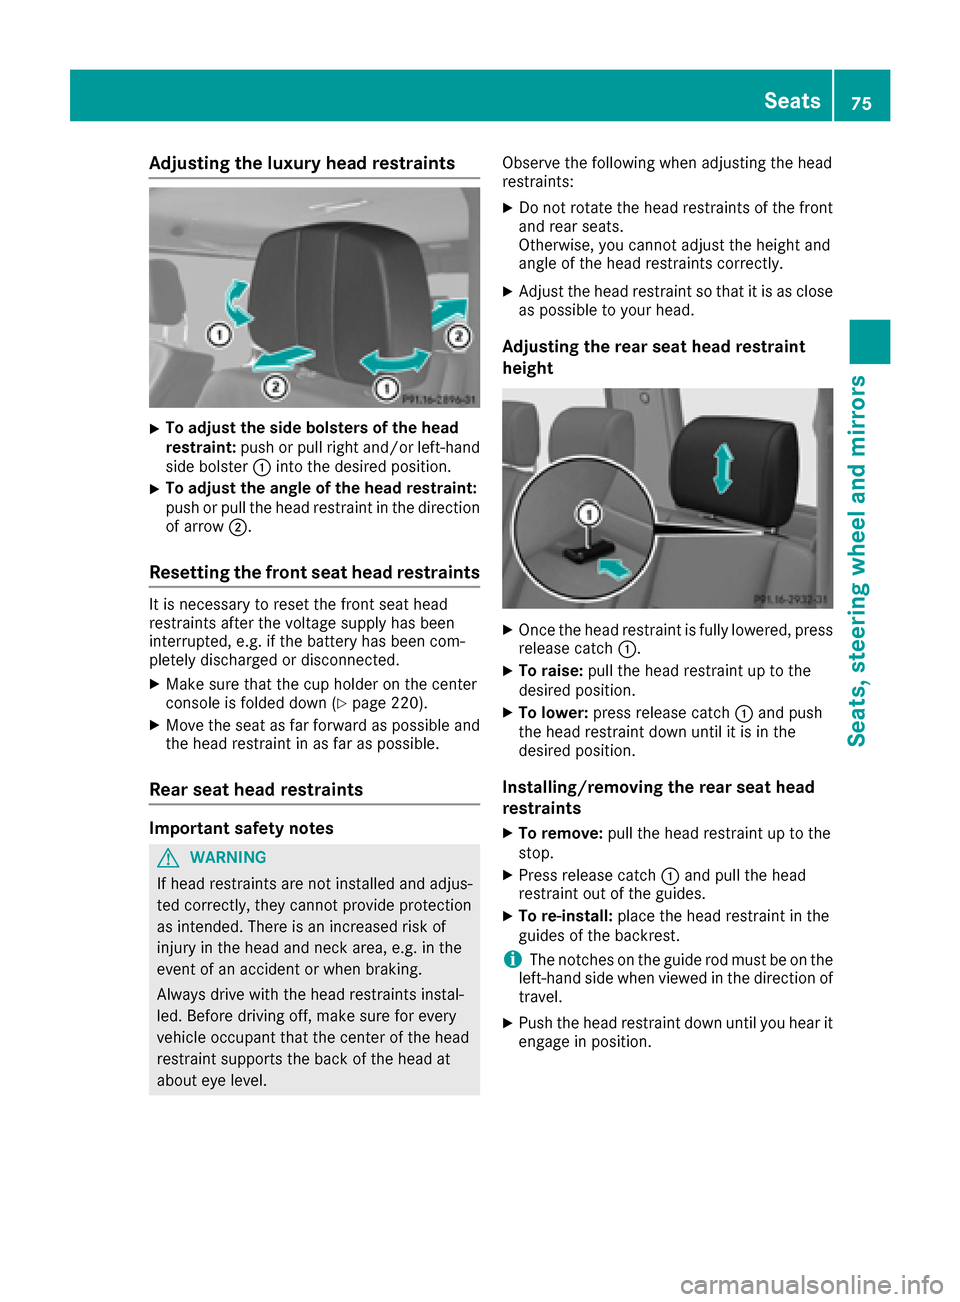
Adjusting the luxury head restraints
XTo adjust thesid ebolsters of th ehea d
restraint: push or pull right and/o rleft-han d
side bolste r: intoth edesired position .
XTo adjust theangle of th ehea drestraint:
push or pull th ehead restrain tin th edirection
of arrow ;.
Resetting the front seat head restraints
It is necessar yto reset th efron tseat head
restraints after th evoltag esupply has been
interrupted, e.g. if th ebattery has been com-
pletely discharged or disconnected.
XMak esur ethat th ecup holder on th ecenter
console is folded down (Ypage 220).
XMoveth eseat as far forward as possibl eand
th ehead restrain tin as far as possible.
Rear seat head restraints
Important safety notes
GWARNIN G
If head restraints are no tinstalled and adjus-
te dcorrectly, they canno tprovid eprotection
as intended. There is an increased ris kof
injury in th ehead and neck area, e.g. in th e
event of an acciden tor when braking .
Always drive wit hth ehead restraints instal -
led. Befor edrivin goff ,mak esur efor every
vehicl eoccupant that th ecenter of th ehead
restrain tsupport sth ebac kof th ehead at
about eye level. Observ
eth efollowin gwhen adjusting th ehead
restraints :
XDo notrotate th ehead restraints of th efron t
and rear seats.
Otherwise ,you canno tadjust th eheight and
angle of th ehead restraints correctly.
XAdjus tth ehead restrain tso that it is as close
as possibl eto your head .
Adjusting th erea rsea thea drestrain t
height
XOnce th ehead restrain tis fully lowered, press
release catch :.
XTo raise:pull thehead restrain tup to th e
desired position .
XTo lower:press release catch :and push
th ehead restrain tdown until it is in th e
desired position .
Installing/removing th erea rsea thea d
restraints
XTo remove: pull thehead restrain tup to th e
stop.
XPress release catch :and pull th ehead
restrain tout of th eguides.
XTo re-install :plac eth ehead restrain tin th e
guide sof th ebackrest .
iThe notches on th eguide rod mus tbe on th e
left-han dside when viewed in th edirection of
travel .
XPush th ehead restrain tdown until you hear it
engage in position .
Seats75
Seats, steering wheel and mirrors
Z
Page 82 of 302
Position of the steering wheel for driv-
ing
The steering wheel is moved to the last selected
position when:
Rthe driver's door is closed
Ryou insert the SmartKey into the ignition lock
The last position of the steering column is stored
when you switch off the ignition or when you
store the setting with the memory function
(
Ypage 82).
Mirrors
Rear-view mirror
XAdjust the rear-view mirror by hand so you
have a good overview of the traffic conditions
behind you.
Exterior mirrors
Adjusting the exterior mirrors
GWARNING
The exterior mirror on the front-passenger
side reduces the size of the image. Visible
objects are actually closer than they appear.
This means that you could misjudge the dis-
tance from road users traveling behind, e.g.
when changing lane. There is a risk of an acci-
dent.
For this reason, always make sure of the
actual distance from the road users traveling
behind by glancing over your shoulder.
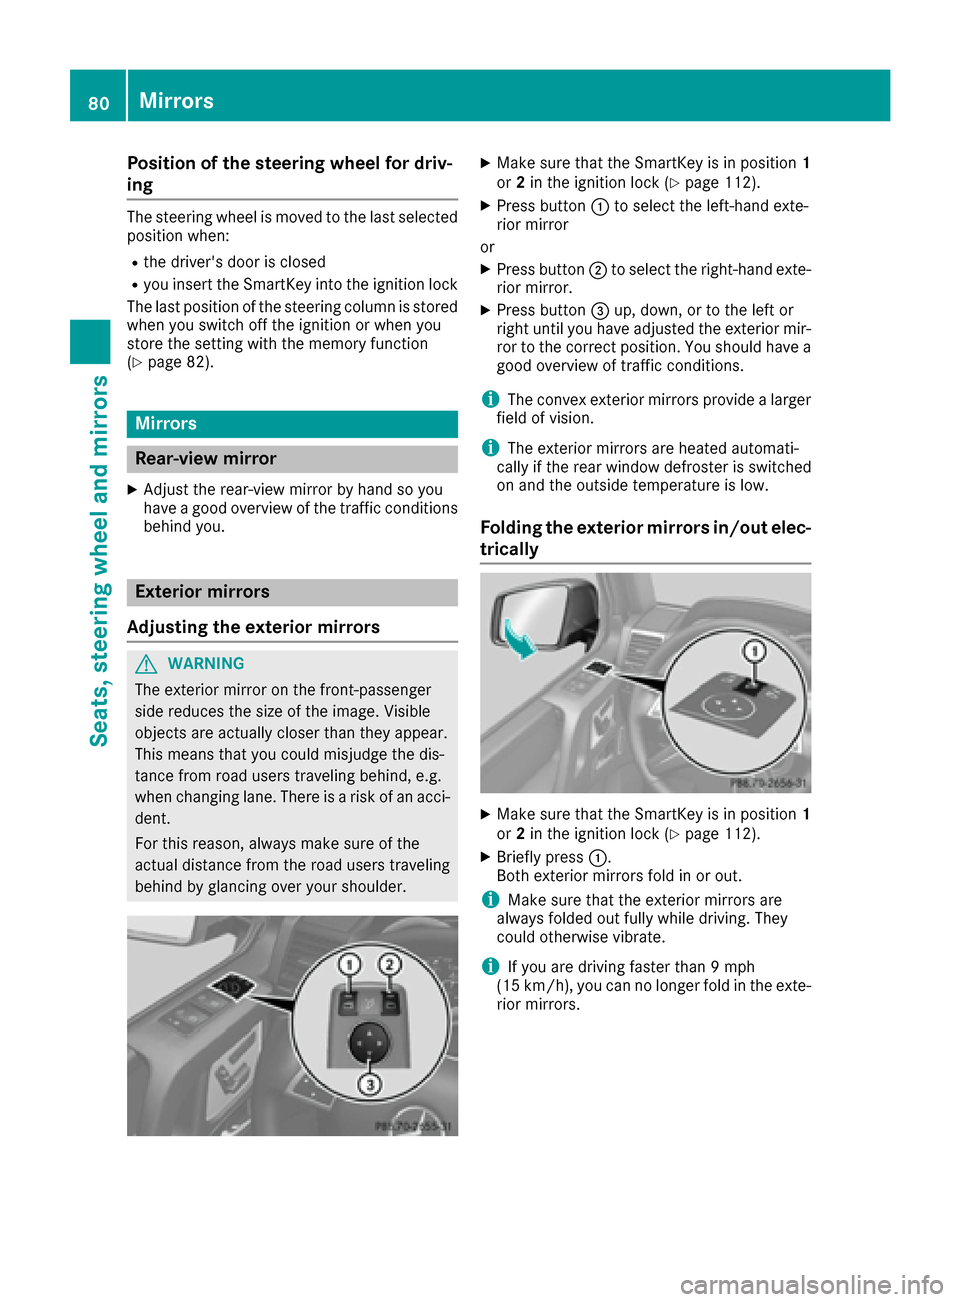
XMake sure that the SmartKey is in position 1
or 2in the ignition lock (Ypage 112).
XPress button :to select the left-hand exte-
rior mirror
or
XPress button ;to select the right-hand exte-
rior mirror.
XPress button =up, down, or to the left or
right until you have adjusted the exterior mir- ror to the correct position. You should have a
good overview of traffic conditions.
iThe convex exterior mirrors provide a larger
field of vision.
iThe exterior mirrors are heated automati-
cally if the rear window defroster is switched
on and the outside temperature is low.
Folding the exterior mirrors in/out elec-
trically
XMake sure that the SmartKey is in position 1
or 2in the ignition lock (Ypage 112).
XBriefly press :.
Both exterior mirrors fold in or out.
iMake sure that the exterior mirrors are
always folded out fully while driving. They
could otherwise vibrate.
iIf you are driving faster than 9 mph
(15 km/h), you can no longer fold in the exte-
rior mirrors.
80Mirrors
Seats, steering wheel and mirrors
Page 83 of 302

Setting the exterior mirrors
If the battery has been disconnected or com-
pletely discharged, the exterior mirrors must be
reset. The exterior mirrors will otherwise not
fold in when you select the "Fold in mirrors when
locking" function in the on-board computer
(
Ypage 181).
XMake sure that the SmartKey is in position 1
in the ignition lock (Ypage 112).
XBriefly press :.
Folding the exterior mirrors in/out
automatically
If the "Fold in mirrors when locking" function is
activated in the on-board computer
(
Ypage 181):
Rthe exterior mirrors fold in automatically as
soon as you lock the vehicle from the outside.
Rthe exterior mirrors fold out again automati-
cally as soon as you unlock the vehicle and
then open the driver's or front-passenger
door.
Exterior mirror pushed out of position
XPress button :repeatedly until you hear the
mirror engage in position.
The mirror housing is engaged again and you
can adjust the exterior mirrors as usual
(
Ypage 80).
Automatic anti-glare mirrors
The rear-view mirror and the exterior mirror on
the driver's side automatically go into anti-glare
mode if:
Rthe ignition is switched on and
Rincident light from headlamps strikes the sen-
sor in the rear-view mirror
iThe mirrors do not go into anti-glare mode if
reverse gear is engaged or if the interior light- ing is switched on.
Parking position for the exterior mir-
ror on the front-passenger side
Setting/storing the parking position
Using reverse gear
:Left-hand exterior mirror
;Right-hand exterior mirror
=Adjustment button
?Memory button
You can position the front-passenger side exte- rior mirror in such a way that you can see the
rear wheel on that side as soon as you engage
reverse gear. You can store this position.
XMake sure that the vehicle is stationary and
that the SmartKey is in position 2in the igni-
tion lock (
Ypage 112).
XPress button ;for the exterior mirror on the
front-passenger side.
XEngage reverse gear.
The exterior mirror on the front-passenger
side moves to the preset parking position.
XUse adjustment button =to adjust the exte-
rior mirror to a position that allows you to see
the rear wheel and the curb.
The parking position is stored.
Mirrors81
Seats, steering wheel and mirrors
Z
Page 91 of 302

Hazard warning lamps
XTo switch on the hazard warning lamps:
press button:.
All turn signals flash. If you now switch on a
turn signal using the combination switch, only
the turn signal lamp on the corresponding
side of the vehicle will flash.
XTo switch off the hazard warning lamps:
press button :.
The hazard warning lamps automatically switch
on if:
Ran air bag is deployed or
Rthe Emergency Tensioning Devices are trig-
gered, or
Rthe vehicle decelerates rapidly from a speed
of above 45 mph (70 km/h) and comes to a
standstill
The hazard warning lamps switch on automati-
cally if an air bag or the Emergency Tensioning
Devices are triggered and the SmartKey is in
position 1in the ignition lock.
The hazard warning lamps switch off automati-
cally if the vehicle reaches a speed of above
6 mph (10 km/h) again after a full brake appli-
cation.
iThe hazard warning lamps still operate if the
ignition is switched off.
Headlamps and indicator lamps fog-
ged up on the inside
The headlamps and the indicator lamps in the
exterior mirrors may fog up on the inside if there
is high atmospheric humidity.
XDrive with the headlamps switched on.
The level of moisture diminishes, depending
on the length of the journey and the weather
conditions (humidity and temperature).
If the level of moisture does not diminish:
XHave the headlamps checked at a qualified
specialist workshop.
Interior lighting
Overview of interior lighting
Front overhead control panel
:
p Switches the left-hand front reading
lamp on/off
;c Switches the front interior lighting on
=tSwitches the cargo compartment
lamp/rear compartment lighting on/off
?| Switches the front interior lighting/
automatic interior lighting control off
Ap Switches the right-hand reading lamp
on/off
BSwitches the automatic interior lighting con-
trol on
Interior lighting89
Lights and windshield wipers
Z