2016 MERCEDES-BENZ G-Class ignition
[x] Cancel search: ignitionPage 227 of 302
The mbrace system is available if:
Rit has been activated and is operational. Acti-vation requires an available mobile phone net-
work, a valid SIM card and a subscription to a
security service.
Rthe battery is sufficiently charged.
Rthe corresponding mobile phone network is
available for transmitting data to the Cus-
tomer Center.
iDetermining the location of the vehicle on a
map is only possible if there is sufficient GPS
reception and the vehicle position can be for-
warded to the Customer Center.
The mbrace system
To adjust the volume during an mbrace call, pro-
ceed as follows:
XPress the WorX button on the multi-
function steering wheel.
or
XUse the COMAND volume control.
The mbrace system provides three different
services:
RAutomatic and manual emergency call
RRoadside Assistance call
RMB Info call
USA only: you can find more information and a
description of all available features under "Own-
ers Online" at http://www.mbusa.com.
System self-test
GWARNING
A malfunction in the system has been detec-
ted if one of the following conditions occurs:
Rthe indicator lamp in the SOS button does
not light up during the system self-diagno-
sis.
Rthe indicator lamp in the ºRoadside
Assistance button does not light up during
the system self-diagnosis.
Rthe indicator lamp in the Einformation
button does not light up during the system
self-diagnosis.
Rthe indicator lamp in the SOS button, º
Roadside Assistance button or Einfor-
mation button continues to be lit red after
the system self-diagnosis.
RtheTeleAidinoperativeorTeleAid
not activatedmessage appears on the
multifunction display after the system self-
diagnosis.
If a malfunction is indicated as outlined above,
the system may not operate as expected. In
the event of an emergency, assistance must
be summoned by other means.
Have the system checked at the nearest
authorized Mercedes-Benz Center or contact
the following service hotlines:
RUSA: Response Center at
1-888-990-9007
RCanada: Customer Service at
1-888-923-8367
After you have switched on the ignition, the sys- tem carries out a self-diagnosis.
Emergency call
Important safety notes
GWARNING
If the indicator lamp in the SOS button is
flashing continuously and there was no voice
connection to the Response Center estab-
lished, then the mbrace system could not ini- tiate an emergency call (e.g. the relevant cel-
lular phone network is not available).
The message Call Failed
appears in the
multifunction display for approximately
10 seconds.
Should this occur, assistance must be sum-
moned by other means.
!You must have a license agreement to acti-
vate the mbrace service. Ensure that your
system is activated and ready for use, and
press the EMB Info call button to register.
If one of these steps is not carried out, it may
not be possible to activate the system.
Features225
Stowage and features
Z
Page 231 of 302
iVehicle remote opening is only possible if
the corresponding mobile phone network is
accessible.
The SOS button flashes and the Connecting
Callmessage appears in the multifunction
display to confirm that the command for vehi-
cle remote unlocking has been received.
If the lock cylinder on the rear door is pressed
for longer than 20 seconds before receiving
authorization for remote unlocking from the
Response center, you must wait 15 minutes
before you can press the lock cylinder on the
rear door again.
Vehicle remote closing
The remote closing feature can be used when
you have forgotten to lock the vehicle and you
are no longer nearby. The vehicle can then be
locked by the Mercedes-Benz Customer Assis-
tance Center.
The vehicle can be remotely locked within four
days of the ignition being turned off.
XContact the following service hotlines:
RUSA: Mercedes-Benz Customer Assistance
Center at 1-800-FOR-MERCedes
(1-800-367-6372) or 1-888-990-9007
RCanada: Customer Service at
1-888-923-8367
You will be asked for your PIN.
The next time you are inside the vehicle and you
switch on the ignition, the Tele Aid Doors
LockedRemotelymessage appears in the mul-
tifunction display.
USA only: alternatively, the vehicle can be
locked via:
Rthe Internet, under the "Owners Online" sec-
tion
Rthe telephone application (e.g. iPhone®,
Blackberry)
To do this, you will need your identification num-
ber and password.
iThe vehicle remote closing feature is avail-
able when the relevant mobile phone network is available and data connection is possible.
Stolen vehicle recovery service
If your vehicle has been stolen:
XContact the police.
The police will issue an incident report. This
report has a number.
XForward this number to the Response Center
together with your PIN.
The Response Center will then attempt to
covertly contact the mbrace system. The
Response Center contacts you and the local
law enforcement authority if the vehicle is
located. However, only the law enforcement
agency is informed of the location of the vehi-
cle.
iIf the anti-theft alarm system is active for
longer than 30 seconds, mbrace is automati-
cally connected with the Customer Assis-
tance center.
Vehicle Health Check
With the vehicle remote malfunction diagnosis
(Vehicle Health Check), the Customer Assis-
tance center can provide improved support for
problems with your vehicle. During an existing
call, vehicle data is transferred to the Customer
Assistance center. The customer service repre-
sentative can use the received data to decide
what kind of assistance is required. You are
then, for example, guided to the nearest
Mercedes-Benz Service center or a recovery
vehicle is called.
If vehicle data needs to be transferred during an
MB Info call or a Roadside Assistance call, this is
initiated by the Customer Assistance center.
You will see the Roadside Assistance Con‐
nectedmessage in the COMAND display. If the
vehicle remote malfunction diagnosis is able to
be started, the Request for vehicle diag‐
nosis received. Start vehicle diagno‐sis?message appears in the display.
XPressYesto confirm the message.
XIf theVehicleDiagnosis:Pleasestartignitionmessage appears: turn the Smart-
Key to position 2in the ignition lock.
XIf the Please follow the instructionsreceivedbyphoneandmoveyourvehi‐cle into a safe positionmessage
appears: follow the instructions of the cus-
tomer service representative.
The message in the display disappears.
Features229
Stowage and features
Z
Page 234 of 302
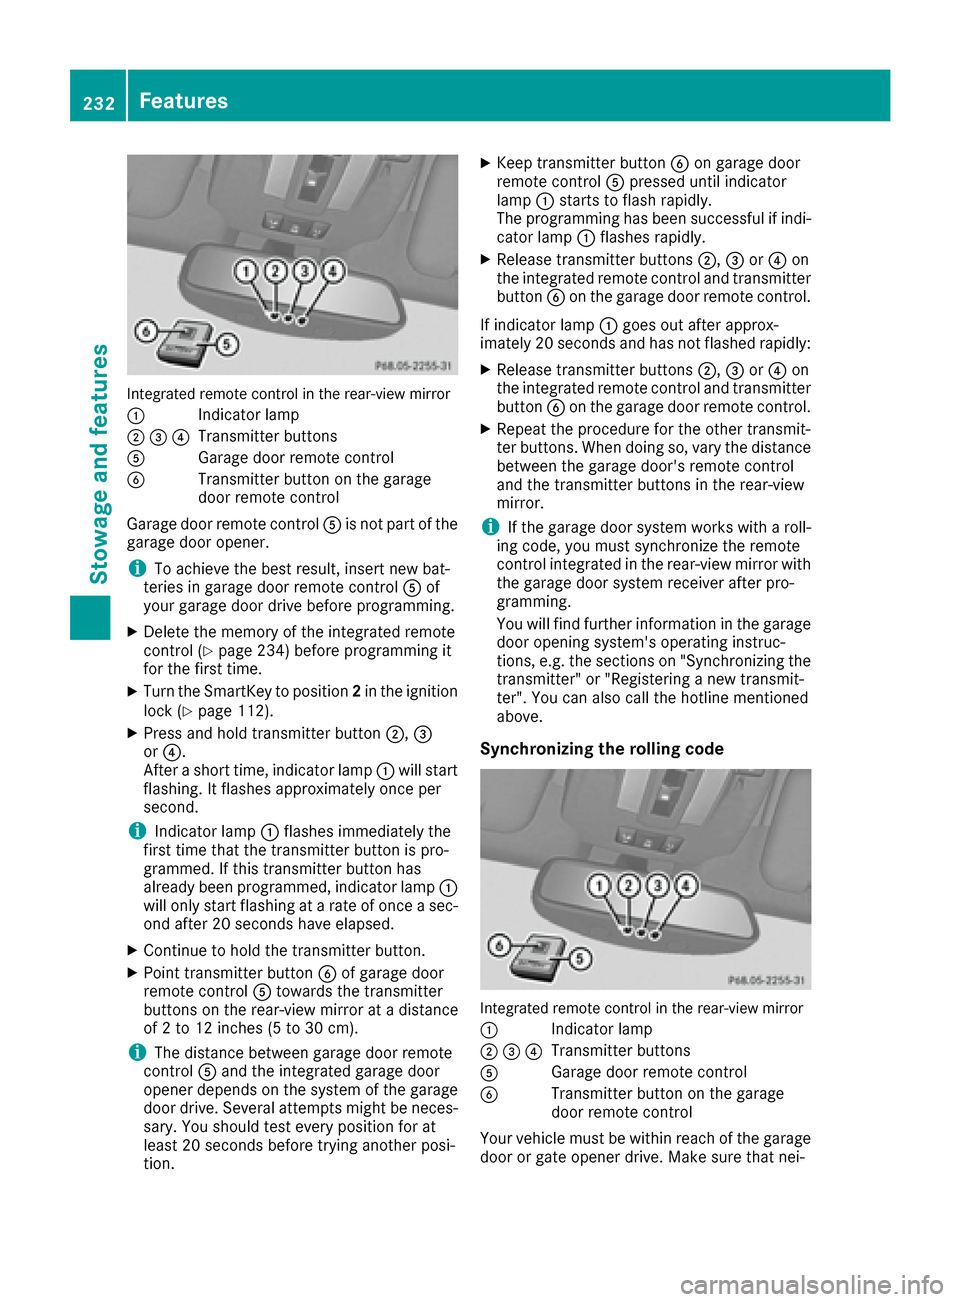
Integrated remote control in the rear-view mirror
:
Indicator lamp
;=?Transmitter buttons
AGarage door remote control
BTransmitter button on the garage
door remote control
Garage door remote control Ais not part of the
garage door opener.
iTo achieve the best result, insert new bat-
teries in garage door remote control Aof
your garage door drive before programming.
XDelete the memory of the integrated remote
control (Ypage 234) before programming it
for the first time.
XTurn the SmartKey to position 2in the ignition
lock (Ypage 112).
XPress and hold transmitter button ;,=
or ?.
After a short time, indicator lamp :will start
flashing. It flashes approximately once per
second.
iIndicator lamp :flashes immediately the
first time that the transmitter button is pro-
grammed. If this transmitter button has
already been programmed, indicator lamp :
will only start flashing at a rate of once a sec-
ond after 20 seconds have elapsed.
XContinue to hold the transmitter button.
XPoint transmitter button Bof garage door
remote control Atowards the transmitter
buttons on the rear-view mirror at a distance
of 2 to 12 inches (5 to 30 cm).
iThe distance between garage door remote
control Aand the integrated garage door
opener depends on the system of the garage
door drive. Several attempts might be neces-
sary. You should test every position for at
least 20 seconds before trying another posi-
tion.
XKeep transmitter button Bon garage door
remote control Apressed until indicator
lamp :starts to flash rapidly.
The programming has been successful if indi-
cator lamp :flashes rapidly.
XRelease transmitter buttons ;,=or? on
the integrated remote control and transmitter
button Bon the garage door remote control.
If indicator lamp :goes out after approx-
imately 20 seconds and has not flashed rapidly:
XRelease transmitter buttons ;,=or? on
the integrated remote control and transmitter button Bon the garage door remote control.
XRepeat the procedure for the other transmit-
ter buttons. When doing so, vary the distance
between the garage door's remote control
and the transmitter buttons in the rear-view
mirror.
iIf the garage door system works with a roll-
ing code, you must synchronize the remote
control integrated in the rear-view mirror with the garage door system receiver after pro-
gramming.
You will find further information in the garage
door opening system's operating instruc-
tions, e.g. the sections on "Synchronizing the
transmitter" or "Registering a new transmit-
ter". You can also call the hotline mentioned
above.
Synchronizing the rolling code
Integrated remote control in the rear-view mirror
:
Indicator lamp
;=?Transmitter buttons
AGarage door remote control
BTransmitter button on the garage
door remote control
Your vehicle must be within reach of the garage door or gate opener drive. Make sure that nei-
232Features
Stowage and features
Page 235 of 302
ther your vehicle nor any persons/objects are
present within the sweep of the door or gate.
Observe the safety notes when performing the
rolling code synchronization (
Ypage 231).
XTurn the SmartKey to position2in the ignition
lock (Ypage 112).
XPress the programming button of the door or
gate drive (see the door or gate drive operat-
ing instructions, e.g. under "Programming
additional remote controls").
iYou now have 30 second sto initiate the next
step.
XPress previously programmed button ;,=
or ? on the integrated garage door opener
until the door closes.
The rolling code synchronization is then com-
plete.
Notes on programming the remote con-
trol
Canadian radio frequency laws require a "break"
(or interruption) of the transmission signals
after broadcasting for a few seconds. Therefore,
these signals may not last long enough for the
integrated remote control to recognize the sig-
nal during programming. Comparable with
Canadian law, American garage door openers
also have a built-in "interruption".
If you live in Canada or have difficulties pro-
gramming the garage door opener (regardless of
where you live) when using the programming
steps, proceed as follows:
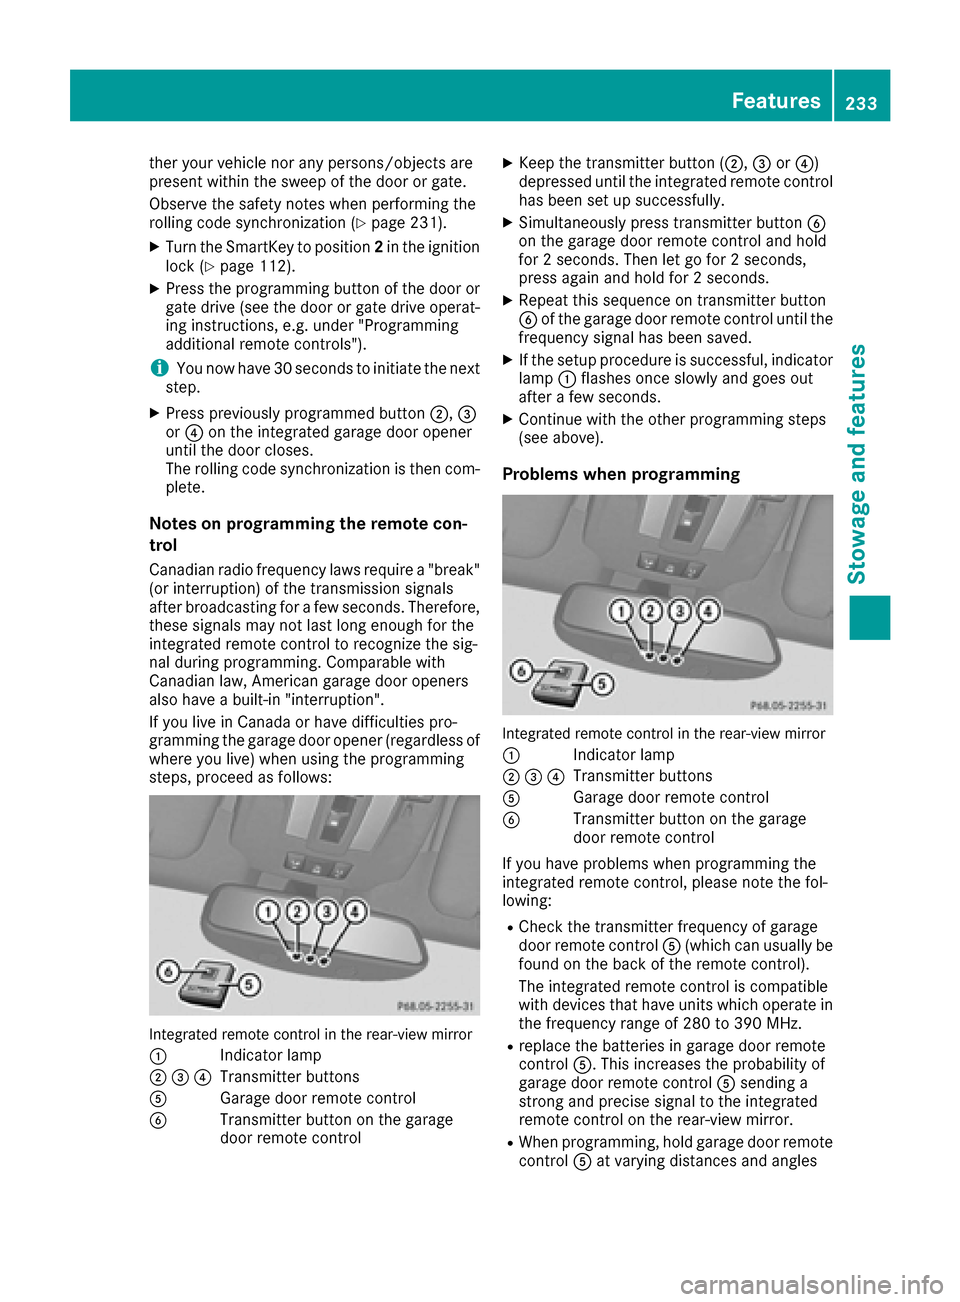
Integrated remote control in the rear-view mirror
:
Indicator lamp
;=?Transmitter buttons
AGarage door remote control
BTransmitter button on the garage
door remote control
XKeep the transmitter button ( ;,=or?)
depressed until the integrated remote control
has been set up successfully.
XSimultaneously press transmitter button B
on the garage door remote control and hold
for 2 seconds. Then let go for 2 seconds,
press again and hold for 2 seconds.
XRepeat this sequence on transmitter button
B of the garage door remote control until the
frequency signal has been saved.
XIf the setup procedure is successful, indicator
lamp :flashes once slowly and goes out
after a few seconds.
XContinue with the other programming steps
(see above).
Problems when programming
Integrated remote control in the rear-view mirror
:
Indicator lamp
;=?Transmitter buttons
AGarage door remote control
BTransmitter button on the garage
door remote control
If you have problems when programming the
integrated remote control, please note the fol-
lowing:
RCheck the transmitter frequency of garage
door remote control A(which can usually be
found on the back of the remote control).
The integrated remote control is compatible
with devices that have units which operate in the frequency range of 280 to 390 MHz.
Rreplace the batteries in garage door remote
control A. This increases the probability of
garage door remote control Asending a
strong and precise signal to the integrated
remote control on the rear-view mirror.
RWhen programming, hold garage door remote
control Aat varying distances and angles
Features233
Stowage and features
Z
Page 236 of 302
from the transmitter button which you are
programming. Try various angles at a distance
between2and 12 inches (5 to 30 cm) or at the
same angle but at varying distances.
RIf there is another garage door remote control
for the same device, perform the program-
ming steps again using that garage door
opener. Before performing these steps, make
sure that new batteries have been installed in
the garage door remote control.
RAlign the antenna cable of the garage door
opener unit. This can improve signal trans-
mission.
Opening/closing the garage door
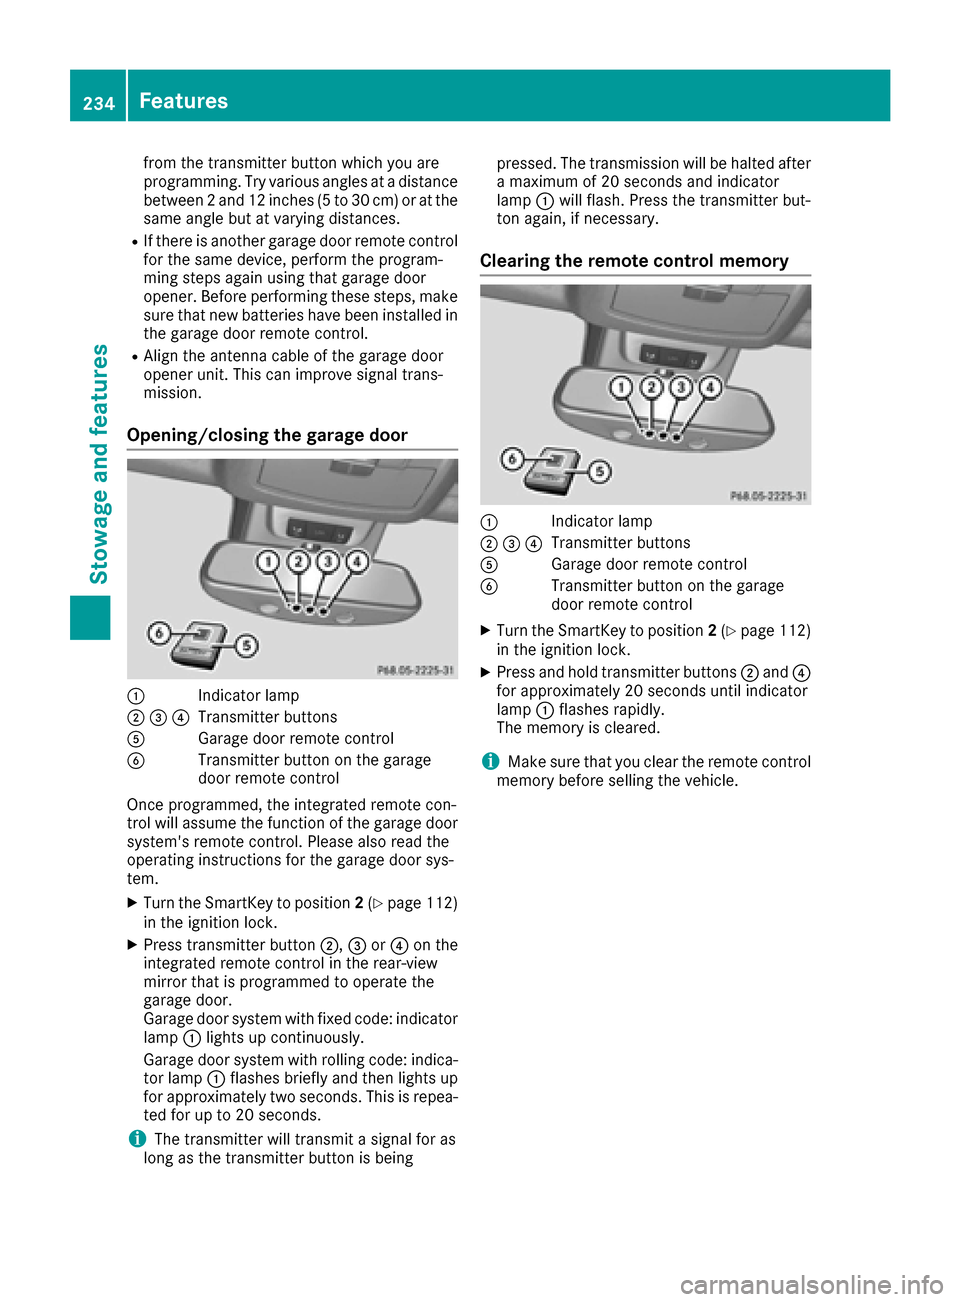
:Indicator lamp
;=?Transmitter buttons
AGarage door remote control
BTransmitter button on the garage
door remote control
Once programmed, the integrated remote con-
trol will assume the function of the garage door
system's remote control. Please also read the
operating instructions for the garage door sys-
tem.
XTurn the SmartKey to position 2(Ypage 112)
in the ignition lock.
XPress transmitter button ;,=or? on the
integrated remote control in the rear-view
mirror that is programmed to operate the
garage door.
Garage door system with fixed code: indicator
lamp :lights up continuously.
Garage door system with rolling code: indica-
tor lamp :flashes briefly and then lights up
for approximately two seconds. This is repea-
ted for up to 20 seconds.
iThe transmitter will transmit a signal for as
long as the transmitter button is being pressed. The transmission will be halted after
a maximum of 20 seconds and indicator
lamp
:will flash. Press the transmitter but-
ton again, if necessary.
Clearing the remote control memory
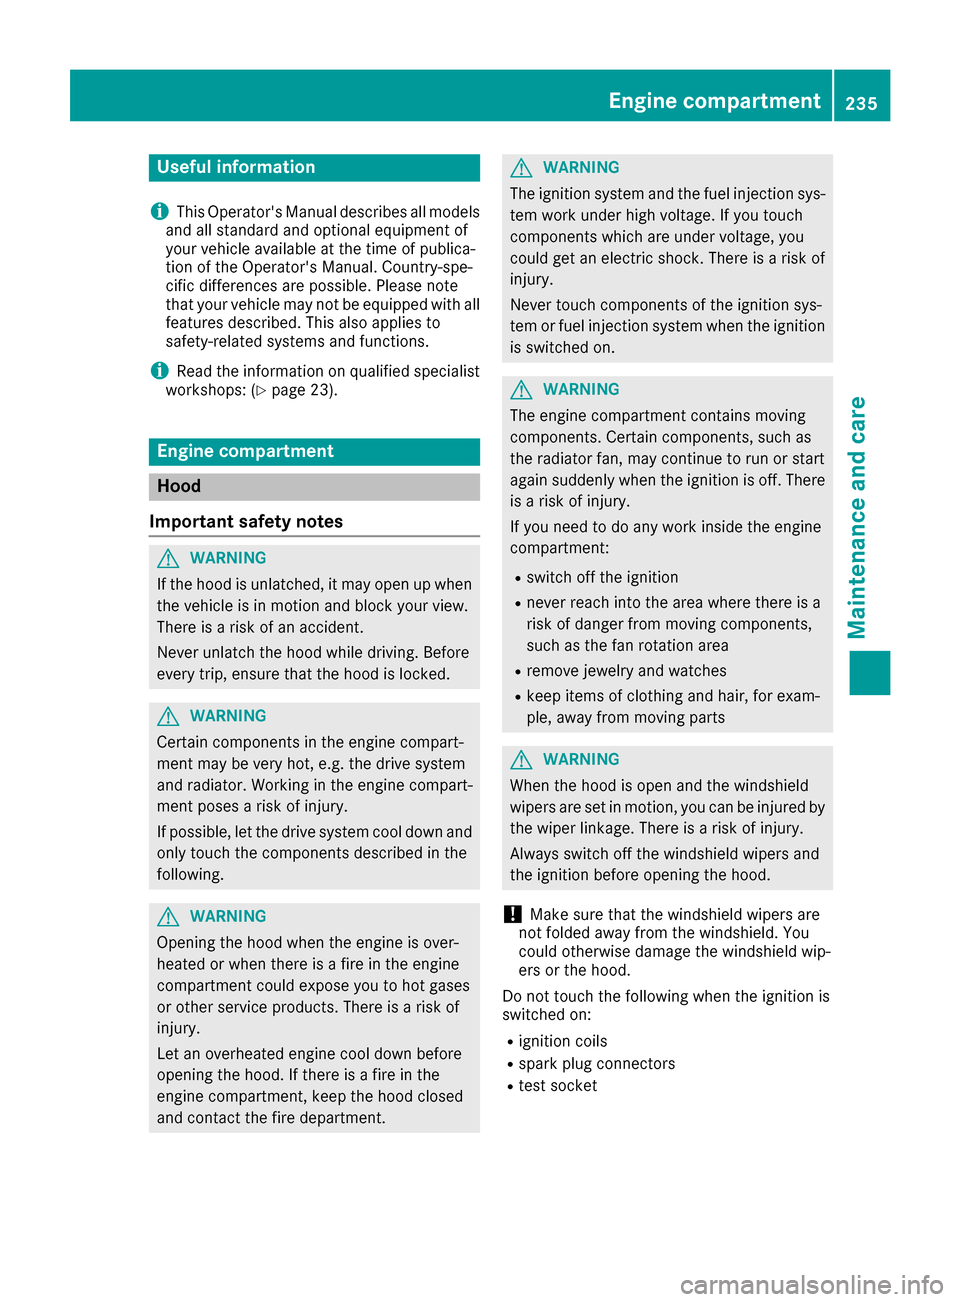
:Indicator lamp
;=?Transmitter buttons
AGarage door remote control
BTransmitter button on the garage
door remote control
XTurn the SmartKey to position 2(Ypage 112)
in the ignition lock.
XPress and hold transmitter buttons ;and ?
for approximately 20 seconds until indicator
lamp :flashes rapidly.
The memory is cleared.
iMake sure that you clear the remote control
memory before selling the vehicle.
234Features
Stowage and features
Page 237 of 302
Useful information
i
This Operator's Manual describes all models
and all standard and optional equipment of
your vehicle available at the time of publica-
tion of the Operator's Manual. Country-spe-
cific differences are possible. Please note
that your vehicle may not be equipped with all
features described. This also applies to
safety-related systems and functions.
iRead the information on qualified specialist
workshops: (Ypage 23).
Engine compartment
Hood
Important safety notes
GWARNING
If the hood is unlatched, it may open up when the vehicle is in motion and block your view.
There is a risk of an accident.
Never unlatch the hood while driving. Before
every trip, ensure that the hood is locked.
GWARNING
Certain components in the engine compart-
ment may be very hot, e.g. the drive system
and radiator. Working in the engine compart-
ment poses a risk of injury.
If possible, let the drive system cool down and only touch the components described in the
following.
GWARNING
Opening the hood when the engine is over-
heated or when there is a fire in the engine
compartment could expose you to hot gases
or other service products. There is a risk of
injury.
Let an overheated engine cool down before
opening the hood. If there is a fire in the
engine compartment, keep the hood closed
and contact the fire department.
GWARNING
The ignition system and the fuel injection sys-
tem work under high voltage. If you touch
components which are under voltage, you
could get an electric shock. There is a risk of
injury.
Never touch components of the ignition sys-
tem or fuel injection system when the ignition
is switched on.
GWARNING
The engine compartment contains moving
components. Certain components, such as
the radiator fan, may continue to run or start
again suddenly when the ignition is off. There is a risk of injury.
If you need to do any work inside the engine
compartment:
Rswitch off the ignition
Rnever reach into the area where there is a
risk of danger from moving components,
such as the fan rotation area
Rremove jewelry and watches
Rkeep items of clothing and hair, for exam-
ple, away from moving parts
GWARNING
When the hood is open and the windshield
wipers are set in motion, you can be injured by
the wiper linkage. There is a risk of injury.
Always switch off the windshield wipers and
the ignition before opening the hood.
!Make sure that the windshield wipers are
not folded away from the windshield. You
could otherwise damage the windshield wip-
ers or the hood.
Do not touch the following when the ignition is
switched on:
Rignition coils
Rspark plug connectors
Rtest socket
Engine compartment235
Maintenance and care
Z
Page 239 of 302

When checking the oil level:
Rpark the vehicle on a level surface.
Rthe engine should be switched off for approx-
imately five minutes if the engine is at normal
operating temperature.
Rthe engine should be switched off for at least
30 minutes if the engine is not at operating
temperature, e.g. if you only start the engine
briefly.
XPull oil dipstick :out of the dipstick guide
tube.
XWipe off oil dipstick :.
XSlowly slide oil dipstick :into the guide tube
to the stop, and take it out again.
If the level is between MIN mark =and MAX
mark ;, the oil level is correct.
XAdd oil if necessary.
On all other models, the on-board computer
must be used to check the engine oil level.
Checking the oil level using the on-
board computer
!Do not add too much oil. adding too much
engine oil can result in damage to the engine
or to the catalytic converter. Have excess
engine oil siphoned off.
G 550: the oil level can only be checked using
the on-board computer.
When checking the oil level:
Rpark the vehicle on a level surface.
Rthe engine should be switched off for approx-
imately five minutes if the engine is at normal
operating temperature.
XMake sure that the SmartKey is in position 2
in the ignition lock.
XPress the 9or: button on the steering
wheel to select the following message:
The measurement takes a few seconds. You will
see one of the following messages in the multi-
function display:
REngine Oil Level OK
RAdd1.0qt(Canada: 1.0liter)toreachmaximum oil level
RAdd 1.5 qts(Canada: 1.5 liters)toreach maximum oil level
RAdd 2.0 qts.(Canada: 2.0 liters)toreach maximum oil level
XAdd oil if necessary.
If the engine is at normal operating temperature and the Engine oil Reduce oil level
dis-
play appears, too much oil has been added.
XHave excess oil siphoned off.
If the Switch ignition on to check
engine oil levelmessage appears:
XTurn the SmartKey to position 2in the ignition
lock (Ypage 112).
If the Observe waiting time
message
appears:
XIf the engine is at normal operating tem-
perature: repeat the measurement after
approximately five minutes.
XIf the engine is not at normal operating
temperature: e.g. if the engine was only star-
ted briefly, repeat the measurement after
approximately 30 minutes.
If the Engine oil level Not when engine
onmessage appears:
XSwitch off the engine.
XIf the engine is at normal operating tem-
perature: wait about five minutes before car-
rying out the measurement.
XIf the engine is not at normal operating
temperature: e.g. if the engine was only star-
ted briefly, wait approximately 30 minutes
before carrying out the measurement.
iIf you wish to cancel the measurement,
press the 9or: button on the multi-
function steering wheel.
Adding engine oil
GWARNING
Certain components in the engine compart-
ment, such as the engine, radiator and parts
of the exhaust system, can become very hot.
Engine compartment237
Maintenance and care
Z
Page 241 of 302

Let the engine cool down before you open the
cap. Wear gloves and eye protection. Slowly
open the cap to relieve pressure.
XPark the vehicle on a level surface.
Only check the coolant level when the vehicleis on a level surface and the engine has cooled
down.
XTurn the SmartKey to position 2(Ypage 112)
in the ignition lock.
XCheck the coolant temperature display in the
instrument cluster.
The coolant temperature must be below
158 ‡ (70 †).
XSlowly turn cap :half a turn counter-clock-
wise and allow excess pressure to escape.
XTurn cap :further counter-clockwise and
remove it.
If the coolant is at the level of marker bar =
in the filler neck when cold, there is enough
coolant in coolant expansion tank ;.
If the coolant level is approximately 0.6 in
(1.5 cm) above marker bar =in the filler neck
when warm, there is enough coolant in cool-
ant expansion tank ;.
XIf necessary, add coolant that has been tested
and approved by Mercedes-Benz.
XReplace cap:and turn it clockwise as far as
it will go.
For further information on coolant, see
(
Ypage 294).
Adding washer fluid to the windshield
washer system/headlamp cleaning
system
GWARNING
Certain components in the engine compart-
ment, such as the engine, radiator and parts
of the exhaust system, can become very hot.
Working in the engine compartment poses a
risk of injury.
Where possible, let the engine cool down and touch only the components described in the
following.
GWARNING
Windshield washer concentrate could ignite if it comes into contact with hot engine compo-
nents or the exhaust system. There is a risk of
fire and injury.
Make sure that no windshield washer con-
centrate is spilled next to the filler neck.
Example: washer fluid reservoir
XTo open: pull cap:upwards by the tab.
XAdd the premixed washer fluid.
XTo close: press cap :onto the filler neck
until it engages.
On vehicles with the headlamp cleaning system,
the recommended minimum washer fluid level is
0.92 US gal (3.5 liters). On vehicles without the
headlamp cleaning system, the recommended
minimum washer fluid level is 0.26 US gal
(1 liter). If the washer fluid level drops below the
recommended minimum fluid level of
0.26 US gal (1 liter), a message appears in the
multifunction display prompting you to add
washer fluid (
Ypage 202).
Engine compartment239
Maintenance and care
Z