2016 MERCEDES-BENZ G-Class ignition
[x] Cancel search: ignitionPage 91 of 302

Hazard warning lamps
XTo switch on the hazard warning lamps:
press button:.
All turn signals flash. If you now switch on a
turn signal using the combination switch, only
the turn signal lamp on the corresponding
side of the vehicle will flash.
XTo switch off the hazard warning lamps:
press button :.
The hazard warning lamps automatically switch
on if:
Ran air bag is deployed or
Rthe Emergency Tensioning Devices are trig-
gered, or
Rthe vehicle decelerates rapidly from a speed
of above 45 mph (70 km/h) and comes to a
standstill
The hazard warning lamps switch on automati-
cally if an air bag or the Emergency Tensioning
Devices are triggered and the SmartKey is in
position 1in the ignition lock.
The hazard warning lamps switch off automati-
cally if the vehicle reaches a speed of above
6 mph (10 km/h) again after a full brake appli-
cation.
iThe hazard warning lamps still operate if the
ignition is switched off.
Headlamps and indicator lamps fog-
ged up on the inside
The headlamps and the indicator lamps in the
exterior mirrors may fog up on the inside if there
is high atmospheric humidity.
XDrive with the headlamps switched on.
The level of moisture diminishes, depending
on the length of the journey and the weather
conditions (humidity and temperature).
If the level of moisture does not diminish:
XHave the headlamps checked at a qualified
specialist workshop.
Interior lighting
Overview of interior lighting
Front overhead control panel
:
p Switches the left-hand front reading
lamp on/off
;c Switches the front interior lighting on
=tSwitches the cargo compartment
lamp/rear compartment lighting on/off
?| Switches the front interior lighting/
automatic interior lighting control off
Ap Switches the right-hand reading lamp
on/off
BSwitches the automatic interior lighting con-
trol on
Interior lighting89
Lights and windshield wipers
Z
Page 99 of 302

If the wiper blades are worn, the windshield will
no longer be wiped properly. This could prevent
you from observing the traffic conditions,
thereby causing an accident.
Combination switch
1
$Windshield wipers off
2ÄIntermittent wipe, low (rain sensor set
to low sensitivity)
3Å Intermittent wipe, high (rain sensor
set to high sensitivity)
4° Continuous wipe, slow
5¯Continuous wipe, fast
BíSingle wipe
CîTo wipe with washer fluid
XSwitch on the ignition.
XTurn the combination switch to the corre-
sponding position.
Intermittent wiping is interrupted if you stop the
vehicle and open a front door. This protects
people getting into and out of the vehicle from
being sprayed with water.
Intermittent wiping continues when all doors are
closed and:
Ryou shift the automatic transmission to drive
position Dor reverse gear R
or
Ryou change the wipe setting on the combina-
tion switch.
In the ÄorÅ position, the appropriate
wiping frequency is set automatically according
to the intensity of the rain. In the Åposition,
the rain sensor is more sensitive than in
the Ä position, causing the windshield wip-
ers to wipe more frequently.
Switching the rear window wiper on/
off
Combination switch
:
è Switch
2bWipes with washer fluid
3ISwitches on intermittent wiping
40 Switches off intermittent wiping
5b Wipes with washer fluid
XTurn the SmartKey to position 1or 2in the
ignition lock.
XTurn switch :on the combination switch to
the corresponding position.
When the rear window wiper is switched on,
the icon appears in the instrument cluster.
iThe rear window wiper comes on automati-
cally if you shift the selector lever to Rwhile
the windshield wiper are on.
Replacing the wiper blades
Important safety notes
GWARNING
If the windshield wipers begin to move while
you are changing the wiper blades, you could be trapped by the wiper arm. There is a risk of
injury.
Always switch off the windshield wipers and
ignition before changing the wiper blades.
!To avoid damaging the wiper blades, make
sure that you touch only the wiper arm of the
wiper.
!Never open the hood if a windshield wiper
arm has been folded away from the wind-
shield.
Windshield wipers97
Lights and windshield wipers
Z
Page 100 of 302
Never fold a windshield wiper arm without a
wiper blade back onto the windshield/rear
window.
Hold the windshield wiper arm firmly when
you change the wiper blade. If you release the
windshield wiper arm without a wiper blade
and it falls onto the windshield, the windshield
may be damaged by the force of the impact.
Mercedes-Benz recommends that you have
the wiper blades changed at a qualified spe-
cialist workshop.
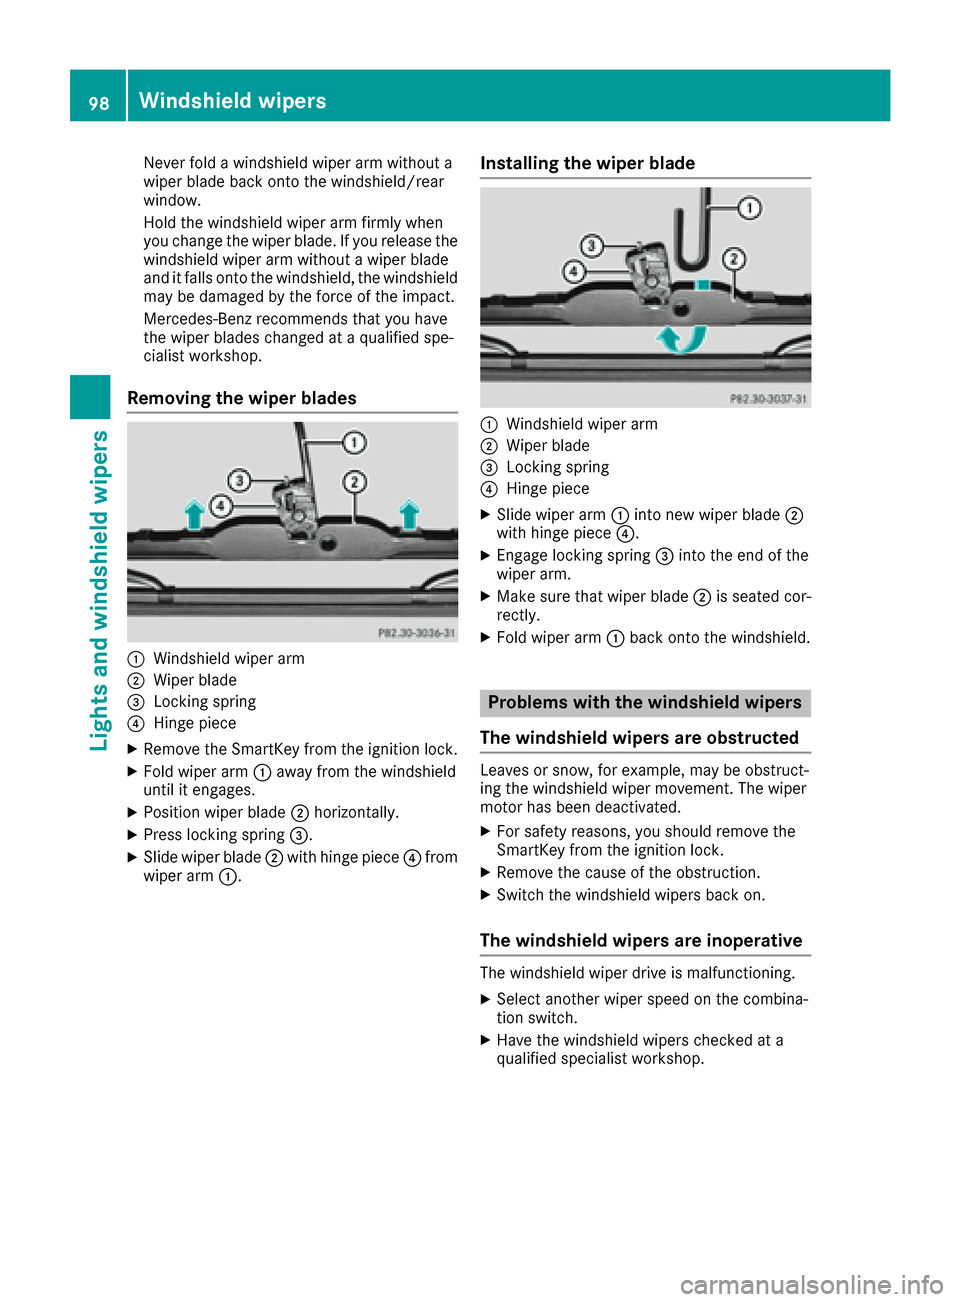
Removing the wiper blades
:Windshield wiper arm
;Wiper blade
=Locking spring
?Hinge piece
XRemove the SmartKey from the ignition lock.
XFold wiper arm:away from the windshield
until it engages.
XPosition wiper blade ;horizontally.
XPress locking spring =.
XSlide wiper blade;with hinge piece ?from
wiper arm :.
Installing the wiper blade
:Windshield wiper arm
;Wiper blade
=Locking spring
?Hinge piece
XSlide wiper arm :into new wiper blade ;
with hinge piece ?.
XEngage locking spring =into the end of the
wiper arm.
XMake sure that wiper blade ;is seated cor-
rectly.
XFold wiper arm :back onto the windshield.
Problems with the windshield wipers
The windshield wipers are obstructed
Leaves or snow, for example, may be obstruct-
ing the windshield wiper movement. The wiper
motor has been deactivated.
XFor safety reasons, you should remove the
SmartKey from the ignition lock.
XRemove the cause of the obstruction.
XSwitch the windshield wipers back on.
The windshield wipers are inoperative
The windshield wiper drive is malfunctioning.
XSelect another wiper speed on the combina-
tion switch.
XHave the windshield wipers checked at a
qualified specialist workshop.
98Windshield wipers
Lights and windshield wipers
Page 101 of 302
Useful information
i
This Operator's Manual describes all models
and all standard and optional equipment of
your vehicle available at the time of publica-
tion of the Operator's Manual. Country-spe-
cific differences are possible. Please note
that your vehicle may not be equipped with all
features described. This also applies to
safety-related systems and functions.
iRead the information on qualified specialist
workshops: (Ypage 23).
Overview of climate control systems
Important safety notes
Observe the settings recommended on the fol-
lowing pages. The windows could otherwise fog
up. This could prevent you from observing the
traffic conditions, thereby causing an accident.
Climate control regulates the temperature and
the humidity in the vehicle interior and filters
undesirable substances from the air.
Dual-zone automatic climate control is only
operational when the engine is running. Opti-
mum operation is only achieved if you drive with
the side windows and sliding sunroof closed.
The climatic comfort deteriorates whilst the slid-
ing sunroof is open. The automatic climate con-
trol cannot maintain the set temperature with
the sliding sunroof open. You have to adjust the
climate control manually.
iThe residual heat function can only be acti-
vated or deactivated with the ignition
switched off (
Ypage 108).
iVentilate the vehicle for a brief period during
warm weather, e.g. using the convenience
opening feature (
Ypage 68). This will speed
up the cooling process and the desired vehi-
cle interior temperature will be reached more
quickly.
iThe integrated filter can filter out most par-
ticles of dust, and completely filters out pol-
len. A clogged filter reduces the amount of air
supplied to the vehicle interior. For this rea-
son, you should always observe the interval
for replacing the filter, which is specified in
the Maintenance Booklet. As it depends on
environmental conditions, e.g. heavy air pol- lution, the interval may be shorter than stated
in the Maintenance Booklet.
Overview of climate control systems99
Climate control
Page 104 of 302
Operating the climate control sys-
tems
Switching climate control on/off
Points to observe before use
GWARNING
When the climate control system is deactiva-
ted, the outside air supply and circulation are
also deactivated. Only choose this setting for
a short time. Otherwise the windows could fog
up, impairing visibility and endangering you
and others.
Switching climate control on/off
XTurn the SmartKey to position 2in the ignition
lock (Ypage 112).
XTo switch on: press theÃbutton.
The indicator lamp in the Ãbutton lights
up. Airflow and air distribution are set to auto-
matic mode.
or
XPress the ^button.
The indicator lamp in the ^button goes
out. The previously selected settings are
restored.
XTo switch off: press the^button.
The indicator lamp in the ^button lights
up.
102Operating the climate control systems
Climate control
Page 107 of 302
Setting climate control to automatic
GWARNING
If you switch off the cooling function, the vehi- cle will not be cooled when weather condi-
tions are warm. The windows can fog up more
quickly. Window fogging may impair visibility
and endanger you and others.
In automatic mode, the set temperature is main-
tained at a constant level. The system automat-
ically regulates the temperature of the dis-
pensed air, the airflow and the air distribution.
Automatic mode will achieve optimal operation
if cooling with air dehumidification is also acti-
vated. If desired, cooling with air dehumidifica-
tion can be deactivated.
XTurn the SmartKey to position 2(Ypage 112)
in the ignition lock.
XSet the desired temperature.
XTo switch on: press theÃbutton.
The indicator lamp in the Ãbutton lights
up. Automatic air distribution and airflow are
activated.
XTo deactivate: press the_button.
or
XPress the IorK button.
The indicator lamp in the Ãbutton goes
out.
Setting the temperature
You can set the temperature separately for the
driver's and front-passenger sides with con-
trols :orB (
Ypage 100).
XTurn the SmartKey to position 2in the ignition
lock (Ypage 112).
XSet control :orB (Ypage 100) to the
desired temperature.
Only change the temperature setting in small
increments. Start at 72 ‡ (22 †).
Setting the air distribution
XTurn the SmartKey to position 2(Ypage 112)
in the ignition lock.
XPress the _button repeatedly until the
desired symbol appears in the display. P
Directs the airflow through the center
vents
O Directs the airflow through the footwell
air vents
S Directs the airflow through the center
and footwell vents
¯ Directs air through the defroster vents
b Canada only: directs the airflow through
the defroster and center vents
a Directs air through the defroster and
footwell vents
_ Canada only: directs the airflow through
the defroster, center and side air vents
and the footwell
Setting the airflow
XTurn the SmartKey to position 2in the ignition
lock (Ypage 112).
XTo increase: press theKbutton.
XTo reduce: press theIbutton.
iThe airflow from the rear-compartment
vents and the center vents is the same.
Switching the ZONE function on/off
XTo switch on: press theábutton.
The indicator lamp in the ábutton lights
up.
iThe temperature setting for the driver's side
is not adopted for the front-passenger side
and the rear compartment. The temperature
for the front-passenger side and the rear com-
partment must be set separately.
XTo switch off: press buttoná.
The indicator lamp in the ábutton goes
out.
iThe temperature setting for the driver's side
is adopted for the front-passenger side and
the rear compartment.
Defrosting the windshield
You can use this function to defrost the wind-
shield or to defrost the inside of the windshield
and the side windows.
iYou should only select the defrosting func-
tion until the windshield is clear again.
Operating the climate control systems105
Climate control
Z
Page 108 of 302
XTurn the SmartKey to position2(Ypage 112)
in the ignition lock.
XTo activate: press the¬button.
The indicator lamp in the ¬button lights
up.
The climate control system switches to the
following functions:
Rcooling with air dehumidification (only with
engine running)
Rhigh airflow (depending on the outside tem-
perature)
Rhigh temperature (depending on the out-
side temperature)
Rair distribution to the windshield and front
side windows
Rair-recirculation mode off
XTo deactivate: press the¬button.
The indicator lamp in the ¬button goes
out. The previously selected settings are
restored. The cooling with air dehumidifica-
tion function remains on. Air-recirculation
mode remains deactivated.
or
XPress the Ãbutton.
The indicator lamp in the ¬button goes
out. Airflow and air distribution are set to
automatic mode.
or
XTurn controls :orB clockwise or counter-
clockwise (Ypage 100).
or
XPress the KorI button.
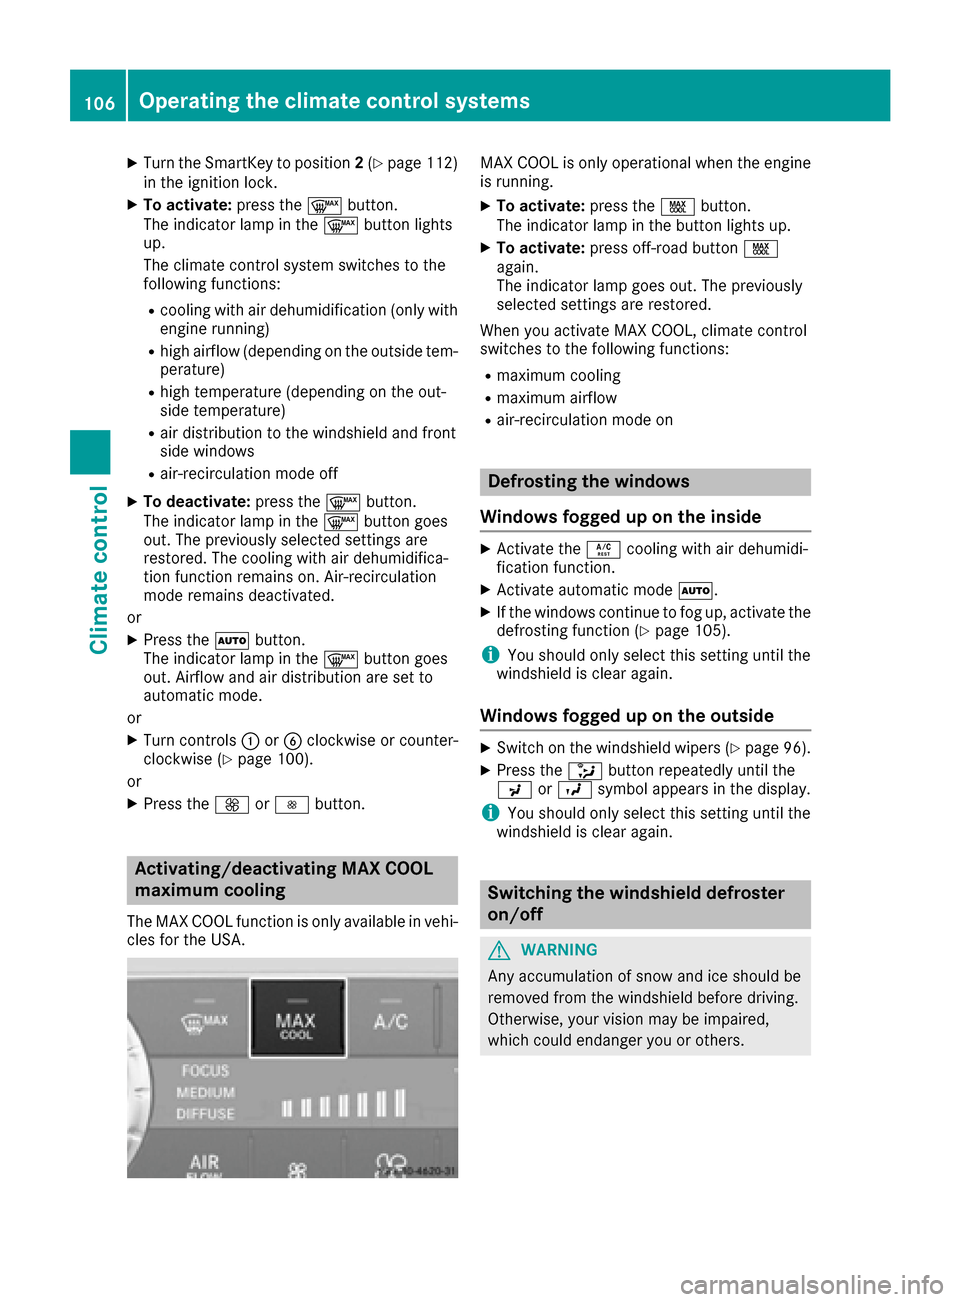
Activating/deactivating MAX COOL
maximum cooling
The MAX COOL function is only available in vehi-
cles for the USA.
MAX COOL is only operational when the engine
is running.
XTo activate: press theÙbutton.
The indicator lamp in the button lights up.
XTo activate: press off-road button Ù
again.
The indicator lamp goes out. The previously
selected settings are restored.
When you activate MAX COOL, climate control
switches to the following functions:
Rmaximum cooling
Rmaximum airflow
Rair-recirculation mode on
Defrosting the windows
Windows fogged up on the inside
XActivate the Ácooling with air dehumidi-
fication function.
XActivate automatic mode Ã.
XIf the windows continue to fog up, activate the
defrosting function (Ypage 105).
iYou should only select this setting until the
windshield is clear again.
Windows fogged up on the outside
XSwitch on the windshield wipers (Ypage 96).
XPress the _button repeatedly until the
P orO symbol appears in the display.
iYou should only select this setting until the
windshield is clear again.
Switching the windshield defroster
on/off
GWARNING
Any accumulation of snow and ice should be
removed from the windshield before driving.
Otherwise, your vision may be impaired,
which could endanger you or others.
106Operating the climate control systems
Climate control
Page 109 of 302
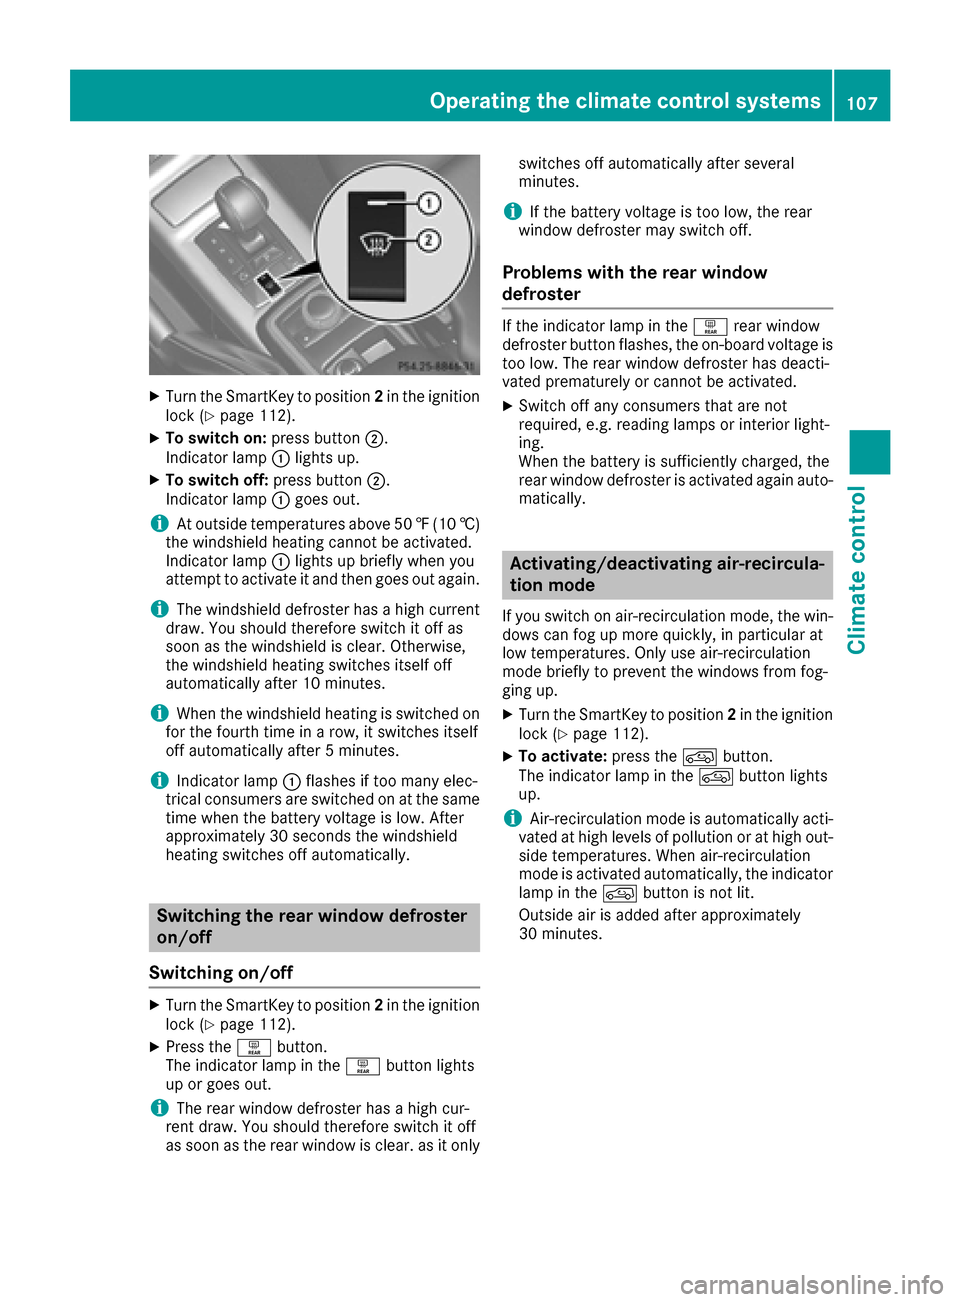
XTurn the SmartKey to position2in the ignition
lock (Ypage 112).
XTo switch on: press button;.
Indicator lamp :lights up.
XTo switch off: press button;.
Indicator lamp :goes out.
iAt outside temperatures above 50 ‡(10 †)
the windshield heating cannot be activated.
Indicator lamp :lights up briefly when you
attempt to activate it and then goes out again.
iThe windshield defroster has a high current
draw. You should therefore switch it off as
soon as the windshield is clear. Otherwise,
the windshield heating switches itself off
automatically after 10 minutes.
iWhen the windshield heating is switched on
for the fourth time in a row, it switches itself
off automatically after 5 minutes.
iIndicator lamp :flashes if too many elec-
trical consumers are switched on at the same
time when the battery voltage is low. After
approximately 30 seconds the windshield
heating switches off automatically.
Switching the rear window defroster
on/off
Switching on/off
XTurn the SmartKey to position 2in the ignition
lock (Ypage 112).
XPress the ªbutton.
The indicator lamp in the ªbutton lights
up or goes out.
iThe rear window defroster has a high cur-
rent draw. You should therefore switch it off
as soon as the rear window is clear. as it only switches off automatically after several
minutes.
iIf the battery voltage is too low, the rear
window defroster may switch off.
Problems with the rear window
defroster
If the indicator lamp in the ªrear window
defroster button flashes, the on-board voltage is
too low. The rear window defroster has deacti-
vated prematurely or cannot be activated.
XSwitch off any consumers that are not
required, e.g. reading lamps or interior light-
ing.
When the battery is sufficiently charged, the
rear window defroster is activated again auto- matically.
Activating/deactivating air-recircula-
tion mode
If you switch on air-recirculation mode, the win-
dows can fog up more quickly, in particular at
low temperatures. Only use air-recirculation
mode briefly to prevent the windows from fog-
ging up.
XTurn the SmartKey to position 2in the ignition
lock (Ypage 112).
XTo activate: press thedbutton.
The indicator lamp in the dbutton lights
up.
iAir-recirculation mode is automatically acti-
vated at high levels of pollution or at high out-
side temperatures. When air-recirculation
mode is activated automatically, the indicator
lamp in the dbutton is not lit.
Outside air is added after approximately
30 minutes.
Operating the climate control systems107
Climate control
Z