2016 MERCEDES-BENZ G-Class door lock
[x] Cancel search: door lockPage 70 of 302
Closing
XPush the rear door closed from outside the
vehicle.
XIf necessary, lock the vehicle with the&
button on the SmartKey.
Side windows
Important safety notes
GWARNING
While closing the side windows, body parts in
the closing area could become trapped. There is a risk of injury.
When closing make sure that no parts of the
body are in the closing area. If somebody
becomes trapped, release the switch or press
the switch to open the side window again.
GWARNING
While opening the side windows, body parts
could become trapped between the side win-
dow and the door frame as the side window
moves. There is a risk of injury.
Make sure that nobody touches the side win-
dow during the opening procedure. If some-
body becomes trapped, release the switch or
pull the switch to close the side window again.
Opening and closing the side win-
dows
The switches for all side windows are located on
the driver's door. There is also a switch on each
door for the corresponding side window.
The switches on the driver's door take prece-
dence.
The side windows cannot be operated from the
rear when the override feature for the side win-
dows is activated (
Ypage 54).
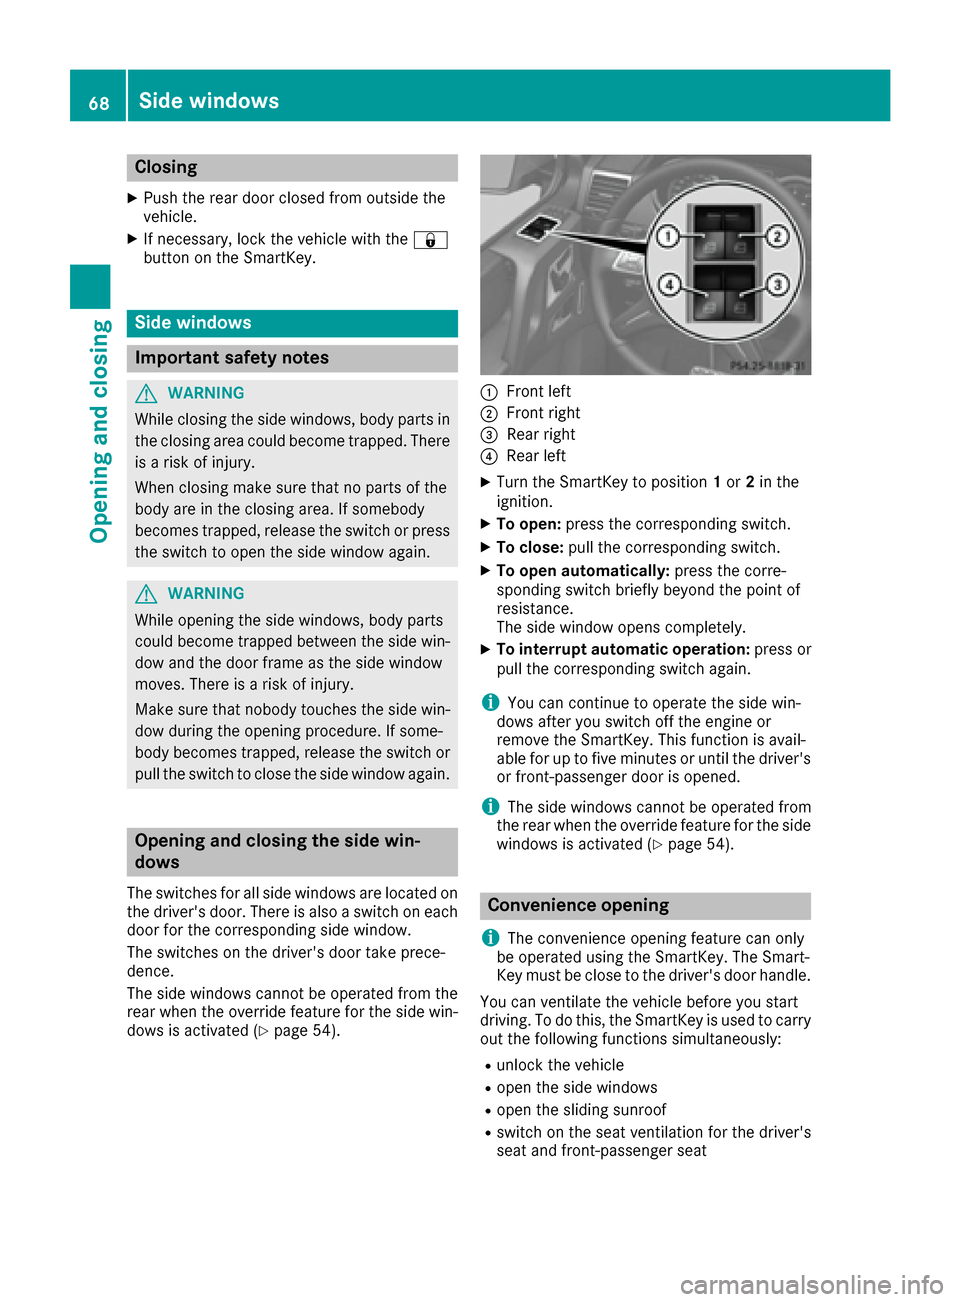
:Front left
;Front right
=Rear right
?Rear left
XTurn the SmartKey to position 1or 2in the
ignition.
XTo open: press the corresponding switch.
XTo close: pull the corresponding switch.
XTo open automatically: press the corre-
sponding switch briefly beyond the point of
resistance.
The side window opens completely.
XTo interrupt automatic operation: press or
pull the corresponding switch again.
iYou can continue to operate the side win-
dows after you switch off the engine or
remove the SmartKey. This function is avail-
able for up to five minutes or until the driver's
or front-passenger door is opened.
iThe side windows cannot be operated from
the rear when the override feature for the side windows is activated (
Ypage 54).
Convenience opening
i
The convenience opening feature can only
be operated using the SmartKey. The Smart-
Key must be close to the driver's door handle.
You can ventilate the vehicle before you start
driving. To do this, the SmartKey is used to carry
out the following functions simultaneously:
Runlock the vehicle
Ropen the side windows
Ropen the sliding sunroof
Rswitch on the seat ventilation for the driver's
seat and front-passenger seat
68Side windows
Opening and closing
Page 71 of 302
XPoint the tip of the SmartKey at the driver's
door handle.
XPress and hold the%button until the side
windows and the sliding sunroof are in the
desired position.
XTo interrupt convenience opening: release
the % button.
Convenience closing feature
Important safety notes
GWARNING
When the convenience closing feature is oper- ating, parts of the body could become trapped
in the closing area of the side window and the
sliding sunroof. There is a risk of injury.
Observe the complete closing procedure
when the convenience closing feature is oper-
ating. Make sure that no body parts are in
close proximity during the closing procedure.
Operation
iThe "convenience closing feature" can only
be operated using the key. The SmartKey
must be close to the driver's door handle.
When you lock the vehicle, you can simultane-
ously:
Rclose the side windows
Rclose the sliding sunroof
XPoint the tip of the SmartKey at the driver's
door handle.
XPress and hold the &button until the side
windows and the sliding sunroof are fully
closed.
XMake sure that all the side windows and the
sliding sunroof are closed.
XTo interrupt convenience closing: release
the & button.
Problems with the side windows
GWARNING
Closing the side windows with increased force
or without the anti-entrapment feature could
lead to serious or even fatal injury. Make sure
that nobody can become trapped when clos-
ing the side windows.
Problem: a side window cannot be closed
because objects are trapped between the
side window and the door frame.
XRemove the objects.
XClose the side window.
Problem: a side window cannot be closed
and you cannot see the cause.
If a side window is obstructed during closing and
reopens again slightly:
XImmediately after the window blocks, pull the
corresponding switch again until the side win-
dow has closed.
If a side window is obstructed again during clos-
ing and reopens again slightly:
XImmediately after the window blocks, pull the
corresponding switch again until the side win-
dow has closed.
iIf a side window no longer opens or closes
due to a malfunction, contact a qualified spe-
cialist workshop.
Sliding sunroof
Important safety notes
!
Only open the sliding sunroof if it is free of
snow and ice. Otherwise, malfunctions may
occur.
Do not allow anything to protrude from the
sliding sunroof. Otherwise, the seals could be
damaged.
!If the sliding sunroof still cannot be opened
or closed as a result of a malfunction, contact
a qualified specialist workshop.
!The weather can change abruptly. It could
start to rain or snow. Make sure that the slid- ing sunroof is closed when you leave the vehi-
cle. The vehicle electronics can be damaged if
water enters the vehicle interior.
iResonance noises can occur in addition to
the usual airflow noises when the sliding sun- roof is open. They are caused by minor pres-
sure fluctuations in the vehicle interior.
Change the position of the sliding sunroof or
open a side window slightly to reduce or elim-
inate these noises.
Sliding sunroof69
Opening and closing
Z
Page 72 of 302
Opening and closing the sliding sun-
roof
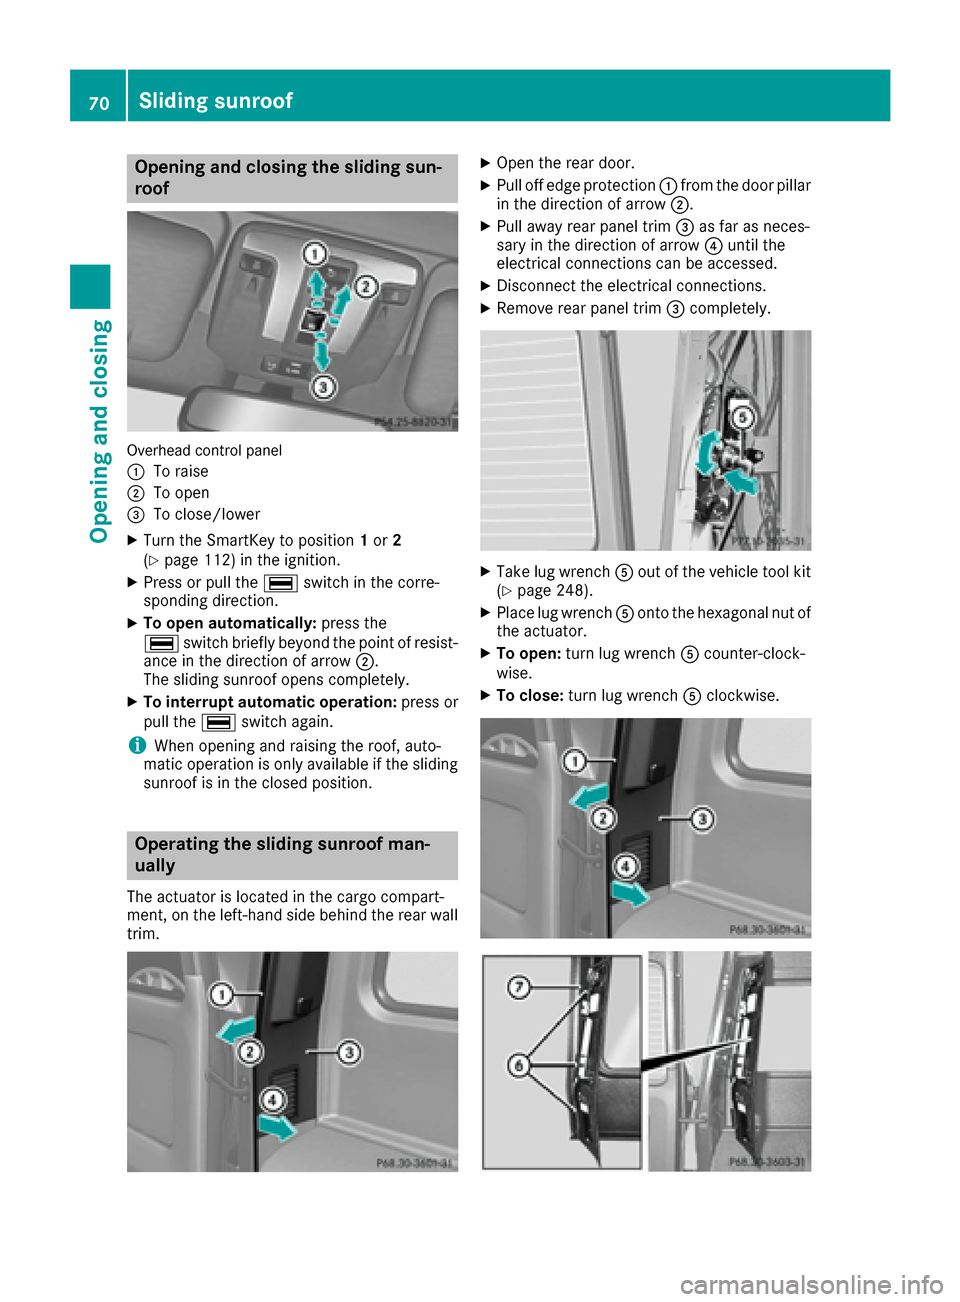
Overhead control panel
:
To raise
;To open
=To close/lower
XTurn the SmartKey to position1or 2
(Ypage 112) in the ignition.
XPress or pull the ¡switch in the corre-
sponding direction.
XTo open automatically: press the
¡ switch briefly beyond the point of resist-
ance in the direction of arrow ;.
The sliding sunroof opens completely.
XTo interrupt automatic operation: press or
pull the ¡switch again.
iWhen opening and raising the roof, auto-
matic operation is only available if the sliding
sunroof is in the closed position.
Operating the sliding sunroof man-
ually
The actuator is located in the cargo compart-
ment, on the left-hand side behind the rear wall trim.
XOpen the rear door.
XPull off edge protection :from the door pillar
in the direction of arrow ;.
XPull away rear panel trim =as far as neces-
sary in the direction of arrow ?until the
electrical connections can be accessed.
XDisconnect the electrical connections.
XRemove rear panel trim =completely.
XTake lug wrench Aout of the vehicle tool kit
(Ypage 248).
XPlace lug wrench Aonto the hexagonal nut of
the actuator.
XTo open: turn lug wrench Acounter-clock-
wise.
XTo close: turn lug wrench Aclockwise.
70Sliding sunroof
Opening and closing
Page 73 of 302
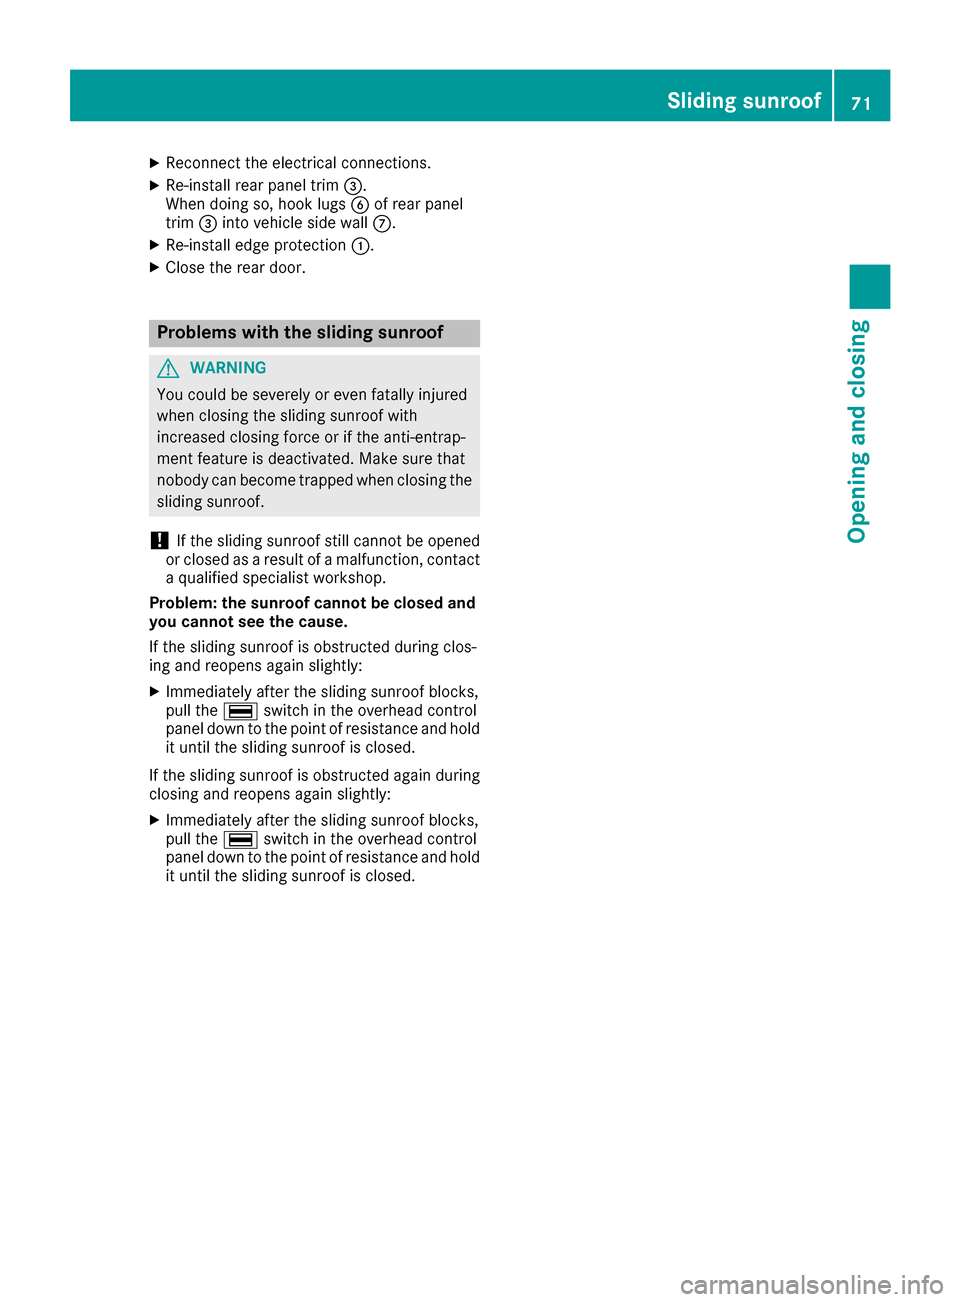
XReconnect theelectrical connections.
XRe-instal lrear panel trim =.
When doin gso, hoo klugs Bof rear panel
trim =intovehicl eside wall C.
XRe-installedge protection :.
XClose therear door .
Problems with the sliding sunroof
GWARNIN G
You could be severely or eve nfatally injured
when closin gth esliding sunroo fwit h
increased closin gforce or if th eanti-entrap-
men tfeature is deactivated. Mak esur ethat
nobody can become trapped when closin gth e
sliding sunroof.
!If th esliding sunroo fstill canno tbe opened
or closed as aresult of amalfunction ,contact
a qualified specialist workshop.
Problem :th esunroo fcannot be closed and
you cannot see th ecause.
If th esliding sunroo fis obstructed during clos-
ing and reopen sagain slightly:
XImmediately after th esliding sunroo fblocks ,
pull th e¡ switch in th eoverhead control
panel down to th epoin tof resistanc eand hold
it until th esliding sunroo fis closed.
If th esliding sunroo fis obstructed again during
closin gand reopen sagain slightly:
XImmediately after th esliding sunroo fblocks ,
pull th e¡ switch in th eoverhead control
panel down to th epoin tof resistanc eand hold
it until th esliding sunroo fis closed.
Sliding sunroof71
Opening and closing
Z
Page 80 of 302
Steering wheel
Important safety notes
GWARNING
You could lose control of your vehicle if you do the following while driving:
Radjust the driver's seat, head restraint,
steering wheel or mirrors
Rfasten the seat belt
There is a risk of an accident.
Adjust the driver's seat, head restraint, steer-
ing wheel and mirror and fasten your seat belt before starting the engine.
GWARNING
Children could injure themselves if they
adjust the steering wheel. There is a risk of
injury.
When leaving the vehicle, always take the
SmartKey with you and lock the vehicle. Never
leave children unsupervised in the vehicle.
The electrically adjustable steering wheel can
still be adjusted when there is no SmartKey in
the ignition lock.
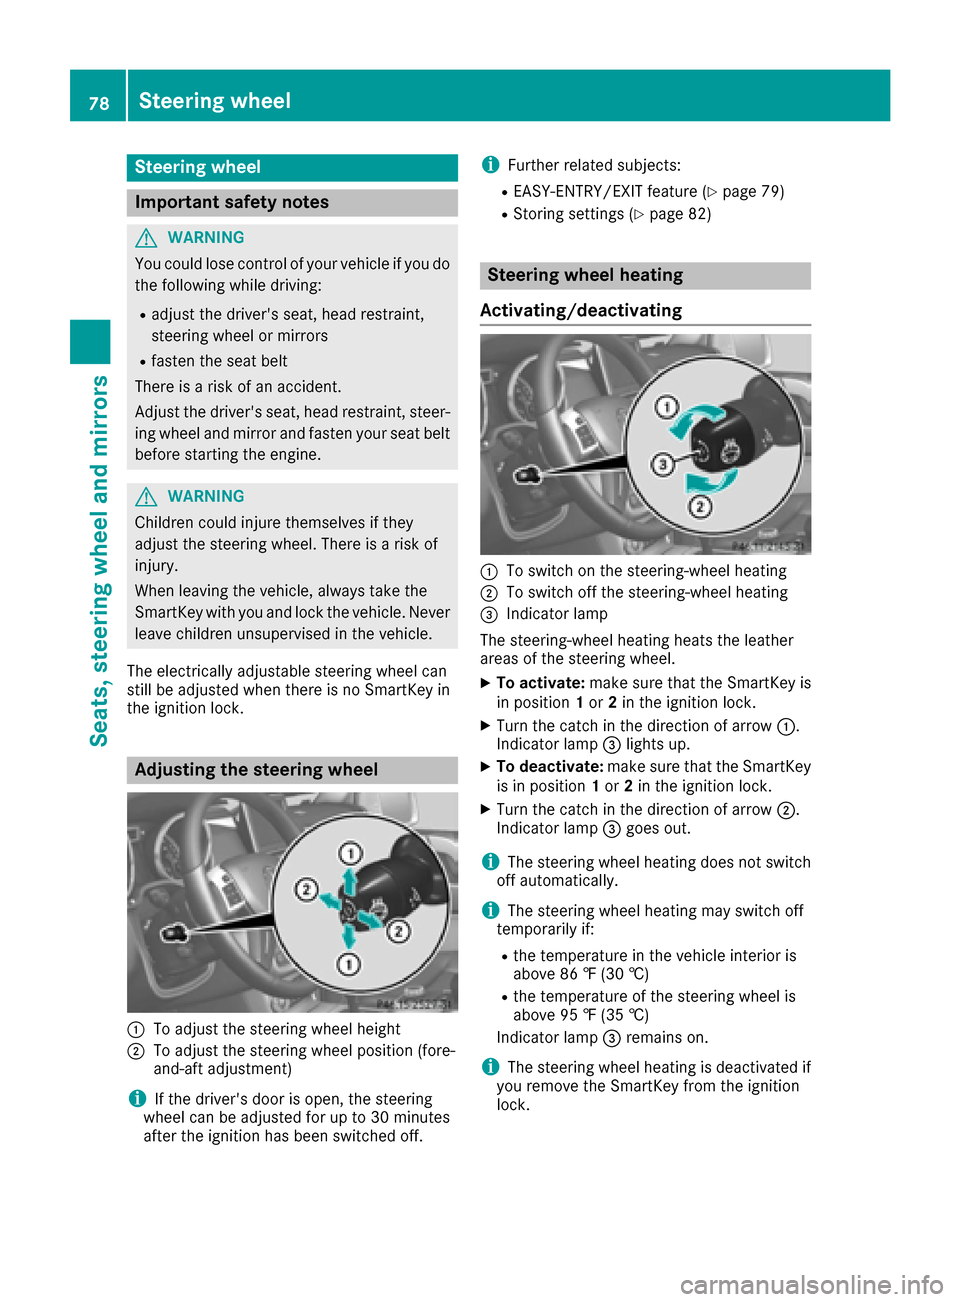
Adjusting the steering wheel
:To adjust the steering wheel height
;To adjust the steering wheel position (fore-
and-aft adjustment)
iIf the driver's door is open, the steering
wheel can be adjusted for up to 30 minutes
after the ignition has been switched off.
iFurther related subjects:
REASY-ENTRY/EXIT feature (Ypage 79)
RStoring settings (Ypage 82)
Steering wheel heating
Activating/deactivating
:To switch on the steering-wheel heating
;To switch off the steering-wheel heating
=Indicator lamp
The steering-wheel heating heats the leather
areas of the steering wheel.
XTo activate: make sure that the SmartKey is
in position 1or 2in the ignition lock.
XTurn the catch in the direction of arrow :.
Indicator lamp =lights up.
XTo deactivate: make sure that the SmartKey
is in position 1or 2in the ignition lock.
XTurn the catch in the direction of arrow ;.
Indicator lamp =goes out.
iThe steering wheel heating does not switch
off automatically.
iThe steering wheel heating may switch off
temporarily if:
Rthe temperature in the vehicle interior is
above 86 ‡ (30 †)
Rthe temperature of the steering wheel is
above 95 ‡ (35 †)
Indicator lamp =remains on.
iThe steering wheel heating is deactivated if
you remove the SmartKey from the ignition
lock.
78Steering wheel
Seats, steering wheel and mirrors
Page 81 of 302
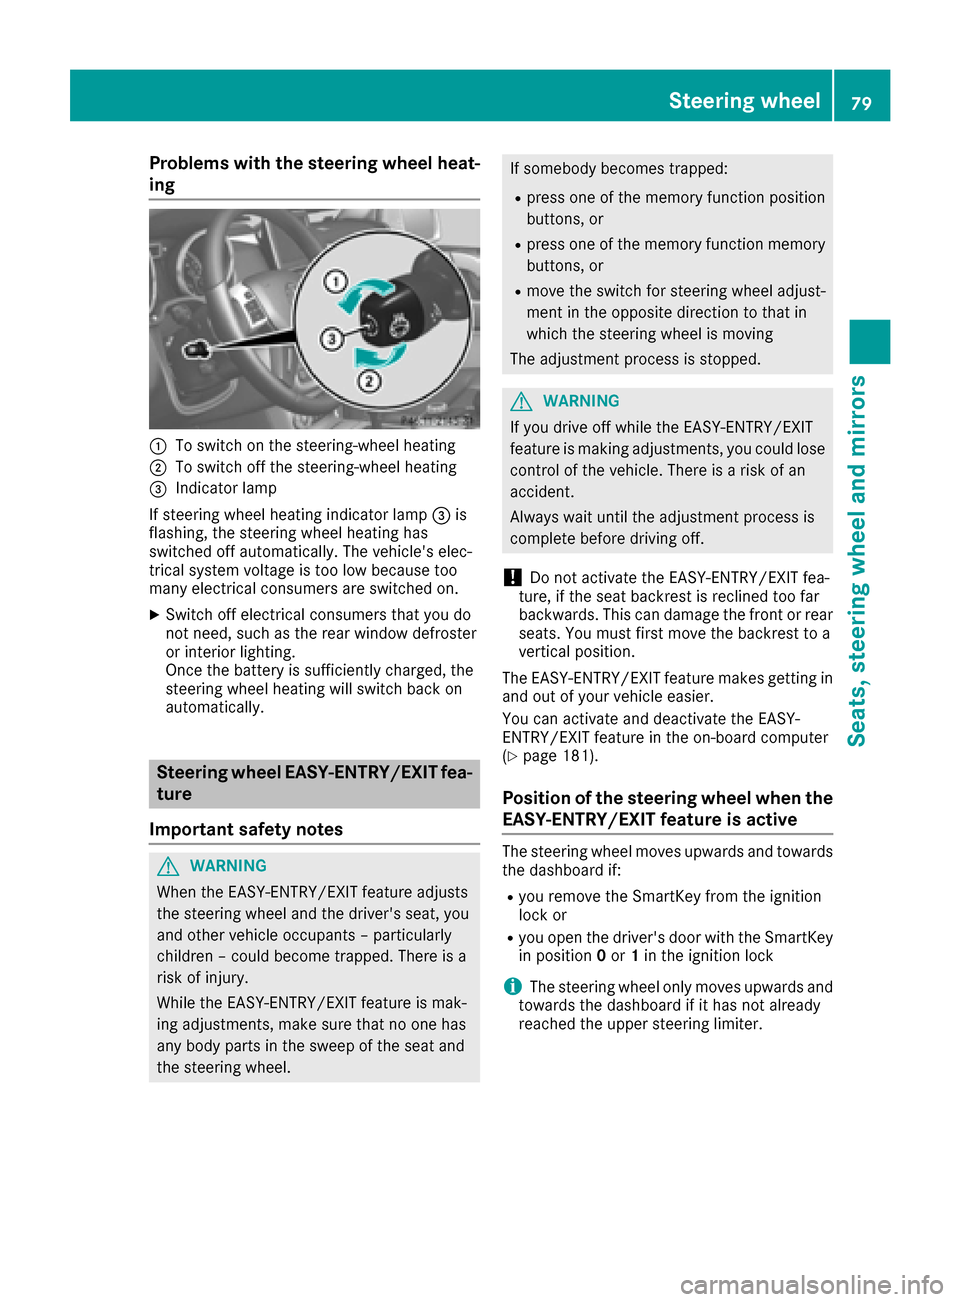
Problems with the steering wheel heat-
ing
:To switch on the steering-wheel heating
;To switch off the steering-wheel heating
=Indicator lamp
If steering wheel heating indicator lamp =is
flashing, the steering wheel heating has
switched off automatically. The vehicle's elec-
trical system voltage is too low because too
many electrical consumers are switched on.
XSwitch off electrical consumers that you do
not need, such as the rear window defroster
or interior lighting.
Once the battery is sufficiently charged, the
steering wheel heating will switch back on
automatically.
Steering wheel EASY-ENTRY/EXIT fea-
ture
Important safety notes
GWARNING
When the EASY-ENTRY/EXIT feature adjusts
the steering wheel and the driver's seat, you
and other vehicle occupants – particularly
children – could become trapped. There is a
risk of injury.
While the EASY-ENTRY/EXIT feature is mak-
ing adjustments, make sure that no one has
any body parts in the sweep of the seat and
the steering wheel.
If somebody becomes trapped:
Rpress one of the memory function position
buttons, or
Rpress one of the memory function memory
buttons, or
Rmove the switch for steering wheel adjust-
ment in the opposite direction to that in
which the steering wheel is moving
The adjustment process is stopped.
GWARNING
If you drive off while the EASY-ENTRY/EXIT
feature is making adjustments, you could lose
control of the vehicle. There is a risk of an
accident.
Always wait until the adjustment process is
complete before driving off.
!Do not activate the EASY-ENTRY/EXIT fea-
ture, if the seat backrest is reclined too far
backwards. This can damage the front or rear
seats. You must first move the backrest to a
vertical position.
The EASY-ENTRY/EXIT feature makes getting in
and out of your vehicle easier.
You can activate and deactivate the EASY-
ENTRY/EXIT feature in the on-board computer
(
Ypage 181).
Position of the steering wheel when the
EASY-ENTRY/EXIT feature is active
The steering wheel moves upwards and towards
the dashboard if:
Ryou remove the SmartKey from the ignition
lock or
Ryou open the driver's door with the SmartKey
in position 0or 1in the ignition lock
iThe steering wheel only moves upwards and
towards the dashboard if it has not already
reached the upper steering limiter.
Steering wheel79
Seats, steering wheel and mirrors
Z
Page 82 of 302
Position of the steering wheel for driv-
ing
The steering wheel is moved to the last selected
position when:
Rthe driver's door is closed
Ryou insert the SmartKey into the ignition lock
The last position of the steering column is stored
when you switch off the ignition or when you
store the setting with the memory function
(
Ypage 82).
Mirrors
Rear-view mirror
XAdjust the rear-view mirror by hand so you
have a good overview of the traffic conditions
behind you.
Exterior mirrors
Adjusting the exterior mirrors
GWARNING
The exterior mirror on the front-passenger
side reduces the size of the image. Visible
objects are actually closer than they appear.
This means that you could misjudge the dis-
tance from road users traveling behind, e.g.
when changing lane. There is a risk of an acci-
dent.
For this reason, always make sure of the
actual distance from the road users traveling
behind by glancing over your shoulder.
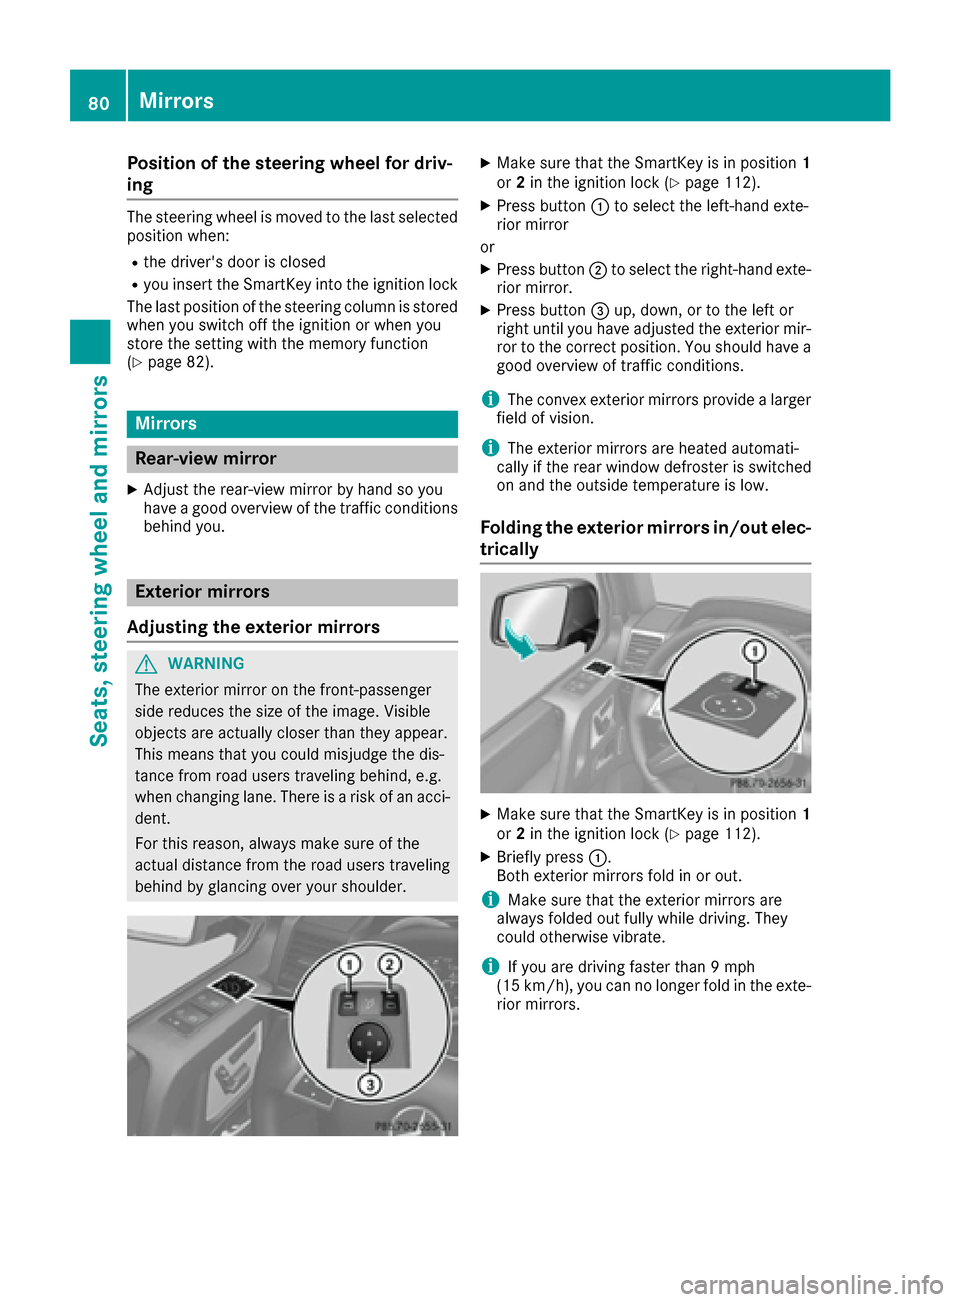
XMake sure that the SmartKey is in position 1
or 2in the ignition lock (Ypage 112).
XPress button :to select the left-hand exte-
rior mirror
or
XPress button ;to select the right-hand exte-
rior mirror.
XPress button =up, down, or to the left or
right until you have adjusted the exterior mir- ror to the correct position. You should have a
good overview of traffic conditions.
iThe convex exterior mirrors provide a larger
field of vision.
iThe exterior mirrors are heated automati-
cally if the rear window defroster is switched
on and the outside temperature is low.
Folding the exterior mirrors in/out elec-
trically
XMake sure that the SmartKey is in position 1
or 2in the ignition lock (Ypage 112).
XBriefly press :.
Both exterior mirrors fold in or out.
iMake sure that the exterior mirrors are
always folded out fully while driving. They
could otherwise vibrate.
iIf you are driving faster than 9 mph
(15 km/h), you can no longer fold in the exte-
rior mirrors.
80Mirrors
Seats, steering wheel and mirrors
Page 83 of 302

Setting the exterior mirrors
If the battery has been disconnected or com-
pletely discharged, the exterior mirrors must be
reset. The exterior mirrors will otherwise not
fold in when you select the "Fold in mirrors when
locking" function in the on-board computer
(
Ypage 181).
XMake sure that the SmartKey is in position 1
in the ignition lock (Ypage 112).
XBriefly press :.
Folding the exterior mirrors in/out
automatically
If the "Fold in mirrors when locking" function is
activated in the on-board computer
(
Ypage 181):
Rthe exterior mirrors fold in automatically as
soon as you lock the vehicle from the outside.
Rthe exterior mirrors fold out again automati-
cally as soon as you unlock the vehicle and
then open the driver's or front-passenger
door.
Exterior mirror pushed out of position
XPress button :repeatedly until you hear the
mirror engage in position.
The mirror housing is engaged again and you
can adjust the exterior mirrors as usual
(
Ypage 80).
Automatic anti-glare mirrors
The rear-view mirror and the exterior mirror on
the driver's side automatically go into anti-glare
mode if:
Rthe ignition is switched on and
Rincident light from headlamps strikes the sen-
sor in the rear-view mirror
iThe mirrors do not go into anti-glare mode if
reverse gear is engaged or if the interior light- ing is switched on.
Parking position for the exterior mir-
ror on the front-passenger side
Setting/storing the parking position
Using reverse gear
:Left-hand exterior mirror
;Right-hand exterior mirror
=Adjustment button
?Memory button
You can position the front-passenger side exte- rior mirror in such a way that you can see the
rear wheel on that side as soon as you engage
reverse gear. You can store this position.
XMake sure that the vehicle is stationary and
that the SmartKey is in position 2in the igni-
tion lock (
Ypage 112).
XPress button ;for the exterior mirror on the
front-passenger side.
XEngage reverse gear.
The exterior mirror on the front-passenger
side moves to the preset parking position.
XUse adjustment button =to adjust the exte-
rior mirror to a position that allows you to see
the rear wheel and the curb.
The parking position is stored.
Mirrors81
Seats, steering wheel and mirrors
Z