2016 MERCEDES-BENZ G-Class door lock
[x] Cancel search: door lockPage 230 of 302
You can find further information on the mbrace
system athttp://www.mbusa.com2Log in
under "Owners Online".
iIf the indicator lamp in MB Info call but-
ton :is flashing continuously and no voice
connection with the Response center has
been established, then the mbrace system
has not been able to initiate an MB Info call
(e.g. the relevant mobile phone network is not
available). The Call Failed
message
appears in the multifunction display.
XTo end a call: press the~button on the
multifunction steering wheel.
or
XPress the corresponding COMAND button to
end a phone call.
Call priority
When service calls are active, e.g. Roadside
Assistance or MB Info calls, an emergency call
can still be initiated. In this case, an emergency
call will take priority and override all other active
calls.
The indicator lamp of the respective button
flashes until the call is ended. An emergency call
can only be terminated by the Response Center.
All other calls can be ended by pressing the
~ button on the multifunction steering wheel
or the corresponding COMAND button for end-
ing a telephone call.
iWhen an mbrace call is initiated, COMAND
is muted. The mobile phone is no longer con-
nected to COMAND.
However, if you want to use your mobile
phone, do so only when the vehicle is station-
ary and in a safe location.
Downloading destinations in COMAND
Destination Download gives you access to a
database with over ten million points of interest
(POIs) which can be downloaded onto the navi-
gation system of your vehicle. If you know the
destination, you can download the address or
obtain the location of points of interest (POIs) or
important destinations in the surrounding area. You are prompted to confirm route guidance to
the address entered.
iFor information on the components and
operating principles of COMAND, (see the
separate operating instructions).
XSelect Yesusing the =or; buttons on
COMAND.
XConfirm using the 9button on COMAND.
The system calculates the route and subse-
quently starts the route guidance with the
address entered.
iIf you select No, the address can be stored in
the address book.
iThe Destination Download function is avail-
able if the corresponding mobile phone net-
work is available and data transfer is possible.
Search & Send
"Search & Send" is a destination entry service.
For more information on "Search & Send", see
the separate operating instructions.
Vehicle remote opening
If you have unintentionally locked your vehicle
(e.g. the SmartKey is inside the vehicle) and a
replacement key is not available:
XContact the following service hotlines:
RUSA: Response Center at
1-888-990-9007
RCanada: Customer Service at
1-888-923-8367
You will be asked for your password.
XReturn to your vehicle at the time arranged
with the Response Center.
XPress the release button on the door handle of
the rear door for at least 20 seconds until the
indicator lamp in the SOS button (
Ypage 225)
flashes.
The Connecting Call
message appears on
the multifunction display.
Alternatively, the vehicle can be opened via the
Internet in the "Owner's Online" section using
your identification number and password
3.
2USA only.3USA only.
228Features
Stowage and features
Page 231 of 302
iVehicle remote opening is only possible if
the corresponding mobile phone network is
accessible.
The SOS button flashes and the Connecting
Callmessage appears in the multifunction
display to confirm that the command for vehi-
cle remote unlocking has been received.
If the lock cylinder on the rear door is pressed
for longer than 20 seconds before receiving
authorization for remote unlocking from the
Response center, you must wait 15 minutes
before you can press the lock cylinder on the
rear door again.
Vehicle remote closing
The remote closing feature can be used when
you have forgotten to lock the vehicle and you
are no longer nearby. The vehicle can then be
locked by the Mercedes-Benz Customer Assis-
tance Center.
The vehicle can be remotely locked within four
days of the ignition being turned off.
XContact the following service hotlines:
RUSA: Mercedes-Benz Customer Assistance
Center at 1-800-FOR-MERCedes
(1-800-367-6372) or 1-888-990-9007
RCanada: Customer Service at
1-888-923-8367
You will be asked for your PIN.
The next time you are inside the vehicle and you
switch on the ignition, the Tele Aid Doors
LockedRemotelymessage appears in the mul-
tifunction display.
USA only: alternatively, the vehicle can be
locked via:
Rthe Internet, under the "Owners Online" sec-
tion
Rthe telephone application (e.g. iPhone®,
Blackberry)
To do this, you will need your identification num-
ber and password.
iThe vehicle remote closing feature is avail-
able when the relevant mobile phone network is available and data connection is possible.
Stolen vehicle recovery service
If your vehicle has been stolen:
XContact the police.
The police will issue an incident report. This
report has a number.
XForward this number to the Response Center
together with your PIN.
The Response Center will then attempt to
covertly contact the mbrace system. The
Response Center contacts you and the local
law enforcement authority if the vehicle is
located. However, only the law enforcement
agency is informed of the location of the vehi-
cle.
iIf the anti-theft alarm system is active for
longer than 30 seconds, mbrace is automati-
cally connected with the Customer Assis-
tance center.
Vehicle Health Check
With the vehicle remote malfunction diagnosis
(Vehicle Health Check), the Customer Assis-
tance center can provide improved support for
problems with your vehicle. During an existing
call, vehicle data is transferred to the Customer
Assistance center. The customer service repre-
sentative can use the received data to decide
what kind of assistance is required. You are
then, for example, guided to the nearest
Mercedes-Benz Service center or a recovery
vehicle is called.
If vehicle data needs to be transferred during an
MB Info call or a Roadside Assistance call, this is
initiated by the Customer Assistance center.
You will see the Roadside Assistance Con‐
nectedmessage in the COMAND display. If the
vehicle remote malfunction diagnosis is able to
be started, the Request for vehicle diag‐
nosis received. Start vehicle diagno‐sis?message appears in the display.
XPressYesto confirm the message.
XIf theVehicleDiagnosis:Pleasestartignitionmessage appears: turn the Smart-
Key to position 2in the ignition lock.
XIf the Please follow the instructionsreceivedbyphoneandmoveyourvehi‐cle into a safe positionmessage
appears: follow the instructions of the cus-
tomer service representative.
The message in the display disappears.
Features229
Stowage and features
Z
Page 234 of 302
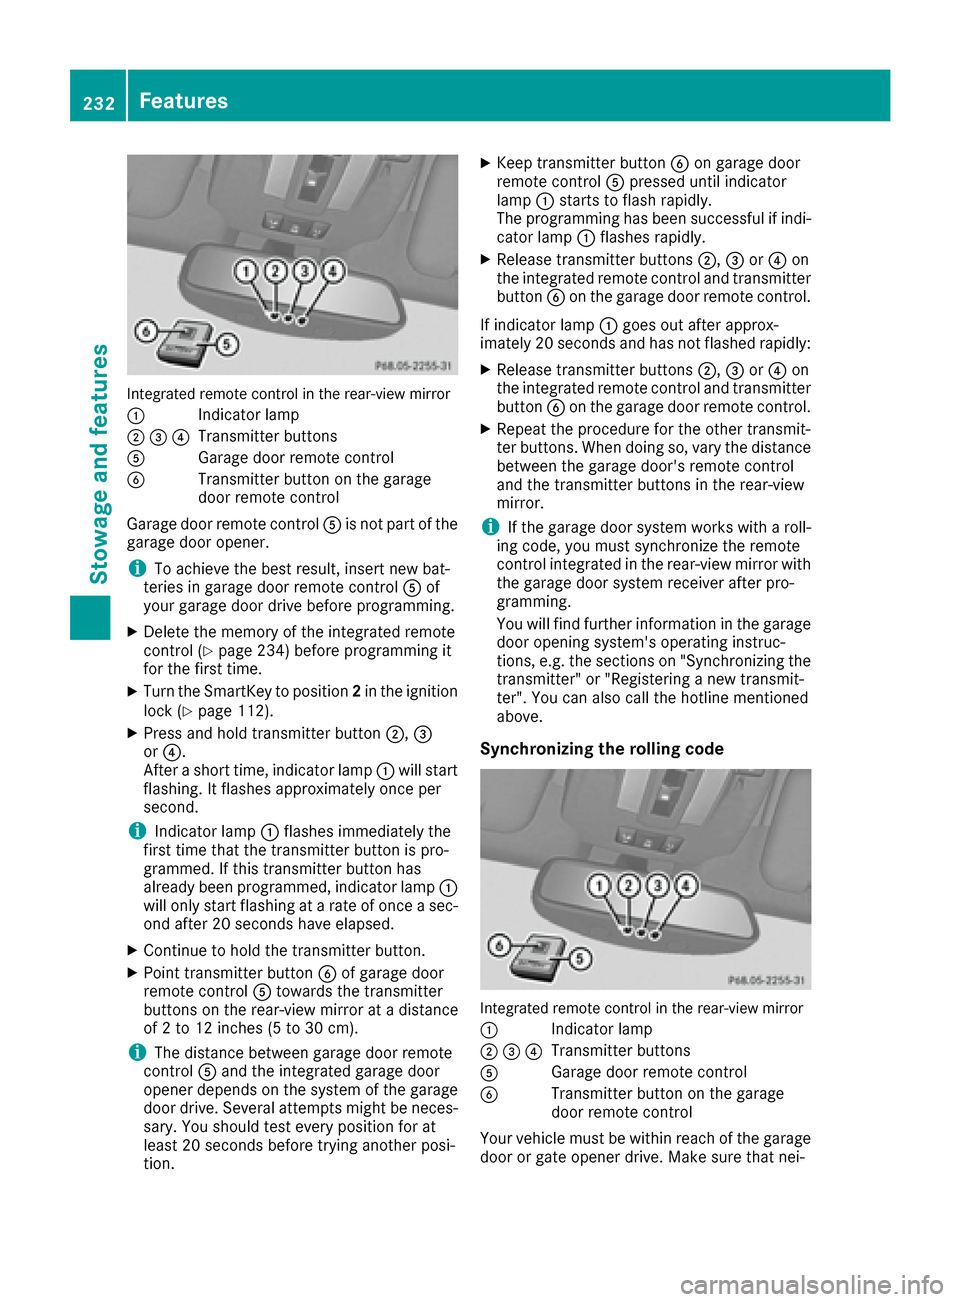
Integrated remote control in the rear-view mirror
:
Indicator lamp
;=?Transmitter buttons
AGarage door remote control
BTransmitter button on the garage
door remote control
Garage door remote control Ais not part of the
garage door opener.
iTo achieve the best result, insert new bat-
teries in garage door remote control Aof
your garage door drive before programming.
XDelete the memory of the integrated remote
control (Ypage 234) before programming it
for the first time.
XTurn the SmartKey to position 2in the ignition
lock (Ypage 112).
XPress and hold transmitter button ;,=
or ?.
After a short time, indicator lamp :will start
flashing. It flashes approximately once per
second.
iIndicator lamp :flashes immediately the
first time that the transmitter button is pro-
grammed. If this transmitter button has
already been programmed, indicator lamp :
will only start flashing at a rate of once a sec-
ond after 20 seconds have elapsed.
XContinue to hold the transmitter button.
XPoint transmitter button Bof garage door
remote control Atowards the transmitter
buttons on the rear-view mirror at a distance
of 2 to 12 inches (5 to 30 cm).
iThe distance between garage door remote
control Aand the integrated garage door
opener depends on the system of the garage
door drive. Several attempts might be neces-
sary. You should test every position for at
least 20 seconds before trying another posi-
tion.
XKeep transmitter button Bon garage door
remote control Apressed until indicator
lamp :starts to flash rapidly.
The programming has been successful if indi-
cator lamp :flashes rapidly.
XRelease transmitter buttons ;,=or? on
the integrated remote control and transmitter
button Bon the garage door remote control.
If indicator lamp :goes out after approx-
imately 20 seconds and has not flashed rapidly:
XRelease transmitter buttons ;,=or? on
the integrated remote control and transmitter button Bon the garage door remote control.
XRepeat the procedure for the other transmit-
ter buttons. When doing so, vary the distance
between the garage door's remote control
and the transmitter buttons in the rear-view
mirror.
iIf the garage door system works with a roll-
ing code, you must synchronize the remote
control integrated in the rear-view mirror with the garage door system receiver after pro-
gramming.
You will find further information in the garage
door opening system's operating instruc-
tions, e.g. the sections on "Synchronizing the
transmitter" or "Registering a new transmit-
ter". You can also call the hotline mentioned
above.
Synchronizing the rolling code
Integrated remote control in the rear-view mirror
:
Indicator lamp
;=?Transmitter buttons
AGarage door remote control
BTransmitter button on the garage
door remote control
Your vehicle must be within reach of the garage door or gate opener drive. Make sure that nei-
232Features
Stowage and features
Page 235 of 302
ther your vehicle nor any persons/objects are
present within the sweep of the door or gate.
Observe the safety notes when performing the
rolling code synchronization (
Ypage 231).
XTurn the SmartKey to position2in the ignition
lock (Ypage 112).
XPress the programming button of the door or
gate drive (see the door or gate drive operat-
ing instructions, e.g. under "Programming
additional remote controls").
iYou now have 30 second sto initiate the next
step.
XPress previously programmed button ;,=
or ? on the integrated garage door opener
until the door closes.
The rolling code synchronization is then com-
plete.
Notes on programming the remote con-
trol
Canadian radio frequency laws require a "break"
(or interruption) of the transmission signals
after broadcasting for a few seconds. Therefore,
these signals may not last long enough for the
integrated remote control to recognize the sig-
nal during programming. Comparable with
Canadian law, American garage door openers
also have a built-in "interruption".
If you live in Canada or have difficulties pro-
gramming the garage door opener (regardless of
where you live) when using the programming
steps, proceed as follows:
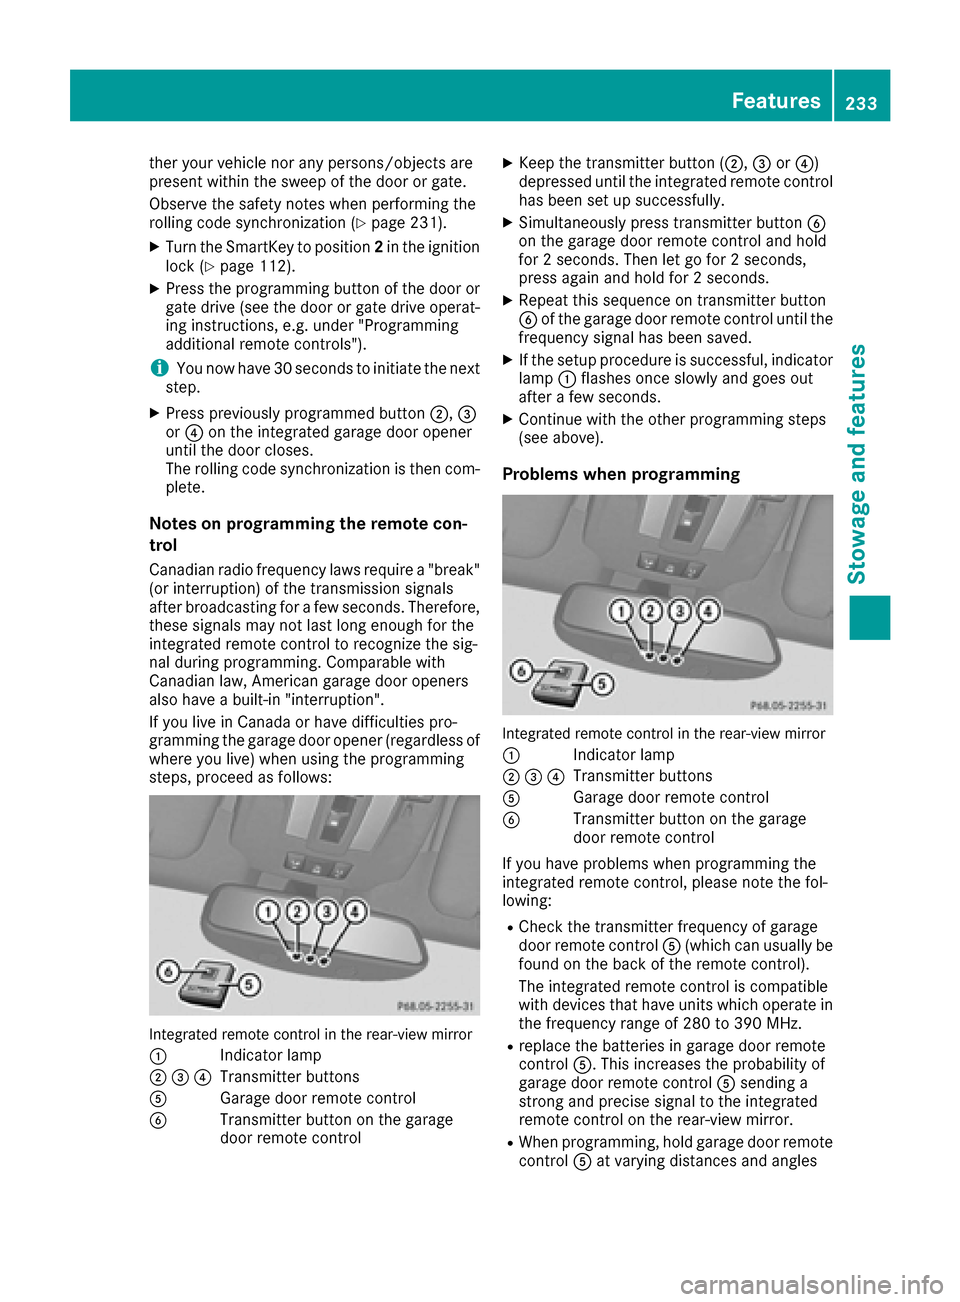
Integrated remote control in the rear-view mirror
:
Indicator lamp
;=?Transmitter buttons
AGarage door remote control
BTransmitter button on the garage
door remote control
XKeep the transmitter button ( ;,=or?)
depressed until the integrated remote control
has been set up successfully.
XSimultaneously press transmitter button B
on the garage door remote control and hold
for 2 seconds. Then let go for 2 seconds,
press again and hold for 2 seconds.
XRepeat this sequence on transmitter button
B of the garage door remote control until the
frequency signal has been saved.
XIf the setup procedure is successful, indicator
lamp :flashes once slowly and goes out
after a few seconds.
XContinue with the other programming steps
(see above).
Problems when programming
Integrated remote control in the rear-view mirror
:
Indicator lamp
;=?Transmitter buttons
AGarage door remote control
BTransmitter button on the garage
door remote control
If you have problems when programming the
integrated remote control, please note the fol-
lowing:
RCheck the transmitter frequency of garage
door remote control A(which can usually be
found on the back of the remote control).
The integrated remote control is compatible
with devices that have units which operate in the frequency range of 280 to 390 MHz.
Rreplace the batteries in garage door remote
control A. This increases the probability of
garage door remote control Asending a
strong and precise signal to the integrated
remote control on the rear-view mirror.
RWhen programming, hold garage door remote
control Aat varying distances and angles
Features233
Stowage and features
Z
Page 236 of 302
from the transmitter button which you are
programming. Try various angles at a distance
between2and 12 inches (5 to 30 cm) or at the
same angle but at varying distances.
RIf there is another garage door remote control
for the same device, perform the program-
ming steps again using that garage door
opener. Before performing these steps, make
sure that new batteries have been installed in
the garage door remote control.
RAlign the antenna cable of the garage door
opener unit. This can improve signal trans-
mission.
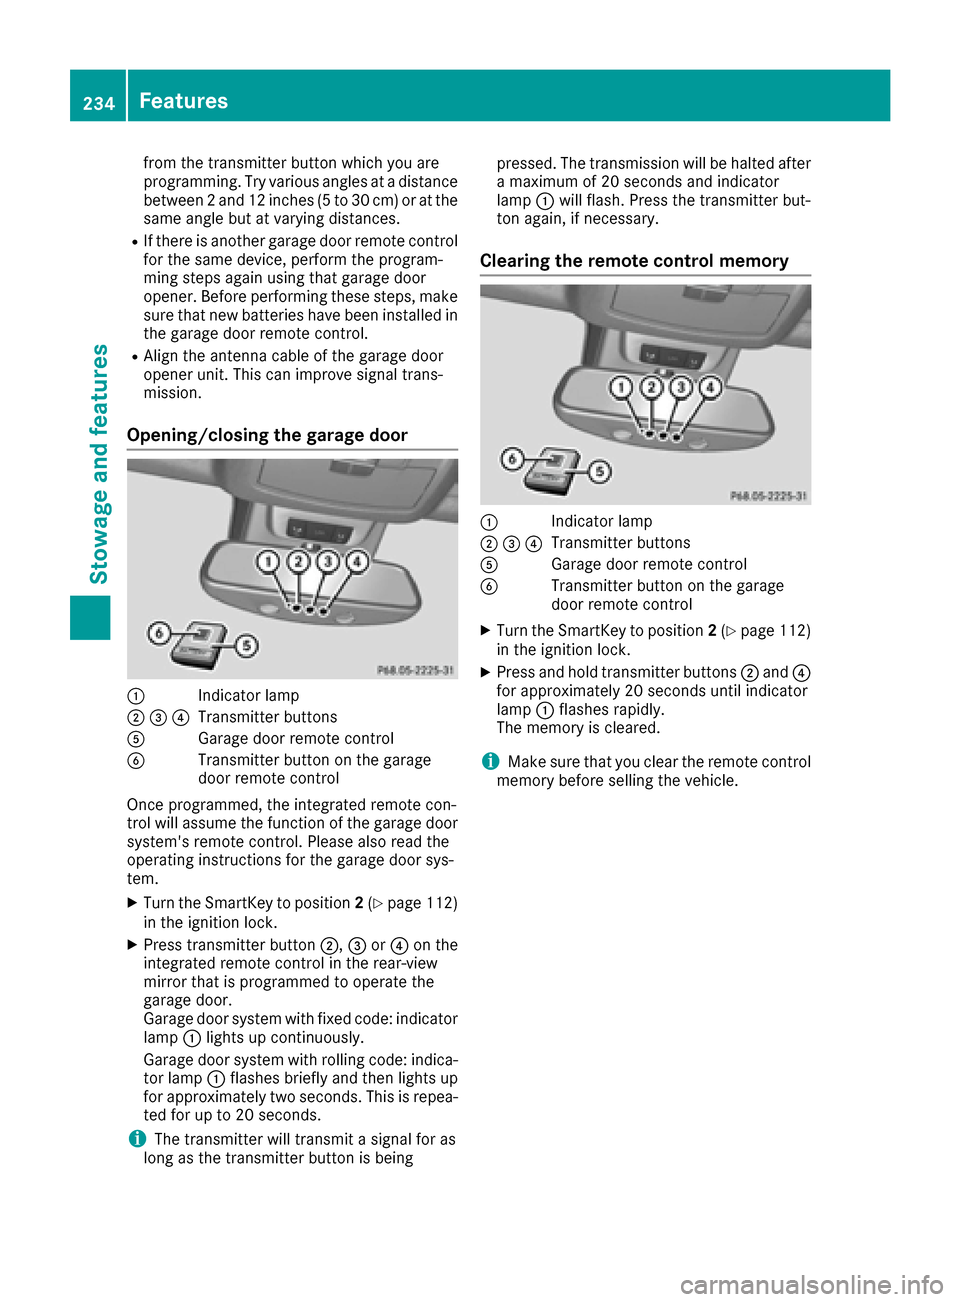
Opening/closing the garage door
:Indicator lamp
;=?Transmitter buttons
AGarage door remote control
BTransmitter button on the garage
door remote control
Once programmed, the integrated remote con-
trol will assume the function of the garage door
system's remote control. Please also read the
operating instructions for the garage door sys-
tem.
XTurn the SmartKey to position 2(Ypage 112)
in the ignition lock.
XPress transmitter button ;,=or? on the
integrated remote control in the rear-view
mirror that is programmed to operate the
garage door.
Garage door system with fixed code: indicator
lamp :lights up continuously.
Garage door system with rolling code: indica-
tor lamp :flashes briefly and then lights up
for approximately two seconds. This is repea-
ted for up to 20 seconds.
iThe transmitter will transmit a signal for as
long as the transmitter button is being pressed. The transmission will be halted after
a maximum of 20 seconds and indicator
lamp
:will flash. Press the transmitter but-
ton again, if necessary.
Clearing the remote control memory
:Indicator lamp
;=?Transmitter buttons
AGarage door remote control
BTransmitter button on the garage
door remote control
XTurn the SmartKey to position 2(Ypage 112)
in the ignition lock.
XPress and hold transmitter buttons ;and ?
for approximately 20 seconds until indicator
lamp :flashes rapidly.
The memory is cleared.
iMake sure that you clear the remote control
memory before selling the vehicle.
234Features
Stowage and features
Page 243 of 302

Ruseinmountainous terrain or on poor road
surfaces
Rif the engine isoften left idling for long periods
Under these or similar conditions, have, for
example, the air filter, engine oil and oil filter
replaced or changed more frequently. Under
arduous operating conditions, the tires must be
checked more often. Further information can be
obtained at a qualified specialist workshop,e.g.
an authorized Mercedes-Benz Center.
Fuel/water separator
HEnvironmental note
Dispose of service products inan environ-
mentally responsible manner.
!Ifyou continue drivingwithout having the
fuel/water separator serviced, th iscould
cause damage to the engine. Any resulting
damage isnot covered bythe warranty.
If the fuel/water separator needs servicing, the
fol lowin g message appears inthe multifunction
displ ay:
Youwillalso hear a brief warning tone.
XVisit a qualified specialist workshop as soon
as possible.
Care
General notes
GWAR NING
Many cleaning products can behazardous.
So me are poisonous, others are flammable.
Alwa ys follow the instructions on the particu-
lar container. Always open your veh icle's
doors or windows when cleaning the ins ide.
Never use fluids or solvents that are not
designed for cleaning your veh icle.
Always lock away cleaning products and keep
them out of reach of children.
!For cleaning your vehicle, donot use any of
the following:
Rdry, rough or hard cloths
Rabrasive cleaning agents
Rsolvents
Rcleaning agents containing solvents
Do not scrub.
Do not touch the surfaces or protective films
wit h hard objects, e.g. a ring or ice scraper.
You could otherwise scratch or damage the
surfaces and protective film.
!Do not park the vehicle for an extended
period straight after cleaning it, particularly
after having cleaned the wheels with wheel
cleaner. Wheel cleaners could cause
increased corrosion of the brake discs and
brake pads/linings. For this reason, you
should drive for a few minutes after cleaning.
Braking heats the brake discs and the brake
pads/linings, thus drying them. The vehicle
can then beparked.
HEnvironmental note
Dispose of empty packaging and cleaning
cloths in an environmentally responsible man-
ner.
Regular care of your vehicle isa condition for
retaining the quality in the long term.
Use care products and cleaning agents recom-
mended and approved by Mercedes-Benz.
Exterior care
Automatic car wash
GWARNING
Braking efficiency is reduced after washing
the vehicle. There is a risk of an accident.
After the vehicle has been washed, brake
carefully while paying attention to the traffic
conditions until full braking power is restored.
!Never clean your vehicle ina Touchless
Automat icCar Wash as these use special
Care241
Maintenance and care
Z
Page 251 of 302
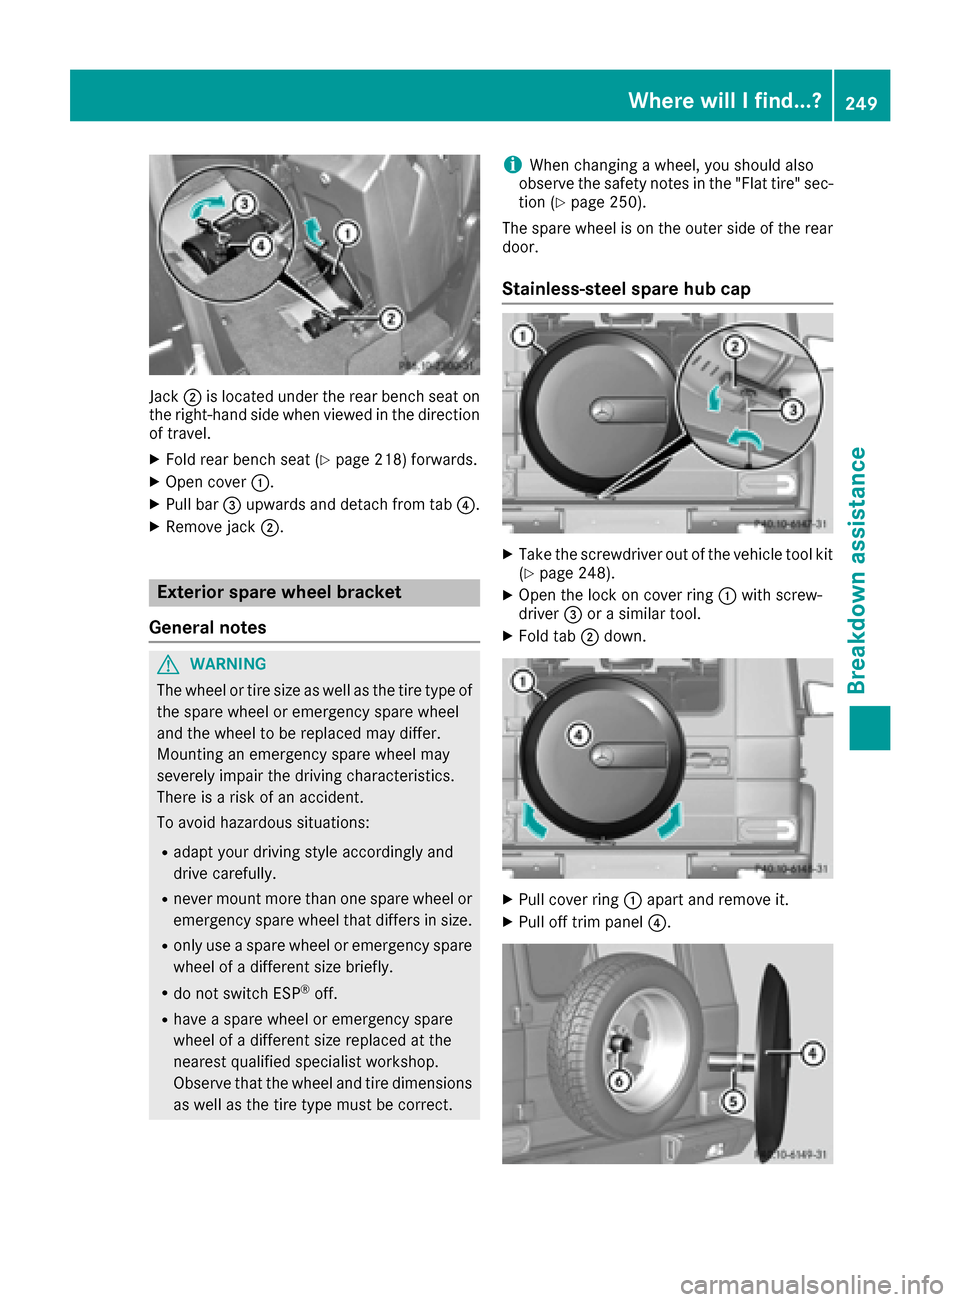
Jack;is located under the rear bench seat on
the right-hand side when viewed in the direction
of travel.
XFold rear bench seat (Ypage 218) forwards.
XOpen cover :.
XPull bar=upwards and detach from tab ?.
XRemove jack;.
Exterior spare wheel bracket
General notes
GWARNING
The wheel or tire size as well as the tire type of the spare wheel or emergency spare wheel
and the wheel to be replaced may differ.
Mounting an emergency spare wheel may
severely impair the driving characteristics.
There is a risk of an accident.
To avoid hazardous situations:
Radapt your driving style accordingly and
drive carefully.
Rnever mount more than one spare wheel or
emergency spare wheel that differs in size.
Ronly use a spare wheel or emergency spare
wheel of a different size briefly.
Rdo not switch ESP®off.
Rhave a spare wheel or emergency spare
wheel of a different size replaced at the
nearest qualified specialist workshop.
Observe that the wheel and tire dimensions
as well as the tire type must be correct.
iWhen changing a wheel, you should also
observe the safety notes in the "Flat tire" sec-
tion (
Ypage 250).
The spare wheel is on the outer side of the rear
door.
Stainless-steel spare hub cap
XTake the screwdriver out of the vehicle tool kit
(Ypage 248).
XOpen the lock on cover ring :with screw-
driver =or a similar tool.
XFold tab ;down.
XPull cover ring :apart and remove it.
XPull off trim panel ?.
Where will I find...?249
Breakdown assistance
Z
Page 252 of 302

iWhen re-installing trim panel?, make sure
that retainer Aengages in recess B.
Removing the spare wheel
The spare wheel is heavy. Take particular note of
this when removing the spare wheel.
XRemove wheel nuts :.
XRemove the spare wheel.
Mounting the wheel
After changing a wheel:
XRepair or replace the damaged wheel as soon
as possible and secure the spare wheel in
place again.
XSecure the damaged wheel on the spare
wheel bracket with wheel nuts :. When
doing so, make sure that the wheel cannot
come loose.
XWhen re-installing trim panel ?, make sure
that retainer Bengages in recess A
(
Ypage 249).
XMake sure that tab ;is below when re-
installing cover ring :(Ypage 249).
XFor safety reasons, regularly check to ensure
that the wheel is securely fastened.
Flat tire
Preparing the vehicle
XStop the vehicle on solid, non-slippery and
level ground, as far away as possible from
traffic.
XSwitch on the hazard warning lamps
(Ypage 89).
XApply the parking brake.
XBring the front wheels into the straight-ahead
position.
XMove the selector lever to position P.
XSwitch off the engine.
XRemove the SmartKey from the ignition lock.
The steering wheel lock stays active for as
long as the SmartKey is removed.
XAll occupants must get out of the vehicle.
Make sure that they are not endangered as
they do so.
XMake sure that no one is near the danger area
while a wheel is being changed. Anyone who
is not directly assisting in the wheel change
should, for example, stand behind the barrier.
XGet out of the vehicle. Pay attention to traffic
conditions when doing so.
XClose the driver's door.
Battery (vehicle)
Important safety notes
Special tools and expert knowledge are required
when working on the battery, e.g. removal and
installation. You should therefore have all work
involving the battery carried out at a qualified
specialist workshop.
GWARNING
Work carried out incorrectly on the battery
can lead, for example, to a short circuit and
thus damage the vehicle electronics. This can
lead to function restrictions applying to
safety-relevant systems, e.g the lighting sys-
tem, the ABS (anti-lock braking system) or the
ESP
®(Electronic Stability Program). The oper-
ating safety of your vehicle may be restricted.
You could lose control of the vehicle, for
example:
Rwhen braking
Rin the event of abrupt steering maneuvers
and/or when the vehicle's speed is not
adapted to the road conditions
There is a risk of an accident.
In the event of a short circuit or a similar inci-
dent, contact a qualified specialist workshop
immediately. Do not drive any further. You
250Battery (vehicle)
Breakdown assistance