2016 MERCEDES-BENZ G-Class door lock
[x] Cancel search: door lockPage 85 of 302

pants – particularly children – could become
trapped. There is a risk of injury.
While the memory function is making adjust-
ments, make sure that no one has any body
parts in the sweep of the seat or steering
wheel. If somebody becomes trapped, imme-diately release the memory function position
button. The adjustment process is stopped.
GWARNING
Children could become trapped if they acti-
vate the memory function, particularly when
unattended. There is a risk of injury.
When leaving the vehicle, always take the
SmartKey with you and lock the vehicle. Never
leave children unsupervised in the vehicle.
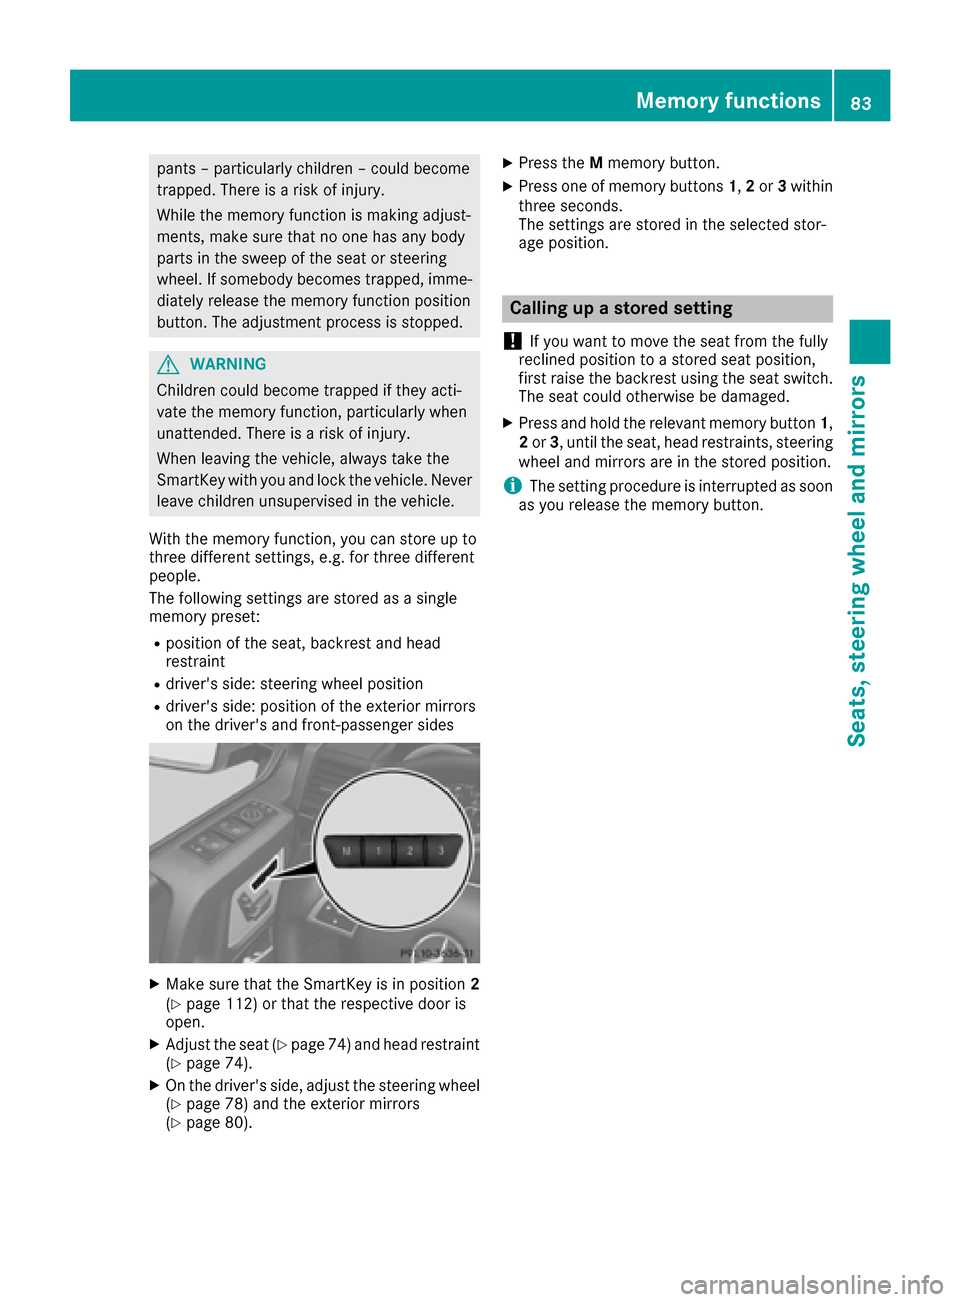
With the memory function, you can store up to
three different settings, e.g. for three different
people.
The following settings are stored as a single
memory preset:
Rposition of the seat, backrest and head
restraint
Rdriver's side: steering wheel position
Rdriver's side: position of the exterior mirrors
on the driver's and front-passenger sides
XMake sure that the SmartKey is in position 2
(Ypage 112) or that the respective door is
open.
XAdjust the seat (Ypage 74) and head restraint
(Ypage 74).
XOn the driver's side, adjust the steering wheel (Ypage 78) and the exterior mirrors
(Ypage 80).
XPress the Mmemory button.
XPress one of memory buttons 1,2or 3within
three seconds.
The settings are stored in the selected stor-
age position.
Calling up a stored setting
!
If you want to move the seat from the fully
reclined position to a stored seat position,
first raise the backrest using the seat switch.
The seat could otherwise be damaged.
XPress and hold the relevant memory button 1,
2 or 3, until the seat, head restraints, steering
wheel and mirrors are in the stored position.
iThe setting procedure is interrupted as soon
as you release the memory button.
Memory functions83
Seats, steering wheel and mirrors
Z
Page 86 of 302

Useful information
i
This Operator's Manual describes all models
and all standard and optional equipment of
your vehicle available at the time of publica-
tion of the Operator's Manual. Country-spe-
cific differences are possible. Please note
that your vehicle may not be equipped with all
features described. This also applies to
safety-related systems and functions.
iRead the information on qualified specialist
workshops: (Ypage 23).
Exterior lighting
Important safety notes
For reasons of safety, Mercedes-Benz recom-
mends that you drive with the lights switched on
even during the daytime. In some countries,
operation of the headlamps varies due to legal
requirements and self-imposed obligations.
Light switch
Operation
!Switch off the parking lamps and low-beam
headlamps when you leave the vehicle. This
prevents the battery from discharging.
!If the battery has been excessively dis-
charged, the parking lamps or standing lamps
are automatically switched off to enable the
next engine start. Always park your vehicle
safely and sufficiently lit according to legal
standards. Avoid the continuous use of the
T parking lamps for several hours. If pos-
sible, switch on the Xright or the Wleft
standing lamp.
1 WLeft-hand standing lamps
2XRight-hand standing lamps
3TParking lamps, side marker lamps,
license plate and instrument cluster
lighting
4ÃAutomatic headlamp mode/daytime
running lamps
5LLow-beam/high-beam headlamps
If you hear a warning tone when you leave the
vehicle, the lights may still be switched on.
XTurn the light switch to Ã.
The turn signals, high-beam headlamps and the
high-beam flasher are operated using the com-
bination switch (
Ypage 88).
The exterior lighting (except the parking/stand-
ing lamps) switches off automatically if you:
Rremove the SmartKey from the ignition lock
Ropen the driver's door with the SmartKey in
position 0in the ignition lock.
Low-beam headlamps
1 WLeft-hand standing lamps
2XRight-hand standing lamps
3TParking lamps, side marker lamps,
license plate and instrument cluster
lighting
84Exterior lighting
Lights and windshield wipers
Page 92 of 302

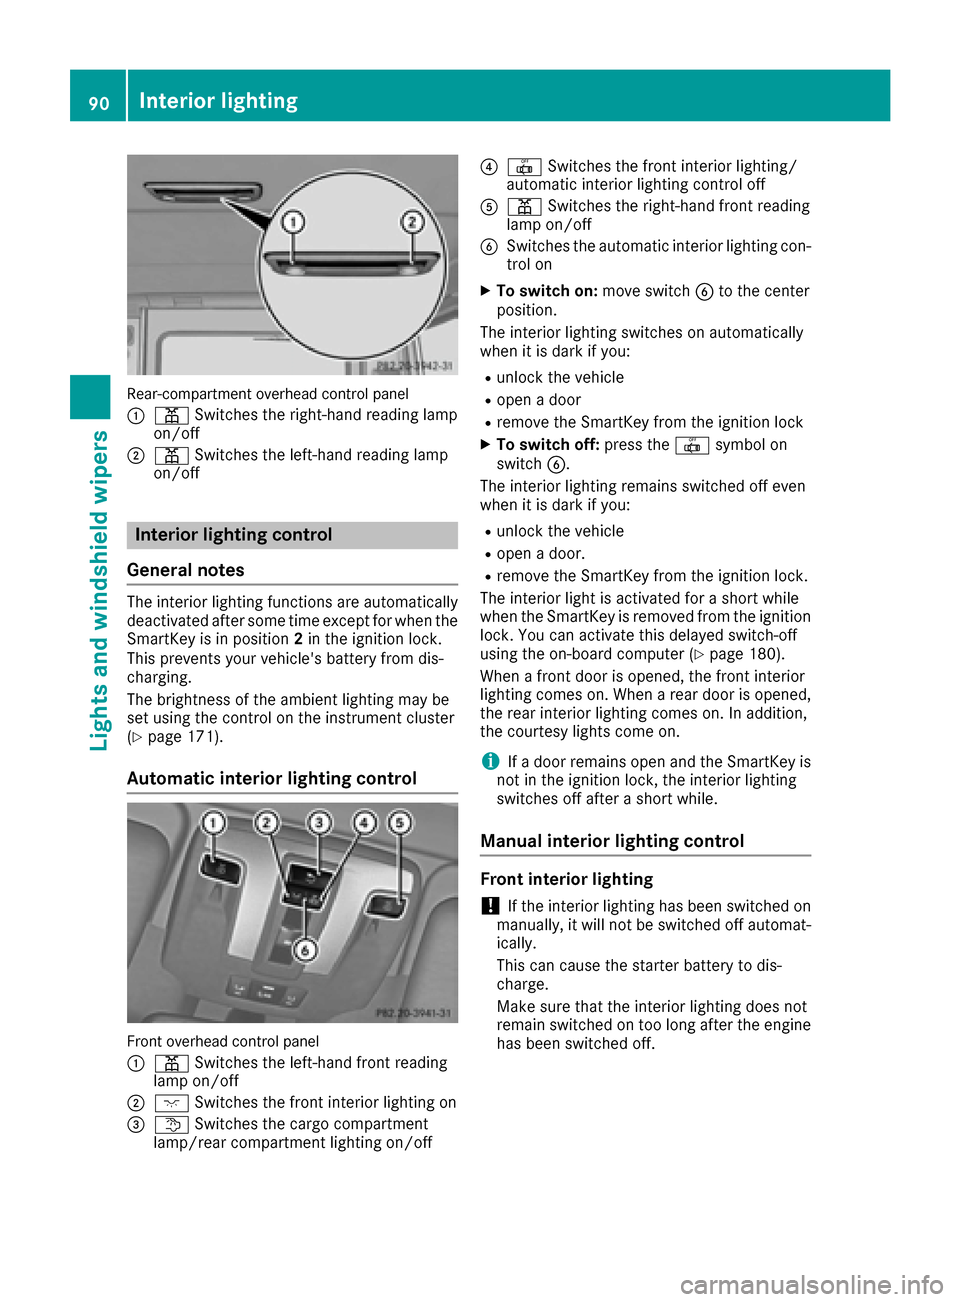
Rear-compartmentoverhead control panel
:
p Switches the right-hand read ing lamp
on/o ff
;p Switches the left-hand read ing lamp
on/o ff
Interior lighting control
General notes
The interior lighting functions are automatical ly
deactivated after some time except for whenthe
Sm artKey is in posi tion2in the igniti on lock.
This prevents your veh icle's battery fr om dis-
chargi ng.
The brightne ssofthe ambient lighting maybe
set using the co ntrol onthe instrument cluster
(
Ypage 171).
Automatic interior lighting control
Fron toverhead control panel
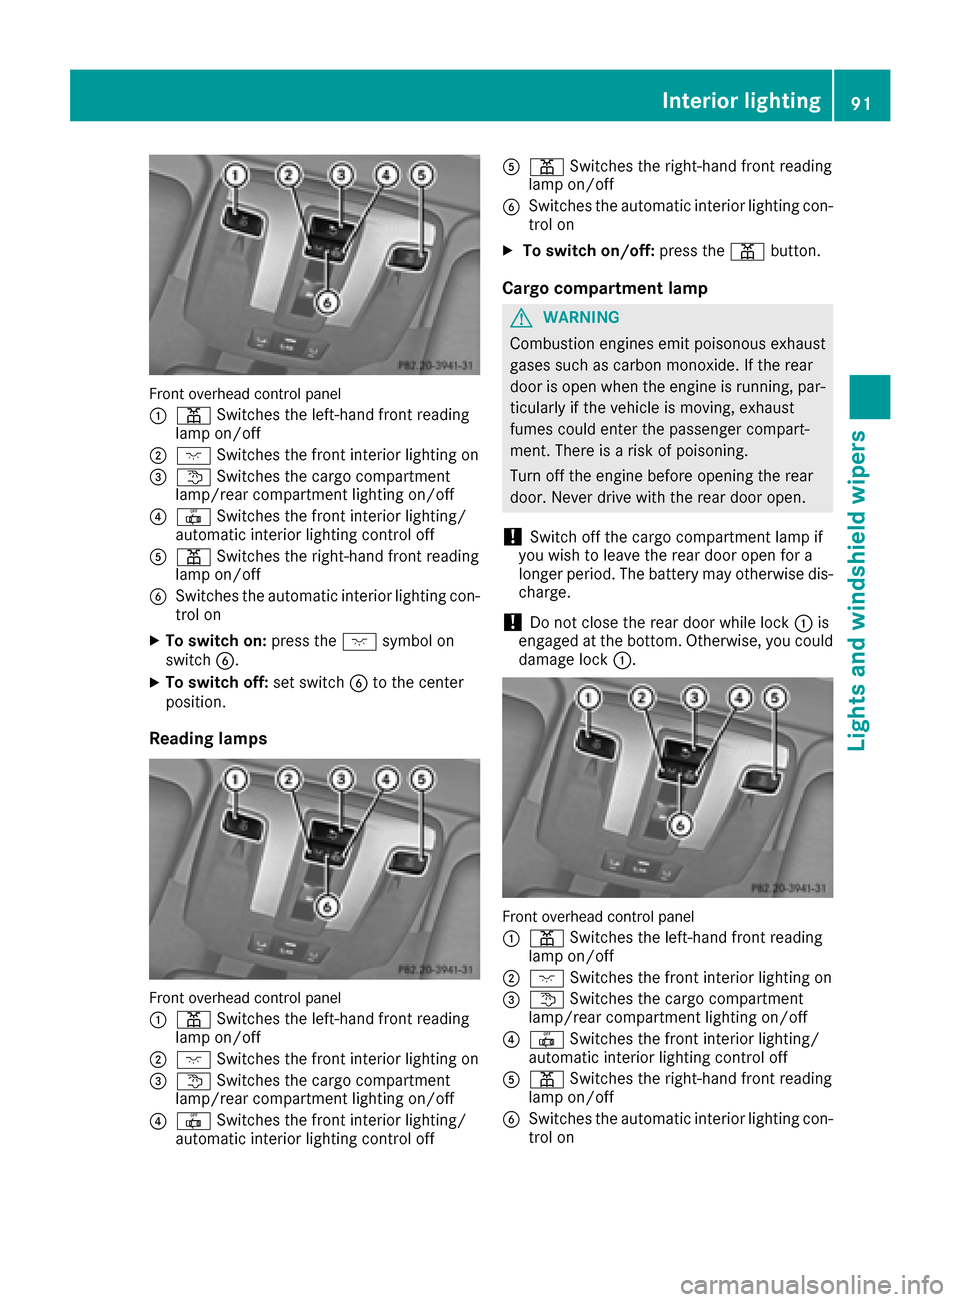
:
p Switches the left-hand fr ont read ing
lamp on/o ff
;cSwitches the fr ontint erior lighting on
=t Switches the cargo co mpartment
lamp/ rear co mpartment lighting on/o ff
?|Switches the fr ontint erior lighting /
automatic interior lighting control off
Ap Switches the rig ht-hand fr ont read ing
lamp on/off
BSwitches the automat icinterior lighting co n-
tr ol on
XTo switch on:mov e switch Bto the center
posi tion.
The interior lighting swit chesonautomatical ly
when it is darkifyou:
Runlock the vehicle
Ropen adoor
Rrem ove theSmartKey fr omthe igniti on lock
XToswitch off: press the|symbol on
switch B.
The interior lighting remains swit ched off even
when itis dark if you:
Runlo ck the vehicle
Ropen adoor .
Rremove theSmartKey fr omthe igniti on lock.
The interior light isactivated for a short while
when theSmartKey is rem oved from the igniti on
loc k.You can activate th isdelayed switch-off
using the on-board co mputer (
Ypage 180).
When a frontdoor isopen ed, the fr ontint erior
lighting comeson.When a rear door is open ed,
the rear interior lighting comeson.In addition ,
the courtesy lights co me on.
iIf adoor remains open and theSmartKey is
no t in the igniti onlock, the interior lighting
switches off after a short while.
Manual interior lighting control
Front interior lighting
!Ifthe interior lighting has been switched on
manually, it will notbe switched off automat-
ically.
This can cause the starter battery to dis-
charge.
Make sure that the interior lighting does not
remain switched ontoo long after the engine
has been switched off.
90Interior lighting
Lights and windshield wipers
Page 93 of 302

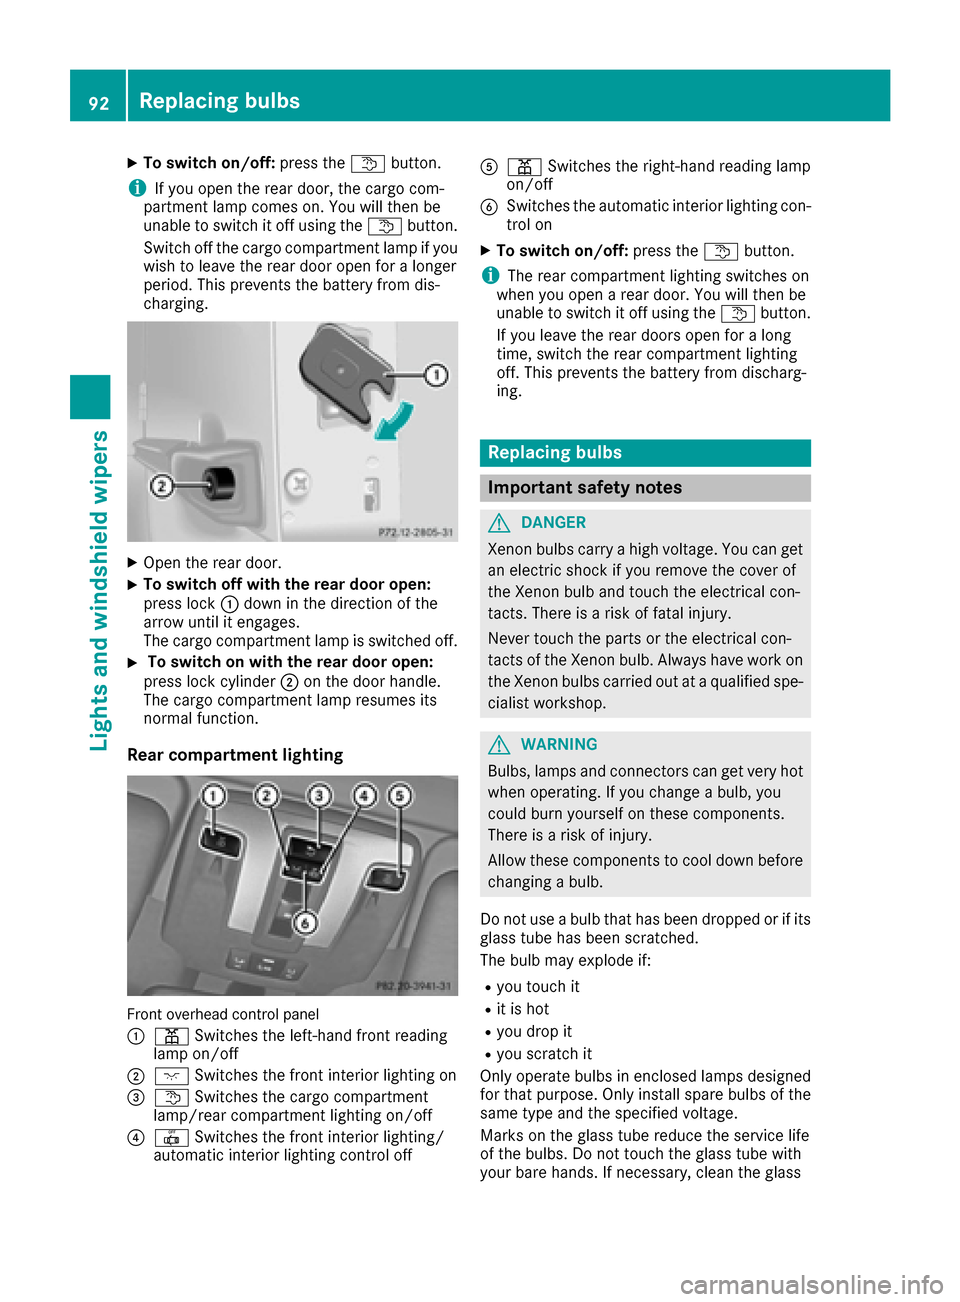
Front overhead control panel
:
pSwitches the left-hand front reading
lamp on/off
;c Switches the front interior lighting on
=tSwitches the cargo compartment
lamp/rear compartment lighting on/off
?| Switches the front interior lighting/
automatic interior lighting control off
Ap Switches the right-hand front reading
lamp on/off
BSwitches the automatic interior lighting con-
trol on
XTo switch on: press thecsymbol on
switch B.
XTo switch off: set switchBto the center
position.
Reading lamps
Front overhead control panel
:
p Switches the left-hand front reading
lamp on/off
;c Switches the front interior lighting on
=tSwitches the cargo compartment
lamp/rear compartment lighting on/off
?| Switches the front interior lighting/
automatic interior lighting control off
Ap Switches the right-hand front reading
lamp on/off
BSwitches the automatic interior lighting con-
trol on
XTo switch on/off: press thepbutton.
Cargo compartment lamp
GWARNING
Combustion engines emit poisonous exhaust
gases such as carbon monoxide. If the rear
door is open when the engine is running, par-
ticularly if the vehicle is moving, exhaust
fumes could enter the passenger compart-
ment. There is a risk of poisoning.
Turn off the engine before opening the rear
door. Never drive with the rear door open.
!Switch off the cargo compartment lamp if
you wish to leave the rear door open for a
longer period. The battery may otherwise dis-
charge.
!Do not close the rear door while lock :is
engaged at the bottom. Otherwise, you could
damage lock :.
Front overhead control panel
:
pSwitches the left-hand front reading
lamp on/off
;c Switches the front interior lighting on
=tSwitches the cargo compartment
lamp/rear compartment lighting on/off
?| Switches the front interior lighting/
automatic interior lighting control off
Ap Switches the right-hand front reading
lamp on/off
BSwitches the automatic interior lighting con-
trol on
Interior lighting91
Lights and windshield wipers
Z
Page 94 of 302

XTo switch on/off:press thetbutton.
iIf you open the rear door, the cargo com-
partment lamp comes on. You will then be
unable to switch it off using the tbutton.
Switch off the cargo compartment lamp if you
wish to leave the rear door open for a longer
period. This prevents the battery from dis-
charging.
XOpen the rear door.
XTo switch off with the rear door open:
press lock :down in the direction of the
arrow until it engages.
The cargo compartment lamp is switched off.
XTo switch on with the rear door open:
press lock cylinder ;on the door handle.
The cargo compartment lamp resumes its
normal function.
Rear compartment lighting
Front overhead control panel
:
p Switches the left-hand front reading
lamp on/off
;c Switches the front interior lighting on
=tSwitches the cargo compartment
lamp/rear compartment lighting on/off
?| Switches the front interior lighting/
automatic interior lighting control off
Ap Switches the right-hand reading lamp
on/off
BSwitches the automatic interior lighting con-
trol on
XTo switch on/off: press thetbutton.
iThe rear compartment lighting switches on
when you open a rear door. You will then be
unable to switch it off using the tbutton.
If you leave the rear doors open for a long
time, switch the rear compartment lighting
off. This prevents the battery from discharg-
ing.
Replacing bulbs
Important safety notes
GDANGER
Xenon bulbs carry a high voltage. You can get an electric shock if you remove the cover of
the Xenon bulb and touch the electrical con-
tacts. There is a risk of fatal injury.
Never touch the parts or the electrical con-
tacts of the Xenon bulb. Always have work on
the Xenon bulbs carried out at a qualified spe-
cialist workshop.
GWARNING
Bulbs, lamps and connectors can get very hot
when operating. If you change a bulb, you
could burn yourself on these components.
There is a risk of injury.
Allow these components to cool down before
changing a bulb.
Do not use a bulb that has been dropped or if its
glass tube has been scratched.
The bulb may explode if:
Ryou touch it
Rit is hot
Ryou drop it
Ryou scratch it
Only operate bulbs in enclosed lamps designed
for that purpose. Only install spare bulbs of the same type and the specified voltage.
Marks on the glass tube reduce the service life
of the bulbs. Do not touch the glass tube with
your bare hands. If necessary, clean the glass
92Replacing bulbs
Lights and windshield wiper s
Page 99 of 302

If the wiper blades are worn, the windshield will
no longer be wiped properly. This could prevent
you from observing the traffic conditions,
thereby causing an accident.
Combination switch
1
$Windshield wipers off
2ÄIntermittent wipe, low (rain sensor set
to low sensitivity)
3Å Intermittent wipe, high (rain sensor
set to high sensitivity)
4° Continuous wipe, slow
5¯Continuous wipe, fast
BíSingle wipe
CîTo wipe with washer fluid
XSwitch on the ignition.
XTurn the combination switch to the corre-
sponding position.
Intermittent wiping is interrupted if you stop the
vehicle and open a front door. This protects
people getting into and out of the vehicle from
being sprayed with water.
Intermittent wiping continues when all doors are
closed and:
Ryou shift the automatic transmission to drive
position Dor reverse gear R
or
Ryou change the wipe setting on the combina-
tion switch.
In the ÄorÅ position, the appropriate
wiping frequency is set automatically according
to the intensity of the rain. In the Åposition,
the rain sensor is more sensitive than in
the Ä position, causing the windshield wip-
ers to wipe more frequently.
Switching the rear window wiper on/
off
Combination switch
:
è Switch
2bWipes with washer fluid
3ISwitches on intermittent wiping
40 Switches off intermittent wiping
5b Wipes with washer fluid
XTurn the SmartKey to position 1or 2in the
ignition lock.
XTurn switch :on the combination switch to
the corresponding position.
When the rear window wiper is switched on,
the icon appears in the instrument cluster.
iThe rear window wiper comes on automati-
cally if you shift the selector lever to Rwhile
the windshield wiper are on.
Replacing the wiper blades
Important safety notes
GWARNING
If the windshield wipers begin to move while
you are changing the wiper blades, you could be trapped by the wiper arm. There is a risk of
injury.
Always switch off the windshield wipers and
ignition before changing the wiper blades.
!To avoid damaging the wiper blades, make
sure that you touch only the wiper arm of the
wiper.
!Never open the hood if a windshield wiper
arm has been folded away from the wind-
shield.
Windshield wipers97
Lights and windshield wipers
Z
Page 110 of 302

XTo deactivate:press thedbutton.
The indicator lamp in the dbutton goes
out.
iAir-recirculation mode switches off auto-
matically:
Rafter approximately five minutes at outside
temperatures below approximately 41 ‡
Rafter approximately five minutes if cooling
with air dehumidification is deactivated
Rafter approximately 30 minutes at outside
temperatures above approximately 41 ‡
(5 †)
Convenience opening or closing using
the air-recirculation button
GWARNING
When the convenience closing feature is oper- ating, parts of the body could become trapped
in the closing area of the side window and the
sliding sunroof. There is a risk of injury.
Observe the complete closing procedure
when the convenience closing feature is oper-
ating. Make sure that no body parts are in
close proximity during the closing procedure.
GWARNING
During convenience opening parts of the body could be drawn in or become trapped
between the side window and window frame.
There is a risk of injury.
Make sure that nobody touches the side win-
dow during the opening procedure. If some-
one becomes trapped, immediately press
the W switch in the door to stop the move-
ment of the side windows. To continue closing
the side window, pull on the Wswitch.
XConvenience closing feature: press and
hold the grocker switch up or down until
the side windows and the sliding sunroof start
to close automatically.
The indicator lamp above the grocker
switch lights up. Air-recirculation mode is
activated.
If you manually open the side windows or the
sliding sunroof after closing with the conve- nience closing feature, they will remain in this
position when opened.
If parts of the body are in the closing area during
convenience closing, proceed as follows:
XPress the Wbutton to stop the side win-
dows.
The side window stops.
XTo then open the side windows, press the
W button again.
XPress the 3switch to stop the sliding sun-
roof.
The sliding sunroof stops.
XTo then open the sliding sunroof, pull back on
the 3 switch.
XConvenience opening feature: press and
hold the grocker switch up or down until
the side windows and the sliding sunroof start
to open automatically.
The indicator lamp above the grocker
switch goes out. Air-recirculation mode is
deactivated.
Activating/deactivating the residual
heat function
The "residual heat" function is only available in
Canada.
It is possible to make use of the residual heat of
the engine to continue heating the stationary
vehicle for up to 30 minutes after the engine has
been switched off. The heating time depends on the coolant temperature and on the interior tem-
perature that has been set.
iThe blower will run at a low speed regardless
of the airflow setting.
iIf you activate the residual heat function at
high temperatures, only the ventilation will be
activated.
XTurn the SmartKey to position 0(Ypage 112)
in the ignition lock or remove it.
XTo activate: press theÁbutton.
The indicator lamp in the Ábutton lights
up.
108Operating the climate control systems
Climate control
Page 115 of 302

Starting the engine
Important safety notes
GWARNING
Combustion engines emit poisonous exhaust
gases such as carbon monoxide. Inhaling
these exhaust gases leads to poisoning. There
is a risk of fatal injury. Therefore never leave
the engine running in enclosed spaces with-
out sufficient ventilation.
GWARNING
Flammable materials introduced through
environmental influence or by animals can
ignite if in contact with the exhaust system or
parts of the engine that heat up. There is a risk
of fire.
Carry out regular checks to make sure that
there are no flammable foreign materials in
the engine compartment or in the exhaust
system.
!Do not depress the accelerator when start-
ing the engine.
Starting procedure
XShift the automatic transmission to posi-
tion P.
The transmission position display in the mul-
tifunction display shows P.
iFor further information about the automatic
transmission, see (Ypage 118).
iIf you depress the brake when starting the
engine, pedal travel is unusually long and
there is less pedal resistance.
XMake sure that the parking brake is applied.
XTurn the SmartKey to position 3(Ypage 112)
in the ignition lock and release it as soon as
the engine is running.
iYou can also use the touch-start function. To
do this, turn the SmartKey to position 3
(
Ypage 112) and release it immediately. The
engine then starts automatically.
Pulling away
Automatic transmission
GWARNING
If the engine speed is above the idling speed
and you engage transmission position Dor R,
the vehicle could pull away suddenly. There is
a risk of an accident.
When engaging transmission position Dor R,
always firmly depress the brake pedal and do not simultaneously accelerate.
!Only shift the automatic transmission to
reverse gear Ror park position Pwhen the
vehicle is stationary. Otherwise, the auto-
matic transmission could be damaged.
!Do not depress the accelerator pedal while
depressing the brake pedal. This impairs
engine performance and results in premature
wear on the brake system and drivetrain.
!If a warning tone sounds and the ReleasePark. Brakemessage appears in the multi-
function display, the parking brake is still
applied. Release the parking brake.
XDepress the brake pedal and keep it
depressed.
XShift the automatic transmission to position D
or R.
iBefore driving off, wait until the gear change
is fully completed.
XRelease the parking brake (Ypage 131).
XRelease the brake pedal.
XCarefully depress the accelerator pedal.
iIt is only possible to shift the automatic
transmission from position Pto a different
position if you depress the brake pedal. Only
then is the selector lever lock released.
iThe vehicle locks centrally once you have
pulled away. The locking knobs in the doors
drop down.
You can open the doors from the inside at any
time.
You can also deactivate the automatic locking feature (
Ypage 180).
iUpshifts take place at higher engine speeds
after a cold start. This helps the catalytic con-
Driving113
Driving and parking
Z