2016 MERCEDES-BENZ G-Class child lock
[x] Cancel search: child lockPage 7 of 302

Cargo compartment coverInstalling/removing ...................... .219
Notes/how to use ......................... 219
Opening and closing ......................2 19
Overview ........................................ 219
Cargo compartment enlargement
Important safety notes .................. 216
Cargo tie down rings ......................... 219
CD player/CD changer (on-board
computer) .......................................... 176
Center console
Overview .......................................... 30
Upper section .................................. 30
Central locking
Automatic locking (on-board com-
puter) ............................................. 180
Locking/unlocking (SmartKey) ........6 0
Changing bulbs
Reversing lamps .............................. 96
Side marker lamps .......................... .94
Turn signals (front) ........................... 94
Changing gears ..................................1 21
Checklist
After driving off-road ...................... 139
Before driving off-road ................... 138
Child
Restraint system .............................. 47
Child seat
BabySmart™ air bag deactivation
system ............................................. 50
Forward-facing restraint system ...... 51
LATCH-type (ISOFIX) child seat
anchors ............................................ 48
On the front-passenger seat ............ 51
Problem (malfunction) ..................... 53
Rearward-facing restraint system .... 51
Top Tether ....................................... 49
Child-proof locks
Important safety notes .................... 53
Rear doors ....................................... 54
Children
Special seat belt retractor ............... 47
Chrome parts (cleaning instruc-
tions) .................................................. 244
Cigarette lighter ................................ 222
Climate control
Controlling automatically ............... 105 Convenience opening/
closing
(air-recirculation mode) ................. 108
Cooling with air dehumidification .. 103
Defrosting the windows ................. 106
Defrosting the windshield .............. 105
Dual-zone automatic climate con-
trol ................................................. 100
Important safety notes .................... 99
Indicator lamp ................................ 104
Maximum cooling .......................... 106
Notes on using dual-zone auto-
matic climate control ..................... 101
Overview of systems ........................ 99
Problem with the rear window
defroster ........................................ 107
Problems with "cooling with air
dehumidification" ........................... 104
Refrigerant ..................................... 293
Refrigerant filling capacity ............. 293
Setting the air distribution ............. 105
Setting the air vents ...................... 109
Setting the airflow ......................... 105
Setting the temperature ................ 105
Switching air-recirculation mode
on/off ............................................ 107
Switching on/off ........................... 102
Switching residual heat on/off ...... 108
Switching the rear window
defroster on/off ............................ 107
Switching the ZONE function on/
off .................................................. 105
Windshield defroster ...................... 106
Cockpit
Overview .......................................... 26
see Instrument cluster
COMAND
see separate operating instructions
Combination switch ............................ 88
Consumption statistics (on-board
computer) .......................................... 173
Convenience opening feature
see Side windows
Convenience opening/closing (air-
recirculation mode) ........................... 108
Coolant (engine)
Checking the level ......................... 238
Display message ............................ 192
Filling capacity ............................... 295
Index5
Page 12 of 302

K
Key positionsSmartKey ...................................... .112
L
Lap time (RACETIMER) ......................182
LATCH-type (ISOFIX) child seat
anchors ................................................ 48
License plate lamp (display mes-
sage) ................................................... 190
Light sensor (display message) ....... 191
Lights
Activating/deactivating the inte-
rior lighting delayed switch-off ....... 180
Automatic headlamp mode .............. 85
Hazard warning lamps ..................... 89
High beam flasher ............................ 88
High-beam headlamps ..................... 88
Light switch ..................................... 84
Low-beam headlamps ......................8 4
Parking lamps ..................................8 7
Rear fog lamp .................................. 86
Standin glamp s................................ 87
Switchin gth edaytime running
lamp son/off (on-boar dcom-
puter) ............................................ .179
Switching the daytime running
lamps on/off (switch) ......................8 5
Switching the exterior lighting
delayed switch-off on/off (on-
board computer) ............................ 179
Switching the surround lighting
on/off (on-board computer) .......... 179
Turn signals ..................................... 88
see Interior lighting
see Replacing bulbs
LIM indicator lamp
Cruise control ................................ 142
DISTRONIC PLUS ........................... 149
Variable SPEEDTRONIC ................. 145
Limit speed
Variable SPEEDTRONIC ................. 145
Load anchorage ................................. 218
Loading guidelines ............................ 214
Locking
Emergency locking ........................... 66 From inside the vehicle (central
locking button) ................................. 65
see C
entral locking
Locking (doors)
Automatic ........................................ 66
Locking centrally
see Central locking
Locking verification signal (on-
board computer) ............................... 180
LOW RANGE off-road gear ................ 162
Low-beam headlamps
Display message ............................ 189
Switching on/off .............................. 84
Luggage compartment enlarge-
ment
Overview ........................................ 216
Lumbar support
Adjusting the 4-way lumbar sup-
port .................................................. 76
Luxury head restraints ....................... 75
M
M+S tires............................................ 264
Malfunction message
see Display messages
Matte finish (cleaning instruc-
tions) .................................................. 243
mbrace
Call priority .................................... 228
Display message ............................ 187
Downloading destinations
(COMAND) ..................................... 228
Downloading routes ....................... 230
Emergency call .............................. 225
Geo fencing ................................... 230
Important safety notes .................. 224
Locating a stolen vehicle ............... 229
MB info call button ........................ 227
Remote vehicle locking .................. 229
Roadside Assistance button .......... 226
Self-test ......................................... 225
Speed alert .................................... 230
System .......................................... 225
Triggering the vehicle alarm ........... 231
Vehicle remote malfunction diag-
nosis .............................................. 229
Vehicle remote unlocking .............. 228
10Index
Page 13 of 302

Mechanical keyFunction/notes ................................ 61
General notes .................................. 61
Removing .........................................6 1
Memory card (audio) ......................... 176
Memory function ................................. 82
Message memory (on-board com-
puter) .................................................. 184
Messages
see Display messages
Mirrors
Sun visor ........................................ 221
see Exterior mirrors
see Rear-view mirror
Mobile phone
Menu (on-board computer) ............ 177
Mounting wheels
Mounting a new wheel ................... 284
Raising the vehicle ......................... 282
Removing a wheel .......................... 283
Securing the vehicle against roll-
ing away ........................................ 282
MP3
Operation ....................................... 176
see separate operating instructions
Multifunction display
Function/notes ............................. 173
Permanent display ......................... 179
Multifunction steering wheel
Back button ................................... 172
Operating the on-board compute r..1 72
Overview .......................................... 29
N
Navigation
Menu (on-board computer) ............ 174
see separate operating instructions
NECK-PRO head restraints
Operation ......................................... 45
Resetting triggered .......................... 45
NECK-PRO luxury head restraints
Important safety notes .................... 45
Operation ......................................... 45
Resetting when triggered ................. 46
Notes on breaking-in a new vehi-
cle ....................................................... 111
O
Occupant safety
Automatic measures after an acci-
dent ................................................. 46
BabySmart™ air bag deactivation
system ............................................. 50
Children in the vehicle ..................... 46
Important safety notes .................... 35
Introduction to the restraint sys-
tem ............................................ 34, 47
PASSENGER AIR BAG indicator
lamps ............................................... 35
Pets in the vehicle ........................... 55
Restraint system warning lamp ........3 5
Off-road
Differential locks ........................... .164
Off-road ABS ....................................5 6
Off-road driving
Checklist ....................................... .138
Driving on sand .............................. 139
Important safety notes .................. 137
Traveling uphill ............................... 140
Off-road fording ................................. 135
Off-road system
Permanent all-wheel drive ............. 157
Oil
see Engine oil
On-board computer
AMG menu ..................................... 182
Assistance menu ........................... 178
Audio menu ................................... 176
Convenience submenu .................. 181
Display messages .......................... 184
DISTRONIC PLUS ........................... 151
Factory settings submenu ............. 181
Important safety notes .................. 170
Instrument cluster submenu .......... 179
Lighting submenu .......................... 179
Menu overview .............................. 173
Message memory .......................... 184
Navigation menu ............................ 174
Operation ....................................... 172
RACETIMER ................................... 182
Service menu ................................. 178
Settings menu ............................... 178
Standard display ............................ 173
Telephone menu ............................ 177
Index11
Page 36 of 302

Useful information
i
This Operator's Manual describes all models
and all standard and optional equipment of
your vehicle available at the time of publica-
tion of the Operator's Manual. Country-spe-
cific differences are possible. Please note
that your vehicle may not be equipped with all
features described. This also applies to
safety-related systems and functions.
iRead the information on qualified specialist
workshops: (Ypage 23).
Panic alarm
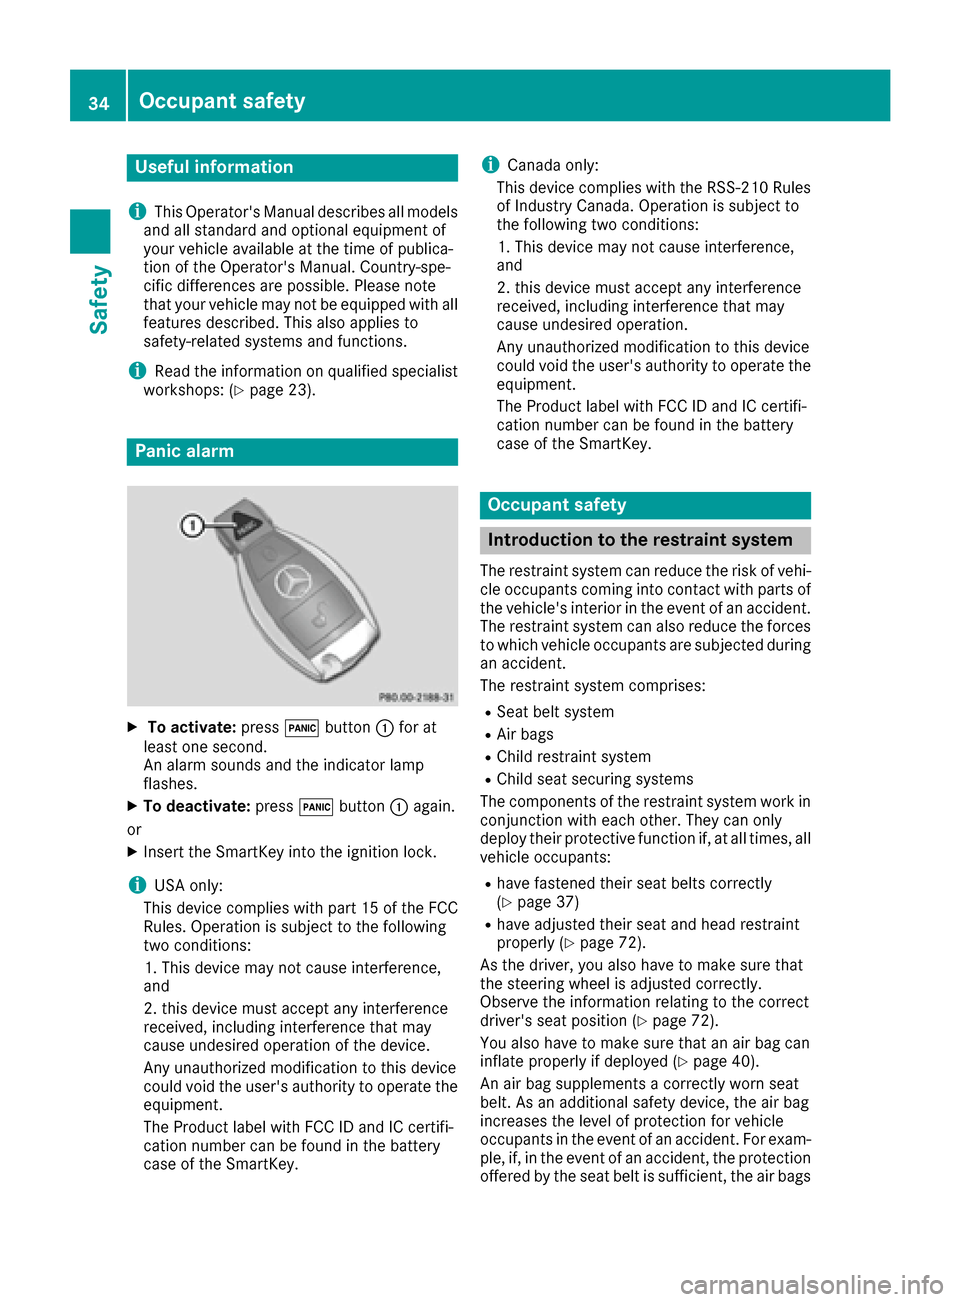
XTo activate: press!button :for at
least one second.
An alarm sounds and the indicator lamp
flashes.
XTo deactivate: press!button :again.
or
XInsert the SmartKey into the ignition lock.
iUSA only:
This device complies with part 15 of the FCC
Rules. Operation is subject to the following
two conditions:
1. This device may not cause interference,
and
2. this device must accept any interference
received, including interference that may
cause undesired operation of the device.
Any unauthorized modification to this device
could void the user's authority to operate the
equipment.
The Product label with FCC ID and IC certifi-
cation number can be found in the battery
case of the SmartKey.
iCanada only:
This device complies with the RSS-210 Rules
of Industry Canada. Operation is subject to
the following two conditions:
1. This device may not cause interference,
and
2. this device must accept any interference
received, including interference that may
cause undesired operation.
Any unauthorized modification to this device
could void the user's authority to operate the equipment.
The Product label with FCC ID and IC certifi-
cation number can be found in the battery
case of the SmartKey.
Occupant safety
Introduction to the restraint system
The restraint system can reduce the risk of vehi-
cle occupants coming into contact with parts of
the vehicle's interior in the event of an accident.
The restraint system can also reduce the forces
to which vehicle occupants are subjected during
an accident.
The restraint system comprises:
RSeat belt system
RAir bags
RChild restraint system
RChild seat securing systems
The components of the restraint system work in
conjunction with each other. They can only
deploy their protective function if, at all times, all
vehicle occupants:
Rhave fastened their seat belts correctly
(Ypage 37)
Rhave adjusted their seat and head restraint
properly (Ypage 72).
As the driver, you also have to make sure that
the steering wheel is adjusted correctly.
Observe the information relating to the correct
driver's seat position (
Ypage 72).
You also have to make sure that an air bag can
inflate properly if deployed (
Ypage 40).
An air bag supplements a correctly worn seat
belt. As an additional safety device, the air bag
increases the level of protection for vehicle
occupants in the event of an accident. For exam-
ple, if, in the event of an accident, the protection
offered by the seat belt is sufficient, the air bags
34Occupant safety
Safety
Page 38 of 302

led child restraint system, and the age and
size of the child. Therefore, always observe
the information on "Children in the vehicle"
(
Ypage 46). There you will also find instruc-
tions on rearward and forward-facing child
restraint systems on the front-passenger
seat.
RAll other persons: the PASSENGER AIR BAG
OFF indicator lamp must be off. Be sure to
observe the notes on "Seat
belts“ (
Ypage 36) and "Air bags"
(Ypage 40). There you can also find infor-
mation on the correct seat position.
Observe the information on the BabySmart™ air
bag deactivation system in the front-passenger
seat (
Ypage 50).
Seat belts
Introduction
Seat belts are the most effective means of
restricting the movement of vehicle occupants
in the event of an accident or the vehicle rolling
over. This reduces the risk of vehicle occupants coming into contact with parts of the vehicle
interior or being ejected from the vehicle. Fur-
thermore, the seat belt helps to keep the vehicle
occupant in the best position in relation to the
air bag.
The seat belt system comprises:
RSeat belts
REmergency Tensioning Devices for the front
seat belts and the outer seat belts in the rear
RBelt force limiters
If the seat belt is pulled out at the belt sash guide
quickly or with a jerky movement, the belt
retractor locks. The belt strap cannot be extrac-
ted any further.
The Emergency Tensioning Device tightens the
seat belt in an accident, pulling the belt close
against the body. However it does not pull the
vehicle occupant back in the direction of the
backrest.
The Emergency Tensioning Device does not cor-
rect an incorrect seat position or the routing of
an incorrectly fastened seat belt.
When triggered, a belt force limiter helps to
reduce the force exerted by the seat belt on the
vehicle occupant.
The belt force limiters for the front seats are
synchronized with the front air bags, which absorb part of the deceleration force. This can
reduce the force exerted on the vehicle occu-
pants during an accident.
!If the front-passenger seat is unoccupied,
do not insert the belt tongue into the buckle of
the front-passenger seat. This may otherwise
lead to the triggering of the Em ergenc
y Ten-
sioning Device in the event of an accident,
which will then need to be replaced.
Important safety notes
The use of seat belts and child restraint systems is required by law in:
Rall 50 states
Rthe U.S. territories
Rthe District of Columbia
Rall Canadian provinces
Even where this is not required by law, all vehicle
occupants should correctly fasten their seat
belts before starting the journey.
GWARNING
If the seat belt is incorrectly fastened, it can-
not protect as intended. Furthermore, an
incorrectly fastened seat belt can cause addi-
tional injury, for example, in an accident, dur-
ing braking or when abruptly changing direc-
tion. This poses an increased risk of injury or
even fatal injury.
Make sure that all vehicle occupants are
seated properly with a correctly fastened seat belt.
GWARNING
The seat belt does not offer the intended level of protection if you have not moved the back-
rest to an almost vertical position. When brak-
ing or in the event of an accident, you could
slide underneath the seat belt and sustain
abdomen or neck injuries, for example. This
poses an increased risk of injury or even fatal injury.
Adjust the seat properly before beginning
your journey. Always ensure that the backrest
is in an almost vertical position and that the
shoulder section of your seat belt is routed
across the center of your shoulder.
36Occupant safety
Safety
Page 48 of 302

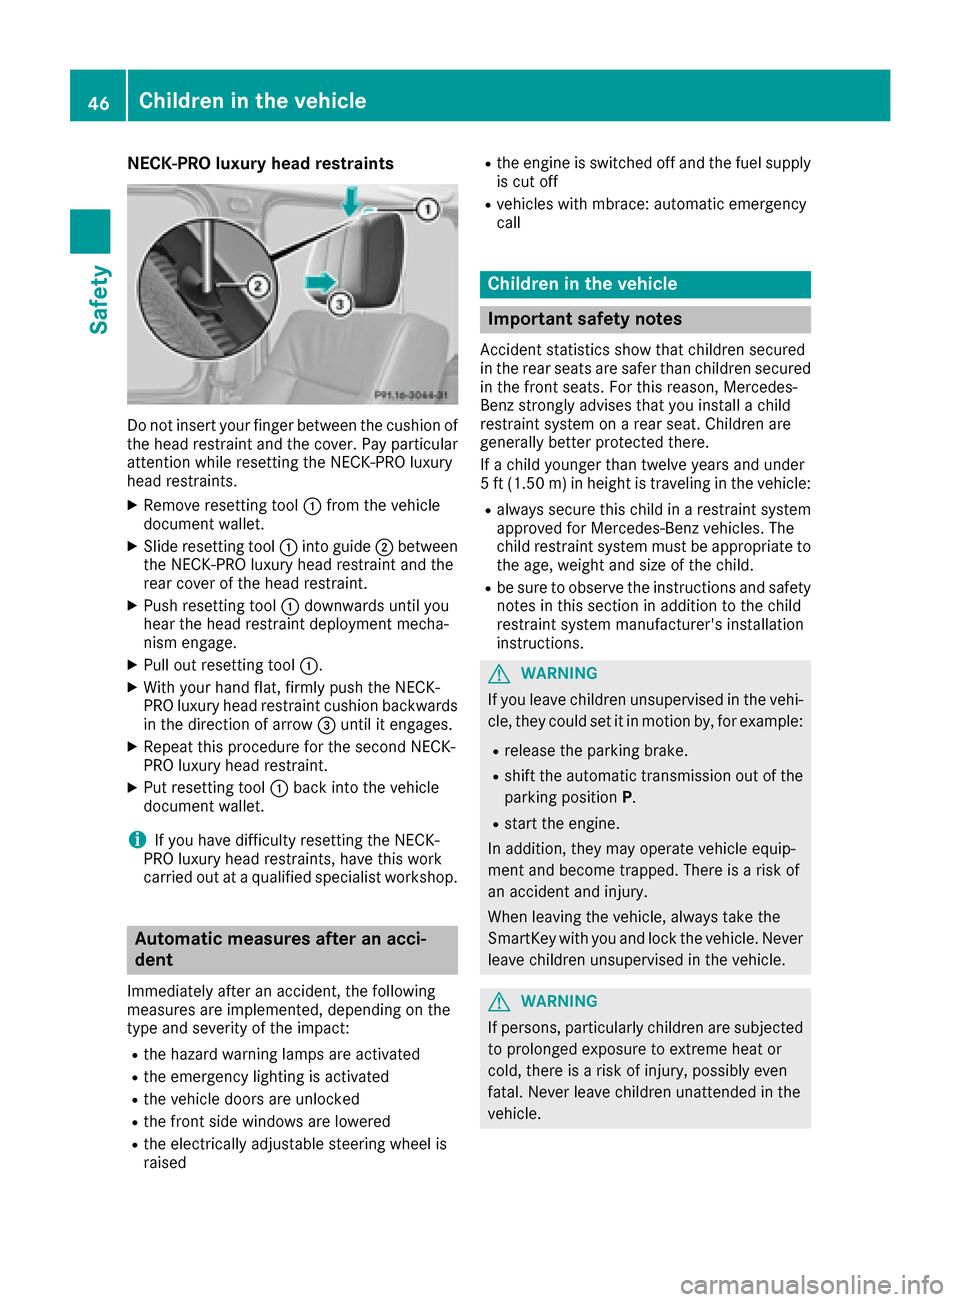
NECK-PRO luxury head restraints
Do not insert your finger between the cushion of
the head restraint and the cover. Pay particular
attention while resetting the NECK-PRO luxury
head restraints.
XRemove resetting tool:from the vehicle
document wallet.
XSlide resetting tool :into guide ;between
the NECK-PRO luxury head restraint and the
rear cover of the head restraint.
XPush resetting tool :downwards until you
hear the head restraint deployment mecha-
nism engage.
XPull out resetting tool :.
XWith your hand flat, firmly push the NECK-
PRO luxury head restraint cushion backwards
in the direction of arrow =until it engages.
XRepeat this procedure for the second NECK-
PRO luxury head restraint.
XPut resetting tool :back into the vehicle
document wallet.
iIf you have difficulty resetting the NECK-
PRO luxury head restraints, have this work
carried out at a qualified specialist workshop.
Automatic measures after an acci-
dent
Immediately after an accident, the following
measures are implemented, depending on the
type and severity of the impact:
Rthe hazard warning lamps are activated
Rthe emergency lighting is activated
Rthe vehicle doors are unlocked
Rthe front side windows are lowered
Rthe electrically adjustable steering wheel is
raised
Rthe engine is switched off and the fuel supply
is cut off
Rvehicles with mbrace: automatic emergency
call
Children in the vehicle
Important safety notes
Accident statistics show that children secured
in the rear seats are safer than children secured
in the front seats. For this reason, Mercedes-
Benz strongly advises that you install a child
restraint system on a rear seat. Children are
generally better protected there.
If a child younger than twelve years and under
5 ft (1.50 m) in height is traveling in the vehicle:
Ralways secure this child in a restraint system
approved for Mercedes-Benz vehicles. The
child restraint system must be appropriate to
the age, weight and size of the child.
Rbe sure to observe the instructions and safety
notes in this section in addition to the child
restraint system manufacturer's installation
instructions.
GWARNING
If you leave children unsupervised in the vehi-
cle, they could set it in motion by, for example:
Rrelease the parking brake.
Rshift the automatic transmission out of the
parking position P.
Rstart the engine.
In addition, they may operate vehicle equip-
ment and become trapped. There is a risk of
an accident and injury.
When leaving the vehicle, always take the
SmartKey with you and lock the vehicle. Never
leave children unsupervised in the vehicle.
GWARNING
If persons, particularly children are subjected to prolonged exposure to extreme heat or
cold, there is a risk of injury, possibly even
fatal. Never leave children unattended in the
vehicle.
46Children in the vehicle
Safety
Page 51 of 302

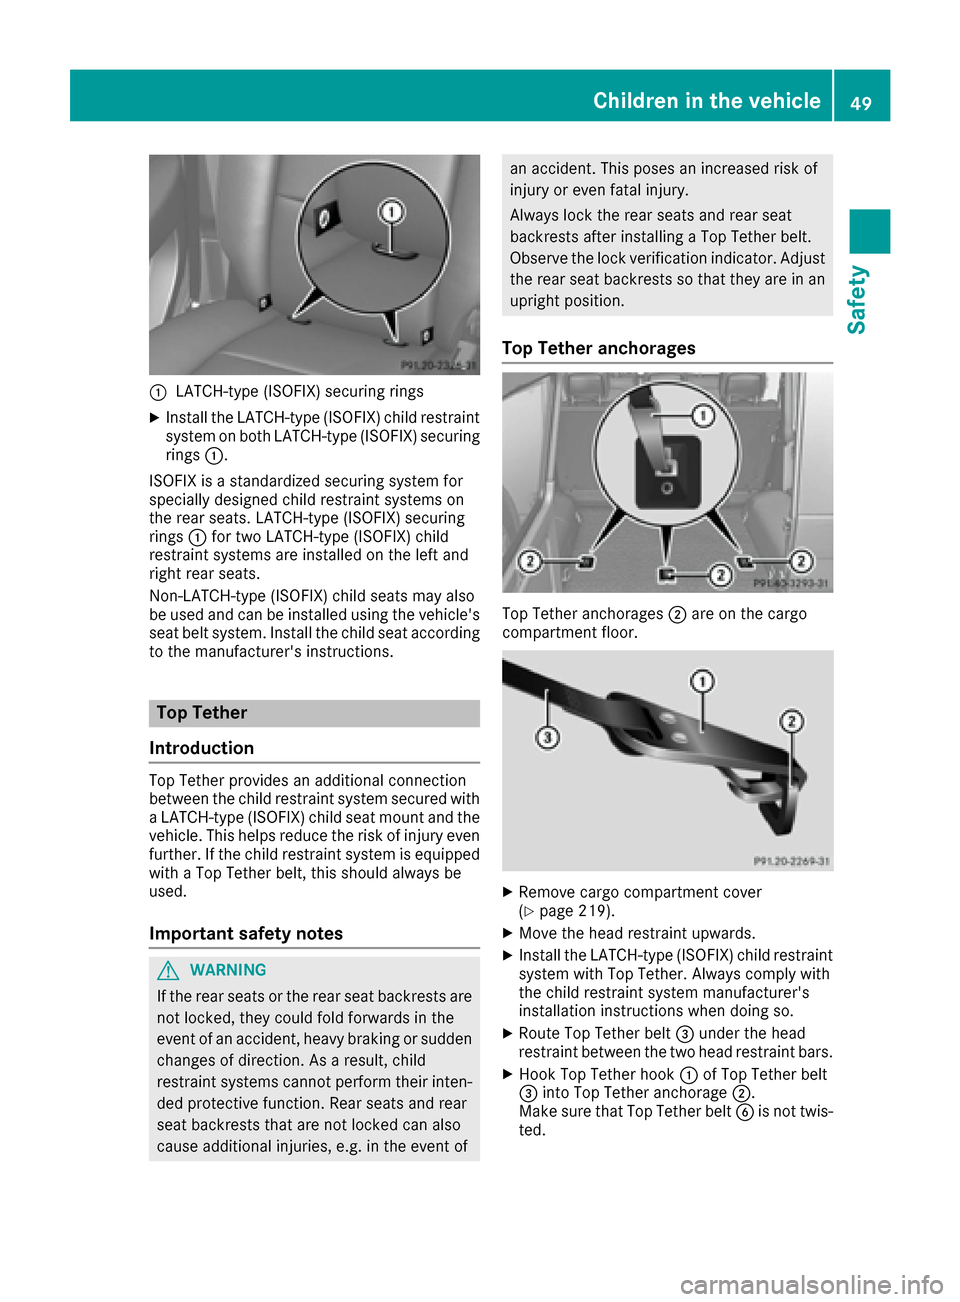
:LATCH-type (ISOFIX) securing rings
XInstall the LATCH-type (ISOFIX) child restraint
system on both LATCH-type (ISOFIX) securing
rings:.
ISOFIX is a standardized securing system for
specially designed child restraint systems on
the rear seats. LATCH-type (ISOFIX) securing
rings :for two LATCH-type (ISOFIX) child
restraint systems are installed on the left and
right rear seats.
Non-LATCH-type (ISOFIX) child seats may also
be used and can be installed using the vehicle's
seat belt system. Install the child seat according
to the manufacturer's instructions.
Top Tether
Introduction
Top Tether provides an additional connection
between the child restraint system secured with
a LATCH-type (ISOFIX) child seat mount and the
vehicle. This helps reduce the risk of injury even
further. If the child restraint system is equipped
with a Top Tether belt, this should always be
used.
Important safety notes
GWARNING
If the rear seats or the rear seat backrests are
not locked, they could fold forwards in the
event of an accident, heavy braking or sudden
changes of direction. As a result, child
restraint systems cannot perform their inten-
ded protective function. Rear seats and rear
seat backrests that are not locked can also
cause additional injuries, e.g. in the event of
an accident. This poses an increased risk of
injury or even fatal injury.
Always lock the rear seats and rear seat
backrests after installing a Top Tether belt.
Observe the lock verification indicator. Adjust
the rear seat backrests so that they are in an
upright position.
Top Tether anchorages
Top Tether anchorages ;are on the cargo
compartment floor.
XRemove cargo compartment cover
(Ypage 219).
XMove the head restraint upwards.
XInstall the LATCH-type (ISOFIX) child restraint
system with Top Tether. Always comply with
the child restraint system manufacturer's
installation instructions when doing so.
XRoute Top Tether belt =under the head
restraint between the two head restraint bars.
XHook Top Tether hook :of Top Tether belt
= into Top Tether anchorage ;.
Make sure that Top Tether belt Bis not twis-
ted.
Children in the vehicle49
Safety
Z
Page 52 of 302

XTension Top Tether belt=. Always comply
with the child restraint system manufactur-
er's installation instructions when doing so.
XMove head restraint back down again slightly if necessary (Ypage 75). Make sure that
you do not interfere with the correct routing of
Top Tether belt =.
BabySmart™ air bag deactivation sys-
tem
The BabySmart™ air bag deactivation system's
sensor system in the front-passenger seat
detects whether a special Mercedes-Benz child
restraint system with a transponder for the
BabySmart™ air bag deactivation system has
been installed. In this case, the PASSENGER AIR
BAG OFF indicator lamp lights up and remains
lit. The front-passenger front air bag is deacti-
vated.
When the SmartKey is removed from the ignition
lock or is in position 0, the PASSENGER AIR BAG
OFF indicator lamp is not lit.
iIf the front-passenger front air bag is deac-
tivated by the BabySmart™ air bag deactiva-
tion system, the following remain enabled on
the front-passenger side:
Rthe side impact air bag
Rthe pelvis air bag
Rthe window curtain air bag
Rthe Emergency Tensioning Device
GWARNING
If you secure a child in a child restraint system on the front-passenger seat and the
PASSENGER AIR BAG OFF indicator lamp is
off, the front-passenger front air bag can
deploy in the event of an accident. The child
could be struck by the air bag. This poses an
increased risk of injury or even fatal injury.
Make sure that the front-passenger front air
bag has been disabled. The PASSENGER AIR
BAG OFF indicator lamp must be lit.
GWARNING
If the PASSENGER AIR BAG OFF indicator
lamp is lit, the front-passenger front air bag is
deactivated. It will not be deployed in the
event of an accident and cannot perform its
intended protective function. A person in the
front-passenger seat could then, for example, come into contact with the vehicle's interior,
especially if the person is sitting too close to
the dashboard. This poses an increased risk of
injury or even fatal injury.
In this case the front-passenger seat may not
be used. You may only transport a child on the
front-passenger seat if they are seated in a
suitable rearward or forward-facing child
restraint system. Always observe the child
restraint system manufacturer's installation
instructions.
GWARNING
If you secure a child in a forward-facing child
restraint system on the front-passenger seat
and you position the front-passenger seat too close to the dashboard, in the event of an
accident, the child could:
Rcome into contact with the vehicle's inte-
rior if the PASSENGER AIR BAG OFF indi-
cator lamp is lit, for example
Rbe struck by the air bag if the PASSENGER
AIR BAG OFF indicator lamp is off
This poses an increased risk of injury or even fatal injury.
Move the front-passenger seat as far back as
possible. Always make sure that the shoulder belt strap is correctly routed from the vehicle
belt sash guide to the shoulder belt guide on
the child restraint system. The shoulder belt
strap must be routed forwards and down-
wards from the belt sash guide. If necessary,
adjust the belt sash guide and the front-
passenger seat accordingly. Always observe
the information about suitable positioning of
the child restraint system in this Operator's
Manual as well as the child restraint system
manufacturer's installation instructions.
50Children in the vehicle
Safety