2016 MERCEDES-BENZ G-Class door lock
[x] Cancel search: door lockPage 151 of 302

Cruise control lever
:To activate or increase speed
;To set the specified minimum distance
=LIM indicator lamp
?To activate at the current speed/last storedspeed
ATo activate or reduce speed
BTo switch between DISTRONIC PLUS and
variable SPEEDTRONIC
CTo deactivate DISTRONIC PLUS
With the cruise control lever, you can operate
DISTRONIC PLUS and variable SPEEDTRONIC.
XTo switch between variable SPEED-
TRONIC and DISTRONIC PLUS: press the
cruise control lever in the direction of arrow
B.
LIM indicator lamp =on the cruise control lever
indicates which function you have selected:
RLIM indicator lamp =off:DISTRONIC PLUS
is selected.
RLIM indicator lamp =on:variable SPEED-
TRONIC is selected.
Activating DISTRONIC PLUS
Activation conditions
In order to activate DISTRONIC PLUS, the fol-
lowing conditions must be fulfilled:
Rthe engine must be started. It may take up to
two minutes after pulling away before
DISTRONIC PLUS is operational.
Rthe parking brake must be released.
Rthe differential lock must be disengaged.
RESP®must be active, but not intervening.
Rthe transmission must be in position D.
Rthe driver's door must be closed when you
shift fromPto Dor your seat belt must be
fastened.
Rthe front-passenger door and rear doors must
be closed.
Rthe vehicle must not skid.
Rthe DISTRONIC PLUS function must be selec-
ted (Ypage 149).
Rthe transfer case must be in the HIGH RANGE
transmission position.
Rthe vehicle must not be on an uphill or down-
hill gradient of more than 22‑25%.
Rthe radar sensor must be free from dirt
(Ypage 244).
Activating while driving
When driving at speeds below 20 mph
(30 km/h), you can activate DISTRONIC PLUS if
the vehicle in front has been detected and is
shown in the multifunction display. If the vehicle
in front is no longer detected and displayed,
DISTRONIC PLUS switches off and a tone
sounds.
XBriefly pull the cruise control lever towards
you ?, or press it up :or down A.
DISTRONIC PLUS is selected.
XPress the cruise control lever up :or down
A repeatedly until the desired speed is set.
XRemove your foot from the accelerator pedal.
Your vehicle adapts its speed to that of the
vehicle in front, but only up to the desired
stored speed.
iIf you do not fully release the accelerator
pedal, the DISTRONIC PLUS Passivemes-
sage appears in the multifunction display. The
set distance to a slower-moving vehicle in
front will then not be maintained. You will be
driving at the speed you determine by the
position of the accelerator pedal.
Driving systems149
Driving and parking
Z
Page 166 of 302

is interrupted. As a result, the vehicle could
roll away. There is a risk of an accident.
Secure the vehicle with the parking brake, and
on uphill or downhill gradients, also secure it
with a device such as a wheel chock.
XTurn the SmartKey to position2in the ignition
lock (Ypage 112).
XApply the parking brake.
XDepress the brake pedal.
XMove the selector lever to position N
(Ypage 119).
XPress and hold LOW RANGE button ;for
approximately ten seconds.
When the shift procedure is complete, the TC
In Neutralmessage appears in the multi-
function display for five seconds.
If the gear change is not completed, the follow-
ing messages could appear in the display
(
Ypage 195).
iIf the transfer case is in neutral, the key is in
the ignition lock and you open the driver's
door, the TC
InNeutralmessage appears in
the multifunction display. If you then release
the parking brake, a warning tone will sound.
Differential locks
General notes
GWARNING
When the differential locks are engaged, ABS, 4ETS, ESP
®and BAS are deactivated. As a
result, the wheels could lock when braking
and the braking distance is increased. There is
a risk of an accident.
Disengage the differential locks immediately
on firm surfaces with good grip.
!In order to avoid damage to the transfer
case, you must operate the vehicle on a dyna-
mometer (1-axle dynamometer) only if:
Rthe axle not driven on is jacked up
or
Rthe corresponding propeller shaft is dis-
connected and the transfer case differen-
tial lock is engaged.
Otherwise, the transfer case can be damaged. Differential locks improve the traction of the
vehicle.
Your vehicle is equipped with a differential lock
each for:
Rthe transfer case: this controls the balance
between the front and rear axles.
Rthe rear axle: this controls the balance
between the wheels on the rear axle.
Rthe front axle: this controls the balance
between the wheels on the front axle.
Information on differential gear system
and differential lock
When the vehicle drives around a curve, the
wheels on the outside of the curve must cover a
greater distance. Therefore, the wheels turn
more rapidly than on the inside. The differential,
a gear system in the drive train, allows for dif-
fering rotational speeds and facilitates corner-
ing.
The disadvantage of a differential is that the
wheels that have the least grip, get the most
drive. An example: a wheel of a driven axle is on
a snow-covered surface and therefore does not
have any traction. The differential sends most of
the drive force to this wheel because the force
takes the route of the lowest resistance. The
opposite wheel on this axle, however, which
stands on firm ground and could therefore allow
propulsion, receives no driving power. 4ETS
compensates for this disadvantage. 4ETS pro-
vides good steerability by automatically braking
the spinning wheel. 4ETS provides the wheel on
the firm surface with more drive force, which in
turn provides propulsion.
ESP
®and 4ETS are traction systems that are
ideal for road driving and suitable for light off-
road driving. The LOW RANGEoff-road gear
also improves off-road capability.
More challenging off-road conditions require
additional measures such as locking one or
more differential. Your vehicle is equipped with
three differential locks:
Ra central differential lock for the transfer case
Ra differential lock for the front axle and
Ra differential lock for the rear axle
Each differential lock can be engaged with the
corresponding switch on the center console. If
the differential in the transfer case is locked, the
front and rear wheels rotate at the same speed.
If t
he differential for the rear axle is locked, both
164Off-road driving systems
Driving and parking
Page 182 of 302

Deactivating delayed switch-off of the exterior
lighting temporarily:
XBefore leaving the vehicle, turn the SmartKey
to position0(Ypage 112 )in the ignition lock.
XTurn the SmartKey to position 2in the ignition
lock (Ypage 112).
The exterior lighting delayed switch-off is
deactivated.
Delayed switch-off of the exterior lighting is
reactivated the next time you start the engine.
If you have activated the Surround Lighting
function and the light switch is set to Ã, the
following functions are activated when it is dark:
Rsurround lighting: the exterior lighting
remains lit for 40 seconds after unlocking
with the SmartKey. If you start the engine, the
surround lighting is switched off and auto-
matic headlamp mode is activated
(
Ypage 85).
Rexterior lighting delayed switch-off: the
exterior lighting remains lit for 60 seconds
after the engine is switched off. If you close all
the doors and the trunk lid, the exterior light- ing goes off after 15 seconds.
iDepending on your vehicle's equipment,
when the surround lighting and delayed
switch-off exterior lighting are on, the follow-
ing light up:
RParking lamps
RLow-beam headlamps
RDaytime running lamps
RSide marker lamps
RSurround lighting in the exterior mirrors
Activating/deactivating the interior light-
ing delayed switch-off
If you activate the Interior Lighting Delayfunction, the interior lighting remains on for
20 seconds after you remove the SmartKey from
the ignition lock.
XPress the=or; button on the steering
wheel to select the Sett.menu.
XPress the:or9 button to select the
Lightssubmenu.
XPress ato confirm.
XPress :or9 to select the InteriorLighting Delayfunction.
When the Interior Lighting Delayfunc-
tion is activated, the vehicle interior is dis-
played in red in the multifunction display.
XPress the abutton to save the setting.
Vehicle
Activating/deactivating the automatic
door locking mechanism
If you activate the AutomaticDoorLockfunc-
tion, the vehicle is centrally locked above a
speed of approximately 9 mph (15 km/h).
XPress the =or; button on the steering
wheel to select the Sett.menu.
XPress the:or9 button to select the
Vehiclesubmenu.
XPress ato confirm.
XPress the :or9 button to select the
Automatic Door Lockfunction.
When the Automatic Door Lockfunction is
activated, the vehicle doors are displayed in
red in the multifunction display.
XPress the abutton to save the setting.
For further information on the automatic locking
feature, see (
Ypage 66).
Activating/deactivating the acoustic
locking verification signal
If you switch on the AcousticLockfunction, an
acoustic signal sounds when you lock the vehi-
cle.
XPress the =or; button on the steering
wheel to select the Sett.menu.
XPress:or9 to select the Vehiclesubmenu.
XPressato confirm.
XPress the :or9 button to select the
Acoustic Lockfunction.
If the Acoustic Lockfunction is activated,
the & symbol in the multifunction display
lights up red.
XPress the abutton to save the setting.
180Menus and submenus
On-board computer and displays
Page 183 of 302

Convenience
Activating/deactivating the EASY-
ENTRY/EXIT feature
GWARNING
When the EASY-ENTRY/EXIT feature adjusts
the steering wheel, you and other vehicle
occupants – particularly children – could
become trapped. There is a risk of injury.
While the EASY-ENTRY/EXIT feature is mak-
ing adjustments, make sure that no one has
any body parts in the sweep of the steering
wheel.
If somebody becomes trapped:
Rpress one of the memory function position
buttons, or
Rmove the switch for steering wheel adjust-
ment in the opposite direction to that in
which the steering wheel is moving.
The adjustment process is stopped.
XPress the =or; button on the steering
wheel to select the Sett.menu.
XPress the:or9 button to select the
Conveniencesubmenu.
XPress ato confirm.
XPress the :or9 button to select the
Easy Entry/Exitfunction.
If the EasyEntry/Exitfunction is activated,
the vehicle steering wheel appears in red in
the multifunction display.
XPress the abutton to save the setting.
Further information on the EASY-ENTRY/EXIT
feature (
Ypage 79).
Switching the fold-in mirrors when lock-
ing feature on/off
When you activate the Auto.MirrorFoldingfunction, the exterior mirrors are folded in when
the vehicle is locked. If you unlock the vehicle
and then open a door, the exterior mirrors fold
out again.
XPress the=or; button on the steering
wheel to select the Sett.menu.
XPress the:or9 button to select the
Conveniencesubmenu.
XPress ato confirm.
XPress :or9 to select the Auto.Mir‐ror Foldingfunction.
If the Auto. Mirror Foldingfunction is
activated, the vehicle's exterior mirror is dis-
played in red in the multifunction display.
XPress the abutton to save the setting.
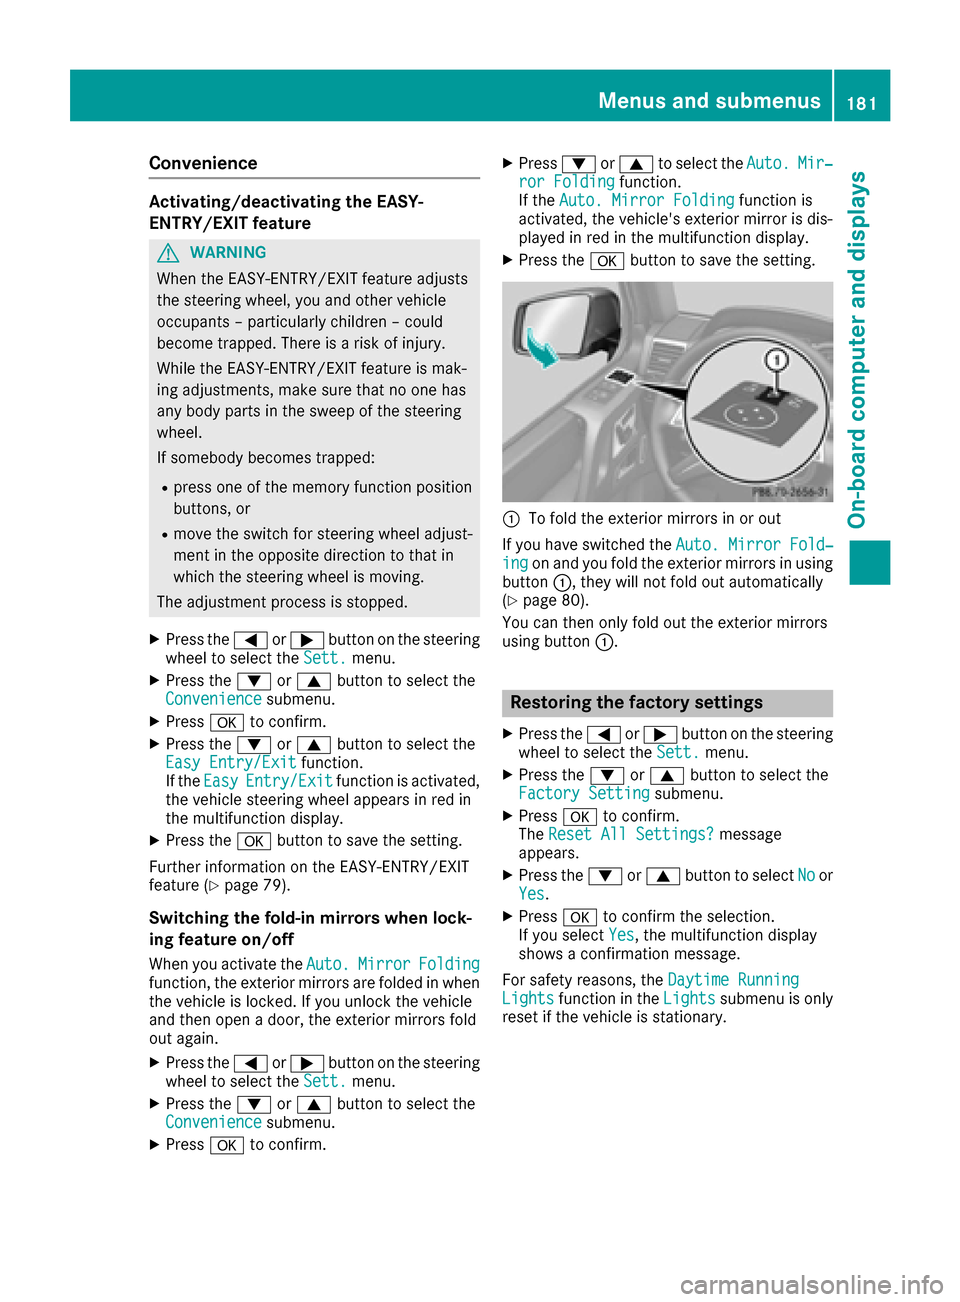
:To fold the exterior mirrors in or out
If you have switched the Auto. Mirror Fold‐
ingon and you fold the exterior mirrors in using
button :, they will not fold out automatically
(
Ypage 80).
You can then only fold out the exterior mirrors
using button :.
Restoring the factory settings
XPress the=or; button on the steering
wheel to select the Sett.menu.
XPress the:or9 button to select the
Factory Settingsubmenu.
XPress ato confirm.
The Reset All Settings?message
appears.
XPress the :or9 button to select Noor
Yes.
XPress ato confirm the selection.
If you select Yes, the multifunction display
shows a confirmation message.
For safety reasons, the Daytime Running
Lightsfunction in theLightssubmenu is only
reset if the vehicle is stationary.
Menus and submenus181
On-board computer and displays
Z
Page 198 of 302

Display messagesPossible causes/consequences andMSolutions
TC NEUTRAL
ON
The transfer cas eis in th eNeutral neutral position .
A warning tone will also soun dwhen th edriver's door is opened and
th ebrak epedal is no tdepressed.
XClos eth edriver's door .
XSecureth evehicl eagainst rollin gaway (Ypage 130).
XShift th etransfer cas eaccording to drivin gcondition s
(Ypage 162).
Preselected differ ‐ential lock
ESP unavailable
Adifferential loc khas been engaged. The differential gear has no tyet
locke dth erespective differential. The activation indicator lamp (yel-
low) (
Ypage 164) of th eswitch lights up.
ES Pis unavailable .
AB Sis still available.
Differential loc kactive
ABSandESPunavail‐able
Adifferential loc kwas engage dand th edifferential gear has locke d
th erespective differential. The activation indicator lamp (yellow) and
function indicator lamp (red) (
Ypage 164) on theswitch ligh tup.
AB Sand ES Pare unavailable .
Blind SpotAssistcurrently unavaila‐ble
See Operator' sMan ‐ual
Blind Spot Assis tis temporarily inoperative. Possibl ecauses are:
Ryou hav eestablished th eelectrical connection between th etrailer
and your vehicle.
Rth esensor sare dirty.
Rfunction is impaire ddue to heav yrain or snow.
Rth eradar sensor system is outside th eoperating temperature
range.
Rth eradar sensor system is temporarily inoperative, e.g. due to elec -
tromagneti cradiation emitted by nearby TV or radi ostation sor
other source sof electromagneti cradiation .
The yellow 9indicator lamp salso ligh tup in th eexterio rmirrors.
XWhe ntowin g atrailer ,confirm th edisplay message wit ha.
If you are drivin gwithout atrailer and th edisplay message does no t
disappear :
XPull overand stop th evehicl esafely as soo nas possible, payin g
attention to roa dand traffic conditions.
XApply th eparking brake.
XClean th esensor s (Ypage 244).
XRestart th eengine.
If th esystem detects that th esensor sare fully operational, th edisplay
message disappears.
Blind Spot Assis tis operational again .
Blind SpotAssistor
InoperativeBlind Spot Assis tis defective.
The yellow 9indicator lamp salso ligh tup in th eexterio rmirrors.
XVisit aqualified specialist workshop .
196Display messages
On-board computer and displays
Page 203 of 302

Vehicle
Display messagesPossible causes/consequences andMSolutions
Shift to P or N toStart EngineYou have attempted to start the engine with the transmission in posi-
tionRor D.
XShift the transmission to position Por N.
Auxiliary BatteryMalfunctionThe auxiliary battery for the automatic transmission is no longer being
charged.
XVisit a qualified specialist workshop at the next opportunity.
XUntil then, set the automatic transmission to position Pbefore you
switch off the engine.
XBefore leaving the vehicle, apply the parking brake.
Apply Brake toShift from PYou have attempted to move the transmission selector lever to posi-
tion D,R or Nwithout depressing the brake pedal.
XDepress the brake pedal.
AThe rear door is open.
GWARNING
When the engine is running, exhaust gases can enter the vehicle inte-
rior if the tailgate is open.
There is a risk of poisoning.
XClose the rear door.
?The hood is open.
GWARNING
The open hood may block your view when the vehicle is in motion.
There is a risk of an accident.
XPull over and stop the vehicle safely as soon as possible, paying
attention to road and traffic conditions.
XSecure the vehicle against rolling away (Ypage 130).
XClose the hood.
CAt least one door is open.
A warning tone also sounds.
XClose all the doors.
Display messages201
On-board computer and displays
Z
Page 218 of 302

XTo lock:insert the mechanical key into the
lock (Ypage 61) and turn it 90° clockwise to
position 2.
XTo unlock: insert the mechanical key into the
lock (Ypage 61) and turn it 90° counter-
clockwise to position 1.
iThe glove box can only be locked and
unlocked using the mechanical key.
Door stowage compartment
There is an additional compartment located on
the driver's door paneling, which can be used to
store a mini tablet PC, for example.
Stowage compartment/telephone com-
partment under the armrest/in the center
console
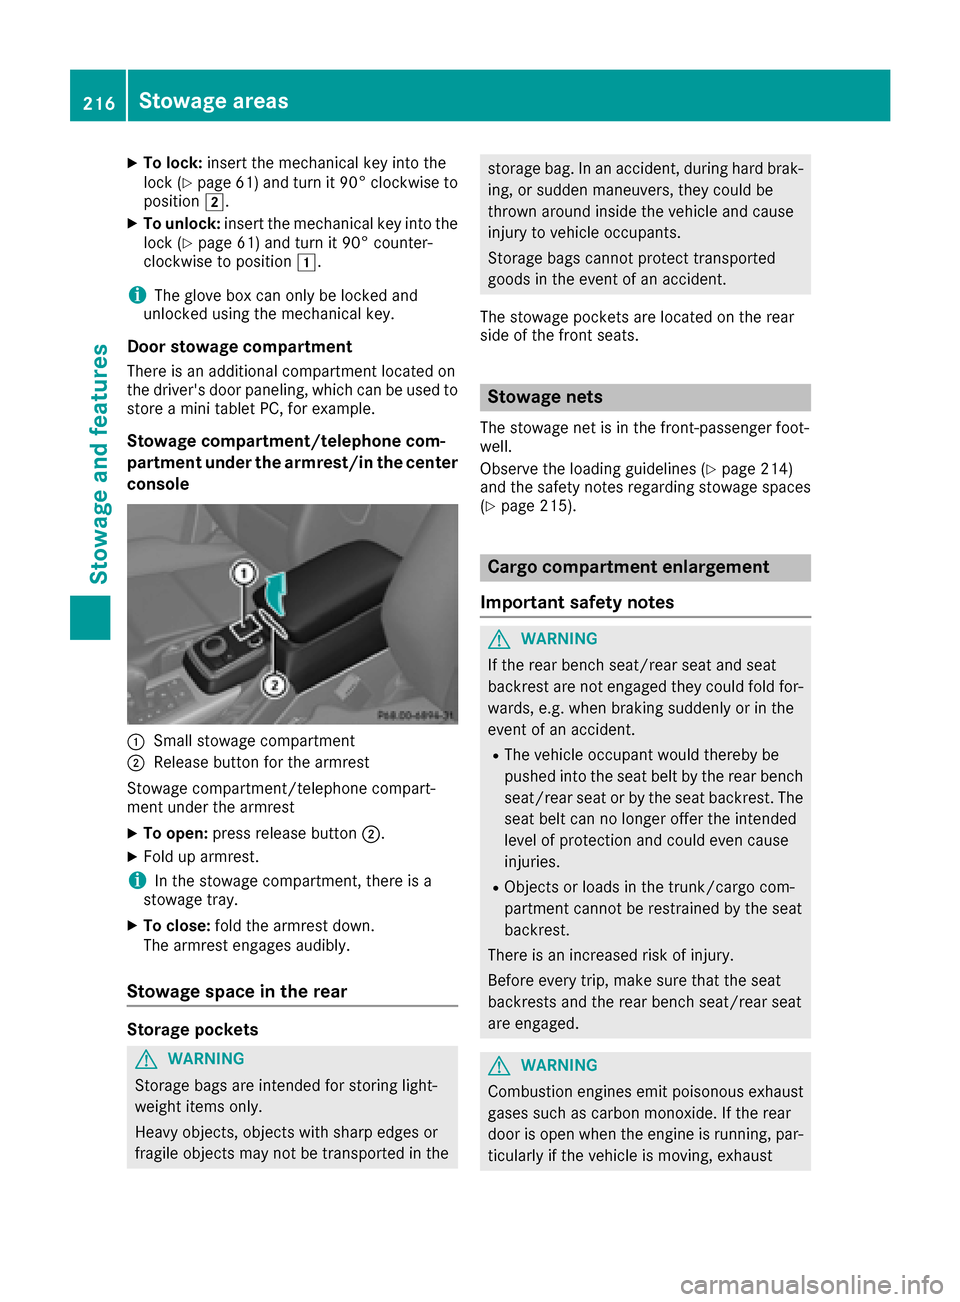
:Small stowage compartment
;Release button for the armrest
Stowage compartment/telephone compart-
ment under the armrest
XTo open: press release button ;.
XFold up armrest.
iIn the stowage compartment, there is a
stowage tray.
XTo close: fold the armrest down.
The armrest engages audibly.
Stowage space in the rear
Storage pockets
GWARNING
Storage bags are intended for storing light-
weight items only.
Heavy objects, objects with sharp edges or
fragile objects may not be transported in the
storage bag. In an accident, during hard brak-
ing, or sudden maneuvers, they could be
thrown around inside the vehicle and cause
injury to vehicle occupants.
Storage bags cannot protect transported
goods in the event of an accident.
The stowage pockets are located on the rear
side of the front seats.
Stowage nets
The stowage net is in the front-passenger foot-
well.
Observe the loading guidelines (
Ypage 214)
and the safety notes regarding stowage spaces
(
Ypage 215).
Cargo compartment enlargement
Important safety notes
GWARNING
If the rear bench seat/rear seat and seat
backrest are not engaged they could fold for-
wards, e.g. when braking suddenly or in the
event of an accident.
RThe vehicle occupant would thereby be
pushed into the seat belt by the rear bench
seat/rear seat or by the seat backrest. The
seat belt can no longer offer the intended
level of protection and could even cause
injuries.
RObjects or loads in the trunk/cargo com-
partment cannot be restrained by the seat
backrest.
There is an increased risk of injury.
Before every trip, make sure that the seat
backrests and the rear bench seat/rear seat
are engaged.
GWARNING
Combustion engines emit poisonous exhaust
gases such as carbon monoxide. If the rear
door is open when the engine is running, par-
ticularly if the vehicle is moving, exhaust
216Stowage areas
Stowag ean d features
Page 225 of 302

XPress in cigarette lighter:.
Cigarette lighter :will pop out automatically
when the heating element is red-hot.
12 V sockets
General notes
!If you are simultaneously using all three
sockets in the vehicle, make sure that you do
not exceed the maximum current draw of
45 A. Otherwise, you will overload the fuses.
The sockets can be used for accessories with a
maximum current draw of 180 W (15 A) each,
e.g. bulbs or chargers for mobile phones.
If you use the sockets for long periods when the
engine is switched off, the battery may dis-
charge.
XTurn the SmartKey to position 2in the ignition
lock.
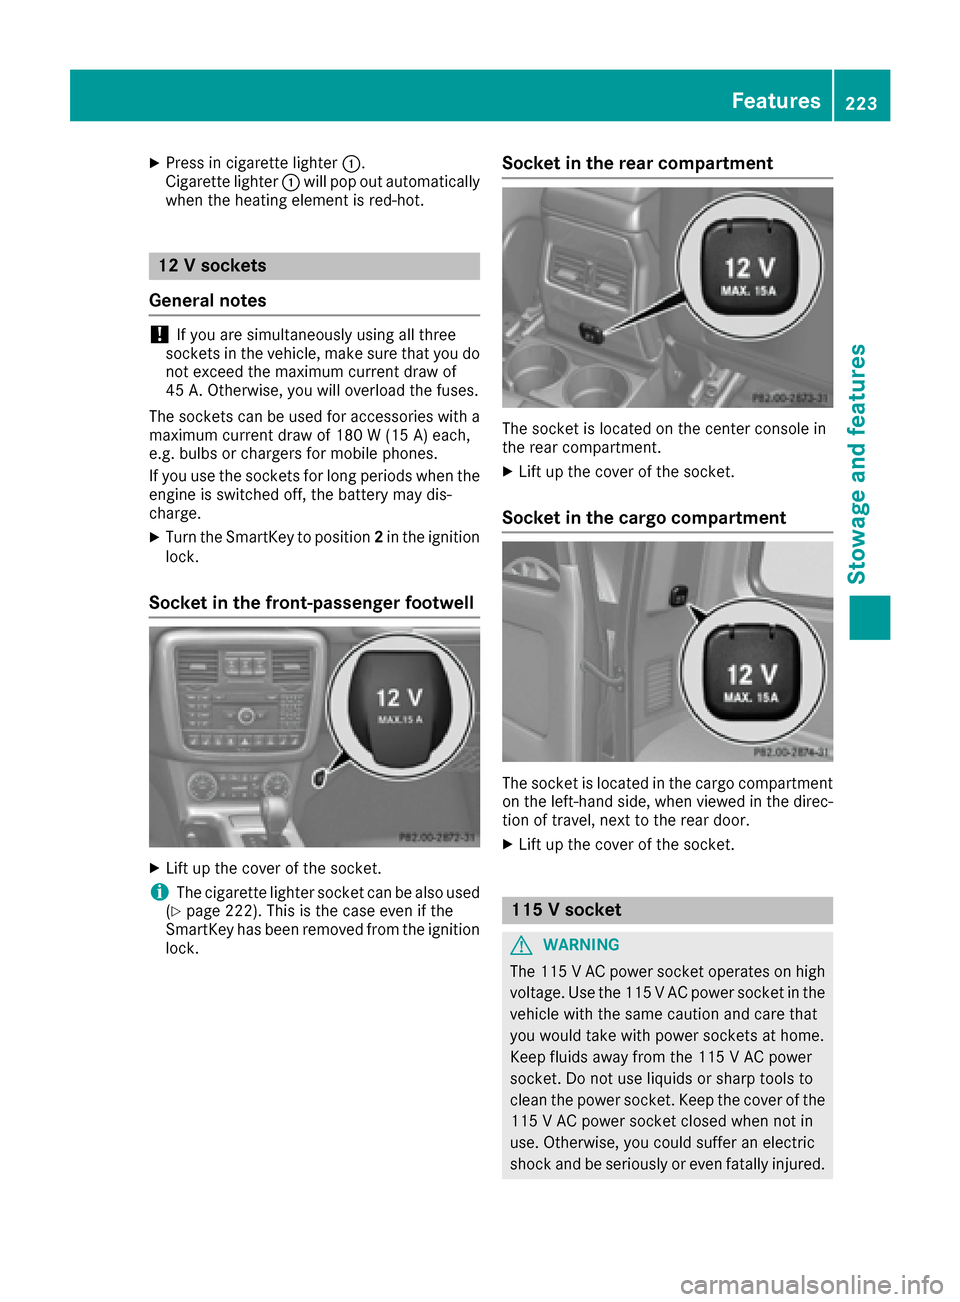
Socket in the front-passenger footwell
XLift up the cover of the socket.
iThe cigarette lighter socket can be also used
(Ypage 222). This is the case even if the
SmartKey has been removed from the ignition
lock.
Socket in the rear compartment
The socket is located on the center console in
the rear compartment.
XLift up the cover of the socket.
Socket in the cargo compartment
The socket is located in the cargo compartment
on the left-hand side, when viewed in the direc-
tion of travel, next to the rear door.
XLift up the cover of the socket.
115 V socket
GWARNING
The 115 VAC power socket operates on high
voltage. Use the 115 V AC power socket in the
vehicle with the same caution and care that
you would take with power sockets at home.
Keep fluids away from the 115 V AC power
socket. Do not use liquids or sharp tools to
clean the power socket. Keep the cover of the
115 V AC power socket closed when not in
use. Otherwise, you could suffer an electric
shock and beseriously or even fat allyinjured.
Features223
Stowage and features
Z