Page 97 of 276
Get Started
1. VisitUconnectPhone.com to check mobile device and feature compatibility and to
find phone pairing instructions.
2. Reduce background noise. Wind and passenger conversations are examples of noise that may impact recognition.
3. Speak clearly at a normal pace and volume while facing straight ahead. The microphone is positioned on the rearview mirror and aimed at the driver.
4. Each time you give a Voice Command, you must first push either the VR or Phone button, wait until afterthe beep, then say your Voice Command.
5. You can interrupt the help message or system prompts by pushing the VR or Phone button and saying a Voice Command from current category.
All you need to control your Uconnect system with your voice are the buttons on your
steering wheel.
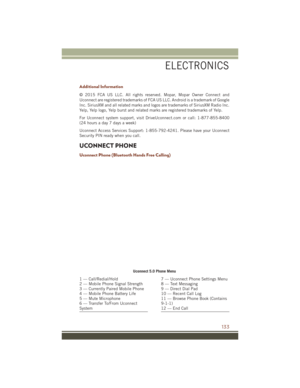
Uconnect VR/Phone Buttons
1 — Push To Initiate Or To Answer A Phone Call, Send Or Receive A Text
2 — Push To Begin Radio Or Media Functions
3 — Push To End Call
ELECTRONICS
95
Page 98 of 276
Basic Voice Commands
The basic Voice Commands below can be given at any point while using your
Uconnect system.
Push the VR button
. After the beep, say:
• Cancel to stop a current voice session
• Help to hear a list of suggested Voice Commands
• Repeat to listen to the system prompts again
Notice the visual cues that inform you of your voice recognition system’s status. Cues
appear on the touchscreen.
Uconnect 5.0 Visual Cues
ELECTRONICS
96
Page 99 of 276
Radio
Use your voice to quickly get to the AM, FM or SiriusXM Satellite Radio stations you
would like to hear. (Subscription or included SiriusXM Satellite Radio trial required.)
Push the VR button
. After the beep, say:
• Tune to ninety-five-point-five FM
• Tune to Satellite Channel Hits 1
TIP: At any time, if you are not sure of what to say or want to learn a Voice Command,
push the VR button
and say “Help.”The system will provide you with a list of
commands.
Uconnect 5.0 Radio
ELECTRONICS
97
Page 100 of 276
Media
Uconnect offers connections via USB, SD, Bluetooth and auxiliary ports (If
Equipped). Voice operation is only available for connected USB and iPod devices.
(Remote CD player optional and not available on all vehicles.)
Push the VR button
. After the beep, say one of the following commands and
follow the prompts to switch your media source or choose an artist.
• Change source to Bluetooth
• Change source to iPod
• Change source to USB
• Play artist Beethoven; Play albumGreatest Hits; Play songMoonlight Sonata; Play
genre Classical
TIP: Press the Browse button on the touchscreen to see all of the music on your iPod
or USB device. Your Voice Command must match exactlyhow the artist, album, song
and genre information is displayed.
Uconnect 5.0 Media
ELECTRONICS
98
Page 101 of 276
Phone
Making and answering hands-free phone calls is easy with Uconnect. When the
Phonebook button is illuminated on your touchscreen, your system is ready.
U.S. residents can visit UconnectPhone.com to check device and feature compat-
ibility and to find device pairing instructions.
Push the Phone button
. After the beep, say one of the following commands…
• Call John Smith
• Dial 123-456-7890 and follow the system prompts
• Redial (call previous outgoing phone number)
• Call back (call previous incoming phone number)
TIP: When providing a Voice Command, push the Phone button
and say “Call,”
then pronounce the name exactlyas it appears in your phone book. When a contact
has multiple phone numbers, you can say “CallJohn Smith work.”
Uconnect 5.0 Phone
ELECTRONICS
99
Page 102 of 276
Additional Information
© 2015 FCA US LLC. All rights reserved. Mopar, Mopar Owner Connect and
Uconnect are registered trademarks of FCA US LLC. Android is a trademark of Google
Inc. SiriusXM and all related marks and logos are trademarks of SiriusXM Radio Inc.
Yelp, Yelp logo, Yelp burst and related marks are registered trademarks of Yelp.
For Uconnect system support, visit DriveUconnect.com or call: 1-877-855-8400
(24 hours a day 7 days a week)
Uconnect Access Services Support: 1-855-792-4241. Please have your Uconnect
Security PIN ready when you call.
UCONNECT 8.4A/8.4AN
Uconnect 8.4A/8.4AN At A Glance
WARNING!
ALWAYS drive safely with your hands on the wheel. You have full responsibility and
assume all risks related to the use of the Uconnect features and applications in
this vehicle. Only use Uconnect when it is safe to do so. Failure to do so may result
in an accident involving serious injury or death.
Uconnect 8.4AN Radio Screen
ELECTRONICS
100
Page 103 of 276

CAUTION!
Do NOT attach any object to the touchscreen, doing so can result in damage to the
screen.
Setting The Time
• Model 8.4AN synchronizes time automatically via GPS, so it should not require any time adjustment. If you do need to set the time manually, follow the
instructions below for Model 8.4A.
• For Model 8.4A, turn the unit on, then press the time display at the top of the screen. Press “Yes.”
• If the time is not displayed at the top of the screen, press the “Settings” button on the touchscreen. In the Settings screen, press the “Clock” button on the touch-
screen, then check or uncheck this option.
• Press “+” or “–” next to Set Time Hours and Set Time Minutes to adjust the time.
• If these features are not available, uncheck the Sync Time box.
• Press “X” to save your settings and exit out of the Clock Setting screen.
Background Themes
• Screen background themes are selectable from a pre-loaded list of themes. If you’d like to set a theme, follow the instructions below.
• Press the “Settings” button on the touchscreen.
• Press the “Display” button on the touchscreen.
• Then press “Set Theme” button on the touchscreen and select a theme.
Audio Settings
• Press of the “Audio” button on the touchscreen to activate the Audio settings screen to adjust Balance\Fade, Equalizer, and Speed Adjusted Volume.
• You can return to the Radio screen by pressing the “X” located at the top right.
Balance/Fade
• Press the “Balance/Fade” button on the touchscreen to Balance audio between the front speakers or fade the audio between the rear and front speakers.
• Pressing the “Front,” “Rear,” “Left,” or “Right” buttons on the touchscreen or press and drag the Speaker Icon to adjust the Balance/Fade.
Equalizer
• Press the “Equalizer” button on the touchscreen to activate the Equalizer screen.
• Press the “+” or “–” buttons on the touchscreen, or press and drag over the level bar for each of the equalizer bands. The level value, which spans between plus or
minus 9, is displayed at the bottom of each of the Bands.
ELECTRONICS
101
Page 104 of 276
Speed Adjusted Volume
• Press the “Speed Adjusted Volume” button on the touchscreen to activate theSpeed Adjusted Volume screen. The Speed Adjusted Volume is adjusted by
pressing the volume level indicator. This alters the automatic adjustment of the
audio volume with variation to vehicle speed.
Personalized Menu Bar
The Uconnect features and services in the main menu bar are easily changed for your
convenience. Simply follow these steps:
1. Press the “Apps
” button to open the App screen.
2. Press and hold, then drag the selected App to replace an existing shortcut in the main menu bar.
The replaced shortcut will now be an active App/shortcut on the main menu bar.
Uconnect 8.4A/8.4AN Main Menu
ELECTRONICS
102