Page 115 of 250
uu Changing Your Route u Adding Waypoints
114
Navigation
2. Select a place.
u The waypoint is added to the
Destination List.
3. Select or , and move the
order of destinations. Select OK.
4. Select Start Ro
ute.
u The route is automatically
recalculat ed and displayed
on
the map screen.
1 Adding Waypoints from the Route Menu
If you select a location by Use Navigation Menu,
the Select order scre en is not displayed.
Select Edit Order on the Destination list screen to
edit the order of waypoint. 2 Editing the Destination List P. 116
Page 117 of 250
116
uu Changing Your Route u Editing the Destination List
Navigation
Editing the Destination List
H HOME u Navi u MENU (when en route) u De stination List
1. Select Edit O r
der.
2. Select a list item to move.
3. Select or , and se
lect a new
location. Select OK.
4. Select Start Ro
ute.
u The route is automatically
recalculated and displayed
on
the map screen.
■ Editing the Order of Waypoints1
Editing the Order of Waypoints
Select Show All on Map to display the destination
and waypoints on the map screen.
Page 118 of 250
117
uu Changing Your Route u Editing the Destination List
Navigation
H HOME u Navi u MENU (when en route) u Destin ation List
1. Select a list item to delete.
2. Select Delete .
■Deleting Waypoints1
Deleting Waypoints
Select Delete on the Destination list screen before
selecting a list item to select multiple locations to
delete.
Select Show on Map to display the waypoint on the
map screen.
Page 122 of 250

121
uu Changing Your Destination u Selecting a Destination on the Map
Navigation
Selecting a Destination on the Map
Select a new destination when en route by selecting a location on the map.
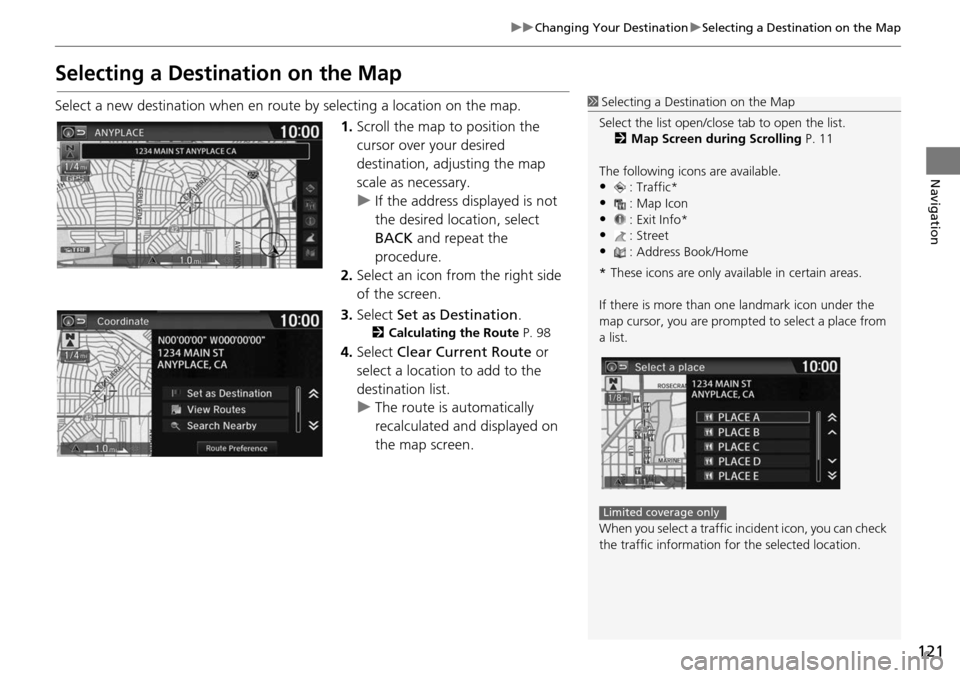
1.Scroll the map to position
the
cursor over your desired
destination, adjusting the map
scale as necessary.
u If the address displayed is not
the desired location, select
BA
CK and repeat the
procedure.
2. Select an icon fr om
the right side
of the screen.
3. Select Set as
Destination.
2Calculating the Route P. 98
4. Select Clear Current Route or
select a location to add to the
destination list.
u The route is automatically
recalc ulated and di
splayed on
the map screen.
1 Selecting a Destination on the Map
Select the list open/clos e tab to open the list.
2 Map Screen during Scrolling P. 11
The following icons are available.
•: Traffic*•: Map Icon
•: Exit Info*
•: Street•: Address Book/Home
* These icons are only available in certain areas.
If there is more than one landmark icon under the
map cursor, you are prompted to select a place from
a list.
When you select a traffic in cident icon, you can check
the traffic information for the selected location.
Limited coverage only
Page 123 of 250
122
uu Changing Your Destination u Entering a New Destination
Navigation
Entering a New Destination
H HOME u Navi u MENU (when en route) u De stination tab
Enter a
new destination using the Destinat ion menu screen
even when you are en
route.
1.Select a method to enter a new
des
tination.
2Entering a Destination P. 80
u After entering a new
destination, the address is
displayed on the Calculate
Route screen.
2. Select Set a
s Destination.
3. Select Clea
r Current Route or
select a location to add to the
destination list.
u The route is automatically
recalculat ed and displayed
on
the map screen.
1 Entering a New Destination
“Display Menu” (on the map screen)
Page 124 of 250

123
Navigation
Resuming Your Trip
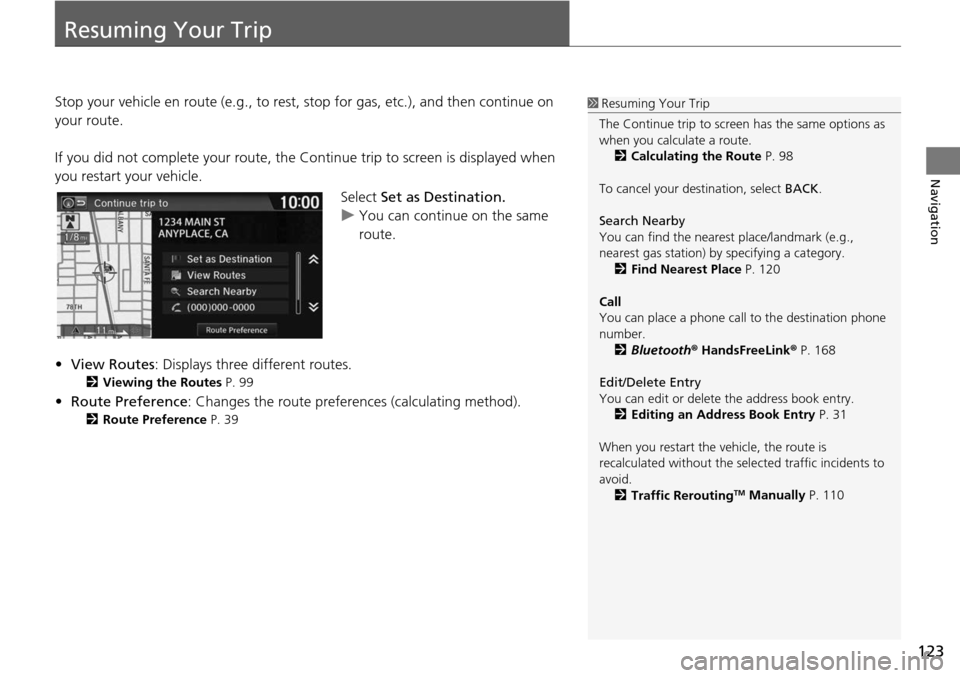
Stop your vehicle en route (e.g., to rest, stop for gas, etc.), and then continue on
your route.
If you did not complete your route, the Cont
inue trip to screen is displayed when
you restart your vehicle.
Select Set as Destination.
u You can continue on the same
ro
ute.
• View Ro utes: Displays
three different routes.
2Viewing the Routes P. 99
• Route Preference: Changes the route preferen ces (calculating method).
2Route Preference P. 39
1 Resuming Your Trip
The Continue trip to screen has the same options as
when you calculate a route. 2 Calculating the Route P. 98
To cancel your de stination, select BACK.
Search Nearby
You can find the nearest place/landmark (e.g.,
nearest gas station) by specifying a category. 2 Find Nearest Place P. 120
Call
You can place a phone call to the destination phone
number.
2 Bluetooth ® HandsFreeLink ® P. 168
Edit/Delete Entry
You can edit or delete the address book entry.
2 Editing an Address Book Entry P. 31
When you restart the vehicle, the route is
recalculated without the sele cted traffic incidents to
avoid. 2 Traffic Rerouting
TM Manually P. 110
Page 128 of 250
127
uu Audio System u Audio System Theft Protection
Audio
Audio System Theft Protection
The audio system is disabled when it is disconnected from the power source, such as
when the battery is disconnected or goes dead. In certain conditions, the system
may display Enter Code. If this occurs, reactivate the audio system.
■ R
eactivating the audio system
1. Set the power mode to ON.
2. Turn on the audio system.
3. Press and ho ld the au
dio system power button for more than two seconds.
u The audio system is reac tivat
ed when the audio control unit establishes a
connection with the vehicle control unit. If the control unit fails to recognize
the audio unit, you must go to a deal er and have the audio unit checked.
Page 129 of 250
128
Audio
Audio Remote Controls
Steering Wheel Controls
Control basic audio system functions using the controls mounted on the steering
wheel.
Cycles through the au d
i
o modes as follows:
1SOURCE Button
Some sources will only appe ar when available, such
as when a CD is inserted or when a compatible device
is connected.
App mode appears only when a connection is
established with your smartphone and the app is
launched.
Aha
TM mode appears only when a connection is
established with your smartphone and HondaLink
app is launched.
AUX-HDMI ® mode appears only when a connection
via HDMI ® cable is established.
Volume button
SOURCE button
Channel button
(Display) button
(Menu) button
■SOURCE Button
FM
PANDORA
®
AM SiriusXM® *
iPod
Disc
USBBluetooth Audio
Apps
AUX-HDMI
®
AhaTM
* Not available on all models