Page 249 of 306
 ®
Fuse box¢ page 282
0 Windscreen washer container {�)
c:::>page 252
The posi")
Downloaded from www.Manualslib.com manuals search engine 0
0
N
,.....
N
......
0
,.....
Vl
CX) ®
Fuse box¢ page 282
0 Windscreen washer container {�)
c:::>page 252
The positions of the engine oil dipstick and en
gine oil filler cap¢ Fig. 214 (items @and @)
may be different on some engine versions.
Engine oil
Choosing the correct engine oil grade
The service interval display in the instrument
cluster of your vehicle will inform you when it is
time for an oil change. We recommend having
the oil changed by a qualified workshop.
If you have to top up the oil between oil changes,
use the grades of oil specified in the table in ac
cordance with VW standards.
- the vehicle is being serviced based on the flexi
ble or fixed oil change service (see last service
record).
- the vehicle has a petrol or diesel engine (see
sticker on inside of fuel tank flap).
Oil Change Service
Flexible Fixed
Petrol engines vw
504 00 vw 502 00
Diesel engines
vw 507 00 With
diesel
particulate fil-
ter:
vw 507 00
Without diesel
particulate fil-
ter:
vw sos 00
Audi recommends
�Castrol )g[Ij)@[g ?m»E«!JJ1)JJ.lf..
Audi recommends Longlife high-performance
engine oil from Audi Genuine Parts
(© Note
If the oil grades specified in the table are not
available, you can use one of the following
grades as a substitute. To prevent damage to
the engine, this should not be done more Checking
and topping up fluids
than once between oil changes and no more
than 0.5 litres should be used.
- Petrol engines: ACEA A3 or API SN (API SM)
standard
- Diesel engines: ACEA C3 or API CJ-4 stand
ard
((!)) Note
The flexible oil change service is not available
for all models in all countries.
Checking and topping up the engine oil
level
The oil dipstick differs depending on the type of
engine.
Fig. 215 Oil dipstick (examples): Checking engine oil level
Fig. 216 Engine compartment: Engine oil filler cap
Please refer to the safety notes ¢ .& in Working
on components in the engine compartment on
page 244.
Checking the engine oil level
- Park the vehicle on a level surface. 0
N
00
a:,
247
Page 250 of 306

Downloaded from www.Manualslib.com manuals search engine Checking
and topping up fluids
- Switch off the warm engine. Wait for a few mi
nutes for the oil to drain back into the sump.
- Open the bonnet ¢page 245.
- Pull out the oil dipstick ¢page 246, Fig. 214,
wipe it with a clean cloth and insert it again,
pushing it in as far as it will go.
- Then pull the dipstick out again and check the
oil level ¢table on page 248.
- If the oil level is too low, add more engine oil.
Markings on oil dipstick ¢ Fig. 215
@ When
the oil Level is near the marking @
you must top up the engine oil. Please refer
to ¢ 0.
@ Do NOT add engine oil.
®
@ Do
NOT add engine oil.
Drive to a qualified workshop without delay
and have the engine oil changed ¢0.
Topping up the engine oil
- Unscrew the cap "E::71 ¢Fig. 216from the oil fill
er opening ¢ page 246, Fig. 214.
- Carefully add 0.5 litres of suitable engine oil
¢page 247.
-After two minutes check the oil level once
again.
- If the oil level is too low, add a smaller quantity
of engine oil. The level must always be below
the marking @¢Fig. 215 ¢0.
- Screw the oil filler cap "E::71 back on and push
the dipstick all the way in.
A WARNING
- Ensure that no engine oil comes into contact
with hot engine components when topping
up: this could cause a fire.
- The oil filler cap must be properly closed to
prevent oil from squirting onto the hot en
gine or exhaust system while the engine is
running -risk of fire!
- Wash your skin thoroughly if it comes into
contact with engine oil.
248 CD
CAUTION
- The engine oil must never drop below the
marking (!)¢ Fig. 215 -risk of engine dam
age!
- When topping up the engine oil, make sure
that the oil level is not above the marking
@ ¢Fig. 215, as this may result in damage
to the catalytic converter or to the engine.
Do NOT start the engine. Contact a qualified
workshop to extract the engine oil if neces
sary.
- Applies to vehicles which have an oil dip
stick with area® ¢Fig. 215: If you run your
vehicle on diesel fuel of poorer quality than
EN 590 standard fuel, the fuel can get into
the engine oil. In this case, the oil Level
gradually rises and the quality of the engine
oil decreases. Once the oil level has reached
the marking @or the indicator lamp II
has come on, the engine oil level must not
be corrected by extracting the surplus oil -
risk of engine damage! The engine oil must
be changed ¢ page 18.
- No additives should be used with engine oil.
Any damage caused by the use of such addi
tives would not be covered by the factory
warranty.
® For the sake of the environment
- Never pour engine oil down drains or into
the ground.
-Always observe statutory requirements
when disposing of empty oil canisters.
@ Note
Depending on how you drive and the condi
tions in which the car is used, oil consumption
can be up to 0.5 Ltr./1000 km. Oil consump
tion on RS models can be up to 0.8 ltr./1,000
km. Oil consumption is likely to be higher for
the first 5,000 km. For this reason the engine
oil level must be checked at regular intervals,
preferably when filling the tank and before a
journey.
Page 251 of 306
 Cooling
system
Coolant
The engine cooling system is filled at the factory
with a")
Downloaded from www.Manualslib.com manuals search engine 0
0
N
,.....
N
......
0
,.....
Vl
CX) Cooling
system
Coolant
The engine cooling system is filled at the factory
with a mixture of conditioned water and coolant
additive. This coolant must not be changed.
The coolant level is monitored by a warning lamp
• ¢page 14. However, we recommend that it
should be checked occasionally.
If you do need to top up the coolant, use a mix
ture of water and coolant additive. We recom
mend mixing coolant additive with distilled wa
ter.
Coolant additive
The coolant additive contains anti-freeze and cor
rosion protection agent. Only use one of the fol
lowing coolant additives. It is possible to mix
these additives.
Coolant additive Specification
G13 TL 774
J
G12++ TL 774 G
The amount of coolant additive which needs to
be mixed with the water depends on the temper
atures to be expected in the winter season. If the
anti-freeze concentration is too low, the coolant
can freeze and cause engine damage.
Cool ant addi· Frost protec-
tive tion
Hot regions min. 40%,
min. -25 °C
max. 45%
Cold regions
min. 50%, max. -40 °C
max. 55%
CD CAUTION
- Have your qualified workshop check the
cooling system before the winter season to
make sure that the anti-freeze concentra
tion is adequate for the conditions to be ex
pected. This applies particularly if you drive
into a colder climate zone.
- To prevent damage to the engine, do not
use a different type of anti-freeze additive if
the approved type of additive is not availa- Checking
and topping up fluids
ble. In this case use only water and bring
the coolant concentration back up to the
correct level as soon as possible by putting
in the specified additive.
-Always top up with fresh, unused coolant.
- Radiator sealants must not be added to the
coolant.
Topping up coolant
Fig. 217 Engine compartment: Cap of coolant expansion
tank ;:::;
co
CD
Please refer to the safety notes ¢ A in Working
on components in the engine compartment on
page 244.
Checking the coolant level
... Park your vehicle on a level surface.
.,.. Switch off the ignition.
.,.. Read
off the coolant level on the coolant ex
pansion tank¢ page 246, Fig. 214. When the
engine is cold, the coolant level should be be
tween the marks. When the engine is warm, it
may be slightly above the top mark.
Topping up the coolant
Important: The coolant expansion tank must not
be empty ¢(D.
.,.. Wait for the engine to cool down .
.,.. Cover the cap on the expansion tank with a
cloth, and carefully unscrew the cap anti-clock
wise ¢ ,& .
.,.. Add coolant in the correct concentration
¢ page 249 up to the top mark.
... You should make sure that the fluid level re
mains stable. If necessary, add more coolant.
... Screw the cap on again tightly.
IJi-
249
Page 252 of 306

Downloaded from www.Manualslib.com manuals search engine Checking
and topping up fluids
Any loss of coolant normally indicates a leak in
the cooling system. Drive to a qualified workshop
without delay and have the cooling system
checked. If there are no leaks in the system, a
loss of coolant can only occur if the coolant boils
and is forced out of the system as a result of
overheating.
A WARNING
- The cooling system is under pressure. Do
not unscrew the cap on the expansion tank
when the engine is hot: you could be scal
ded by escaping steam.
- The coolant and coolant additive can be a
health hazard. Store the coolant additive in
the original container in a safe place out of
reach of children -risk of poisoning.
- When working in the engine compartment
be aware that the radiator fan may start
running suddenly, even if the ignition is
switched off- risk of injury!
CD CAUTION
Do not add coolant if the expansion tank is
empty. Air could have got into the cooling
system -risk of engine damage! In this case,
do NOT drive on. Obtain professional assis
tance.
Brake fluid
&
8cm DOT 4 �
0
0
Fig. 218 Engine compartment: Cap of brake fluid reservoir
Please refer to the safety notes ¢ A in Working
on components in the engine compartment on
page 244.
250 Checking
brake fluid level
� Read off the brake fluid level on the brake fluid
reservoir ¢page 246, Fig. 214. The brake fluid
level must be between the MIN and MAX marks
¢_A.
The brake fluid level is also automatically moni
tored.
Having brake fluid changed
Have the brake fluid changed regularly by a quali
fied workshop.
A WARNING
- If the brake fluid level is under the MIN
mark, the effectiveness of the brakes and
therefore the safety of the vehicle may be
impaired -risk of accident! Do not drive on.
Obtain professional assistance.
- Heavy use of the brakes may cause a vapour
lock if old brake fluid is left in the system.
This would seriously impair the effective
ness of the brakes and the safety of the car
- risk of accident!
CD CAUTION
- If the brake fluid level is above the MAX
mark, brake fluid may escape via the cap on
the reservoir in certain circumstances and
cause damage to the vehicle.
- Brake fluid must not be allowed to come in
to contact with the vehicle's body, other
wise it will attack the paintwork.
Battery General warnings for batteries
Because of the complexity of the power supply,
any battery work, such as disconnection, replace
ment, etc. must be carried out by a qualified
workshop ¢ ,& .
The term "vehicle battery" refers to the 12 Volt
battery in your vehicle.
�
Page 253 of 306
 Explanation
of warnings on vehicle battery:
® Wear safety
glasses!
A Battery
acid")
Downloaded from www.Manualslib.com manuals search engine 0
0
N
,.....
N
......
0
,.....
Vl
CX) Explanation
of warnings on vehicle battery:
® Wear safety
glasses!
A Battery
acid is extremely corrosive. Wear
protective gloves and safety glasses.
@ Keep
open flames, sparks, uncovered
Lights and Lit cigarettes away from the
battery!
� A
highly explosive mixture of gases may
be given off when the battery is under
charge!
® Keep children
away from batteries and
battery acid.
.&_ WARNING
Any work on the batteries and electrical sys
tem in your vehicle entails a risk of injury and
chemical burns in addition to danger of acci
dent or fire. For this reason, you must have
the work carried out by a qualified workshop.
CD CAUTION
If the car is left standing for Long periods,
protect the battery from frost. The battery
will be damaged irreparably if it is allowed to
freeze <=> page 2 51.
@ For the sake of the environment
'8 Batteries contain toxic substances including
sulphuric acid and Lead. Please contact a
qualified workshop if you have any questions.
Vehicle battery
The term "vehicle battery" refers to the 12 Volt
battery in your vehicle.
If the vehicle is not used for long periods
If you do not drive your vehicle for a period of
several days or weeks, the power management
will gradually shut off the on-board systems one
by one, or reduce the amount of current they are
using. This Limits the amount of power consumed
and helps to ensure reliable starting even after a
Long period <=> page 118. Certain convenience fea
tures, such as interior Lighting or electric seat ad
justment, may not be available. These functions Checking
and topping up fluids
will be restored when you switch on the ignition
and start the engine.
Even though some systems are deactivated auto
matically, certain electrical equipment continues
to draw current even when the ignition is off. If
the vehicle is Left standing for Long periods, this
can result in total battery discharge. If the vehi
cle battery is allowed to discharge completely, an
internal chemical reaction damages the battery
irreparably. To avoid this, the vehicle battery
should be recharged at Least once a month
<=> page 251. Please contact a qualified workshop
if you have any questions.
Winter conditions
Cold weather is very hard on the vehicle battery.
The starting capacity may be reduced as a result.
For this reason, you should have the vehicle bat
tery checked by a qualified workshop before the
start of winter.
Charging the vehicle battery
Fig. 219 Engine compartment: Terminals for jump leads
and battery charger
Important: Only use chargers with a maximum
charge voltage of 14.8 V (the battery cables do
not have to be disconnected).
� Note the warnings c:> A in General warnings
for batteries on page 251 and<=> A_ .
� Switch
off all electrical equipment and the igni
tion.
� Open the bonnet<=> page 245.
� Open the red cap on the positive terminal
<=>Fig. 219.
� Connect the charger cables to the jump-start
terminals as specified <=> Fig. 219.
�
251
Page 254 of 306

Downloaded from www.Manualslib.com manuals search engine Checking
and topping up fluids
... Now connect the battery charger to the mains
and switch on.
... After charging the battery: switch off the bat-
tery charger and disconnect the mains cable .
... Detach the charger cables from the terminals.
... Refit
the red cap onto the positive terminal.
... Close the bonnet ¢page 245.
A WARNING
- A highly explosive mixture of gases may be
given off when the battery is under charge.
Only charge the vehicle battery in a well
ventilated area.
- When it is discharged the vehicle battery
can freeze at temperatures around 0°
(. You
must not use a vehicle battery which has
frozen, even after it has thawed, because
the ice may have cracked the battery casing
and allowed the battery acid to escape -risk
of explosion and chemical burns! Please
contact a qualified workshop if you have any
questions.
- Do not connect or disconnect the charging
cables during the charging process -risk of
explosion!
1 Note
- Use only the terminals in the engine com
partment to charge the vehicle battery.
- Before you charge the vehicle battery, al
ways read and follow the manufacturer's in
structions for using the battery charger.
Windscreen washer
Fig. 220 Engine compartment: Cap of windscreen washer
container
252 �
0
>
u..
co The
container for the windscreen washer@ con
tains the cleaning fluid for the windscreen and
the headlight washer system* ¢ page 246,
Fig. 214. For the container capacity, please refer
to¢ page 288 .
Clean water should be used when topping up. If
possible, use soft water to prevent scaling on the
washer jets. Always add washer fluid to the wa
ter. In cold weather you should add anti-freeze to
the water to prevent it from freezing.
CD CAUTION
- The anti-freeze concentration must be
matched to the climate of the country in
which you are driving. If the concentration
is too high, damage to the car may result.
- Never put in radiator anti-freeze or other
additives.
- Never use washer fluid which contains paint
thinners or solvents as it can damage the
paintwork.
Service interval display
The service interval display detects when the
next service is due for your vehicle .
There are two service interval display levels:
- Inspection or oil change reminder: After a cer
tain mileage, a service reminder will appear on
the infotainment display each time the ignition
is switched on/off. The distance or time re
maining will be shown briefly.
- Inspection or oil change due: When your vehi
cle is due for an inspection, oil change or both,
the corresponding reminder Inspection due!,
Oil change due! or Oil change and inspection
due! will appear briefly after you switch the ig
nition on/off.
Checking the service intervals
You can look up the distance and time remaining
until the next oil change and next service inspec
tion. Select the following on the infotainment
system: IM EN u I button > Car > left control but
ton > Servicing & checks > Service intervals.
Applies to: vehicles with flexible oil change serv
ice
Page 255 of 306
 You
cannot check the service interval on a new
vehicle until it has been driven fo")
Downloaded from www.Manualslib.com manuals search engine 0
0
N
,.....
N
......
0
,.....
Vl
CX) You
cannot check the service interval on a new
vehicle until it has been driven for about 500 km.
Qualified workshops reset the service interval af
ter the oil is changed. The distance to the next oil
change is initially displayed based on the driving
profile prior to the oil change. Your own personal
driving profile is used subsequently to calculate
the remaining distance. Frequent cold starts or
short trips place extra demands on the engine oil
with the result that the oil has to be changed
more often.
Resetting the display
Your qualified workshop resets the service inter
val display after each service.
It is very important that you reset the oil change
display if you change the oil yourself. The next oil
change will be due after a fixed service interval.
To reset the display, select the following on the
infotainment system: !MENU! button> Car > left
control button > Servicing & checks > Service in
tervals > Reset oil change interval.
CD CAUTION
- Do not reset the oil change interval display
unless you have changed the oil.
- Keeping to the correct service intervals is
most important for the service life and re
sidual value of the vehicle (and especially
for the life of the engine). Services must al
ways be carried out promptly, even if the
mileage is low. Checking
and topping up fluids
253
Page 256 of 306
. Remove a")
Downloaded from www.Manualslib.com manuals search engine Wheels
Wheels
Tyres and rims
General notes
� Inspect the tyres regularly for damage (cuts,
cracks or blisters, etc.). Remove any foreign
bodies embedded in the treads.
� If you have to drive over a kerb or similar obsta
cle, drive very slowly and as near as possible at
a right angle to the kerb.
� Damaged rims or tyres must be replaced imme
diately.
� Keep grease, oil and fuel off the tyres.
� Mark
the wheels before taking them off so that
they rotate in the same direction when refitted.
� When removed, the wheels should be stored
flat in a cool, dry and preferably dark place.
CD CAUTION
- Please note that summer and winter tyres
are optimised for the prevailing road condi
tions at different times of year. We recom
mend that you use winter tyres during the
winter months. At low temperatures, sum
mer tyres lose their elasticity and grip, and
braking performance also suffers as a re
sult. Cracks can form in the tread block on
summer tyres if they are used at very cold
temperatures, and this can cause perma
nent damage to the tyres. An increase in
rolling noise and tyre imbalance may result
from this damage.
- Machined, polished or chrome-plated rims
must not be used in winter conditions. The
process used to manufacture these types of
wheel rim does not provide adequate sur
face protection against corrosion, and the
rims can be permanently damaged by road
salt or similar.
New wheels or tyres
It is best to have all servicing of wheels and tyres
performed by a qualified workshop, since they
l l
COC = Certificate of conformity
254 have
the necessary special tools and replacement
parts in addition to trained personnel.
� New tyres do not yet give maximum grip. When
driving with new tyres, drive at moderate
speeds and be especially careful during the first
500 km.
� All four wheels must be fitted with tyres of the
same type, size (rolling circumference) and
preferably the same tread pattern.
� Tyres should be replaced in pairs and not indi
vidually (i.e. both front tyres or both rear tyres
together).
� We recommend the use of Audi Genuine Tyres.
If you wish to use other tyres, please note that
the actual size can differ from the nominal size
marked on the tyre ¢ A .
� If you wish to purchase a different combination
of rims and tyres than the ones fitted on the ve
hicle during production, it is advisable to con
sult a qualified workshop beforehand ¢ A.
The sizes of the rims and tyres approved for your
vehicle are listed in the vehicle's documents (e.g.
EC Certificate of Conformity or COC document l)).
The vehicle documents vary depending on the
country in which the vehicle is registered.
If the spare wheel* is not the same type as the
tyres fitted on the car (for example if the car has
winter tyres or wide-section tyres) you should on
ly use the spare wheel* if a puncture occurs, and
then only for a short period of time. In this case,
please drive with extra care. Refit a normal road
wheel as soon as possible.
On vehicles with four-wheel drive, all four wheels
must always be fitted with tyres of the same
type, make and tread pattern, as the driveline
could otherwise be damaged by variations in the
wheel speeds. For the same reason, only use a
spare wheel* which has the same rolling circum
ference as the normal road wheels.
Manufacturing date
The manufacturing date is indicated on the tyre
sidewall (possibly only on the inner side of the
wheel): ..,.
 1
1 2
2 3
3 4
4 5
5 6
6 7
7 8
8 9
9 10
10 11
11 12
12 13
13 14
14 15
15 16
16 17
17 18
18 19
19 20
20 21
21 22
22 23
23 24
24 25
25 26
26 27
27 28
28 29
29 30
30 31
31 32
32 33
33 34
34 35
35 36
36 37
37 38
38 39
39 40
40 41
41 42
42 43
43 44
44 45
45 46
46 47
47 48
48 49
49 50
50 51
51 52
52 53
53 54
54 55
55 56
56 57
57 58
58 59
59 60
60 61
61 62
62 63
63 64
64 65
65 66
66 67
67 68
68 69
69 70
70 71
71 72
72 73
73 74
74 75
75 76
76 77
77 78
78 79
79 80
80 81
81 82
82 83
83 84
84 85
85 86
86 87
87 88
88 89
89 90
90 91
91 92
92 93
93 94
94 95
95 96
96 97
97 98
98 99
99 100
100 101
101 102
102 103
103 104
104 105
105 106
106 107
107 108
108 109
109 110
110 111
111 112
112 113
113 114
114 115
115 116
116 117
117 118
118 119
119 120
120 121
121 122
122 123
123 124
124 125
125 126
126 127
127 128
128 129
129 130
130 131
131 132
132 133
133 134
134 135
135 136
136 137
137 138
138 139
139 140
140 141
141 142
142 143
143 144
144 145
145 146
146 147
147 148
148 149
149 150
150 151
151 152
152 153
153 154
154 155
155 156
156 157
157 158
158 159
159 160
160 161
161 162
162 163
163 164
164 165
165 166
166 167
167 168
168 169
169 170
170 171
171 172
172 173
173 174
174 175
175 176
176 177
177 178
178 179
179 180
180 181
181 182
182 183
183 184
184 185
185 186
186 187
187 188
188 189
189 190
190 191
191 192
192 193
193 194
194 195
195 196
196 197
197 198
198 199
199 200
200 201
201 202
202 203
203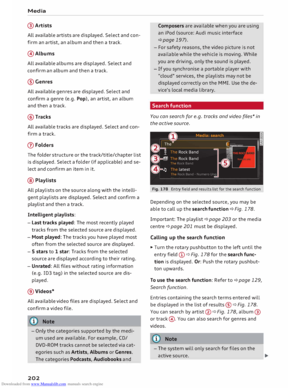 204
204 205
205 206
206 207
207 208
208 209
209 210
210 211
211 212
212 213
213 214
214 215
215 216
216 217
217 218
218 219
219 220
220 221
221 222
222 223
223 224
224 225
225 226
226 227
227 228
228 229
229 230
230 231
231 232
232 233
233 234
234 235
235 236
236 237
237 238
238 239
239 240
240 241
241 242
242 243
243 244
244 245
245 246
246 247
247 248
248 249
249 250
250 251
251 252
252 253
253 254
254 255
255 256
256 257
257 258
258 259
259 260
260 261
261 262
262 263
263 264
264 265
265 266
266 267
267 268
268 269
269 270
270 271
271 272
272 273
273 274
274 275
275 276
276 277
277 278
278 279
279 280
280 281
281 282
282 283
283 284
284 285
285 286
286 287
287 288
288 289
289 290
290 291
291 292
292 293
293 294
294 295
295 296
296 297
297 298
298 299
299 300
300 301
301 302
302 303
303 304
304 305
305