Page 217 of 306
 Audi
smartphone
Applies to: vehicles with Audi smartphone interface
- Connect your")
Downloaded from www.Manualslib.com manuals search engine 0
0
N
,.....
N
......
0
,.....
Vl
CX) Audi
smartphone
Applies to: vehicles with Audi smartphone interface
- Connect your mobile phone to the Audi music
interface ¢page 198via a USB adapter
¢page 197, Fig. 171.
- Select your mobile phone from the list of mo
bile phones already connected.
Further options
Further options may be available in the connec
tion manager via the right control button de
pending on the function selected.
Bluetooth settings
- Bluetooth: Select and confirm a discoverability
setting for the Bluetooth connection. Select
visible to make the MMI visible to other devi
ces. Select invisible to make the MMI invisible
to other devices. Devices which have already
been bonded can connect via Bluetooth even
when discoverability is deactivated. Select off
to switch discoverability off. It is then not pos
sible to establish a Bluetooth connection.
- Bluetooth audio player: When this function is
switched on�, the Bluetooth audio player is
available as a source in the Media menu.
- Delete Bluetooth device: The selected mobile
phone/device is disconnected from the MMI.
- Display Bluetooth profiles: You can Connect or
Disconnect the Handsfree, Car phone and Di
rectory/contacts profiles individually.
- Bluetooth audio player: Switch this function on
� to be able to use the Bluetooth audio player
as a source in the media menu.
- Bluetooth name: The Bluetooth name of the
MMI system (e.g. "AUDI MMI 2017") is dis
played and can be changed.
When this function is on �. the symbol @
¢page 130, Fig. 137 will appear on the infotain
ment display.
Online settings*
- Data connection settings: Refer to ¢ page 166,
Configuring the data connection
- Data usage meter: The number of the data
packets sent/received via the MMI system is System
settings
displayed. Select Reset data meter to reset the
usage statistics to zero.
- Connection status: The mobile network provid
er for data services and the network status are
displayed.
Wi-Fi settings*
Refer to ¢ page 165, Wi-Fi hotspot.
SIM PIN settings*
-Automatic PIN entry: When this function is
switched on�, the SIM PIN is stored in the
MMI after it has been entered for the first time.
You can save the PIN codes of four different
SIM cards on the MMI. If this function is
switched off, the PIN currently stored in the
MMI will be deleted. If the automatic PIN entry
function is activated, the system does not ask
you to enter your SIM PIN explicitly.
- Deactivate PIN query: The system does not ask
for the SIM PIN when you switch it on. The au
tomatic PIN entry function is ignored in this
case.
- Change PIN: You can change the PIN code for
your SIM card. First enter the existing PIN code
for your SIM card. The SIM PIN code can only
consist of numbers from Oto 9. The new SIM
PIN code has to be entered twice, as a precau
tionary measure, and is stored on the SIM card.
Network settings*
- Registration: To dial into your service provid
er's mobile network automatically or to select a
network manually from the list of available
networks.
- Network selection: You can use this function to
select the available networks for the current
position of the vehicle. This function is only
available when the manual setting is activated
for registration.
Apple CarPlay sound settings/Android Auto
sound settings
Applies to: vehicles with Audi smartphone interface
Refer to ¢ page 217.
215
Page 218 of 306

Downloaded from www.Manualslib.com manuals search engine System
settings
Ab out Appl e CarPla y/About Android Auto
Applies to: vehicles with Audi smartphone interface
Here you will find legal information about using
Apple CarPlay/Android Auto and information
about data transfer for specific devices.
Delete CarPlay device/Delete Android Auto
device
Applies to: vehicles with Audi smartphone interface
Important: Your mobile phone must no longer be
connected to the Audi music interface via a USB
adapter.
Select: Audi smartphone > a device from the list
> right control button.
To remove your mobile phone from the list of
mobile phones already connected, select and
confirm Delete CarPlay device or Delete Android
Auto device.
� Note
Some SIM cards do not allow the SIM PIN
query to be deactivated.
System update ..,
Sele
ct:
!MENU! button > Settings > left control
button > System maintenance.
- System update: Insert the storage medium
with the update data into the appropriate drive
¢page 192. Select and confirm the appropri
ate drive > Start update. The duration of this
process depends on the size of the update.
- Reset driver installation: The media driver
package selected is reset to the factory de
faults.
- Version information: Information on the soft
ware version of the M MI and the navigation da
tabase* is displayed. In addition, you can use
the Software information function to display
information on the MMI's software and licence
conditions.
216 On-board
Handbook
Applies to: vehicles with On-board Handbook
The On-board Handbook includes the Owner's
Manual for your vehicle.
Insta lling/u pdating the On-board Handbook
Important: The storage medium on which the
On-board Handbook is stored must have been in
serted into the relevant drive ¢page 192.
.., Select: I MEN
U
I button >Settings > left control
button > System maintenance > System up
date> SD card 1, SD card 2, CD/DVD* or USB*.
.., Follow the instructions given by the system.
Starting the Handbook
Important: The Handbook must have been instal
led previously.
.., Select: I MENU
I button >Car> left control but-
ton > Handbo ok.
The On-board Handbook will automatically load
in the language that is set under the option Menu
language in the MMI ¢page 212.
Using the On-board Handbook
The following functions are available when you
are operating the On-board Handbook using the
rotary pushbutton:
- Select and confirm an entry: Turn the rotary
pushbutton to the entry you require and press
the rotary pushbutton.
- Show a picture in full size: Turn the rotary
pushbutton to the desired picture and press the
rotary pushbutton.
- Call up the options menu: You can use the
right control button to return to the Home
page, Refresh the content in the On-board
Handbook, Cancel refresh of the content and
open the Index.
A WARNING
You should only use the On-board Handbook
when the traffic conditions allow you to do so
safely and when you can maintain proper con-
trol of your vehicle -risk of injury.
�
Page 219 of 306
 Note
- The On-board Handbook is not available in
all countries. Your Audi dealer w")
Downloaded from www.Manualslib.com manuals search engine 0
0
N
,.....
N
......
0
,.....
Vl
CX) Note
- The On-board Handbook is not available in
all countries. Your Audi dealer will be able
to provide you with more detailed informa
tion.
- Switch off the ignition while you are instal
ling/updating the On-board Handbook.
- Please note that the On-board Handbook is
not a substitute for the printed Owner's
Manual.
Sound settings
You can adjust the sound and volume of the MMI
individually. The settings depend on the equip
ment fitted in your vehicle.
Fig. 180 Adjusting balance/fader
� Select: IM
E
N
u I button > Sound > left control
button > Entertainment.
Treble / Bass
You can adjust the settings for Treble and Bass
by turning the rotary pushbutton. Any changes to
the settings only apply to the audio source cur
rently active. This allows you to set the sound for
each audio source separately.
Bala nce/fader (sound focus)
- To set the left/right volume ratio: Press the
rotary pushbutton. Turn the rotary pushbutton
clockwise or anti-clockwise to the desired posi
tion.
- To set the front/rear volume ratio: Press the
rotary pushbutton again. Turn the rotary push
button clockwise or anti-clockwise to the de
sired position.
-To set the volume ratio using the MMI touch
pad*: Move your finger in the desired direction
on the MMI touch pad. System
settings
Sound effects*
Select and confirm a setting for Focus:
- all: All the loudspeakers in the vehicle are ac
tive (evenly distributed sound focus).
- front: Only the loudspeakers in the front of the
vehicle are active.
Speed-d ependent volume control
You can adjust the automatic volume adaption to
the interior noise level by turning the rotary
pushbutton.
Volume settings
Adjusting the volume
Using the ON/OFF button, you can adjust the vol
ume of an audio source or system message (e.g.
during a speech dialogue*) directly while it is be
ing played.
- Volume up/down: Turn the ON/OFF button (D
¢ page 121, Fig. 124 clockwise or anti-clock
wise.
- Mute/pause: Briefly press the ON/OFF button.
Or: Turn the ON/OFF button anti-clockwise un
til the mute symbol appears. Any active audio/
video source will then be paused.
- Unmute/resume: Briefly press the ON/OFF but
ton. Or: Turn the ON/OFF button clockwise.
{a)) Note
When you switch on the MMI system, very
high/very low volume levels are automatically
reduced/increased to a preset level.
Setting the system volume � Sele
ct:
IMENU! button > Sound > left control
button.
Telephone
Applies to: vehicles with telephone
Mute telephone: Message and ring tones are si
lenced.
Ring tone: Refer to ¢page 156, Ring tone and
volume settings.
..,.
217
Page 220 of 306

Downloaded from www.Manualslib.com manuals search engine System
settings
Ring tone volume: You can adjust the volume of
the ring tone currently selected by turning the ro
tary pushbutton.
Message volume: You can adjust the volume of
the tone informing you of a new text message by
turning the rotary pushbutton.
Microphone input Level: You can adjust the vol
ume during a call by turning the rotary pushbut
ton.
Navigation
Applies to: vehicles with navigation system
Voice guidance: Refer to ¢ page 177, Voice guid
ance.
Voice guidance during calls: Refer to
¢ page 177, Voice guidance.
Volume of spoken cues: You can adjust the vol
ume of the spoken cues while route guidance is
active by turning the rotary pushbutton.
Entertainment fader: This option allows the vol
ume of the current audio source to be temporari
ly reduced when the parking aid is active or while
a navigation cue is being played.
Announ cements
Traffic announcements: Refer to¢ page 186.
DAB announcements*: Refer to¢ page 186.
Volume of announcements: You can adjust the
volume of traffic announcements by turning the
rotary pushbutton.
Speech dialogue system
Applies to: vehicles with speech dialogue system
Short dialogue: This option can be switched on/
off. When it is activated, the spoken cues played
by the system are shortened.
Speech dialogue system volume: You can adjust
the volume of the spoken cues by turning the ro
tary pushbutton.
Parking aid*
Turn the rotary pushbutton to adjust the volume
of the beeps.
- To adjust the front volume: Select and confirm
high, medium or Low.
218 -
To adjust the rear volume: Select and confirm
high, medium or Low.
MMI touch volume*
You can adjust the volume of the M MI touch*
spoken cues by turning the rotary pushbutton.
Audi heartbeat
You can adjust the volume of the Audi heartbeat
by turning the rotary pushbutton.
� Note
Please note that the speech dialogue system*
is not available as a factory option for Cabrio
let models without a seat belt microphone.
Restarting the MMI
system (Reset)
Fig. 181 Combination of buttons for restart
.,. Briefly press the rotary pushbutton and simul
taneously press the two rocker switches up
wards¢ Fig. 181.
Notes on software
licences
Information on the MMI system's software and
its Licence conditions
- Select: I MENU
I button
>Settings > left control
button > System maintenance > Version infor
mation.
- Or: On the Internet at www.audi.com/softwar
einfo.
Information on the instrument cluster's soft
ware and its Licence conditions
Page 221 of 306
Downloaded from www.Manualslib.com manuals search engine 0
0
N
,.....
N
......
0
,.....
Vl
CX) Press
the reset button I o.o I� page 24, Fig. 12
twice in the first five seconds after switching on
the ignition. System
settings
219
Page 222 of 306

Downloaded from www.Manualslib.com manuals search engine Safe
driving
Safe driving
General notes
Safety is the first priority
Your safety is our first priority.
This chapter contains important information,
tips, suggestions and warnings that you should
read and observe for your own safety and the
safety of your passengers.
A WARNING
- The information in this chapter is important
for the driver of the vehicle and the passen
ger. The other chapters in this manual (and,
where applicable, in the other literature
supplied with the vehicle) contain further
important notes which you should read and
observe for your own safety and that of your
passenger.
- Ensure that the complete vehicle wallet is
always in the vehicle. This is especially im
portant when you lend or sell the vehicle to
others.
Safety features
The safety features Listed here are part of the ve
hicle's occupant restraint system. They work to
gether to help reduce the risk of injury in a wide
variety of accident situations.
Your safety and the safety of your passengers
should not be left to chance. In the event of an
accident, the safety features incorporated in your
vehicle are capable of reducing the risk of injury.
These are just a few of the safety features in your
Audi:
- Seat belts for all seats
- Belt force limiters for all seats
- Belt tensioners for all seats
- Front airbags
- Side airbags in the backrests
- "ISOFIX" anchorages* for "ISO FIX" child seats
on the passenger's seat
-Adjustable steering column
220 These
individual safety features are harmonised
to provide you and your passenger with the best
possible protection in accident situations. How
ever, they can only be effective if you and your
passenger sit in the correct position and adjust
and use the safety equipment properly.
For these reasons, this chapter explains why
these safety features are so important, how they
can protect you, what you need to remember
when using them, and how you and your passen
gers can gain the most benefit from them. There
are also a number of important safety warnings
which you and your passengers should always ob
serve in order to minimise the risk of injury.
Safety is everyone's responsibility!
Before every trip
The driver is responsible for the safety of the
passengers and the safe operation of the vehicle
at all times.
For your own safety and the safety of your pas
senger, always note the following points before
every trip:
.,. Make sure that all lights and turn signals are
working properly .
... Check
the tyre pressures.
... Make sure that all windows are clean and give
good visibility to the outside.
... Secure all luggage and other items carefully
¢page 227.
... Make sure that no objects can interfere with
the pedals.
... Adjust the mirrors and the seat according to
your body height.
.,. Make sure that children are protected with suit
able safety seats and properly worn seat belts
¢page 223.
... Sit
in the correct position in your seat. Make
sure that your passenger is sitting in the cor
rect position ¢ page 54.
... Fasten your seat belt correctly. Make sure that
your passenger does the same¢ page 230.
Page 223 of 306
 What
factors can impair your safety?
Safety on the road is directly related to how")
Downloaded from www.Manualslib.com manuals search engine 0
0
N
,.....
N
......
0
,.....
Vl
CX) What
factors can impair your safety?
Safety on the road is directly related to how you
drive, and can also be affected by the passengers
in the vehicle.
The driver is responsible for the safety of the ve
hicle and all its occupants. If your ability to drive
is impaired in any way, you endanger yourself and
other road users ¢ ,A. Therefore:
""Do not let yourself be distracted by passengers
or by using a mobile phone, etc.
"" Never drive when your driving ability is im
paired (by medication, alcohol, drugs, etc.).
"" Obey all traffic regulations and speed limits
and always maintain a safe distance to the vehi
cle in front.
"" Always adjust your speed to suit the road, traf
fic and weather conditions.
"" Take frequent breaks on long trips. Do not drive
for more than two hours without a stop.
""If possible, avoid driving when you are tired or
stressed.
A WARNING
- Distractions while driving or any kind of im
pairment to your driving ability increase the
risk of accident and injury.
- Do not place loose objects on the dash pan
el. These objects could fly around the interi
or when the vehicle is moving (under accel
eration or whilst cornering) and distract the
driver -risk of accident! Safe
driving
Correct sitting positions
Correct driving position
The correct driving position is important for safe
driving.
Fig. 182 Adjust seat and sit in correct position 0
0
For your own safety, and to reduce the risk of in
jury in the event of an accident, we recommend
the following driving position.
"" Adjust the driver's seat and steering wheel so
there is a distance of at least 25 cm between
your breastbone and the centre of the steering
wheel¢ Fig. 182.
"" Adjust the height and fore/aft position of the
driver's seat so that you are able to press the
pedals to the floor without fully straightening
your legs¢ A.
"" Adjust the backrest to an upright position so
that your back remains in contact with the up
holstery.
""Adjust the longitudinal position of the steering
wheel so that your arms are slightly bent and
you can read the dials and instruments easily.
"" Make sure that you can comfortably reach the
top of the steering wheel.
"" Fasten your seat belt correctly ¢ page 230.
"" Keep both feet in the footwell so that you are in
full control of the vehicle at all times.
For detailed information on how to adjust the
driver's seat, see¢ page 54, Front seats.
A WARNING
A driver who is not sitting in the correct posi
tion or who is not wearing a seat belt can be
fatally injured if the airbag is triggered.
221
Page 224 of 306

Downloaded from www.Manualslib.com manuals search engine Safe
driving
-Adjust the driver's seat and steering wheel
so there is a distance of at least 25 cm be
tween your breastbone and the centre of the
steering wheel¢ Fig. 182.
- While driving, always hold the steering
wheel with both hands on the outside of the
rim at about the 9 o'clock and 3 o'clock posi
tion. This reduces the risk of injury if the
driver's airbag inflates.
- Never hold the steering wheel at the 12
o'clock position, or with your hands inside
the rim or on the steering wheel hub. This
could result in serious injuries to the arms,
hands and head if the driver's airbag in
flates.
- To reduce any risk of injury to the driver dur
ing a sudden brake application or in an acci
dent, never drive with the backrest tilted
too far back. The airbag system and seat
belts can only provide proper protection
when the backrest is in an upright position
and the driver is wearing the seat belt in the
correct position. The further the backrest is
tilted back, the greater the risk of injury due
to incorrect positioning of the belt webbing
or an incorrect sitting position.
Correct position for the passenger
The front seat passenger must sit at least 25 cm
away from the dash panel so that the airbag has
enough room to inflate and give maximum pro
tection in an accident.
For your own safety and to reduce the risk of in
jury in the event of an accident, we recommend
adjusting the passenger's seat as follows:
"" Adjust the backrest to an upright position so
that your back remains in contact with the up
holstery.
"" Keep both feet in the footwell in front of the
seat.
"" Fasten your seat belt correctly ¢ page 232.
In exceptional cases you can disable the pas
senger's airbag via the key-operated switch*
¢page 237.
222 For
detailed information on how to adjust the
passenger's seat, see ¢ page 54, Front seats.
A WARNING
A passenger who is not sitting in the correct
position or who is not wearing a seat belt can
be fatally injured if the airbag is triggered.
-Adjust the passenger's seat so there is a dis-
tance of at least 25 cm between your
breastbone and the dash panel.
- Always keep your feet on the floor when the
vehicle is moving; never rest them on the in
strument panel, out of the window or on the
seat. If you sit in an incorrect position, you
increase your risk of injury in the event of
sudden braking or an accident. If the airbag
is triggered, you could sustain potentially
fatal injuries by sitting out of position.
- To reduce the risk of injury to the passenger
in the case of sudden braking or an accident,
the passenger should never travel in a mov
ing vehicle with the backrest reclined. The
airbag system and seat belt can only provide
proper protection when the backrest is in an
upright position and the passenger is wear
ing the seat belt in the correct position. The
further the backrest is tilted back, the
greater the risk of injury due to incorrect po
sitioning of the belt webbing or an incorrect
sitting position.
Examples of incorrect seating positions
Occupants can suffer severe or fatal injuries if
they sit in an incorrect position while the vehicle
is moving.
Seat belts can only provide maximum protection
if the belt webbing is positioned correctly. Sitting
out of position greatly reduces the effectiveness
of the seat belts and increases the risk of injury
since the belt webbing is not worn in the position
for which it is designed. The driver is responsible
for the safety of all vehicle occupants, especially
for children.
"" Never allow anyone to sit out of position while
the vehicle is moving ¢,&. . ..,.
 1
1 2
2 3
3 4
4 5
5 6
6 7
7 8
8 9
9 10
10 11
11 12
12 13
13 14
14 15
15 16
16 17
17 18
18 19
19 20
20 21
21 22
22 23
23 24
24 25
25 26
26 27
27 28
28 29
29 30
30 31
31 32
32 33
33 34
34 35
35 36
36 37
37 38
38 39
39 40
40 41
41 42
42 43
43 44
44 45
45 46
46 47
47 48
48 49
49 50
50 51
51 52
52 53
53 54
54 55
55 56
56 57
57 58
58 59
59 60
60 61
61 62
62 63
63 64
64 65
65 66
66 67
67 68
68 69
69 70
70 71
71 72
72 73
73 74
74 75
75 76
76 77
77 78
78 79
79 80
80 81
81 82
82 83
83 84
84 85
85 86
86 87
87 88
88 89
89 90
90 91
91 92
92 93
93 94
94 95
95 96
96 97
97 98
98 99
99 100
100 101
101 102
102 103
103 104
104 105
105 106
106 107
107 108
108 109
109 110
110 111
111 112
112 113
113 114
114 115
115 116
116 117
117 118
118 119
119 120
120 121
121 122
122 123
123 124
124 125
125 126
126 127
127 128
128 129
129 130
130 131
131 132
132 133
133 134
134 135
135 136
136 137
137 138
138 139
139 140
140 141
141 142
142 143
143 144
144 145
145 146
146 147
147 148
148 149
149 150
150 151
151 152
152 153
153 154
154 155
155 156
156 157
157 158
158 159
159 160
160 161
161 162
162 163
163 164
164 165
165 166
166 167
167 168
168 169
169 170
170 171
171 172
172 173
173 174
174 175
175 176
176 177
177 178
178 179
179 180
180 181
181 182
182 183
183 184
184 185
185 186
186 187
187 188
188 189
189 190
190 191
191 192
192 193
193 194
194 195
195 196
196 197
197 198
198 199
199 200
200 201
201 202
202 203
203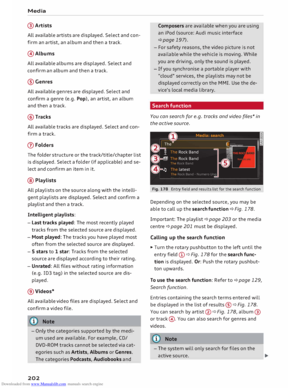 204
204 205
205 206
206 207
207 208
208 209
209 210
210 211
211 212
212 213
213 214
214 215
215 216
216 217
217 218
218 219
219 220
220 221
221 222
222 223
223 224
224 225
225 226
226 227
227 228
228 229
229 230
230 231
231 232
232 233
233 234
234 235
235 236
236 237
237 238
238 239
239 240
240 241
241 242
242 243
243 244
244 245
245 246
246 247
247 248
248 249
249 250
250 251
251 252
252 253
253 254
254 255
255 256
256 257
257 258
258 259
259 260
260 261
261 262
262 263
263 264
264 265
265 266
266 267
267 268
268 269
269 270
270 271
271 272
272 273
273 274
274 275
275 276
276 277
277 278
278 279
279 280
280 281
281 282
282 283
283 284
284 285
285 286
286 287
287 288
288 289
289 290
290 291
291 292
292 293
293 294
294 295
295 296
296 297
297 298
298 299
299 300
300 301
301 302
302 303
303 304
304 305
305 Press
the reset button I o.o I� page 24, Fig. 12
twice in the first five second")