Page 41 of 272

Power top
-Be careful when installing so you do not
pinch your fingers.
- Pay attention to the traffic when installing
the wind def lector. Install the w ind deflec
tor from the s ide of the vehicle that is away
from traffic.
(D Note
Do not lean against the veh icle when instal
ling the wind deflector. Hard objects and dec
orations on clothing such as belt buckles can
scratch the pa int.
{!) Tips
- The wind deflector works best when a ll of
the w indows are rolled up wh ile driving.
- Only store the wind deflector in the storage
bag* when it is dry.
Power top emergency
operation
General information
The power top con be closed manually if there is
o malfunction.
• Set the parking brake.
• Open all windows.
• Switch the ignition off.
• Pull the button@ for approximately 10 to
15 seconds to reduce th e pressure in the power
top hydraulics ¢
page 36, fig. 25.
Only close the power top m anually in an eme r
gency . Have a second person assist . Drive to an
author ized Audi dealer or author ized Audi Service
Facility immediately to have the malfunction cor
rected.
A WARNING
- There is a r isk of pinching the hands or othe r
people during all of the power top emergen
cy operat ion steps.
- Make sure a ll windows are lowered during
emergency ope ration.
- Do not reach into the power top suppor ts
or other moving components .
40
-Never drive when the power top is not
locked correct ly. The wind from driving
could cause the power top to open. This can
result in injur ies and damage to the vehicle .
{!) Tips
The power top storage compartment cover is
not latched after the emergency operation is
complete. Dr ive to an authorized Audi dealer
or authorized Audi Service Facility immediate
l y to have the malfu nction corrected.
Step 1: Release the power top storage
compartment cover
Fig. 31 Rear seats fo lded forward : release loop for the
power top storage compartment cover
Fig. 32 Open ing the s ide covers
• Open the luggage compartment lid.
• Fold the rear seat backrests forward.
• Remove the wheel wrench from the vehicle tool
kit.
• Close the luggage compartment lid .
• Pull the release loop down from the rear to re
lease the power top storage compartment cov
er
¢ fig. 31.
• Slide the covers on both sides of the veh icle in
the direction of the arrow until they lock in
place
¢fig. 32.
Page 42 of 272

<( co ..... N
" N ..... 0 r--. > 00
Step 2: Lift the power top storage
compartment cover out
Fig. 33 Lifting the power top storage compartment cover
out and setting up the supports
Fig . 3 4 Power top storage compartment cover: supports
set up
.,. Raise the power top compartment cover out of
the power top compa rtment and hold it in
place @~
fig. 33 ~,&. in General information
on page 40 .
.,. Secure the power top storage compartment
cover by pressing on the side supports on both
sides @.
A WARNING
-Always make sure that the side supports on
the open power top storage compartment
cover are in place, even when the power top
is not fully open or closed . Otherw ise, the
power top storage compartment cover could
fall, which increases the risk of an accident.
- Avoid making contact with the supports and
other moving parts when opening the power
top storage compa rtment cover.
If do you
make contact, your hands cou ld be pinched .
Powe r top
Step 3 : Open the locking pin
Fig. 35 Rear of the vehicle: opening the lock ing pin
.,. Remove the cap on the trip and insert the
wheel wrench into the opening .
.,. Turn the whee l wrench clockwise until it stops
to open the locking pin .
.,. Remove the wheel wrench.
A WARNING
When raising the power top storage bay cov
er, avoid contact with the supports or other moving parts. Otherwise you could pinch your
hands.
Step 4: Close the power top
• •
•
Fig . 36 Rear of vehicle: closing t he power top (1)
Fig . 37 Rear of vehicle: closing the power top (2)
41
Page 43 of 272

Power top
.,. Pos ition yourself near the vehicle .
.,. Hold the power top by its front edge and pull it
out completely ¢
fig. 36 ¢ A in General infor
mation on page 40.
.,. Lift the rear edge of the power top.
.,. Release the power top storage compartment
cover by pu lling on the side supports to release
them .
.,. Close the power top storage compartmen t cov
er (!) and let the rear edge of the power top
drop @r::!;>fig .
37.
Step 5: Lock the power top
Fig . 38 W inds hield : closi ng t he powe r top
F ig . 39 Inside of the powe r top: lock ing the powe r top
.,. Press the power top onto the w indshield frame
r::!;> fig . 38 r::!;> _& in General information on
page 40 .
.,. Insert the wheel wrench into the opening and
turn it co unterclockwise unti l it stops
r::!;> fig . 39 .
.,. Remove the whee l wrench and seal the opening
with the cap .
.,. Put the whee l wrench back into the vehicle tool
k it
r::!;> page 230 .
42
A WARNING
-When positioning the powe r top , avoid con
tact w ith the supports o r other moving
parts. Otherwise you could pinch yo ur
hands .
- When pressing the power top down onto the windshield frame, make s ure that you
do not pi nch yourse lf or anyone else .
@ Tips
Make sure the lock ing mechan isms are locked
securely .
Page 44 of 272

The headlights only work when the ignition is
switched on . The")
Lights and Vision
Exterior Lighting
Switching lights on and off
Fig. 40 Instrument panel: l ig ht switc h (example)
The headlights only work when the ignition is
switched on . The headlights turn
off automati
cally when the engine is switched on or when the
i gn it ion is switched off . Only the side-marker
l ights stay on.
A warning symbol will appear in the driver infor mat io n disp lay if the system is not f unction ing
correctly
¢ page 21.
Light s witch ·'ti- ·
Turn the switch c:> fig. 40 to the corresponding
position . When the lights are switched on, the re·
spective symbol turns on .
0 -lights off . In some countries, the day time
running lights* are turned on and
off together
with the ign ition.
- USA model s: the daytime running lights switch
on automatically when the ignition is switched
on and the light switch <=>
fig. 40 is set to the 0
or the AUTO position (only in daylight) . The
Daytim e runn ing ligh ts can be switched on and
off in the MMI ¢ page 45 ¢ .&. .
-Canada model s: the daytime running lights
switch on automatically when the ignition is
switched on and the light switch ¢
fig. 40 is in
the
O posit ion, :oo: or the AUTO position (on ly in
daylight)
c:> ,&. .
;;§ AUTO* -automatic headlig hts switch on and off .....
~ depending on brightness, for example in tw ilight ,
8 during ra in or in tunne ls. In veh icles with inte-
S; g rated day time running lights*, ei ther the day-co
Lights and V ision
t ime running lights or the headlights will turn on
automatica lly, depending on the amo unt of light
(may vary depending on the country) .
:oo: -Par king ligh ts
io -Low beam headlights
The following will happen in these light switch pos itions w hen you lock the vehicle:
- iD -Low beam headlight: the entire exterior
lighting is switched
off
- AU TO *: the Coming home* function is turned
on
¢ page 45
Fog lights* /rear fog light(s )
Press the correspondi ng b utton c:> fig. 40:
tO -Front fog lights* (not pictured) . This b utton
rep laces the b utton for all-wea ther lights
When the fog lights are sw itched on, the tO sym
bol in the b utton ill umin ates .
0$ -Rear fog light(s) When the rea r fog lights are
swi tched on, the
0$ symbo l in the b utton illumi
nates.
All-weather light s*
Apples to : vehicles wit h LED he adlights.
Press the corresponding button ,;ii o ¢ fig. 40 on
the light switch :
"1~D -All-weather lights . The symbol "11D in the
button lights up when all-weather lights are
switched on.
In vehicles with all -weather lights, the front
lights are adjusted automatically so that you are
less likely to see g lare from your own headlights,
for example whe n driving on a wet road.
Headlight range control system
The headlight range adjusts a utomat ically when
t h ere is a change in ve hicle load and during brak
ing and accelerating so that the headlights do
not cause glare for oncoming traffic.
Audi adaptive light*
T he ada ptive lig ht only functions when the light
switch is in the AUTO pos ition . You can deactivate
adaptive light in the MMI
¢ page 45 . ..,.
43
Page 45 of 272

Lights and Vision
When switched on, adaptive light adjusts to
curves depending on the vehicle speed and steer
ing wheel angle. This provides better lighting
through the curve. The system operates in a
speed range from approximately 6 mph (10 km/
h) to 68 mph (110 km/h) .
Static cornering light* -the cornering light
switches on automatically when the steering
wheel is turned at a ce rtain angle at speeds up to
approximately 44 mph (70 km/h) and when the
turn signal is activated at speeds up to approxi
mately 25 mph (40 km/h) . The area to the side of
the vehicle is illuminated better when turning.
Speed dependent light distribution* -The speed
dependent light distribution adapts the light in
towns and on highways or expressways . Intersec
tions can also be illuminated on vehicles with a
navigation system* .
Highway light function*
This function adapts the lighting for highway
driving based on vehicle speed .
A WARNING
-Automatic headlights* are only intended to
assist the driver. They do not relieve the
driver of responsibility to check the head
lights and to turn them on manually accord
ing to the current light and visibility condi
tions. For example, fog cannot be detected by the light sensors . So always switch on the
low beam under these weather conditions
and when driving in the dark ~D.
- Accidents could occur if you can not see the road ahead of you well and if others on the
road cannot see you . Always switch your
headlights on so that you can see the road
ahead of you and others can see your vehicle
from behind.
- The rear fog lights should only be turned on
in accordance with traffic regulations, to
prevent glare for traffic behind your vehicle.
-If the battery has been discharging for a
while, the parking light may switch off auto
matically. Always make sure your vehicle is
parked and adequately lit according to the
44
laws. Avoid using the parking lights for sev
eral hours.
- Please observe legal regulations when using
the lighting systems described.
(D Tips
- The light sensor for the automatic head
lights* is in the rearview mirror mount.
Therefore , do not place any stickers in this
area on the windshield.
- Some exterior lighting functions can be ad
justed
Q page 45.
- If you turn off the ignition while the exterior lights are on and open the door, you will
hear a warning tone.
- In some market-specific versions, the tail
lights do not turn on when switching on the
daytime running lights .
- In cool or damp weather, the inside of the
headlights, turn signals and tail lights can
fog over due to the temperature difference between the inside and outside. They will
clear shortly after switching them on . This
does not affect the service life of the light
ing.
-A message will appear in the instrument
cluster if there is a malfunction in the light
sensor
Q page 21 .
Emergency flasher
Fig. 41 Ins trumen t panel: e merge ncy flasher butto n
The emergency flashers makes other drivers
aware of your vehicle in dangerous situations.
.,. Press the~ button to switch the emergency
flashers on or off .
Page 46 of 272

<( co ..... N
" N ..... 0 r--. > 00
You can indicate a lane change or a tu rn when the
emergency flas hers are sw itche d on by us ing the
turn sig nal lever . The emergency flashers stop
tempo rarily.
The emergency flashers also work when the igni
tion is tur ned off.
@ Tips
You should s witch the e merge ncy fla shers on
if:
- Y ou a re the la st c ar in a tra ffic j am so th at
a ll ot her vehicles appro ach ing from be hind
ca n see you, or if
- You r vehicle has br oke n do wn or y ou ar e
h aving an eme rgency, or i f
- Y our vehi cle is bei ng towe d or if yo u are
tow ing anot her vehicle.
Turn signal and high beam lever
The Lever operates the turn signals, the high
beams and the headlight flasher.
F ig . 42 Turn signal an d high bea m lever
Turn signals ¢i ¢
The turn s ignals activate when you move the lev
er into a turn s ignal position w hen the ignition is
switched on.
(D -Tur n signa l
@-Tur n sign al
The tu rn s ignal bl inks three times if you tap th e
l eve r (conve nience turn s ignal) .
High beams and headlight flasher ~D
Move the lever to the correspond ing posit ion:
@ -high beams on
Lights and V ision
@ -high beams off or he adlight flasher
T he
El in di cato r light in t he inst rument cl uste r
tu rns o n.
_& WARNING
H ig h be ams can cau se gla re fo r ot her dr ivers,
which increases the risk of an accident. Fo r
this reason, only use the high beams or the
h eadlight flasher when they will not create
g la re for ot her dr ivers.
Adjusting the exterior lighting
The settings are adjusted in the MMI.
.,. Sele ct: the I MENU I but to n > Car > Systems *
control b utton > Vehicle settings > Exterior
lighting .
Automatic headlights
Yo u can adjust the following s ettings in the Au
tomatic headlights
menu:
Activation time -you can adjust if the headlights
switch on
Early , Medium or Late accord ing to the
sensit ivity of th e light s ensor .
Audi adaptive light * -you can switch adaptive
li ght
On and Off .
Coming home, leaving home*
T he coming home f unction ill uminates the area
outside the vehicle when you turn the ignit ion off
and open the driver 's door. To turn the function
o n, select
Lights when leaving car > On .
The leaving home i llum inates the area outside
the vehicle when yo u unlock the vehicle. To turn
t h e function on , se lect
Lights when unlocking
car > On .
The coming home a nd leav ing home functions
on ly operate when it is dark and the light switch
is in the
AUTO pos ition.
Daytime running lights*
USA models:
t h e dayt ime run ning lights can be
switched on or off using the MM I. Select
On or
Off . ..,_
45
Page 47 of 272

Lights and Vision
Canada models : this function cannot be switched
off . They activate automatica lly each time the ig
n ition is switched on. T his menu item is shown
with a "gray background".
Travel mode*
The headlig ht beam is asymme trical. This pro
vides stronge r ill uminat ion on the side of the
road on w hich you are driving . In ve hicles with
Xenon headlights* with tu rni ng light* or LED
headl ights* ,
you must adjust the headlights
when you are driv ing in a country where th e traf
fic direction is oppos ite from your own country .
Otherw ise, oncoming traffic will be blinded by
the glare from the headlights . An a djustment is
not needed in veh icles with Xenon headlights
w it h out t urni ng lig hts .
To prevent glare:
- Travel mode must be activated in vehicles w ith
Xenon headlights* and turning light* or LED
headlights*. Select: the
I M ENU I button> Car >
Sy stem s*
cont rol button > Vehicle settings >
Exterior lighting > Light for driving on left , for
example .
After you have adjusted the headlights , the fol
low ing message w ill appear:
II Headlight converter active for driv ing on
left. Range reduced!
(D Tips
When travel mode is activated, a disp lay in
the dr ive r information system indicates this
each t ime you switch the ignition on.
46
Interior lighting
Interior lights
Fi g. 43 Headliner: interior ligh ts, version 1
Fig. 44 Headline r: inte rior l ights, ve rs io n 2
~ Reading lights
.,. Ve rsion 1 :
to turn a reading light on or off,
press the
l!J button c:> fig. 43.
.,. Version 2 (touch-sensitive read ing lights w ith
manual dimming function *):
To switch a read
ing light on/off, briefly touch t he surface @
c:>fig. 44 .
.,. To acti vate the m anual dimmi ng f unc tion,
t o uch the s urfa ce @ when the ligh t is switched
off and keep touchi ng it un til the desired
brightness is reached.
[!I Door contact switch
.,. To have the in te rior lig hts contro lled automati -
cally, p ress the
I!] b utt on.
Interior lighting*
You can adjust the brightness of the inter ior
ligh ting . In the MMI*, select: the
I MENU I button
>
Car > System s* control but ton > Vehicle s et
tings > Interior lighting .
The interior light ing turns on when you sw itch
the headlights on w hile the ignition is on.
Page 48 of 272

<( co ..... N
" N ..... 0 r--. > 00
Instrument illumination
The brightness of the instrument cluster and the
center console can be adjusted .
Fig. 45 Instrumel'lt illumination
Requirement: the light must be switched on.
.. Press the knob to release it.
.. Turn the knob toward "-"or"+" to reduce or in
crease the brightness.
.. Press the knob again to return i t to its original
position .
@ Tips
The needles and gauges in the instrument
cluste r illuminate when the headlights are off
and the ignition is switched on . The illumina
tion reduces automatically and eventua lly
turns off as brightness outside decreases.
This function reminds the driver to turn the
headlights on at the appropriate time.
Vision
Adjusting the exterior mirrors
0
g
>
Fig. 46 Driver's doo r: knob fo r th e exterior mirrors (exam
ple)
Turn the knob to the desired position:
a, (X)
Lights and V ision
0 -All adjustment functions are deactivated.
Q/P -adjusting the left/r ight exte rior m irror.
Move the knob in the desired direction.
(@ -Heat* the mirror glass depend ing o n the out
s ide temperatu re.
8 -Folding exterior mirrors*. You can select if
the mirrors fold in automatically when you lock
the vehicle In the MMI*
q page 31.
Front passenger 's exterior mirror tilt
function*
To help you see the curb when backing into a
parking space, the surface of the m irror tilts
s li ghtly. For this to happen, the knob must be in
the position for the front passenger's outside
mirror .
You can adjust the tilted mirror surface by turn
ing the knob in the desired d irect ion . When you
move out of reverse and into another gea r, the
new mirror position is stored and assigned to the
key you are using.
The mirror goes back into its or iginal position
once you drive forward faste r than 9 mph
(15 km/h) or turn the ignition off.
_& WARNING
Cur ved m irror surfaces (convex) enlarge the
f ield of vision. However, they make objects in
the m irror appear smaller and further away.
Your may estimate incorrectly when you use
these mirrors to gauge your distance from the
vehicles beh ind you when changing lanes -ac
cident r isk!
(D Note
- Applies to vehicles with power fo lding out
side mirrors*: if the mirror housing was
moved by outside forces (such as an impact
when maneuvering), you must use the pow
er foldi ng function to fold the mirror all the
way out. You will hear a loud noise when the
mirrors are latched back in place. The mirror
housing must not be moved back into place
by hand because this would impair the func-
tion of the mirror mechanism. ..,.
47
 1
1 2
2 3
3 4
4 5
5 6
6 7
7 8
8 9
9 10
10 11
11 12
12 13
13 14
14 15
15 16
16 17
17 18
18 19
19 20
20 21
21 22
22 23
23 24
24 25
25 26
26 27
27 28
28 29
29 30
30 31
31 32
32 33
33 34
34 35
35 36
36 37
37 38
38 39
39 40
40 41
41 42
42 43
43 44
44 45
45 46
46 47
47 48
48 49
49 50
50 51
51 52
52 53
53 54
54 55
55 56
56 57
57 58
58 59
59 60
60 61
61 62
62 63
63 64
64 65
65 66
66 67
67 68
68 69
69 70
70 71
71 72
72 73
73 74
74 75
75 76
76 77
77 78
78 79
79 80
80 81
81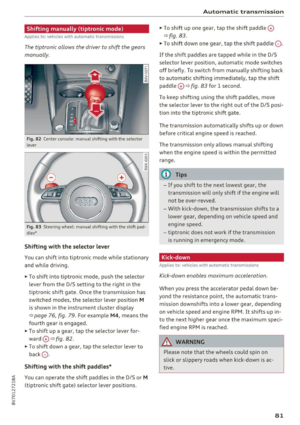 82
82 83
83 84
84 85
85 86
86 87
87 88
88 89
89 90
90 91
91 92
92 93
93 94
94 95
95 96
96 97
97 98
98 99
99 100
100 101
101 102
102 103
103 104
104 105
105 106
106 107
107 108
108 109
109 110
110 111
111 112
112 113
113 114
114 115
115 116
116 117
117 118
118 119
119 120
120 121
121 122
122 123
123 124
124 125
125 126
126 127
127 128
128 129
129 130
130 131
131 132
132 133
133 134
134 135
135 136
136 137
137 138
138 139
139 140
140 141
141 142
142 143
143 144
144 145
145 146
146 147
147 148
148 149
149 150
150 151
151 152
152 153
153 154
154 155
155 156
156 157
157 158
158 159
159 160
160 161
161 162
162 163
163 164
164 165
165 166
166 167
167 168
168 169
169 170
170 171
171 172
172 173
173 174
174 175
175 176
176 177
177 178
178 179
179 180
180 181
181 182
182 183
183 184
184 185
185 186
186 187
187 188
188 189
189 190
190 191
191 192
192 193
193 194
194 195
195 196
196 197
197 198
198 199
199 200
200 201
201 202
202 203
203 204
204 205
205 206
206 207
207 208
208 209
209 210
210 211
211 212
212 213
213 214
214 215
215 216
216 217
217 218
218 219
219 220
220 221
221 222
222 223
223 224
224 225
225 226
226 227
227 228
228 229
229 230
230 231
231 232
232 233
233 234
234 235
235 236
236 237
237 238
238 239
239 240
240 241
241 242
242 243
243 244
244 245
245 246
246 247
247 248
248 249
249 250
250 251
251 252
252 253
253 254
254 255
255 256
256 257
257 258
258 259
259 260
260 261
261 262
262 263
263 264
264 265
265 266
266 267
267 268
268 269
269 270
270 271
271