Page 105 of 272

<( co .... N r--N .... 0 ,.__
> co
-In some situations, the system may not
function or its function may be limited. For
example:
- If vehicles are approach ing or being left
behind very quickly. The display may not
turn on in time.
- In poor weather conditions such as heavy
rain, snow or heavy mist.
- On very wide lanes, in tight curves, or if
there is a rise in the road surface. Vehicles
in the adjacent lane may not be detected
because they are outside of the sensor
range.
- Audi side assist cannot detect all vehicles
under all conditions, which can increase the
risk of accidents.
- Please note that side assist only displays ap
proaching vehicles or vehicles in your blind
spot if your vehicle is traveling at least
19 mph (30 km/h).
- In certain situations, the system may not
work or its function may be limited. For ex ample:
- The display may not turn on at the right
time if veh icles are approaching or passing
very quickly.
- In poor weather conditions, such as heavy
rain, snow or fog.
- In very wide lanes, in tight curves or when
there are slopes in the roadway, vehicles
in the neighboring lanes may not be de
tected because they are outside of the
sensor range.
(D Note
The sensors can be displaced by impacts or damage to the bumper, wheel housing and
underbody. This can affect the system. Have
an authorized Audi dealer or authorized Audi
Service Facility check their function.
(D Tips
-If the window glass in the driver's door or
front passenger's door has been tinted, the
display in the exterior mirror may be misin
terpreted.
Assist
- For an explanation on conformity with the
FCC regulations in the United States and the
Industry Canada regulations, refer to
¢ page 256.
Switching on and off
Applies to : vehicles with Aud i s ide ass ist
The system and be switched on and off in the
MMI*.
.. Select: the I MENU I button> Car> Systems*
control button > Driver assistance> Audi side
assist .
With Off, the system is switched off.
An activated system will signal every time the ig
nition is switched on by turning the displays in
the exterior mirrors on briefly .
Adjusting the display brightness
Applies to: vehicles with Aud i s ide assist
The display brightness can be adjusted in the
MM!*.
.. Select: the I MENU I button >C ar> Systems*
control button > Driver assistance > Aud i side
assist .
The display brightness adjusts automatically to
the brightness of the surroundings, both in the
information and in the warning stage. In very
dark or very bright surroundings, the display is
already set to the minimum or max imum level by
the automatic adjustment . In such cases, you
may not ice no change when adjust ing the bright
ness , or the change may only be noticeable once
the surround ings change .
Adjust the br ightness to a level where the display
in the information stage will not disrupt your
view forward. If you change the brightness, the
display in the exterior m irror will briefly show the
brightness level in the information stage. The
brightness of the warning stage is linked to the
brightness in the information stage and is adjust
ed along with the information stage adjustment.
(D Tips
- Side assist is not active while you are mak
ing the adjustment.
105
Page 106 of 272

Ass is t
- Your settings are automatically stored and
assigned to the remote control key being
used .
Driver messages
Applies to: ve hicles w ith Audi side assist
If the side assist switches off automatically, a
message appears in the instrument cluster dis
play.
(ij Audi side a ssi st : cur rentl y un ava ilable No
s en so r v isi on
The radar sensors' vision is affected. Do not cover
the area in front of the sensors with bike wheels,
stickers, dirt or other objects . Clean the area in
front of the sensors, if necessary~
page 104,
fig. 105.
@j Audi side assist : cur rently un available
Side assist cannot be switched on temporar ily be
cause there is a malfunction (for example, the
battery charge level may be too low).
@j Audi side a ssi st : S ystem fau lt!
The system cannot guarantee that it will detect
veh icles correctly and it is switched off. The sen
sors have been d isplaced or are faulty . Have the
system checked by an authorized Audi dealer or
author ized Audi Service Facility soon .
Audi drive select (drive
settings)
Introduction
App lies to: vehicles with Aud i drive select
Audi drive select makes it possible to experience
d ifferent types of vehicle settings in o ne veh icle .
The drive r can select from three
Comfort , Auto
and D ynam ic modes us ing the te'i:.1 button in the
center console or the MMI to switch between a
sporty and a comfortable driving mode, for ex
ample. In the
Ind ividu al* mode, the settings can
be adjusted to your personal preferences. This
makes it poss ible to combine settings such as a
sporty eng ine setting w ith smooth steering.
106
A WARNING ,_
Using Aud i drive select incorrectly can lead to
coll is ions, other accidents and serious inju
ries.
Description
App lies to: vehicles with Aud i drive se lect
The vehicle setup in each mode depends on the
vehicle's features. However, the engine a nd
steering are a lways affected.
Engine and automatic tr ansmiss ion
Depending on the mode, the engine and auto
matic transmission* respond more qu ickly or in a
more ba lanced manner to accelerator pedal
movements.
Adapt ive damper s (Audi magneti c ride )*
The adaptive dampers use sensors to record in
format ion regarding steering movements, brak
i ng and acceleration operations by the driver,
road surface, driving speed, and load . W ith Aud i
drive select you can adjust the adaptive dampers
spo rty (dynamic), comfortable (comfort) o r bal
anced (auto).
Ste ering
The steering adapts in terms of steering ass is
tance. There are d ifferent modes
~page 107.
Ind irect steering that moves easi ly as in comfort
mode is espec ially suited to long d rives on a h igh
way. The dynamic mode provides sporty, direct
steering.
Fo r vehicles with p rogress ive steering* the steer
i ng perfo rmance is more agile.
Corn ering light*
The cornering light adjusts when driv ing on
curves at speeds between 6 mph (10 km/h) and 68 mp h (1 10 km/h) . The pivoting act ion and the
li ght ing are also adapted to the mode.
Adapt ive cruise cont rol*
The behavior whe n accelerating can be adjusted
from comfortable to sporty, depending on the
Audi drive select mode . Adaptive cruise control ..,.
Page 107 of 272

<( co ..... N
" N ..... 0 r--. > 00
also responds to the driving behavior of the vehi
cl e ahead in a more cons ervative or sporty man
ner.
@ Tips
I n some models, the maximum vehicle speed
can only be reached in the auto and dynamic
modes .
Selecting the driving mode
Applies to: ve hicles with Audi drive select
You can choose between comfort, auto, dynamic
and individual*.
Fi g. 10 6 Ce nte r co nsole : d rive se lec t button
Fig. 107 MM I: driv e selec t
Adjusting the Individual mode
Ass ist
.,. To set the mode, press the r:/tc'i button
~ fig . 106 repeatedly until the desired mode is
disp layed i n the instrument cluster. Or
.,. In the MMI, select : the
I MENU I button > Car >
Systems "
control button > Comfort , A uto , Dy
namic or Individual *.
You can change the driving mode when the vehi
cle is stationary or while driv ing. If traff ic per
mits, after changing modes, briefly take your
foot off the accelerator pedal so that the recently
selected mode is also ac tivated for t he engine .
Comfort -provides a comfort-or iented vehicle
setup and is suited for long drives o n highways.
Auto -provides an overa ll comfortab le yet dy
namic dr iving feel and is suited for everyday use .
Dynamic -gives the drive r a spo rty driving fee l
and is suited to a sporty driving style.
Individual* -~ page 107.
A WARNING
Pay atten tion to traffic w he n ope rating the
d rive select to p revent pote ntia l risk o f an ac
cident .
You can adjust the vehicle settings to your personal preferences .
.,. Se lect : the I MENU ! button> Car> Systems *
control button > Set individual contro l button.
Once you select the men u, you will automat i
ca lly dr ive in the
Individual * mode.
After you have closed the sett ings, you will auto
mat ica lly dr ive in the
Individual * mode . The equipment in you
r vehicle will determine
which sett ings you can adjus t. The follow ing ta
ble g ives an overview of t he characteristics .
107
Page 108 of 272
Assist Systems comfort
Engine
and Transmission comfortab le
Steering comfortable
Cornering light* comfortab le
Audi adaptive cruise control* comfortable
Damper control* comfortable
Engine sound* subtle
a) Subt le in th e se lector le ver pos it ion D and sporty in S.
(D Tips
Your Individual* mode settings are automati
cally stored and assigned to the remote con
trol key being used.
108
auto dynamic
balanced sporty
balanced sporty
balanced sporty
ba lanc ed sporty
balanced sporty
subtle/sporty a)
sporty
Page 109 of 272

<( co .... N r--N .... 0 r--> co
Parking systems
General information
Applies to: ve hicles with a rea r parking sys te m /pa rking sys
tem plus/rearv iew camera
Depending on your vehicle's equipment, various
parking aids will help you when parking and ma
neuvering.
The
rear parking system is an audible parking aid
that warns you of obstacles
behind the vehicle
¢page 110.
The parking system plus assists you when park
ing by audibly and visually indicating objects de
tected
in front of and behind the vehicle
¢page 110.
The rearview camera shows the area behind the
vehicle in the MMI display. This display assists
you when you are cross or parallel parking. The parking system plus functions are also available
¢page 111.
A WARNING ,--
- Always look for traffic and check the area
around your vehicle by looking at it directly
as well. The parking system cannot replace
the driver's attention. The driver is always
responsible when entering or leaving a park
ing space and during similar maneuvers.
- Please note that some surfaces, such as
clothing, are not detected by the system.
- Sensors and cameras have blind spots in
which people and objects cannot be detect
ed . Be especially cautious of small children
and animals.
- Always pay attention to the area around the
vehicle -using the rearview mirror, too.
- The sensors can be displaced by impacts or
damage to the radiator grille, bumper,
wheel housing and the underbody . The park
ing system may become impaired as a re
sult. Have an authorized Audi dealer or au
thorized Audi Service Facility check their
function.
- Make sure the sensors are not obstructed by
stickers, deposits or other materials. If they
are the sensor function could be impaired.
I
Parking systems
For additional information on cleaning, re
fer to¢
page 224.
@ Note
-Some objects are not detected or displayed
by the system under certain circumstances:
- Objects such as barrier chains, trailer draw
bars, vertical poles or fences
- Objects above the sensors such as wall ex
tensions
- Objects with specific surfaces or struc
tures such as chain link fences or powder
snow
- If you continue driving closer to a low-lying
object, it may disappear from the sensor
range . Note that you will no longer be
warned about this obstacle.
- The sensors can be displaced by impacts or
damage to the radiator grille, bumper,
wheel housing and the underbody. The
parking system may become impaired as a
result . Have an authorized Audi dealer or
authorized Audi Service Facility check their
function.
(D Tips
- The system may provide a warning even
though there are no obstacles in the cover
age area in some situations, such as:
- certain road surfaces or for long grass .
- external ultrasonic sources e.g. from
cleaning vehicles.
- heavy rain, snow, or thick vehicle exhaust.
- We recommend that you practice parking in
a traffic-free location or parking lot to be
come familiar with the system. When doing
this, there should be good light and weath
er conditions .
- You can change the volume and pitch of the
signals as well as the display¢
page 115.
-What appears in the MMI display is some
what time-delayed.
- The sensors must be kept clean and free of
snow and ice for the park assist to operate.
109
Page 110 of 272

Parking system s
Rear parking system
Description
Applies to: ve hicles w ith rear park ing system
The rear parking system is an audible parking
aid.
Descri ption
There is a sensor in the rear bumper cover . If
these detect an obstacle, audible signals warn
you .
Make sure the sensors are not covered by stick
ers, deposits or any other obstructions as it may
impair the sensor function. For information on
cleaning , refer to¢
page 224.
The range at which the sensors begin to measure
is approximately:
Side rear 3 ft (0.90 m)
Side center 5.2
ft (1.60 m)
The closer
you get to the obstacle, the shorter
the interval between the audible signals . A con
tinuous tone sounds when the obstacle is less
than approximately 1 foot (0.30 meters) away.
Do not continue backing up¢.&.
in General infor
mation on page 109,
¢0 in General information
on page 109!
If the distance to an obstacle remains constant,
the volume of the distance warning gradually drops after about four seconds (this is not apply
in the continuous tone range).
Activ ating
The parking system activates automatically when
the reverse gear is selected. You will hear a brief
confirmation tone.
110
Parking system plus
Description
App lies to: vehicles with parking system plus
The parking system plus provides audio and visu
al signals when parking .
Fig. 108 D isp lay fie ld
Sensors are located in the front and rear bump
ers. If these detect an obstacle, audible and visu
al signals warn you .
Make sure the sensors are not covered by stick
ers, deposits or any other obstruct ions as it may
impair the sensor function. For information on
cleaning, refer to¢
page 224.
The display field begins approx imately at:
® 4 ft (1.20 m)
® 3 ft (0 .90 m)
© 5.2 ft (1.60 m)
® 3 ft (0 .90 m)
The closer you get to the obstacle , the shorter
the interval between the audible signals. A con
tinuous tone sounds when the obstacle is less
than approximately 1 foot (0.30 meters) away.
Do not continue driving forward or in reverse
¢.&. in General information on page 109, ¢@) in
General information on page 109!
If the distance to an obstacle remains constant,
the volume of the distance warning gradually
drops after about four seconds (this is not apply
in the continuous tone range).
Page 111 of 272

<( co ..... N
" N ..... 0 r--. > 00
Switching on/off
App lies to: vehicles with parking system plus
F ig. 109 Center console: parking aid button
Fig. 110 MMI: opt ical dista nce display
Switching on
• Shift into reverse, or
• Press the
P,,1A button in the center console
¢fig. 109. A short confi rmation tone sounds
and the LED in the button turns on.
Switching off
• Drive faster than 6 mph (10 km/h), or
• Press the
P,,1A button, or
• Switch the ign ition off.
Segments in the visual display
The segments in front of and behind the vehicle
(veh icles w ith park ing system plus*) help you to
dete rm ine the distance between you and an ob
stacle. On some equipment the red lines mark
the expected direction of travel according to the
steering angle. A white segment indicates an
identified obstacle that is outside of the vehicle's
path. Red segments show identified obstacles
that are in your vehicle's path. As your vehicle
comes closer to the obstacle, the segments move
closer to the vehicle. The collision area has been
reached when the next to last segment is d is-
Parking systems
played. Obstacles in the collision area, including
those outside of the vehicle's path, are shown in
red. Do not continue driving forward or in reverse
¢ & in General information on page 109, ¢ (i) in
General information on page
109!
Rearview camera
Introduction
Appl ies to: vehicles with parking system plus with rearview
camera
Fig. 111 Illust ratio n: Cross parking
Fig. 112 Illust ratio n: pa rallel parking
In add ition to parking system plus¢ page 110,
this parking system also has a rearv iew camera.
You can use
cross parking for example, to park in
a parking space or in a garage ¢
fig. 111. You can
use
parallel parking if you would like to park on
the side of the road ¢
fig. 112.
111
Page 112 of 272

Parking system s
General information
Applies to: ve hicles w ith park ing system p lus with rearv iew
camera
F ig . 1 13 Area covered © and area not covered @by the
r earv iew came ra (example)
Fig. 114 Rear lid : locat io n of the rearview camera (exam ·
ple)
0
-8
>
lll
The rearview camera is located above the rear li
cense plate bracket. Make sure that the lens for
the parking system
c.:> fig. 114 is not covered by
depos its or any other obstructions because th is
can affect the function of the parking system . For
information on cleaning, refer to
c.:> page 224 .
The rearview camera coverage area includes(!)
c.:> fig. 113. Only this area is displayed in the MMI.
Objects that are outside of th is area @are not
displayed .
The accuracy of the orientation lines and b lue
surfaces d iminishes if
D ynamic mode is activated
¢ page 106.
A WARNING
-Always read and follow the applicable warn
ings
c.:> .&. in General information on
page 109.
- If the posit ion and the installation ang le of
the rearv iew camera was changed, for ex
ample, after a co llision, do not continue to
112
use the system for safety reasons . Have it
checked by an a uthorized Audi dea ler or au
thorized Audi Service Fac ility.
- Only use the rearview camera to assist you if
it shows a good, clear picture . For example,
the image may be affected by the sun shin
ing into the lens, dirt on the lens or if there is a defect.
- Use the rearv iew camera on ly if the luggage
compa rtment lid is completely closed.
If the
luggage compartment lid is open the orien
tation lines and b lue surfaces are hidden.
Ma ke sure a ny objects you may h ave mo unt
ed on t he luggage compartment lid do not
b lock the rearview camera .
- The camera lens enlarges and distorts the
fie ld of vision. The object appears both a l
tered and inaccurate on the screen .
- I n cer tain s itu ations, people or objects in
the display appea r closer or farther away:
- For objects that do not touch the ground,
such as the bumper of a parked vehicle, a
trailer hitch or the rear of a truck . Do not
use the help lines in th is case.
- If driven from a level surface onto an in cline, or a downward slope .
- If driven toward protruding objects.
- If the vehicle is carrying too much load in
the rear .
(D Note
-Always read and fo llow the applicable warn
ings
c.:> (D in General information on
page 109.
- The orange colored orientat ion lines in the
MMI display show the direction of trave l of
the vehicle rear depending on the steering
wheel angle . The front of the vehicle swings
out more than the rear of the veh icle. Main
tain plen ty of dis tance so tha t your outside
mi rror or a co rne r of your veh icle does not
c o llide wit h any obs tacle s.
 1
1 2
2 3
3 4
4 5
5 6
6 7
7 8
8 9
9 10
10 11
11 12
12 13
13 14
14 15
15 16
16 17
17 18
18 19
19 20
20 21
21 22
22 23
23 24
24 25
25 26
26 27
27 28
28 29
29 30
30 31
31 32
32 33
33 34
34 35
35 36
36 37
37 38
38 39
39 40
40 41
41 42
42 43
43 44
44 45
45 46
46 47
47 48
48 49
49 50
50 51
51 52
52 53
53 54
54 55
55 56
56 57
57 58
58 59
59 60
60 61
61 62
62 63
63 64
64 65
65 66
66 67
67 68
68 69
69 70
70 71
71 72
72 73
73 74
74 75
75 76
76 77
77 78
78 79
79 80
80 81
81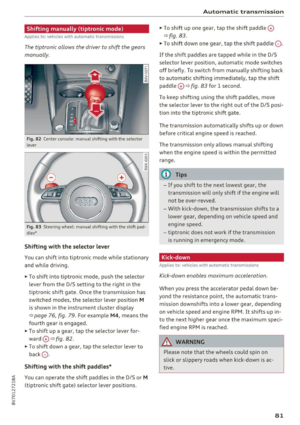 82
82 83
83 84
84 85
85 86
86 87
87 88
88 89
89 90
90 91
91 92
92 93
93 94
94 95
95 96
96 97
97 98
98 99
99 100
100 101
101 102
102 103
103 104
104 105
105 106
106 107
107 108
108 109
109 110
110 111
111 112
112 113
113 114
114 115
115 116
116 117
117 118
118 119
119 120
120 121
121 122
122 123
123 124
124 125
125 126
126 127
127 128
128 129
129 130
130 131
131 132
132 133
133 134
134 135
135 136
136 137
137 138
138 139
139 140
140 141
141 142
142 143
143 144
144 145
145 146
146 147
147 148
148 149
149 150
150 151
151 152
152 153
153 154
154 155
155 156
156 157
157 158
158 159
159 160
160 161
161 162
162 163
163 164
164 165
165 166
166 167
167 168
168 169
169 170
170 171
171 172
172 173
173 174
174 175
175 176
176 177
177 178
178 179
179 180
180 181
181 182
182 183
183 184
184 185
185 186
186 187
187 188
188 189
189 190
190 191
191 192
192 193
193 194
194 195
195 196
196 197
197 198
198 199
199 200
200 201
201 202
202 203
203 204
204 205
205 206
206 207
207 208
208 209
209 210
210 211
211 212
212 213
213 214
214 215
215 216
216 217
217 218
218 219
219 220
220 221
221 222
222 223
223 224
224 225
225 226
226 227
227 228
228 229
229 230
230 231
231 232
232 233
233 234
234 235
235 236
236 237
237 238
238 239
239 240
240 241
241 242
242 243
243 244
244 245
245 246
246 247
247 248
248 249
249 250
250 251
251 252
252 253
253 254
254 255
255 256
256 257
257 258
258 259
259 260
260 261
261 262
262 263
263 264
264 265
265 266
266 267
267 268
268 269
269 270
270 271
271