Page 105 of 182
 Traffic and road conditions
Rather high consumption levels are
linked to situations with heavy traffic, for
instance when travelling in queues with
frequent use of the lower gears or in
cities with ma")
Traffic and road conditions
Rather high consumption levels are
linked to situations with heavy traffic, for
instance when travelling in queues with
frequent use of the lower gears or in
cities with many traffic lights.
Stops in traffic
During prolonged hold-ups (e.g. level
crossings) the engine should be
switched off.SNOW TYRES
Use snow tyres of the same size as the
normal tyres provided with the car: the
dedicated Alfa Romeo Dealership will
be able to advise you on the most
appropriate tyre to use.
Only use these tyres in the event of ice
or snow on the roads. In these
conditions it is recommended to select
the "All Weather" mode of the Alfa DNA
system.
For the type of tyre to be used, inflation
pressures and the specifications of
snow tyres, follow the instructions given
in the "Wheels" paragraph in the
"Technical specifications" chapter.
90)
The performance of these tyres on
low-grip surfaces are reduced
considerably when the tread depth is
below 4 mm. They should be replaced
in this case.
Due to the specific characteristics of
snow tyres, in normal weather
conditions and dry asphalt or on long
motorway journeys, the performance of
these tyres is lower than that of
standard tyres. Their usage should
therefore be restricted in accordance
with their type approval.
IMPORTANT When using snow tyres
with a maximum speed index below the
one that can be reached by the car
(increased by 5%), place a notice in the
passenger compartment, plainly in view,
which states the maximum speedallowed by the snow tyres (as per EC
Directive).
All four tyres should be the same brand
to ensure greater safety when driving
and braking as well as making the car
more responsive. It is inadvisable to
change the rotation direction of tyres.
Refer to the "Raising the car" section in
the "In an emergency" chapter for
further details on how to raise the car
correctly.
WARNING
90)The maximum speed for snow tyres
marked “Q” is 160 km/h, while it is
190 km/h for “T” tyres and 210 km/h for
"H" tyres. The highway code speed limits
must however always be complied with.
102
STARTING AND DRIVING
Page 106 of 182
 SNOW CHAINS
Reduced size snow chains with a
maximum projection of 7 mm beyond
the tyre profile can be fitted only on
235/40 R18 rear tyres.
The use of snow chains should be in
compliance with local re")
SNOW CHAINS
Reduced size snow chains with a
maximum projection of 7 mm beyond
the tyre profile can be fitted only on
235/40 R18 rear tyres.
The use of snow chains should be in
compliance with local regulations. Snow
chains can be fitted on the tyres of the
rear wheels (drive wheels) only. 19" rear
tyres cannot be fitted with chains.
Check the tension of the snow chains
after the first few metres have been
driven.
11)
IMPORTANT Snow chains cannot be
fitted to the space-saver wheel (for
versions/markets, where provided).
IMPORTANT
11)Keep your speed down when snow
chains are fitted; do not exceed 50 km/h
(or the equivalent in miles). Avoid potholes,
do not drive over steps or sidewalks and do
not drive long distances over roads without
snow, to avoid damaging both your vehicle
and the road surface.
CAR INACTIVITY
If the vehicle is to be left inactive for
longer than a month, observe the
following precautions:
park the car in covered, dry and if
possible well-ventilated premises and
slightly open the windows;
check that the handbrake is not
engaged;
disconnect the negative battery
terminal and check the battery charge.
Repeat this check once every three
months during storage. For optimum
preservation of the battery charge, it is
advisable to use the charge-holder (for
versions/markets, where provided, or
alternatively, available from
Lineaccessori). For more details on its
operation, refer to the attached
Supplement;
if the battery is not disconnected
from the electrical system, checks its
state of charge every thirty days;
clean and protect the painted parts
using protective wax;
sprinkle talcum powder on the
rubber blade of the windscreen wiper
and lift it off the glass (for the correct
lifting procedure, refer to the
"Windscreen wiper" paragraph in the
"Maintenance and care" chapter);
cover the car with a cloth or
perforated plastic sheet. Do not use
sheets of non-perforated plastic as theydo not allow moisture on the car body
to evaporate;
inflate tyres to +0.5 bar above the
standard prescribed pressure and
check it periodically;
do not drain the engine cooling
system;
every time the car is left inactive for
two weeks or longer, run the air
conditioning system for about 5
minutes, set to outside air and with fan
set to maximum, with the engine idling;
this operation will ensure adequate
lubrication to minimise the possibility of
damage to the compressor when the
system is put back into operation;
ensure that the air intake directly in
front of the windscreen is not
obstructed by leaves or other foreign
bodies; any leaves in the air intake
could reduce the air flow and, if they
enter the reservoir, could prevent water
drainage. In winter months, make sure
that the air intake is not obstructed by
ice, mud or snow.
IMPORTANT After turning the ignition
key to STOP and having closed the
driver side door, wait at least one
minute before disconnecting the
electrical supply from the battery. When
reconnecting the electrical supply to the
battery, make sure that the ignition key
is in the STOP position and the driver
side door is closed.
103
Page 107 of 182
IN AN EMERGENCY
A punctured tyre or a burnt-out bulb?
At times, a problem may interfere with
our journey.
The pages on emergencies can help
you to deal with critical situations
independently and with calm.
In an emergency we recommend that
you call the freephone number found in
the Warranty Booklet.
You can also use the toll-free number
00 800 2532 4200 to find your nearest
dedicated Alfa Romeo DealershipSTARTING THE ENGINE.......105
REPAIRING A WHEEL.........106
REPLACING A WHEEL........109
CHANGING A BULB..........112
REPLACING EXTERIOR BULBS . . .116
INTERIOR BULB REPLACEMENT. .119
REPLACING FUSES..........120
RECHARGING THE BATTERY. . . .124
RAISING THE CAR...........124
TOWING THE CAR...........125
104
IN AN EMERGENCY
Page 108 of 182
 STARTING THE
ENGINE
Contact the dedicated Alfa Romeo
Dealership immediately ifwarning
light stays on constantly on the
instrument panel.
JUMP STARTING
If the battery is flat, start the engine
using an")
STARTING THE
ENGINE
Contact the dedicated Alfa Romeo
Dealership immediately ifwarning
light stays on constantly on the
instrument panel.
JUMP STARTING
If the battery is flat, start the engine
using an auxiliary battery with the same
capacity or a little higher than the flat
one.
Proceed as follows to start the car:connect the positive terminals (+ sign
near the terminal) of the two batteries
with a jump lead fig. 81;
with a second lead, connect the
negative terminal(−)oftheauxiliary
battery to an earthing point
on the
engine or the gearbox/transmission of
the car to be started;
start the engine; when the engine
has started, remove the leads, reversing
the order above.
If after a few attempts the engine does
not start, do not persist but contact the
dedicated Alfa Romeo Dealership.
IMPORTANT Do not connect the
negative terminals of the two batteries
directly! If the auxiliary battery is
installed on another car, check that
there is no accidental contact between
metallic parts of the two cars.
BUMP STARTING
Never, under any circumstances, jump
start the engine by pushing, towing or
coasting downhill.
IMPORTANT
12)Never use a fast battery-charger to
start the engine as this could damage the
electronic systems of your vehicle,
particularly the ignition and engine fuel
supply control units.
WARNING
91)This starting procedure must be
performed by expert personnel because
incorrect actions could cause electrical
discharge of considerable intensity.
Furthermore, battery fluid is poisonous and
corrosive: avoid contact with skin and
eyes. Keep naked flames and lighted
cigarettes away from the battery and do
not cause sparks.
81A0L0116
105
91)12)
Page 109 of 182
 REPAIRING A WHEEL
GENERAL
INSTRUCTIONS
The car is equipped with a quick tyre
repair device called the \"Fix&Go
automatic\" kit.
92) 94)
To use it, follow the instructions below.93) 95) 96)13)2)")
REPAIRING A WHEEL
GENERAL
INSTRUCTIONS
The car is equipped with a quick tyre
repair device called the "Fix&Go
automatic" kit.
92) 94)
To use it, follow the instructions below.93) 95) 96)13)2)
"Fix&Go automatic" KIT
It is located in the luggage
compartment.
The kit includes:
bottle A fig. 82 containing sealant
and fitted with: filling tube B and
adhesive label C with the wording “max.
80 km/h” to be placed in a clearly
visible position (e.g. on the dashboard)
after repairing the tyre;
compressor D complete with
pressure gauge and connectors;
an information leaflet fig. 83,
providing instructions for using the kit
correctly. This booklet should be given
to the persons charged with handling
the tyre treated with this kit;
a pair of gloves located in the side
compartment of the compressor;
adaptors for inflating different
elements.IMPORTANT The sealant is suitable for
use at temperatures in the range from
−20°C to +50°C. The sealant has an
expiry date.
INFLATION PROCEDURE
Proceed as follows:97)
engage the handbrake, unscrew the
tyre valve cap, take out filler hose A
fig. 84 and tighten ring nut B on the tyre
valve;
make sure that switch A fig. 85 for
the compressor is in position 0 (off),
start the engine, insert the plug into the
cigar lighter socket on the central tunnel
(see fig. 86 ) and switch on the
compressor by bringing switch A
fig. 85 to I (on);
82A0L0076
83A0L0077
84A0L0078
106
IN AN EMERGENCY
Page 110 of 182
 inflate the tyre to the pressure
indicated in the “Wheels” paragraph in
the “Technical data” chapter. In order to
obtain a more precise reading, check
the pressure value on pressure gauge B
fi")
inflate the tyre to the pressure
indicated in the “Wheels” paragraph in
the “Technical data” chapter. In order to
obtain a more precise reading, check
the pressure value on pressure gauge B
fig. 85 with the compressor off;
if after 5 minutes it is impossible to
reach at least 1.8 bar, disconnect the
compressor from the valve and powersocket, then move the car forwards
approximately 10 metres in order to
distribute the sealant inside the tyre
evenly, then repeat the inflation
operation;
if you still cannot obtain a pressure of
at least 1.8 bar within 5 minutes from
the compressor switching on, do not
drive off and contact a dedicated Alfa
Romeo Dealership;
after driving for about 10 minutes
stop and check the tyre pressure again;
remember to engage the handbrake;
if a pressure value of at least 1.8 bar
is detected, restore the correct pressure
(with the engine running and the
handbrake engaged), resume driving
and drive with great care to a dedicated
Alfa Romeo Dealership.
98) 99) 100)
CHECKING AND
RESTORING TYRE
PRESSURE
The compressor can also be used to
check and, if necessary, restore the tyre
pressure.
Release quick connector A fig. 87 and
connect it directly to the valve of the
tyre to be inflated.
REPLACING THE BOTTLE
Proceed as follows:release connector A fig. 88 and
disconnect tube B;
turn the bottle to be replaced
anticlockwise and raise it;
insert the new bottle and turn it
clockwise;
insert connector A and tube B in their
housings.
85A0L0079
86A0L0080
87A0L0081
107
Page 111 of 182
 WARNING
92)Indicate the presence of the stationary
car in accordance with current regulations:
hazard warning lights, warning triangle, etc.
Those on board should get out of the
vehicle and wait for t")
WARNING
92)Indicate the presence of the stationary
car in accordance with current regulations:
hazard warning lights, warning triangle, etc.
Those on board should get out of the
vehicle and wait for the wheel to be
repaired away from the threat posed by the
traffic. If parked on a slope or rough
surface, chock the wheels with wedges or
other suitable devices (for the correct
procedure for parking the car safely, refer
to the "Parking" paragraph in the "Starting
and driving" chapter).
93)Give the booklet to the technicians who
will be handling the tyre that was treated
using the "Fix&Go Automatic" kit.
94)A repair is not possible if the wheel rim
is damaged (groove is deformed, causing
air to escape). Do not remove foreign
bodies (screws or nails) from the tyre.95)Never operate the compressor for
longer than 20 consecutive minutes. Risk
of overheating. The kit is not suitable for
definitive repairs, so the repaired tyres may
only be used temporarily.
96)As required by current regulations, the
information on chemical substances for the
protection of human health and the
environment and on the safe use of the
sealing fluid are on the packaging label.
Compliance with the indications on the
label is an essential condition to ensure the
safety and the effectiveness of the product.
Remember to carefully read the label
before use; the user of the product is
responsible for any damages caused by
improper use. The sealing fluid has an
expiry date. Replace the bottle if the
sealant has expired.
97)Wear the protective gloves provided
with the kit.
98)Apply the adhesive label where it can
be easily seen by the driver as a reminder
that the tyre has been treated with the
quick repair kit. Drive carefully, especially
on corners. Do not exceed 80 km/h. Avoid
sudden acceleration or braking.
99)If the pressure has fallen below 1.8 bar,
do not drive any further: the Fix&Go
Automatic quick tyre repair kit cannot
guarantee the correct hold because the
tyre is too damaged. Contact a dedicated
Alfa Romeo Dealership.
100)Always indicate that the tyre was
repaired using the quick tyre repair kit. Give
the leaflet to the personnel charged with
handling the tyre treated with the tyre
repair kit.
IMPORTANT
13)In the event of a puncture caused by
foreign bodies, the kit may be used to
repair tyres showing damage on the tread
or shoulder up to max. 4 mm diameter. Do
not use the repair kit if the tyre was
damaged as a result of being used when
underinflated.
IMPORTANT
2)Dispose of the bottle and the sealant
liquid properly. Have them disposed of in
compliance with national and local
regulations.
88A0L0082
108
IN AN EMERGENCY
Page 112 of 182
 REPLACING A
WHEEL
(for versions/markets, where provided)
GENERAL
INSTRUCTIONS
In some specific markets, the car may
be equipped with a space-saver wheel:
see the instructions on the following
pages fo")
REPLACING A
WHEEL
(for versions/markets, where provided)
GENERAL
INSTRUCTIONS
In some specific markets, the car may
be equipped with a space-saver wheel:
see the instructions on the following
pages for changing the tyre.
101) 102) 103) 104) 105)
JACK
Please note that:the jack weight is 1.7 kg;
the jack requires no adjustment;
the jack cannot be repaired and in
the event of a fault it must be replaced
by another original one;
no tool other than its operating rod
may be fitted on the jack.
Servicing
prevent any dirt from depositing on
the "worm screw";
keep the "worm screw" lubricated;
never modify the jack.
Conditions for non-use
temperatures below – 40°C;
on sandy or muddy ground;
on uneven ground;
on steep roads;
in extreme weather conditions:
thunderstorms, typhoons, hurricanes,
blizzards, storms, etc...
in direct contact with the engine or
for repairs under the vehicle;
on boats.
To change a wheel, proceed as
follows:
stop the car in a position that is not
dangerous for oncoming traffic where
you can change the wheel safely. The
ground must be flat and sufficiently
compact;
switch off the engine, pull up the
handbrake and engage the 1stgear or
reverse. Wear the reflective safety
jacket (compulsory by law) before
getting out of the vehicle;
take the space-saver wheel;
access the luggage compartment
and take the wheel replacement
kitfig. 89;
take the spanner A and loosen the
fixing stud bolts fig. 90 by about oneturn. swing the car laterally to make it
easier to separate the rim from the
wheel hub;
position the jack under the car, near
the wheel to be changed, next to the
symbols
on the side skirts;
fit the operating rod D fig. 92 in the
seat on the device A;
push the jack under the car using
the rod until the wording "STOP" on the
rod corresponds with the side skirt:
"FRONT" when replacing the front
wheel, "REAR" when replacing the rear
wheel (see fig. 93 - fig. 94 );
fit the suitable tool E fig. 92 on the
operating rod;
IMPORTANT As shown in fig. 93 -
fig. 94, on the operating rod D there is
the indication of max. limit for front and
rear insertion under car that must
coincide with the mark
on the side
skirts.
89A0L0182
90A0L0183
109
 1
1 2
2 3
3 4
4 5
5 6
6 7
7 8
8 9
9 10
10 11
11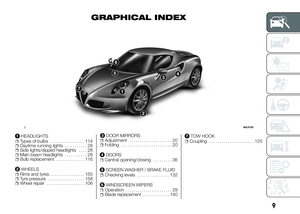 12
12 13
13 14
14 15
15 16
16 17
17 18
18 19
19 20
20 21
21 22
22 23
23 24
24 25
25 26
26 27
27 28
28 29
29 30
30 31
31 32
32 33
33 34
34 35
35 36
36 37
37 38
38 39
39 40
40 41
41 42
42 43
43 44
44 45
45 46
46 47
47 48
48 49
49 50
50 51
51 52
52 53
53 54
54 55
55 56
56 57
57 58
58 59
59 60
60 61
61 62
62 63
63 64
64 65
65 66
66 67
67 68
68 69
69 70
70 71
71 72
72 73
73 74
74 75
75 76
76 77
77 78
78 79
79 80
80 81
81 82
82 83
83 84
84 85
85 86
86 87
87 88
88 89
89 90
90 91
91 92
92 93
93 94
94 95
95 96
96 97
97 98
98 99
99 100
100 101
101 102
102 103
103 104
104 105
105 106
106 107
107 108
108 109
109 110
110 111
111 112
112 113
113 114
114 115
115 116
116 117
117 118
118 119
119 120
120 121
121 122
122 123
123 124
124 125
125 126
126 127
127 128
128 129
129 130
130 131
131 132
132 133
133 134
134 135
135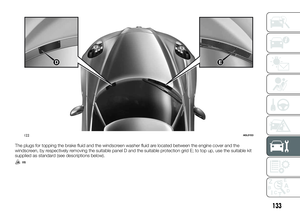 136
136 137
137 138
138 139
139 140
140 141
141 142
142 143
143 144
144 145
145 146
146 147
147 148
148 149
149 150
150 151
151 152
152 153
153 154
154 155
155 156
156 157
157 158
158 159
159 160
160 161
161 162
162 163
163 164
164 165
165 166
166 167
167 168
168 169
169 170
170 171
171 172
172 173
173 174
174 175
175 176
176 177
177 178
178 179
179 180
180 181
181 IN AN EMERGENCY
A punctured tyre or a burnt-out bulb?
At times, a problem may interfere with
our journey.
The pages on emergencies can help
you to deal with critical situations
independently and with")