Page 105 of 161

105
AIR FIL AIR FILAIR FIL AIR FIL
AIR FIL
TER TERTER TER
TER
Air Filter Air FilterAir Filter Air Filter
Air Filter
The air filter element should be cleaned as per service schedule .
Replace the air filter element with a new one when the service
indicator shows red band even after cleaning in vehicle operations.
Always use genuine air filter element.
Replacement of Air Filter Element Replacement of Air Filter ElementReplacement of Air Filter Element Replacement of Air Filter Element
Replacement of Air Filter Element
a) Disconnect air filter from hose. Unscrew top cover of the air
filter.
b) Remove the cover of the air filter.
c) Remove the air filter element.
d) Clean the air filter element with pressurised air. Do not tap or
hammer the element on ground.
e) Check element for puncture or pin holes by light source.
f ) If found OK install paper filter element. Fit the cover and tighten air
filter screws at the place.
g) Clean the hose connecting the air filter to turbocharger pipe.
Reset the indicator by pressing the rubber cap, red band will disappear
from Service Indicator.
M A I N T E N A N C E
1. Service Indicator 2. Air filter
ProCarManuals.com
Page 106 of 161

106
Engine Cooling System Engine Cooling SystemEngine Cooling System Engine Cooling System
Engine Cooling System
If engine overheating occurs, there could be a fault in the
cooling system which may be on account of :
1. Less coolant in the cooling system or dirt/scale having
accumulated inside cooling water passages especially
in the radiator core.
2 . Choking of radiator passages due to foreign material or
damages.
3. Defective thermostat.
4. Defective coolant temperature sensor.
5 . Non operation of electrically operated fans (Controlled
by ECU).
6. Coolant leakage.
7. Radiator cap not sealing properly.
8 . A.C. condenser fan not working
9. Excessive refrigerant charging in the A.C. system.
10. No communication between auxiliary tank and radiator.
P PP P
P
r rr r
r
e ee e
e
v vv v
v
en enen en
en
tion of R tion of Rtion of R tion of R
tion of R
ust F ust Fust F ust F
ust F
or oror or
or
ma mama ma
ma
tion tiontion tion
tion
To prevent rust formation in the radiator use premixed
recommended anti-freeze coolant. This is sufficient to
operate the vehicle upto -40
oC.
C CC C
C
OOLING SY OOLING SYOOLING SY OOLING SY
OOLING SY
STEM STEMSTEM STEM
STEMM A I N T E N A N C E
1.Auxiliary Tank 2. Radiator Pressure Cap
Coolant filling Procedure: Coolant filling Procedure:Coolant filling Procedure: Coolant filling Procedure:
Coolant filling Procedure:
It is recommended that the refilling of the engine coolant
should be carried out at authorized service centre
1. 1.1. 1.
1.
A A A A
A
ir e ir eir e ir e
ir e
v vv v
v
acua acuaacua acua
acua
tion and c tion and ction and c tion and c
tion and c
o oo o
o
olan olanolan olan
olan
t filling ( t filling (t filling ( t filling (
t filling (
V VV V
V
acuum filling) acuum filling)acuum filling) acuum filling)
acuum filling)
Method : Method :Method : Method :
Method :
The coolant refilling in the system is recommended to be
carried out through air evacuation and coolant filling method
for quick filling.
1 . Allow the engine to cool up to ambient temperature.
2 . Keep cabin heater valve (if applicable) at “ON” position
throughout the coolant refilling.
ProCarManuals.com
Page 107 of 161

before refillin")
107
C CC C
C
OOLING SY OOLING SYOOLING SY OOLING SY
OOLING SY
STEM STEMSTEM STEM
STEMM A I N T E N A N C E
3. The complete cooling system should be drained (old coolant)
before refilling the system.
a. Remove radiator pressure cap
b. Drain the coolant from engine through the drain hole on
thermostat housing lower part. Drain coolant from radiator
through the radiator drain hole.
c. Refit the drain plugs on thermostat housing lower part and
the radiator.
d. Pour fresh water through the filler neck up to top and again
drain the water through the drain holes. This will ensure
removal of the old coolant from the system
e. After flushing out water, secure the drain plugs on radiator
and thermostat housing lower part properly with new
sealing washer.
f. Drain the auxiliary tank and refit the hoses.
4. Take the recommended coolant and water in 1:1 proportion
5. Carry out air evacuation and coolant filling on machine
( Vacuum filling)
( The machine setting to be done as follows,
Quantity to be filled: 6.1 lit approx, back pressure: 1.7 bar)
6. Fill the coolant in auxiliary tank up to “FIRST FILL / REFILL”
mark.
Manual Coolant refilling : Manual Coolant refilling :Manual Coolant refilling : Manual Coolant refilling :
Manual Coolant refilling :
If the air evacuation and coolant filling (vacuum filling) system is
not available, then alternate procedure is as mentioned below.1. Follow sr. no 1 to 4 indicated in Air evacuation and coolant
filling ( Vacuum filling) procedure.
2. Refill the coolant (coolant and water as per recommendation)
through radiator filler neck.
3. When coolant level comes up to radiator filler neck, wait and
allow air bubbles to escape from the system for 2 to 5 min.
Top up coolant in radiator filler neck when level drops.
4. Fill the coolant in the auxiliary tank up to “FIRST FILL / REFILL”
mark.
5. Start the engine and run at idle for 10 min. with open radiator
filler neck. Allow air to escape from the system.Top up coolant
slowly in the radiator filler neck while idling.
6. Stop the engine and allow air bubbles to escape from the
system. Top up coolant through radiator filler neck. Secure
the radiator pressure cap on radiator filler neck.
7. Start the engine and run in stationary condition at 2200 to
2500 rpm till thermostat opens and continue to run for 5
minutes. ( The radiator fans coming on is the indication of
opening the thermostat)
8. Stop the engine and allow it to cool. Open the radiator
pressure cap & top up coolant in radiator filler neck. Secure
the radiator pressure cap on the radiator filler neck.
9. Refill the coolant in the auxiliary tank till “first fill / Refill” level
mark.
10. The coolant refilling is complete now.
11. Ensure that there are no leakages in the completesystem.
ProCarManuals.com
Page 108 of 161

108
Changing of Engine Oil and Oil Filter Changing of Engine Oil and Oil FilterChanging of Engine Oil and Oil Filter Changing of Engine Oil and Oil Filter
Changing of Engine Oil and Oil Filter
Change the oil and oil filter at specified service intervals. (Engine oil and
oil filter may be changed earlier inline with recommendation given for
additional maintenance schedule under severe driving condition)
Changing of oil and oil filter requires access from underneath the vehicle.
Vehicle should be raised on a hydraulic lift of a service station or should
be on a service pit.
1 . Run the engine until it reaches normal operating temperature. Then
shut it off.
2. Remove oil sump guard.
3. Open the bonnet and remove engine oil filler cap. Remove the drain
plug of the oil sump from the bottom of the engine. Drain the oil into
an appropriate container.
4. Remove the oil filter with the help of special wrench. The removed
oil filter should not be reused and hence should be destroyed to
avoid recycling of the same. Used filter and oil should be disposed
in compliance with the current legislation.
5. Ensure cooler is tightened to it’s position.
6. Smear a little fresh engine oil on rubber gasket of new engine oil
filter. Hand tighten the engine oil filter fully and further 3/4 turn with
special tool.
Do not over tighten engine oil filter as this may damage oil filter and
oil may leak out.
7. Before filling in fresh oil in the engine, clean the drain plug..
ENGINE OIL & OIL FIL ENGINE OIL & OIL FILENGINE OIL & OIL FIL ENGINE OIL & OIL FIL
ENGINE OIL & OIL FIL
TER TERTER TER
TER
1. Engine Oil Filling Neck
2. Dip Stick
1. Oil Sump Drain Plug
2. Engine Oil Filter
M A I N T E N A N C E
2 22 2
21 11 1
1
ProCarManuals.com
Page 109 of 161

109
FUEL FIL FUEL FILFUEL FIL FUEL FIL
FUEL FIL
TER & FUEL SY TER & FUEL SYTER & FUEL SY TER & FUEL SY
TER & FUEL SY
STEM STEMSTEM STEM
STEM
6. Refit the drain plug using a new sealing washer. Tighten
drain plug to 5 mkg. torque.
7. Fill, recommended quantity of fresh engine oil in the crank
case and secure the oil filler cap in its place.
8. Start the engine and run for a few minutes. The engine oil
pressure indicator lamp should go ‘off ’ after starting the
engine.
9. Check for engine oil leakages.
10. Stop the engine and recheck engine oil level after a few
minutes. If necessary add oil to bring the level to the upper
mark on the dipstick.
NOTICE NOTICENOTICE NOTICE
NOTICE
Use of reclaimed oil is not recommended
Priming Pump Priming PumpPriming Pump Priming Pump
Priming Pump
Priming pump is used for priming the fuel manually after
overhauling of the engine or after refitment of fuel lines. Pump
the fuel by means of priming pump until all air in the fuel line is
removed. Before cranking the engine ensure that there is no air
in the fuel system.
NOTICE NOTICENOTICE NOTICE
NOTICE
Please do not loosen/remove high pressure pipes and injectors
for air bleeding in the fuel.
M A I N T E N A N C E
F FF F
F
uel & F uel & Fuel & F uel & F
uel & F
ilt iltilt ilt
ilt
er D er Der D er D
er D
r rr r
r
aining ainingaining aining
aining
Loosen drain plugs by 1-2 turn and drain out water and other
sediments from fuel filter bowls depending on operating
conditions to ensure that no water is allowed to enter the fuel
system.
S SS S
S
edimen edimenedimen edimen
edimen
t tt t
t
er er er er
er
W WW W
W
a aa a
a
t tt t
t
er D er Der D er D
er D
r rr r
r
aining ainingaining aining
aining
Water sedimenter is located near fuel tank at rear left hand side
of the vehicle.
Loosen drain plug by 1-2 turns and drain out water and other
sediments from sedimenter when water level indicator lamp
glows in instrument cluster to ensure that no water is
allowed to enter the fuel system.
Sedimenter
ProCarManuals.com
Page 110 of 161

110
Gear Box Oil Gear Box OilGear Box Oil Gear Box Oil
Gear Box Oil
C CC C
C
heck heckheck heck
heck
ing of Oil L ing of Oil Ling of Oil L ing of Oil L
ing of Oil L
e ee e
e
v vv v
v
el elel el
el
1. Clean the oil level plug and surrounding area.
2 . Remove the oil level plug and check whether oil is dripping out.
Oil level must not be below the filler plug. Add oil to bring it to
the level.
3. Tighten oil level plug to 2-3 mkg. torque.
C CC C
C
hanging Oil in G hanging Oil in Ghanging Oil in G hanging Oil in G
hanging Oil in G
ear B ear Bear B ear B
ear B
o oo o
o
x xx x
x
1. Let the engine idle for about 5 min. in neutral, so that the gear box
oil is warmed up.
2. Clean the oil level plug, drain plug and surrounding area.
3. Place a container under gear box to collect the oil.
4. Remove the drain plug and let the oil drain out.
5. Also remove the oil level plug.
6. Tighten the oil drain plug and fill new recommended oil through oil
level plug and tighten the oil drain plug oil level plug to 2-3 mkg.
torque.
GEAR BO GEAR BOGEAR BO GEAR BO
GEAR BO
X OIL X OILX OIL X OIL
X OIL
1. Gear Box Oil Filler Plug / Level Plug
2. Gear Box Drain Plug
1
2
M A I N T E N A N C E
ProCarManuals.com
Page 111 of 161

111
TRANSFER CASE OIL TRANSFER CASE OILTRANSFER CASE OIL TRANSFER CASE OIL
TRANSFER CASE OIL
C CC C
C
heck heckheck heck
heck
ing Oil L ing Oil Ling Oil L ing Oil L
ing Oil L
e ee e
e
v vv v
v
el of el of el of el of
el of
T TT T
T
r rr r
r
ansf ansfansf ansf
ansf
er C er Cer C er C
er C
ase asease ase
ase
NO NONO NO
NO
TICE TICETICE TICE
TICE
Before checking or removing the oil, warming up of the transfer
case is necessary. This should be done by driving the vehicle for
some time in 4x4 mode.
Checking of Oil levels Checking of Oil levelsChecking of Oil levels Checking of Oil levels
Checking of Oil levels
1. Clean the oil level plug and surrounding area.
2 . Remove the oil level plug and check whether oil is dripping out.
3 . If oil is not dripping out, oil level must be below the required
level. Add oil to bring it to the level when it starts dripping out.
4. Tighten oil level plug. Tightening torque of oil level plug is 2 to
3 mkg.
C CC C
C
hanging of hanging of hanging of hanging of
hanging of
T TT T
T
r rr r
r
ansf ansfansf ansf
ansf
er C er Cer C er C
er C
ase Oil ase Oilase Oil ase Oil
ase Oil
1. Clean the oil level plug, drain plug and surrounding area.
2. Place a container to collect oil, under transfer case.
3. Remove the drain plug and let the oil drain out.
4. Remove the oil level plug.
5. Tighten oil drain plug and fill new recommended oil through oil
level plug, till it begins to drip out.
6. Tighten oil level plug. Tightening torque of oil drain plug is 2 to 3 mkg.
1. Transfer case Oil Filler Plug / Level Plug
2. Transfer case Oil Drain Plug
1
2
M A I N T E N A N C E
ProCarManuals.com
Page 112 of 161

112
Checking Oil Level in Front/Rear Axle Checking Oil Level in Front/Rear AxleChecking Oil Level in Front/Rear Axle Checking Oil Level in Front/Rear Axle
Checking Oil Level in Front/Rear Axle
1 . Clean the oil level plug and surrounding area.
2. Remove the oil level plug and check whether oil is dripping
out. Oil level must be below the required level. Add oil to bring
it to the level, when it starts dripping out.
3 . Tighten oil level plug to 2 to 3 mkg. torque.
Changing Oil in Front Axle/Rear Axle Changing Oil in Front Axle/Rear AxleChanging Oil in Front Axle/Rear Axle Changing Oil in Front Axle/Rear Axle
Changing Oil in Front Axle/Rear Axle
1 . Clean the oil level plug, drain plug and surrounding area.
2 . Place a container under Front/Rear axle to collect the oil.
3 . Remove the drain plug and let the oil drain out.
4 . Also remove the oil level plug.
5 . Tighten the oil drain plug and fill new recommended oil through
oil level plug till it begin to drip.
6 . Tighten oil drain and oil level plugs to 2 to 3 mkg. torque.
FRONT AXLE AND REAR AXLE OIL FRONT AXLE AND REAR AXLE OILFRONT AXLE AND REAR AXLE OIL FRONT AXLE AND REAR AXLE OIL
FRONT AXLE AND REAR AXLE OIL
1. Front Axle Oil Filler Plug / Level Plug
2. Front Axle Oil Drain Plug
1
2
M A I N T E N A N C E
ProCarManuals.com
 1
1 2
2 3
3 4
4 5
5 6
6 7
7 8
8 9
9 10
10 11
11 12
12 13
13 14
14 15
15 16
16 17
17 18
18 19
19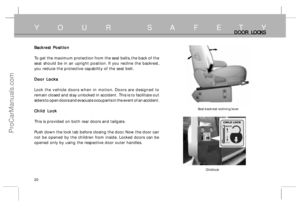 20
20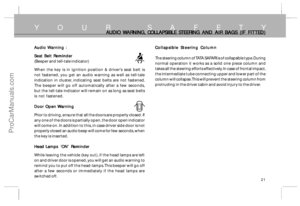 21
21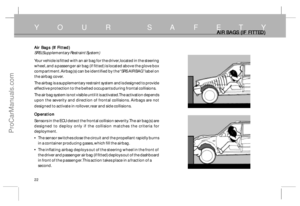 22
22 23
23 24
24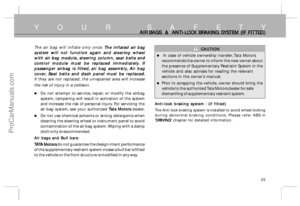 25
25 26
26 27
27 28
28 29
29 30
30 31
31 32
32 33
33 34
34 35
35 36
36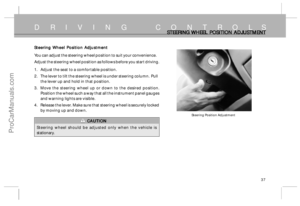 37
37 38
38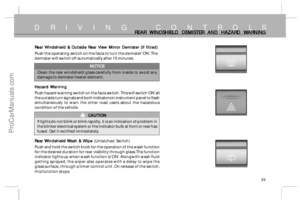 39
39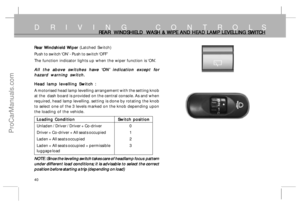 40
40 41
41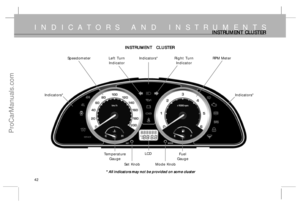 42
42 43
43 44
44 45
45 46
46 47
47 48
48 49
49 50
50 51
51 52
52 53
53 54
54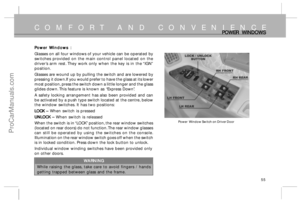 55
55 56
56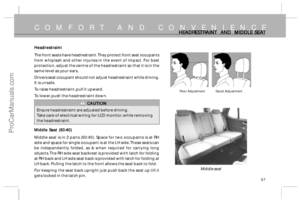 57
57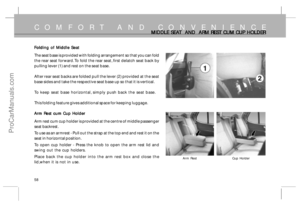 58
58 59
59 60
60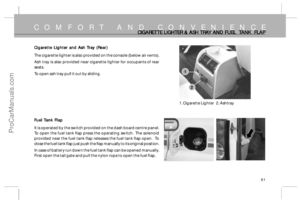 61
61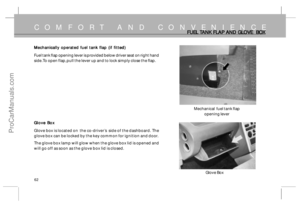 62
62 63
63 64
64 65
65 66
66 67
67 68
68 69
69 70
70 71
71 72
72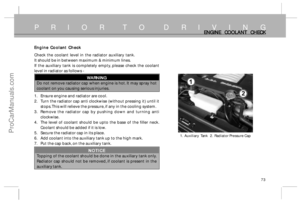 73
73 74
74 75
75 76
76 77
77 78
78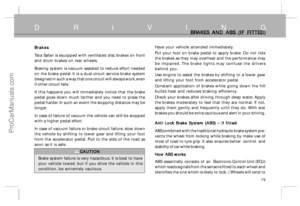 79
79 80
80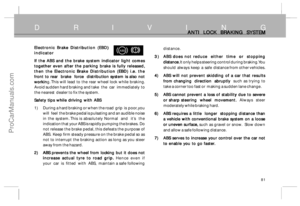 81
81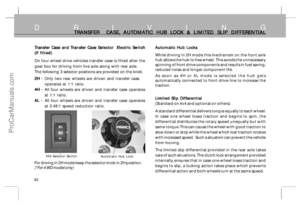 82
82 83
83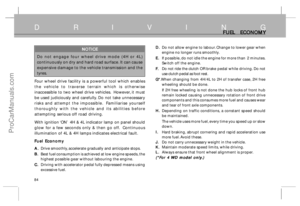 84
84 85
85 86
86 87
87 88
88 89
89 90
90 91
91 92
92 93
93 94
94 95
95 96
96 97
97 98
98 99
99 100
100 101
101 102
102 103
103 104
104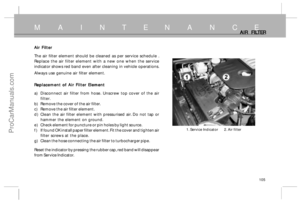 105
105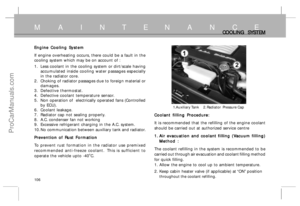 106
106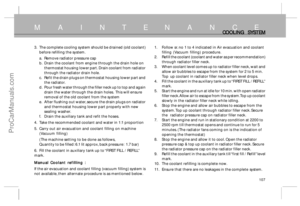 107
107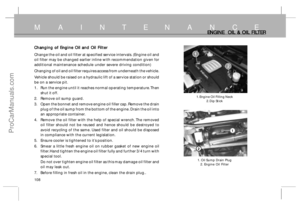 108
108 109
109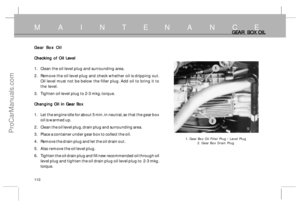 110
110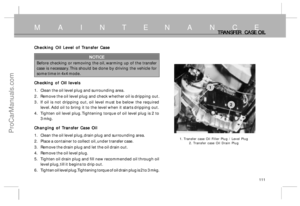 111
111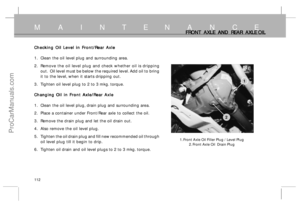 112
112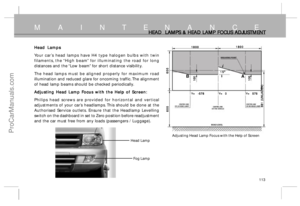 113
113 114
114 115
115 116
116 117
117 118
118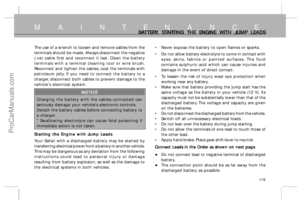 119
119 120
120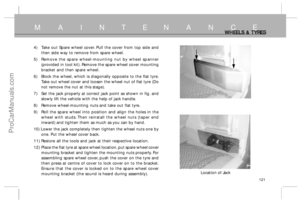 121
121 122
122 123
123 124
124 125
125 126
126 127
127 128
128 129
129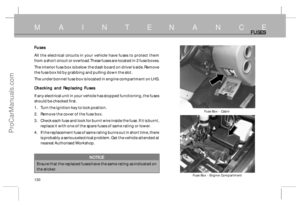 130
130 131
131 132
132 133
133 134
134 135
135 136
136 137
137 138
138 139
139 140
140 141
141 142
142 143
143 144
144 145
145 146
146 147
147 148
148 149
149 150
150 151
151 152
152 153
153 154
154 155
155 156
156 157
157 158
158 159
159 160
160