Page 105 of 232

Lights and visibility
Convenience turn signals
F or the c
on
venience turn signals, move the
lever as far as possible upwards or down-
wards and release the lever. The turn signal
will flash 3 times.
The convenience indicators can be deactiva-
ted at a Specialised workshop. WARNING
Improper or lack of use of the turn signals, or
for g
etting to deactivate them can confuse
other road users. This could result in a seri-
ous accident.
● Always give warning when you are going to
chan
ge lane, overtake or when turning, acti-
vating the turn signal in good time.
● As soon as you have finished changing
lane, ov
ertaking or turning, switch the turn
signal off. WARNING
Incorrect use of the headlights may cause ac-
cident s
and serious injury, as the main beam
may distract or dazzle other drivers. Note
● If the c on
venience turn signals are operat-
ing (three flashes) and the other convenience
turn signals are switched on, the active part
stops flashing and only flashes once in the
new part selected. ●
The turn s ign
al only works when the igni-
tion is switched on. The hazard warning
lights also work when the ignition is switch-
ed off ››› page 69.
● If any of both turn signals fails, the warning
lamp wi
ll start flashing twice faster than nor-
mal.
● The main beam headligh
ts can only be
switched on if the dipped beam headlights
are already on. Hazard warning lights
Fig. 110
Dash panel: Button for switching the
h az
ar
d lights warning system on and off. Read the additional information carefully
› ›
›
page 22
Always fulfil legal requirements for securing a
broken down vehicle. In a number of coun-
tries it is now obligatory, for example, to turn on the hazard warning lights and use a re-
flective s
afety vest ››› page 69.
If your vehicle breaks down:
Park the vehicle a safe distance from
traffic and on suitable ground ››› .
T urn on the h
az
ard warning lights with
the button
› ››
Fig. 110
.
Ap
ply the handbrake firmly
››› page 132.
Put the gearbox lever in neutral or the
selector lever in position N ››› page 137.
Switch off the engine and remove the
key from the ignition.
Have all occupants leave the vehicle and
move to safety, for example behind a
guard rail.
When leaving the vehicle, take all keys
with you.
Place an emergency warning triangle to
indicate the position of your vehicle to
other road users.
Allow the engine to cool and check if a
specialist is required.
When being towed with the hazard warning
lights on, a change in direction or traffic lane
can be indicated as usual using the turn sig-
nal lever. The hazard lights will be interrup-
ted temporarily. »
1.
2.
3.
4.
5.
6.
7.
8.
9.
103
Technical data
Advice
Operation
Emergencies
Safety
Page 106 of 232

Operation
If the hazard warning lights are not working,
y ou mu
s
t use an alternative method of draw-
ing attention to your vehicle. This method
must comply with traffic legislation. WARNING
A faulty vehicle in traffic represents a risk of
acc ident
for the driver and for other road
users.
● Stop the vehicle safely as soon as possible.
Park the
vehicle a safe distance from sur-
rounding traffic to lock all the doors in case of
an emergency. Turn on the hazard warning
lights to warn other road users.
● Never leave children or disabled people
alone in the v
ehicle if the doors are to be
locked. In case of an emergency, passengers
will be trapped inside the vehicle. Individuals
locked in the vehicle can be exposed to very
high or very low temperatures. WARNING
The components of the exhaust system reach
ver y
high temperatures. This could cause a
fire and considerable damage.
● Always park your vehicle so that no part of
the exhau
st system can come in contact with
flammable materials (such as dried grass or
fuel). Note
● The v ehic
le battery will discharge and run
down if the hazard warning lights remain on for too long (even with the ignition turned
off).
● In some vehicles, the brake lights will flash
when brak in
g abruptly at speeds of approxi-
mately 80 km/h (50 mph) to warn vehicles
travelling behind. If braking continues, the
hazard warning lights system will automati-
cally be turned on at a speed of less than ap-
proximately 10 km/h (6 mph). The brake
lights remain lit. Upon accelerating, the haz-
ard warning lights will be automatically
turned off. Adjusting the headlights
In those countries where vehicles drive on
the other s
ide of
the r
oad to the home coun-
try, the asymmetric dipped beam may dazzle
drivers of oncoming vehicles.
For this reason, stickers may be needed to
cover the headlights when driving abroad.
For further information, please refer to a spe-
cialised workshop. SEAT recommends visiting
a technical service. Note
The use of stickers to cover headlights is only
permitted o v
er a short period. To modify the
direction of the headlamps more permanent-
ly, please take the vehicle to a specialised
workshop. SEAT recommends taking your car
in for technical service. Headlight range control, lighting of
the in
s
trument
panel and controls Fig. 111
Next to the steering wheel: Head-
light r
an
ge control Headlamp height adjustment
The he
a
dlight
range control ››› Fig. 111 is
modified according to the value of the head-
light beam and the vehicle load status. This
offers the driver optimum visibility and the
headlights do not dazzle oncoming drivers
››› .
The he a
dlights
can only be adjusted when
the dipped beam is switched on.
To reset, turn switch ››› Fig. 111:
ValueVehicle load status a)
–Two front occupants, luggage compart-
ment empty104
Page 107 of 232

1All seats occupied, luggage compartment
empty
2All seats occupied, luggage compartment
full
3Driver only, l")
Lights and visibilityTo reset, turn switch
››› Fig. 111:
ValueVehicle load status a)
1All seats occupied, luggage compartment
empty
2All seats occupied, luggage compartment
full
3Driver only, luggage compartment full
a)
If the vehicle load does not correspond to those shown in the
table, it is possible to select intermediary positions.
Instrument and switch lighting
When the side lights or dipped beam head-
lights are switched on, the lighting for instru-
ments and controls lights up at a constant
brightness. WARNING
Heavy objects in the back of vehicle may
cau se he
adlight dazzle and distract other
drivers. This could result in a serious acci-
dent.
● Adjust the light beam to the vehicle load
stat
us so that it does not blind other drivers. Luggage compartment light
The light is activated when the rear lid is
open, ev
en when the ignition and lights
ar
e
turned off. For this reason, ensure that the
rear lid is always closed. Visibility
Sun
visors Fig. 112
Sun visor Options for adjusting driver and front pas-
sen
g
er s
un visors:
● Lower the sun visor towards the wind-
scr
een.
● The sun visor can be pulled out of its
mounting and t
urned towards the door.
● Swing the sun visor towards the door, lon-
gitudinal
ly backwards.
Vanity mirror*
There may be a vanity mirror in the folded
sun visor on the passenger side and a card-
holder in the driver sun visor. WARNING
Folded sun blinds can reduce visibility.
● Always roll or fold sun blinds and visors
aw a
y when not in use. Heat-insulating glass windscreen
Fig. 113
Windscreen with reflective infrared
and met al
c
oating and small window (red sur-
face) The heat-insulating windscreens include a re-
fl
ectiv
e infr
ared coating. The section above
the rear vision mirror has been left uncoated
(communication window) to allow electric
components from the accessories shop to
operate correctly ›››
Fig. 113. »
105
Technical data
Advice
Operation
Emergencies
Safety
Page 108 of 232

Operation
CAUTION
When the uncoated surface is covered or has
a stic k
er on the interior or exterior, malfunc-
tions in the electronic components may oc-
cur. Never cover the uncoated surface on the
interior or exterior. Windscreen wiper and window
wiper sy
s
tems
Window wiper lever Read the additional information carefully
› ›
›
page 23 WARNING
Water from the windscreen washer water bot-
tle m a
y freeze on the windscreen if it does
not contain enough anti-freeze, reducing for-
ward visibility.
● In winter, ensure the windscreen washer
contain
s enough anti-freeze.
● In cold conditions, you should not use the
wash/w
ipe system unless you have warmed
the windscreen with the ventilation system.
The antifreeze could freeze on the windscreen
and reduce visibility. WARNING
Worn or dirty wiper blades reduce visibility
and incr e
ase the risk of accident and serious
injury.
● Always replace damaged or worn blades or
bla
des which do not clean the windscreen
correctly. CAUTION
In icy conditions, always check that the wiper
bl a
des are not frozen to the glass before us-
ing the wipers for the first time. In cold
weather, it may help to leave the vehicle
parked with the wipers in service position
››› page 44. CAUTION
If the ignition is switched off while the wind-
sc r
een wipers are on, the windscreen wipers
carry on wiping at the same level when the
ignition is switched back on. Ice, snow and
other obstacles may damage the windscreen
wiper and the respective motor.
● If necessary, remove snow and ice from the
winds
creen wipers before starting your jour-
ney.
● Carefully lift the frozen windscreen wipers
from the gla
ss. SEAT recommends a de-icer
spray for this operation. Note
● The wind s
creen wipers will only work when
the ignition is switched on.
● The interval wipe speed varies according to
the vehic
le speed. The faster the vehicle is
moving, the more often the windscreen is
cleaned.
● The rear wiper is automatically switched on
when the winds
creen wiper is on and the car
is in reverse gear. Windscreen wiper functions
Windscreen wiper performance in different sit-
uations
If the vehicle is at a
standstillThe activated position provision-
ally changes to the previous posi-
tion.
For intermittent wip-
ersIntervals between wipes depend
on the vehicle's speed. The high-
er the vehicle speed the shorter
the intervals.
Note
The wiper will try to wipe away any obstacles
that ar
e on the windscreen. The wiper will
stop moving if the obstacle blocks its path.
Remove the obstacle and switch the wiper
back on again. 106
Page 109 of 232

Lights and visibility
Rear vision mirror Int erior r
e
ar vision mirrorFig. 114
Manual anti-dazzle function for rear
v i
s
ion mirror The driver should always adjust the rear vi-
s
ion mirr
or t
o permit adequate visibility
through the rear window.
Manual anti-dazzle function for interior rear
vision mirror
● Basic position: point the lever at the bot-
tom of the mirr
or forwards.
● Pull the lever to the back to select the anti-
dazzl
e function ››› Fig. 114. Exterior mirrors
Fig. 115
In the front doors: button to adjust
the mec h
anic
al exterior rear vision mirror Fig. 116
In the driver door: rotary control for
the e xt
erior el
ectric mirrors Read the additional information carefully
› ›
›
page 13
Adjust the exterior mirrors by pressing the
adjust button ››› Fig. 115 or the rotary con-
trol* ››› Fig. 116. Folding in the exterior mirrors and returning
them to their original
position is possible
through a mechanical system. Carefully fold
the exterior rear vision mirror casing towards
the side window or pull it away from the win-
dow until it clicks into place. WARNING
Fold and unfold the exterior mirror, taking
car e t
o avoid injuries.
● Only fold or unfold the exterior mirror when
there is
no-one in the way of the mirror.
● When moving the mirror, take care not to
trap fing
ers between the mirror and the mir-
ror bracket. WARNING
Failure to correctly estimate the distance of
the v ehic
le behind could lead to serious acci-
dent.
● Rear-view convex or aspheric mirrors in-
cre
ase the field of vision, however objects ap-
pear smaller and further away in the mirrors.
● The use of these mirrors to estimate the
dist
ance to the next vehicle when changing
lane is imprecise and could result in serious
accident.
● If possible, use the rear vision mirror to es-
timate di
stances to vehicles behind you or in
other circumstances.
● Make sure that the rear visibility is ade-
quate. » 107
Technical data
Advice
Operation
Emergencies
Safety
Page 110 of 232

Operation
For the sake of the environment
The exterior mirror heating should be switch-
ed off when it i
s no longer needed. Other-
wise, it is an unnecessary fuel waste. Note
In the event of a fault, the electric exterior
mirror s
can be adjusted manually by pressing
the edge of the mirror surface. Seats and head restraints
Adju
s
tin
g the seat and head re-
straints
Manual front seat adjustment Read the additional information carefully
›› ›
page 12 WARNING
The safe driving chapter contains important
inform ation, tip
s, suggestions and warnings
that you should read and observe for your
own safety and the safety of your passengers
››› page 47. WARNING
● Adjus t
the front seats only when the vehi-
cle is stationary. Failure to follow this instruc-
tion could result in an accident.
● Be careful when adjusting the seat height.
Carel
ess or uncontrolled adjustment can
cause injuries.
● The front seat backrests must not be re-
clined for driv
ing. Otherwise, seat belts and
the airbag system might not protect as they
should in case of an accident, increasing risk
of injury. Removing and fitting the rear head re-
s
tr
aint
s Fig. 117
Removing the rear head restraint The rear seats are equipped with a head re-
s
tr
aint
.
Removing the rear head restraint.
● Unlock the seat backrest and fold it forward
›››
page 118.
● Push the head restraint up as far as it will
go ››
› .
● Pull the head restraint out of the fitting
w ithout
r
eleasing the button ››› Fig. 117 1 .
● Fold the backrest of the rear seat backward
ag ain u
nti
l it is engaged.
● Safely store the removed head restraints.
Fitting the re
ar head restraint
● Unlock the seat backrest and fold it forward
›››
page 118.
108
Page 111 of 232

Seats and head restraints
● Inser
t
the head restraint into the guides on
the seat backrest.
● Push the head restraint down as far as it
wil
l go while pressing button 1 .
● Fold the backrest of the rear seat backward
ag ain u
nti
l it is engaged.
● Adjust the head restraint to the correct po-
sition ››
› page 50. WARNING
Travelling with the head restraints removed
or improperly a
djusted increases the risk of
severe or fatal injuries in the event of acci-
dents and sudden braking or manoeuvres.
● Always fit and adjust the head restraint
properly whenev
er a person is occupying a
seat.
● Refit any removed head restraints immedi-
ately so th
at passengers are properly protec-
ted. CAUTION
When removing and fitting the head restraint,
mak e s
ure it does not hit the headliner of the
vehicle or the front seat backrest. Otherwise,
the interior roof and other parts of the vehicle
could be damaged. Seat functions
Se at
he
ating* Fig. 118
In the centre console: Front seats
he atin
g sw
itch The front seat cushions can be heated electri-
c
al
ly
when the ignition is switched on.
Switch off seat heating if there is nobody in
the seat.
FunctionAction ››› Fig. 118
ActivatePress button . Seat heating is
switched on fully. All warning sig-
nals light up.
Adjusting the
heating outputPress the button again to adjust
the desired heat.
DeactivatingKeep pressing button until all of
the lights are switched off. WARNING
People whose pain and temperature thresh-
ol d h
as been affected by some kind of medi-
cine, paraplegia or chronic illness (e.g. diabe-
tes) may sustain burns to the back, buttocks
and legs from using the seat heaters that
may lead to a long healing process or that
may never completely heal. Seek medical ad-
vice if you have doubts regarding your health.
● People with limited pain and temperature
thresho
lds must never use seat heating. WARNING
Inappropriate use of the seat functions can
cau se sev
ere injuries.
● Assume the proper sitting position before
your trip and rem
ain in it throughout. This al-
so applies to the other occupants.
● Keep hands, fingers, feet and other limbs
awa
y from the seat operating and adjustment
radius. CAUTION
● To av oid d
amaging the heating elements of
the seat heaters, please do not kneel on the
seat or apply sharp pressure to a single point
on the seat cushion or backrest.
● Liquids, sharp objects and insulating mate-
rial
s on the seat could damage the seat heat-
ing. » 109
Technical data
Advice
Operation
Emergencies
Safety
Page 112 of 232

Operation
●
In the event of
smells, switch off the seat
heating immediately and have the unit in-
spected by a specialised workshop. For the sake of the environment
The seat heating should remain on only when
needed. Other wi
se, it is an unnecessary fuel
waste. Transport and practical
equipment
T r
an
sporting objects
Introduction Always transport heavy loads in the luggage
comp
ar
tment and place the seat backs in a
vertical position. Never overload the vehicle.
Both the carrying capacity as well as the dis-
tribution of the load in the vehicle affect driv-
ing behaviour and braking ability ››› .
WARNING
Unsecured or incorrectly secured objects can
cau se seriou
s injury in case of a sudden ma-
noeuvring or breaking or in case of an acci-
dent. This is especially true when objects are
struck by a detonating airbag and fired
through the vehicle interior. To reduce the
risks, please note the following:
● Secure all objects in the vehicle. Always
keep equipment and he
avy objects in the lug-
gage compartment.
● Always secure objects with suitable rope or
sling
s so that they cannot enter the deploy-
ment areas around the frontal or side airbags
in case of sudden braking or an accident.
● Always ensure that objects inside the vehi-
cle c
annot move into the deployment area of
the bags while driving. ●
Whil e driv
ing, always keep object compart-
ments closed.
● Remove all objects from the front passen-
ger seat
when it is folded down. When the
seat backrest is folded down, it presses on
small and light objects and these are detec-
ted by the weight sensor on the seat; this
sends false information to the airbag control
unit.
● While the backrest of the front passenger
seat i
s folded, the frontal airbag must remain
disconnected and the PASSENGER AIRBAG
OFF light on.
● Objects secured in the vehicle should never
be plac
ed in such a way as to make passen-
gers sit in an incorrect position.
● If secured objects occupy a seat, this seat
should not
be occupied or used by anyone. WARNING
The driving behaviour and braking ability
ch an
ge when transporting heavy and large
objects.
● Adjust your speed and driving style to visi-
bility
, road, traffic and weather conditions.
● Accelerate gently and carefully.
● Avoid sudden braking and manoeuvres.
● Brake early. 110
 1
1 2
2 3
3 4
4 5
5 6
6 7
7 8
8 9
9 10
10 11
11 12
12 13
13 14
14 15
15 16
16 17
17 18
18 19
19 20
20 21
21 22
22 23
23 24
24 25
25 26
26 27
27 28
28 29
29 30
30 31
31 32
32 33
33 34
34 35
35 36
36 37
37 38
38 39
39 40
40 41
41 42
42 43
43 44
44 45
45 46
46 47
47 48
48 49
49 50
50 51
51 52
52 53
53 54
54 55
55 56
56 57
57 58
58 59
59 60
60 61
61 62
62 63
63 64
64 65
65 66
66 67
67 68
68 69
69 70
70 71
71 72
72 73
73 74
74 75
75 76
76 77
77 78
78 79
79 80
80 81
81 82
82 83
83 84
84 85
85 86
86 87
87 88
88 89
89 90
90 91
91 92
92 93
93 94
94 95
95 96
96 97
97 98
98 99
99 100
100 101
101 102
102 103
103 104
104 105
105 106
106 107
107 108
108 109
109 110
110 111
111 112
112 113
113 114
114 115
115 116
116 117
117 118
118 119
119 120
120 121
121 122
122 123
123 124
124 125
125 126
126 127
127 128
128 129
129 130
130 131
131 132
132 133
133 134
134 135
135 136
136 137
137 138
138 139
139 140
140 141
141 142
142 143
143 144
144 145
145 146
146 147
147 148
148 149
149 150
150 151
151 152
152 153
153 154
154 155
155 156
156 157
157 158
158 159
159 160
160 161
161 162
162 163
163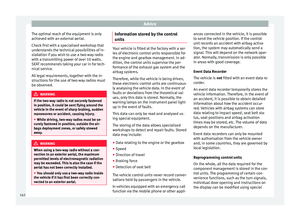 164
164 165
165 166
166 167
167 168
168 169
169 170
170 171
171 172
172 173
173 174
174 175
175 176
176 177
177 178
178 179
179 180
180 181
181 182
182 183
183 184
184 185
185 186
186 187
187 188
188 189
189 190
190 191
191 192
192 193
193 194
194 195
195 196
196 197
197 198
198 199
199 200
200 201
201 202
202 203
203 204
204 205
205 206
206 207
207 208
208 209
209 210
210 211
211 212
212 213
213 214
214 215
215 216
216 217
217 218
218 219
219 220
220 221
221 222
222 223
223 224
224 225
225 226
226 227
227 228
228 229
229 230
230 231
231