Page 121 of 232

Transport and practical equipment
●
Stor e he
avy objects in the luggage com-
partment as far from the rear axle as possi-
ble. CAUTION
Hard objects on the rear shelf could chafe
ag ain s
t the wires of the heating element in
the heated rear window and cause damage. Note
The ventilating slits between the heated rear
windo w and the r
ear shelf must not be cov-
ered so that used air can escape from the ve-
hicle. Folding and lifting up the rear seat
benc
h b
ac
krestFig. 132
Rear seat: unlock button A ; red
m ark
in
g B The rear seat backrest can be folded forward
t
o e
xt
end the luggage compartment.
Folding the rear seat backrest forwards
● Push the head restraint down as far as it
wil
l go or remove it if necessary ››› page 47
and store it in a safe place.
● Pull the unlock switch ›››
Fig. 132 A for-
w ar
d
s whilst simultaneously lifting the rear
seat backrest.
● The rear seat backrest is not engaged when
the red mark
ing of the button B is visible.
● If the rear seat backrest is folded, people
(inc ludin
g c
hildren) are not permitted to trav-
el in the rear folded seats.
Folding up the rear seat backrest
● Lift back the backrest of the rear seat and
push it
firmly into the lock until it clicks se-
curely into place ››› .
● The red marking on the unlock button B must not be seen.
●
Make sure that the backrest of the rear seat
i s
sec
urely locked in position so that the seat
belts can provide proper protection in the
rear seats.
● If necessary, reinstall and readjust the head
res
traints ›››
page 108. WARNING
Folding and lifting the backrests of the rear
seat s
carelessly without paying attention
could cause serious injury.
● Never fold or lift the seats while driving.
● Do no trap or damage seat belts when rais-
ing the seat
backrest.
● Keep hands, fingers, feet and other limbs
awa
y from the range of the rear seat backr-
ests when folding and lifting them.
● All seat backrests must engage correctly for
the seat belt
s on the rear seats to work prop-
erly. When the backrest of an occupied seat is
not correctly locked in place, the passenger
can be thrust forward with the rear seat back-
rest in case of sudden braking, sudden ma-
noeuvres or an accident.
● A red signal on the button B warns that
the bac k
rest is not engaged. Always check to
make sure that the red mark is not visible
when the backrest of the rear seat is in the
upright position.
● No seat must be occupied if the backrest of
the rear se
at is folded or not correctly engag-
ed. CAUTION
Before folding the rear seat backrest, adjust
the front se
ats so that neither the head re-
straint or backrest hit them when folded. If
necessary, remove the head restraints
››› page 108 and store them safely. 119
Technical data
Advice
Operation
Emergencies
Safety
Page 122 of 232

Operation
Luggage compartment shelf* Fig. 133
In the luggage compartment: remov-
in g and in
s
talling the rear shelf You may put light items of clothing on the
r
e
ar shelf
. Check that the rear view is not limi-
ted.
Removing the shelf
● Unhook the loops ›››
Fig. 133 B from
hou s
in
gs A .
● Extract the cover from its slot, in its rest po-
s ition and p
u
ll outwards. WARNING
Unsecured or incorrectly secured objects or
anima l
s on the rear shelf could cause serious
injuries in case of a sudden manoeuvre, sud-
den braking or an accident.
● Do not leave hard, heavy or sharp objects
(loose or in bag
s) on the rear shelf. ●
Never tr an
sport animals on the rear shelf.
● Never drive with the rear shelf raised. Al-
way
s lower it or remove it before the journey. CAUTION
To prevent the rear shelf from being dam-
ag ed:
● Alw
ays check that the side supports are
firmly en
gaged.
● Regulate the height of the load in the lug-
gage c
ompartment to ensure the rear shelf
does not press down on the load with the rear
lid closed. Luggage compartment variable floor
Fig. 134
A: open the boot variable floor. B:
r ai
sed boot
variable floor. 120
Page 123 of 232

Transport and practical equipment
Fig. 135
C: extend the boot downward. D: ex-
t end the boot
f
orward. Raise and lower the boot floor
● To r aise the floor, raise handle
› ›
› Fig. 134 1 in the direction of the arrow
and p u
l
l from the floor all the way up
››› Fig. 134 B.
● To lower it , guide the floor down
ward.
Extend the boot downward
● Raise the boot floor and push it downward
in the rail
›››
Fig. 135 C (arrows)
● Place the variable floor over the floor lining.
● If necessary, fold the backrest of the rear
seat f
orward ›››
page 119. Extending the luggage compartment forward
● Disassemble the luggage compartment tray
›››
page 120.
● Disassemble the rear headrests ›››
page 47.
● Fold the backrest of the rear seat forward
›››
page 119.
● If necessary, expand the boot downward. CAUTION
Do not let the luggage compartment floor fall
when clo s
ing it. Always carefully guide it
downward in a controlled manner. Otherwise,
the lining and the floor of the boot could be
damaged. Class N1 (commercial) vehicles
For safe vehicle operation, the electrical sys-
t
em mu
s
t work perfectly. Special attention
should be paid so it is not damaged during
adjustment, loading and unloading of trans-
ported objects.
Fastening rings* In the front part of the luggage compartment,
ther
e m
a
y be fastening rings to secure the
luggage.
In order to use the fastening rings, they must
be lifted beforehand. WARNING
If unsuitable or damaged belts or retaining
str ap
s are used, they may break in the event
of braking or an accident. Objects could then
be launched across the passenger compart-
ment and cause serious or fatal injuries.
● It is important to always use belts or retain-
ing str
aps that are suitable and in a good
condition.
● Belts and retaining straps should be se-
curely
fastened to the fastening rings.
● Objects in the luggage compartment that
are un
secured could move suddenly and mod-
ify the handling of the vehicle.
● Small light objects should also be fixed in
plac
e.
● The maximum tensile load of the fastening
ring for sec
uring objects should never be ex-
ceeded.
● A child seat should never be secured with
the fas
tening rings. Note
● The max imum t
ensile load that the fasten-
ing rings can support is 3.5 kN.
● Belts and securing systems for the appro-
priate lo
ad can be obtained from specialised
dealerships. SEAT recommends visiting a
SEAT dealership for this. 121
Technical data
Advice
Operation
Emergencies
Safety
Page 124 of 232

Operation
Retaining hooks Fig. 136
In the luggage compartment: retain-
in g hook
s There may be hooks in the upper left and
right
p
ar
t of the luggage compartment. WARNING
Never use these hooks to secure objects. In
ca se of
sudden braking or an accident, they
could rupture. CAUTION
The hooks can support a maximum of 2.5 kg
eac h. Roof carrier
Intr oduction The vehicle roof has been designed to opti-
mise aer
ody
namics. For this reason, conven-
tional roof carrier systems cannot be secured
to the water drains.
Given that the water drains have been incor-
porated into the roof for aerodynamic rea-
sons, only the SEAT approved basic supports
and roof carrier systems can be used.
When the roof carrier system should be re-
moved:
● When they are not used.
● When the vehicle is being washed in a car
wa sh.
● When the
vehicle height exceeds the maxi-
mum height, for ex
ample, in some garages. WARNING
The risk of an accident is increased by trans-
portin g he
avy or bulky loads on the roof,
which affects the car's handling by shifting
the centre of gravity and increasing suscepti-
bility to cross winds.
● Always secure loads correctly with suitable
and undam
aged attachment rope or straps.
● Large, heavy, wide and flat loads negatively
affect the
vehicle aerodynamics, centre of
gravity and handling. ●
Av oid bru
sque manoeuvres and sudden
braking.
● Adjust your speed and driving style to visi-
bility
, road, traffic and weather conditions. CAUTION
● Alw a
ys remove the roof carrier system from
the roof before entering a car wash.
● The height of your vehicle is changed by
the inst
allation of the roof carrier and the
load secured on it. Compare the vehicle
height with the passage height, for example
in underground car parks or for garage doors.
● The roof antenna and the range of the rear
lid should not
be affected by the roof carrier
system or the load being transported.
● Take extra care not to let the hatch strike
the roof lo
ad when opening. For the sake of the environment
The vehicle uses more fuel when the roof car-
rier sys t
em is fitted.122
Page 125 of 232

Transport and practical equipment
Fastening the base supports and the
r oof
c
arrier system Fig. 137
Attachment points for the basic sup-
por ts
and the r
oof carrier system in two-door
vehicles. Fig. 138
Attachment points for the basic sup-
por ts and the r
oof carrier system in four-door
vehicles. The mounts are the basis of a complete roof
c
arrier sy s
tem. Special fixtures must be add-
ed in order to safely transport luggage, bicy- cles, skis, surf boards or boats on the roof.
The suitab
le accessories can be acquired at
SEAT dealerships.
Securing the base supports and roof carrier
system
The roof carrier system must always be instal-
led exactly according to the instructions pro-
vided.
Two-door vehicles: the holes and marks indi-
cating the fitting points for base front sup-
ports are in the lower half of the roof struts
››› Fig. 137 (enlarged left image). The holes
and marks are only seen with the door open.
The fitting marks for base rear supports are in
the upper half of the windows ››› Fig. 137 (en-
larged right image).
Four-door vehicles: the holes or marks indi-
cating the fitting points for base supports are
in the lower half of the roof struts and can on-
ly be seen with the door open ››› Fig. 138.
The base support should only be fitted to the
points indicated in the diagram . WARNING
If the base supports and the roof carrier sys-
tem ar e inc
orrectly fitted or used in an unsuit-
able manner, the entire system could break
free causing accident and injury.
● Always take the manufacturer assembly in-
structions
into account. ●
Only u
se base supports and roof carrier
systems that are not damaged and are cor-
rectly fitted.
● The base support should only be fitted to
the points indic
ated in the diagram
››› Fig. 137.
● Secure the base supports and roof carrier
syst
em correctly.
● Check the screws and attachments before
driving and af
ter a short distance. During
each long journey, check the attachments
during every break.
● Always fit the roof carrier system correctly
for wheels, sk
is and surfboards, etc.
● Never modify or repair the basic supports
or roof c
arrier system. Note
Read and take into account the instructions
included w ith the r
oof carrier system fitted
and keep them in the vehicle. Loading the roof carrier
Loads can only be correctly secured when the
r
oof
c
arrier system is correctly fitted ››› .
M ax
imum authori
sed roof load
The maximum authorised roof load is 50 kg.
The roof load includes the weight of the base »
123
Technical data
Advice
Operation
Emergencies
Safety
Page 126 of 232

Operation
support, the roof carrier system and the load
bein g tr
an
sported ››› .
A lw
a
ys check the weight of the base support,
the roof carrier system and the weight of the
load to be transported and, if necessary,
weigh them. Never exceed the maximum au-
thorised roof load.
If you are using a roof carrier with a lower
weight rating, you cannot transport the maxi-
mum roof load. Do not exceed the maximum
weight limit for the roof carrier given in the
fitting instructions.
Distributing a load
Uniformly distribute loads and secure them
correctly ››› .
Chec k
att
achments
After fitting the base supports and the roof
carrier system, always check the attachments
after a short trip and at regular intervals. WARNING
Exceeding the maximum authorised roof load
can r e
sult in accidents and/or vehicle dam-
age.
● Never surpass the maximum authorised
weight f
or the roof, the maximum authorised
weight on the axles and the total maximum
authorised weight of the vehicle. ●
Never e x
ceed the capacity of the roof carri-
er system even if this is less than the maxi-
mum authorised roof load.
● Secure heavy items as far forward as possi-
ble and di
stribute the vehicle load uniformly. WARNING
Loose and incorrectly secured loads can fall
fr om the r oof
carrier system causing acci-
dents and injury.
● Always use suitable ropes and straps in
good condition.
● A
lways secure loads correctly. Air conditioning
He atin
g,
ventilation and air
conditioning system
Introduction Read the additional information carefully
›› ›
page 28
Dust and pollen filter
The dust and pollen filter with its activated
charcoal cartridge serves as a barrier against
impurities in the interior ambient air.
For the air conditioner to work with maximum
efficiency, the dust and pollen filter must be
replaced at the intervals specified in the
Maintenance Programme.
If the filter loses efficiency prematurely due
to use in areas with very high levels of air
pollution, the filter must be changed more
frequently than stated in the Service Sched-
ule. WARNING
Reduced visibility through the windows in-
cr e
ases the risk of serious accidents.
● Ensure that all windows are free of ice and
snow and th
at they are not fogged up pre-
venting a clear view of everything outside. 124
Page 127 of 232

Air conditioning
●
The max imum he
at output required to de-
frost windows as quickly as possible is only
available when the engine has reached its
normal running temperature. Only drive when
you have good visibility.
● Always ensure that you use the heating
syst
em, ventilation, air conditioner and the
heated rear window to maintain good visibili-
ty.
● Never leave the air recirculation on for a
long period of time. If
the cooling system is
switched off and air recirculation mode
switched on, the windows can mist over very
quickly, considerably limiting visibility.
● Switch air recirculation mode off when it is
not requir
ed. WARNING
Stuffy or used air will increase fatigue and re-
duce driv er c
oncentration possibly resulting
in a serious accident.
● Never leave the fresh air fan turned off or
use the air rec
irculation for long periods of
time; the air in the vehicle interior will not be
refreshed. CAUTION
● Swit c
h the air conditioner off if you think it
may be broken. This will avoid additional
damage. Have the air conditioner checked by
a specialised workshop.
● Repairs to the air conditioner require spe-
cia
list knowledge and special tools. SEAT rec-
ommends taking your car in for technical
service. Note
● When the coo lin
g system is turned off, air
coming from the outside will not be dried. To
avoid fogging up the windows, SEAT recom-
mends leaving the cooler (compressor) on. To
do this, press the A/C button. The button
lamp shou l
d light up.
● The maximum heat output required to de-
fros
t windows as quickly as possible is only
available when the engine has reached its
normal running temperature.
● Keep the air intake slots in front of the
winds
creen free of snow, ice and leaves to en-
sure heating and cooling are not impaired, and to prevent the windows from misting
ov
er
. 125
Technical data
Advice
Operation
Emergencies
Safety
Page 128 of 232

Operation
Heating and ventilation system user instructions Fig. 139
In the centre console: Heating and ventilation system rotary control Fig. 140
In the centre console: air conditioning system controls Temperature
The de
s
ir
ed temperature for the interior can-
not be lower than that of the exterior air tem-
perature, as the heating and fresh air system
cannot cool or dehumidify the air.
Setting for conditions of optimal visibility
● Set fan ››› Fig. 139 2 to setting 1 or 2.
● Turn the temperature control ››
›
Fig. 139 1 to the centre position.
●
Open and direct the air outlets in the dash
p anel
›
›› page 127. ●
Turn the air dis
tribution control ››› Fig. 139
3 to the defrost position.
Air conditioner user instructions* The interior cooling system only works when
the engine i
s
running and the fan is switched
on.
The air conditioning operates most effective-
ly with the windows closed. However, if the
vehicle has heated up after standing in the
sun for some time, the air inside can be cooled more quickly by opening the windows
briefly.
Settin
g f
or conditions of optimal visibility
When the air conditioning is switched on, the
temperature and the air humidity in the vehi-
cle interior drop. In this way, when the out-
side air humidity is high, the windows do not
mist over and comfort for the vehicle occu-
pants is improved.
● Disable air recirculation mode
›››
page 128.
126
 1
1 2
2 3
3 4
4 5
5 6
6 7
7 8
8 9
9 10
10 11
11 12
12 13
13 14
14 15
15 16
16 17
17 18
18 19
19 20
20 21
21 22
22 23
23 24
24 25
25 26
26 27
27 28
28 29
29 30
30 31
31 32
32 33
33 34
34 35
35 36
36 37
37 38
38 39
39 40
40 41
41 42
42 43
43 44
44 45
45 46
46 47
47 48
48 49
49 50
50 51
51 52
52 53
53 54
54 55
55 56
56 57
57 58
58 59
59 60
60 61
61 62
62 63
63 64
64 65
65 66
66 67
67 68
68 69
69 70
70 71
71 72
72 73
73 74
74 75
75 76
76 77
77 78
78 79
79 80
80 81
81 82
82 83
83 84
84 85
85 86
86 87
87 88
88 89
89 90
90 91
91 92
92 93
93 94
94 95
95 96
96 97
97 98
98 99
99 100
100 101
101 102
102 103
103 104
104 105
105 106
106 107
107 108
108 109
109 110
110 111
111 112
112 113
113 114
114 115
115 116
116 117
117 118
118 119
119 120
120 121
121 122
122 123
123 124
124 125
125 126
126 127
127 128
128 129
129 130
130 131
131 132
132 133
133 134
134 135
135 136
136 137
137 138
138 139
139 140
140 141
141 142
142 143
143 144
144 145
145 146
146 147
147 148
148 149
149 150
150 151
151 152
152 153
153 154
154 155
155 156
156 157
157 158
158 159
159 160
160 161
161 162
162 163
163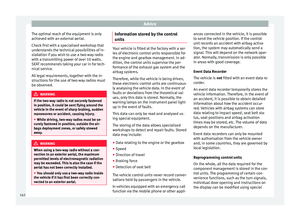 164
164 165
165 166
166 167
167 168
168 169
169 170
170 171
171 172
172 173
173 174
174 175
175 176
176 177
177 178
178 179
179 180
180 181
181 182
182 183
183 184
184 185
185 186
186 187
187 188
188 189
189 190
190 191
191 192
192 193
193 194
194 195
195 196
196 197
197 198
198 199
199 200
200 201
201 202
202 203
203 204
204 205
205 206
206 207
207 208
208 209
209 210
210 211
211 212
212 213
213 214
214 215
215 216
216 217
217 218
218 219
219 220
220 221
221 222
222 223
223 224
224 225
225 226
226 227
227 228
228 229
229 230
230 231
231