2015 Peugeot 208 ESP
[x] Cancel search: ESPPage 176 of 341
174
208_en_Chap08_Informations-pratiques_ed01-2015
General information
Engine characteristicsWeights and towed loads
The kerb weight is equal to the unladen
weight + driver (75 kg).
The gross train weight and towed load values
indicated apply up to a maximum altitude of
1 000 metres; the towed load mentioned must
be reduced by 10 % for every additional
1 000 metres.
The weight of the braked trailer can be
increased, within the GTW limit, on condition
that the GV W of the towing vehicle is reduced
by the same amount.
The recommended nose weight is the vertical
load on the towbar ball (removable with or
without tools). High ambient temperatures may result
in a reduction in the per formance of
the vehicle to protect the engine; when
the ambient temperature is higher than
37 °C, limit the towed weight.
Towing with a lightly loaded vehicle can
adversely affect roadholding.
Braking distances are increased when
towing a trailer.
Never exceed 60 mph (100 km/h) when
towing (comply with the legislation in
force in your country).
GV W:
gross vehicle weight, the maximum authorised vehicle weight.
GT W: gross train weight, the maximum authorised weight of vehicle
plus trailer.
The engine characteristics (capacity,
maximum power, maximum power speed, fuel,
CO
2 emissions...) for your vehicle are given in
the registration document, as well as in sales
brochures.
These characteristics correspond to the
values type-approved on a test bed, under
conditions defined in European legislation
(Directive 1999/99/EC).
For more information, contact a PEUGEOT
dealer or a qualified workshop. The maximum weights and towed loads for your
vehicle are given are given in the registration
document, as well as in sales brochures.
These values are also present on the
manufacturer's plate or label.
See the "Identification markings" section.
For more information, contact a PEUGEOT
dealer or a qualified workshop.
Practical information
Page 178 of 341
176
208_en_Chap08_Informations-pratiques_ed01-2015
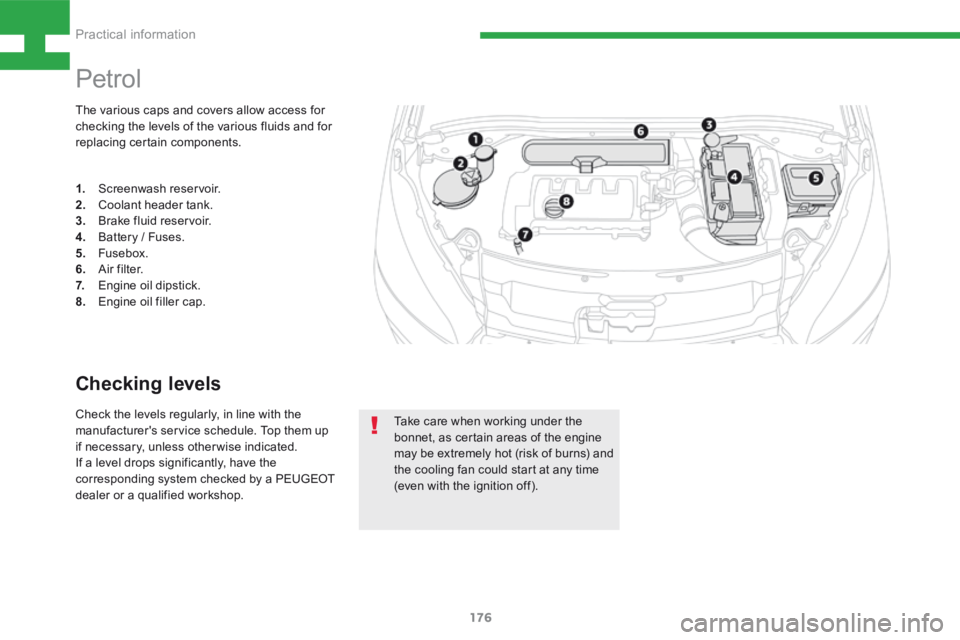
The various caps and covers allow access for
checking the levels of the various fluids and for
replacing certain components.
Petrol
1. Screenwash reservoir.
2. Coolant header tank.
3. Brake fluid reservoir.
4. Battery / Fuses.
5. Fusebox.
6. A i r f i l t e r.
7. Engine oil dipstick.
8. Engine oil filler cap.
Take care when working under the
bonnet, as certain areas of the engine
may be extremely hot (risk of burns) and
the cooling fan could start at any time
(even with the ignition off).
Checking levels
Check the levels regularly, in line with the
manufacturer's service schedule. Top them up
if necessary, unless otherwise indicated.
If a level drops significantly, have the
corresponding system checked by a PEUGEOT
dealer or a qualified workshop.
Practical information
Page 179 of 341
177
208_en_Chap08_Informations-pratiques_ed01-2015
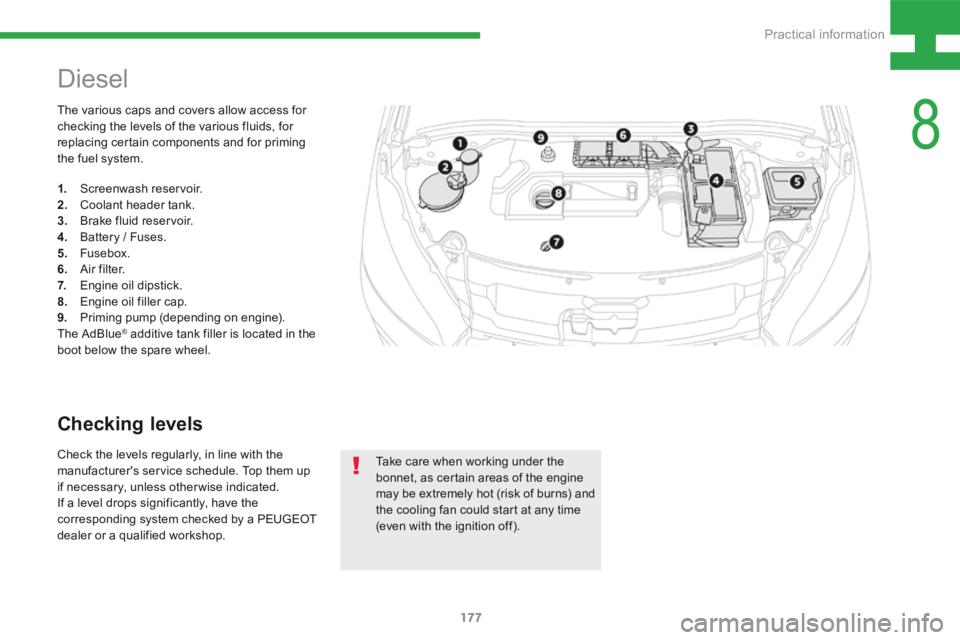
The various caps and covers allow access for
checking the levels of the various fluids, for
replacing certain components and for priming
the fuel system.
Diesel
1. Screenwash reservoir.
2. Coolant header tank.
3. Brake fluid reservoir.
4. Battery / Fuses.
5. Fusebox.
6. A i r f i l t e r.
7. Engine oil dipstick.
8. Engine oil filler cap.
9. Priming pump (depending on engine).
The AdBlue
® additive tank filler is located in the
boot below the spare wheel.
Take care when working under the
bonnet, as certain areas of the engine
may be extremely hot (risk of burns) and
the cooling fan could start at any time
(even with the ignition off).
Checking levels
Check the levels regularly, in line with the
manufacturer's service schedule. Top them up
if necessary, unless otherwise indicated.
If a level drops significantly, have the
corresponding system checked by a PEUGEOT
dealer or a qualified workshop.
8
Practical information
Page 186 of 341
184
208_en_Chap08_Informations-pratiques_ed01-2015
On vehicle fitted with HDi engines, the fuel
system must be primed if you run out of fuel.
For versions with a manual priming pump,
refer to the drawing of the corresponding
underbonnet view.
If the tank on your vehicle is fitted with
a misfuel prevention device, refer to the
corresponding section.
Running out of fuel (Diesel)
If the engine does not start first time,
don't keep trying. Start the procedure
again from the beginning.
1.4 HDi engine
F Add at least five litres of Diesel fuel to the
tank.
F Open the bonnet.
F Press and release the priming pump until
resistance is felt (there may be resistance
on the first press).
F Operate the starter motor to start the
engine.
F Close the bonnet.
1.6 HDi engine
(except BlueHDi version)
F Add at least five litres of Diesel fuel to the
tank.
F Open the bonnet.
F If necessary, unclip the styling cover for
access to the priming pump.
F Squeeze and release the priming pump
repeatedly until resistance is felt (there
may be resistance at the first press).
F Operate the starter to start the engine
(if the engine does not start at the first
attempt, wait around 15 seconds before
trying again).
F If the engine does not start after a few
attempts, operate the priming pump again
then start the engine.
F Refit the styling cover and clip it in place.
F Close the bonnet.
1.6 HDi engine
(BlueHDi version)
F Add at least five litres of Diesel fuel to the
tank.
F Switch the ignition on (without starting the
engine).
F Wait around 6 seconds and switch off the
ignition.
F Repeat the operation 10 times.
F Operate the starter motor to start the
engine.
Practical information
Page 194 of 341
192
208_en_Chap08_Informations-pratiques_ed01-2015
It is advisable to disconnect the battery
if the vehicle is to be left unused for
more than one month.
The batteries contain harmful substances
such as sulphuric acid and lead. They
must be disposed of in accordance
with regulations and must not, in any
circumstances, be discarded with household
waste.
Take used remote control batteries and
vehicle batteries to a special collection point.
Protect your eyes and face before
handling the battery.
All operations on the battery must be
carried out in a well ventilated area and
away from naked flames and sources
of sparks, so as to avoid the risk of
explosion or fire.
Do not try to charge a frozen battery;
the battery must first be thawed out to
avoid the risk of explosion. If the battery
has been frozen, before charging have
it checked by a PEUGEOT dealer or a
qualified workshop who will check that
the internal components have not been
damaged and the casing is not cracked,
which could cause a leak of toxic and
corrosive acid.
Do not reverse the polarity and use only
a 12 V charger.
Do not disconnect the terminals while
the engine is running.
Do not charge the batteries without
disconnecting the terminals first.
Wash your hands afterwards.
Do not push the vehicle to start the
engine if you have an electronic or
automatic gearbox.Before disconnecting the battery
Wait 2 minutes after switching off the ignition
before disconnecting the battery.
Close the windows and the doors before
disconnecting the battery.
Following reconnection
of the battery
Following reconnection of the battery, switch on
the ignition and wait 1 minute before starting to
permit initialisation of the electronic systems.
However, if problems remain following this
operation, contact a PEUGEOT dealer or a
qualified workshop.
Referring to the corresponding section, you
must yourself reinitialise:
- the remote control key,
- the on-board satellite navigation system.
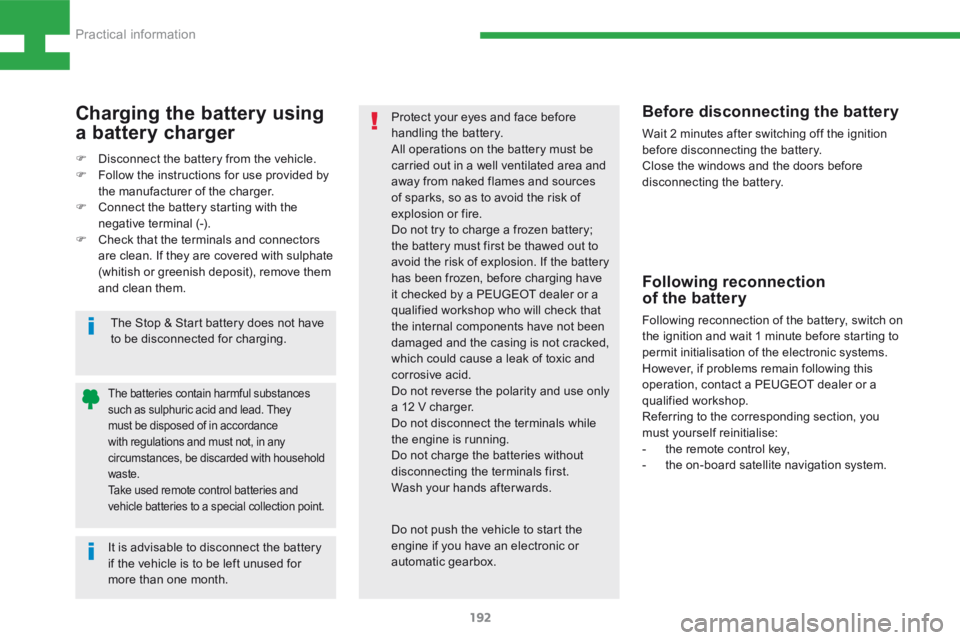
The Stop & Start battery does not have
to be disconnected for charging.
Charging the battery using
a battery charger
F
Disconnect the battery from the vehicle.
F Follow the instructions for use provided by
the manufacturer of the charger.
F Connect the battery starting with the
negative terminal (-).
F Check that the terminals and connectors
are clean. If they are covered with sulphate
(whitish or greenish deposit), remove them
and clean them.
Practical information
Page 196 of 341
194
208_en_Chap08_Informations-pratiques_ed01-2015
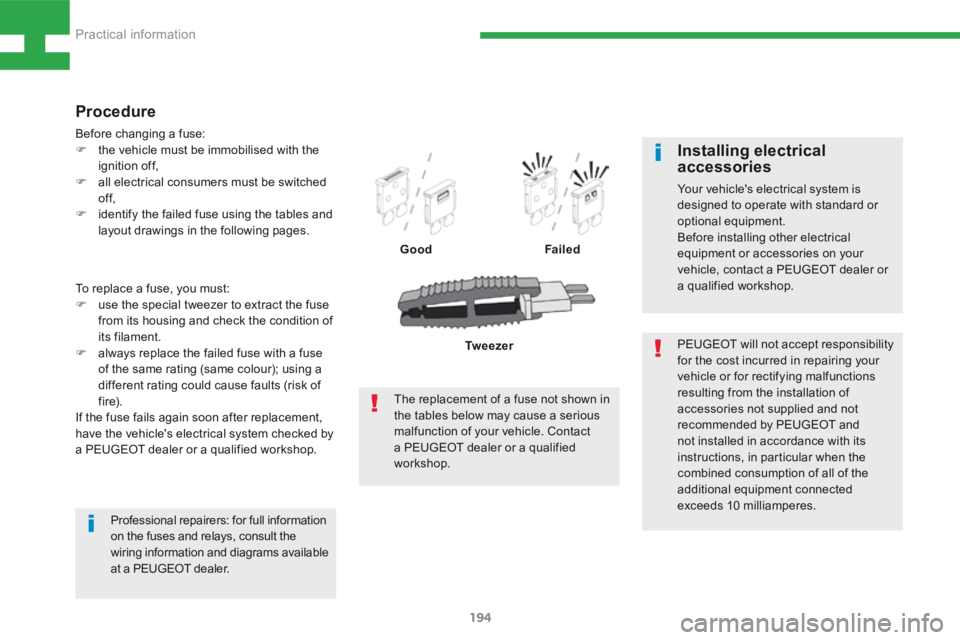
To replace a fuse, you must:
F use the special tweezer to extract the fuse
from its housing and check the condition of
its filament.
F always replace the failed fuse with a fuse
of the same rating (same colour); using a
different rating could cause faults (risk of
f i r e).
If the fuse fails again soon after replacement,
have the vehicle's electrical system checked by
a PEUGEOT dealer or a qualified workshop.
Procedure
Before changing a fuse:
F the vehicle must be immobilised with the
ignition off,
F all electrical consumers must be switched
of f,
F identify the failed fuse using the tables and
layout drawings in the following pages.
GoodFailed
PEUGEOT will not accept responsibility
for the cost incurred in repairing your
vehicle or for rectifying malfunctions
resulting from the installation of
accessories not supplied and not
recommended by PEUGEOT and
not installed in accordance with its
instructions, in particular when the
combined consumption of all of the
additional equipment connected
exceeds 10 milliamperes.
Installing electrical
accessories
Your vehicle's electrical system is
designed to operate with standard or
optional equipment.
Before installing other electrical
equipment or accessories on your
vehicle, contact a PEUGEOT dealer or
a qualified workshop.
The replacement of a fuse not shown in
the tables below may cause a serious
malfunction of your vehicle. Contact
a PEUGEOT dealer or a qualified
workshop. Tw e e z e r
Professional repairers: for full information
on the fuses and relays, consult the
wiring information and diagrams available
at a PEUGEOT dealer.
Practical information
Page 200 of 341
198
208_en_Chap08_Informations-pratiques_ed01-2015
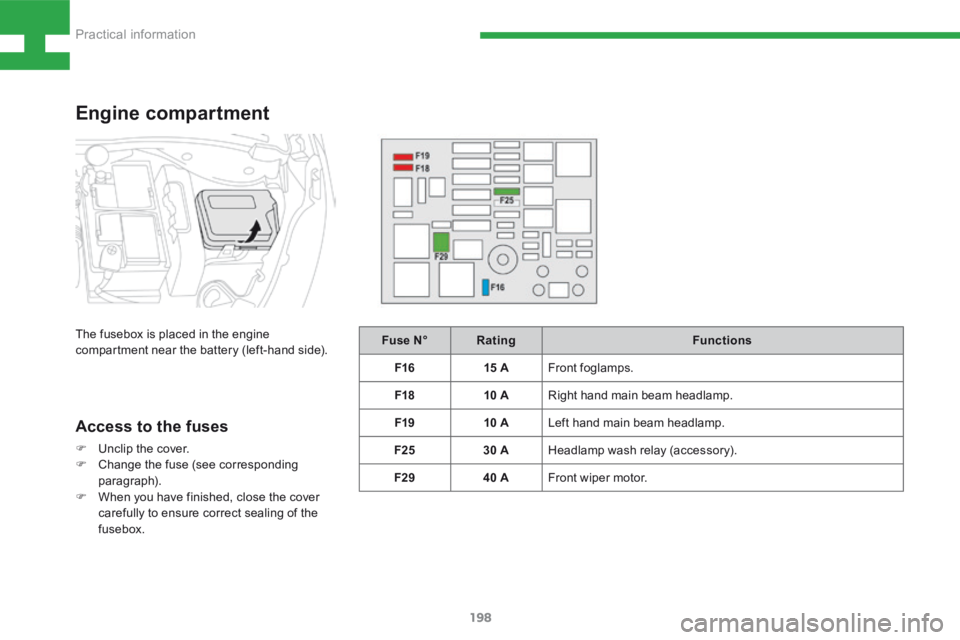
Fuse N°Rating Functions
F16 15 AFront foglamps.
F18 10 ARight hand main beam headlamp.
F19 10 ALeft hand main beam headlamp.
F25 30 AHeadlamp wash relay (accessory).
F29 40 AFront wiper motor.
Engine compartment
Access to the fuses
F Unclip the cover.
F Change the fuse (see corresponding
paragraph).
F When you have finished, close the cover
carefully to ensure correct sealing of the
fusebox.
The fusebox is placed in the engine
compartment near the battery (left-hand side).
Practical information
Page 251 of 341
249
208_en_Chap9b_SMEGplus_ed01-2015
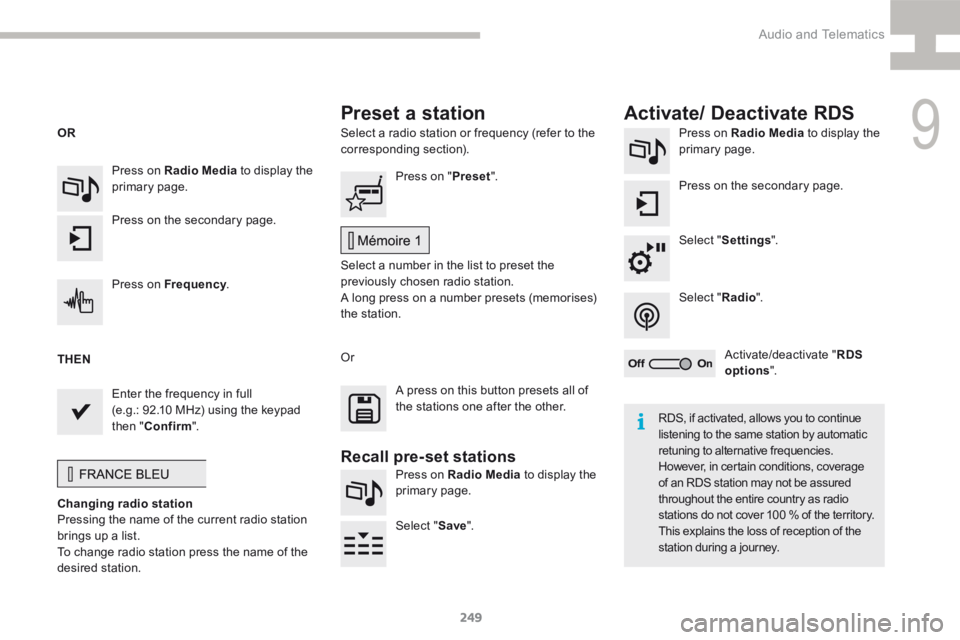
Select a radio station or frequency (refer to the
corresponding section).Press on Radio Media
to display the
primary page.
Press on the secondary page.
Select " Settings ".
Select " Radio".
Activate/deactivate " RDS
options ".
Press on Radio Media
to display the
primary page.
Press on the secondary page. Press on "
Preset".
Select a number in the list to preset the
previously chosen radio station.
A long press on a number presets (memorises)
the station.
Press on Frequency
.
Enter the frequency in full
(e.g.: 92.10 MHz) using the keypad
then " Confirm ".
Changing radio station
Pressing the name of the current radio station
brings up a list.
To change radio station press the name of the
desired station. Or
Press on Radio Media to display the
primary page.
Select " Save".
Preset a station Activate/ Deactivate RDS
OR
THEN
A press on this button presets all of
the stations one after the other.
Recall pre-set stations
RDS, if activated, allows you to continue
listening to the same station by automatic
retuning to alternative frequencies.
However, in certain conditions, coverage
of an RDS station may not be assured
throughout the entire country as radio
stations do not cover 100 % of the territory.
This explains the loss of reception of the
station during a journey.
9
Audio and Telematics