2015 MERCEDES-BENZ S-COUPE engine
[x] Cancel search: enginePage 215 of 286
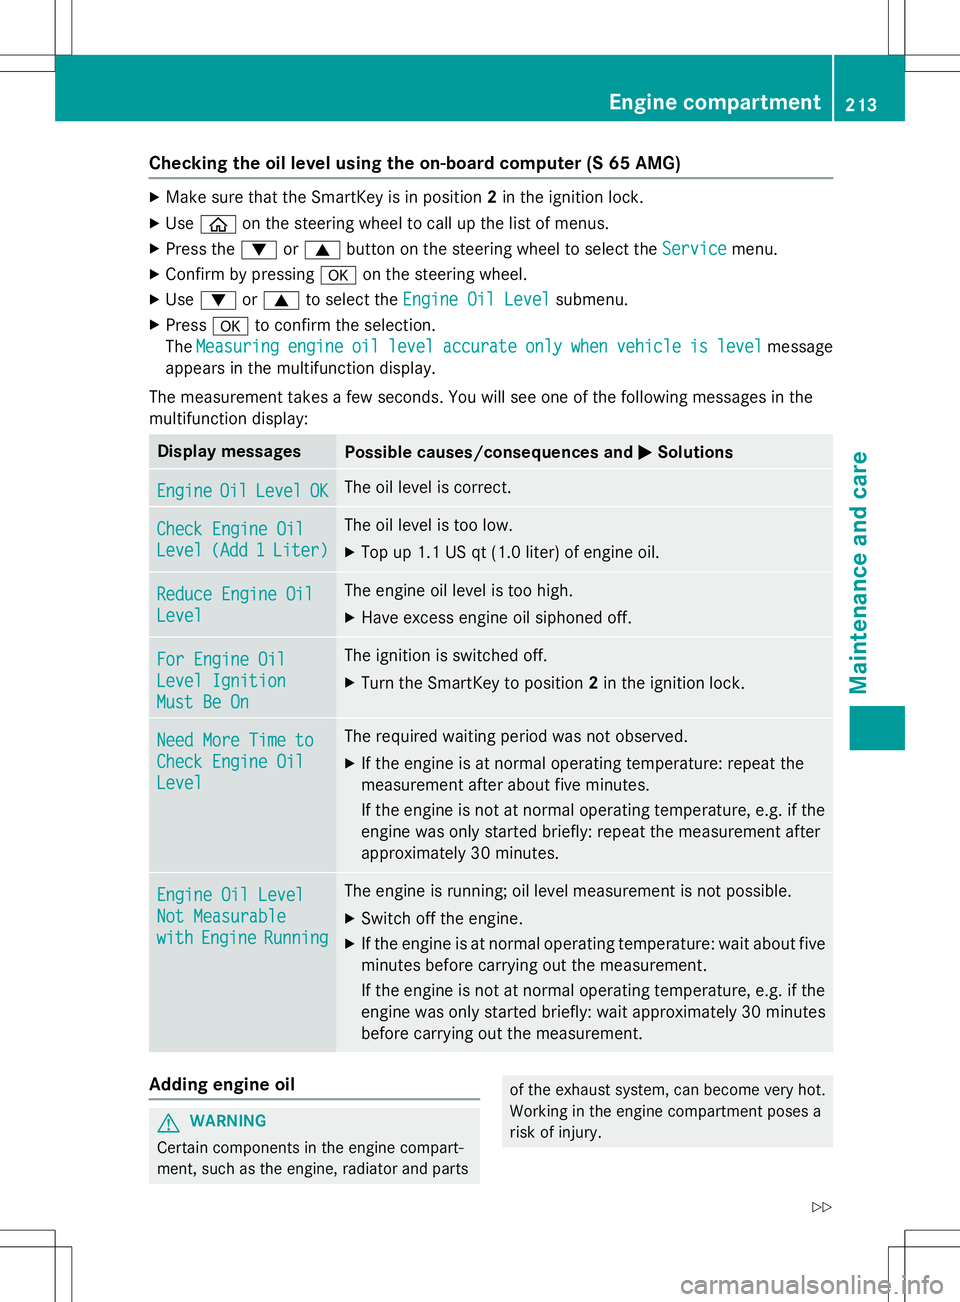
Checking the oil level using the on-board computer (S 65 AMG)
XMake sure that the SmartKey is in position 2in the ignition lock.
X Use ò on the steering wheel to call up the list of menus.
X Press the :or9 button on the steering wheel to select the
Servicemenu.
X Confirm by pressing aon the steering wheel.
X Use : or9 to select the
Engine Oil Levelsubmenu.
X Press ato confirm the selection.
The
Measuringengineoillevelaccurateonlywhenvehicleislevelmessage
appears in the multifunction display.
The measurement takes a few seconds. You will see one of the following messages in the
multifunction display:
Display messagesPossible causes/consequences and MSolutions
EngineOilLevelOKThe oil level is correct.
Check Engine Oil
Level(Add1Liter)
The oil level is too low.
X Top up 1.1 US qt (1.0 liter) of engine oil.
Reduce Engine Oil
Level
The engine oil level is too high.
X Have excess engine oil siphoned off.
For Engine Oil
Level Ignition
Must Be On
The ignition is switched off.
X Turn the SmartKey to position 2in the ignition lock.
Need More Time to
Check Engine Oil
Level
The required waiting period was not observed.
X If the engine is at normal operating temperature: repeat the
measurement after about five minutes.
If the engine is not at normal operating temperature, e.g. if the
engine was only started briefly: repeat the measurement after
approximately 30 minutes.
Engine Oil Level
Not Measurable
withEngineRunning
The engine is running; oil level measurement is not possible.
X Switch off the engine.
X If the engine is at normal operating temperature: wait about five
minutes before carrying out the measurement.
If the engine is not at normal operating temperature, e.g. if the
engine was only started briefly: wait approximately 30 minutes before carrying out the measurement.
Adding engine oil
GWARNING
Certain components in the engine compart-
ment, such as the engine, radiator and parts
of the exhaust system, can become very hot.
Working in the engine compartment poses a
risk of injury.
Engine compartment213
Maintenance and care
Z
Page 216 of 286
Where possible, let the engine cool down andtouch only the components described in the following.
GWARNING
If engine oil comes into contact with hot com- ponents in the engine compartment, it may
ignite. There is a risk of fire and injury.
Make sure that engine oil is not spilled next to
the filler neck. Let the engine cool down and
thoroughly clean the engine oil off the com-
ponents before starting the engine.
HEnvironmental note
When adding oil, take care not to spill any. If
oil enters the soil or waterways, it is harmful to the environment.
!Only use engine oils and oil filters that
have been approved for vehicles with a ser-
vice system. You can obtain a list of the
engine oils and oil filters tested and
approved in accordance with the
Mercedes-Benz Specifications for Service
Products at any Mercedes-Benz Service
center.
Damage to the engine or exhaust system is
caused by the following:
R using engine oils and oil filters that have
not been specifically approved for the
service system
R replacing engine oil and oil filters after
the interval for replacement specified by
the service system has been exceeded
R using engine oil additives.
!Do not add too much oil. adding too much
engine oil can result in damage to the
engine or to the catalytic converter. Have
excess engine oil siphoned off.
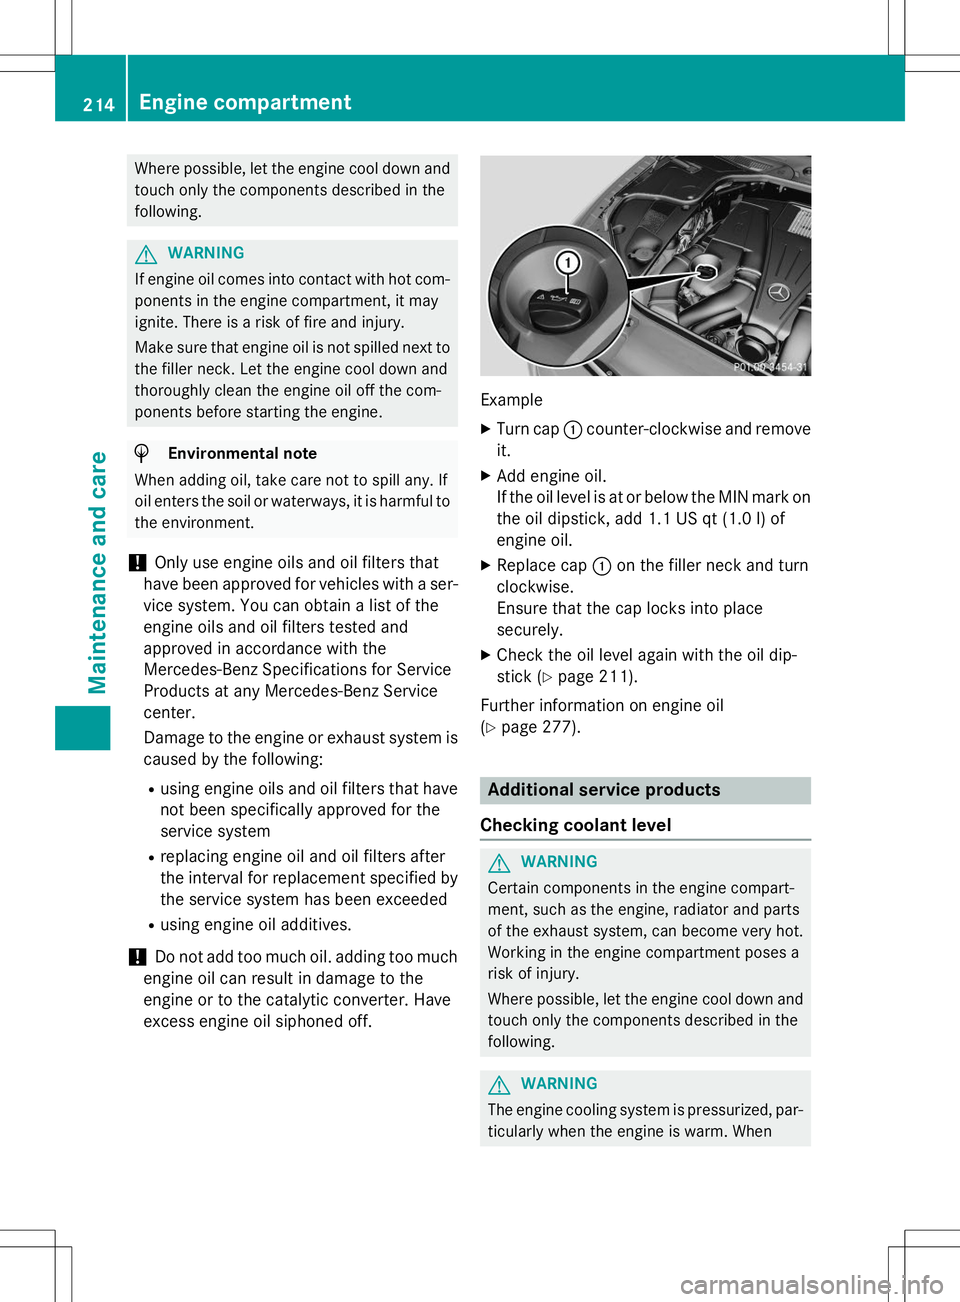
Example
X Turn cap :counter-clockwise and remove
it.
X Add engine oil.
If the oil level is at or below the MIN mark on
the oil dipstick, add 1.1 US qt (1.0 l)of
engine oil.
X Replace cap :on the filler neck and turn
clockwise.
Ensure that the cap locks into placesecurely.
X Check the oil level again with the oil dip-
stick ( Ypage 211).
Further information on engine oil( Y page 277).
Additional service products
Checking coolant level
GWARNING
Certain components in the engine compart-
ment, such as the engine, radiator and parts
of the exhaust system, can become very hot.
Working in the engine compartment poses a
risk of injury.
Where possible, let the engine cool down and touch only the components described in the following.
GWARNING
The engine cooling system is pressurized, par-ticularly when the engine is warm. When
214Engine compartment
Maintenance and care
Page 217 of 286
opening the cap, you could be scalded by hotcoolant spraying out. There is a risk of injury.
Let the engine cool down before opening the
cap. Wear eye and hand protection when
opening the cap. Open the cap slowly half a
turn to allow pressure to escape.
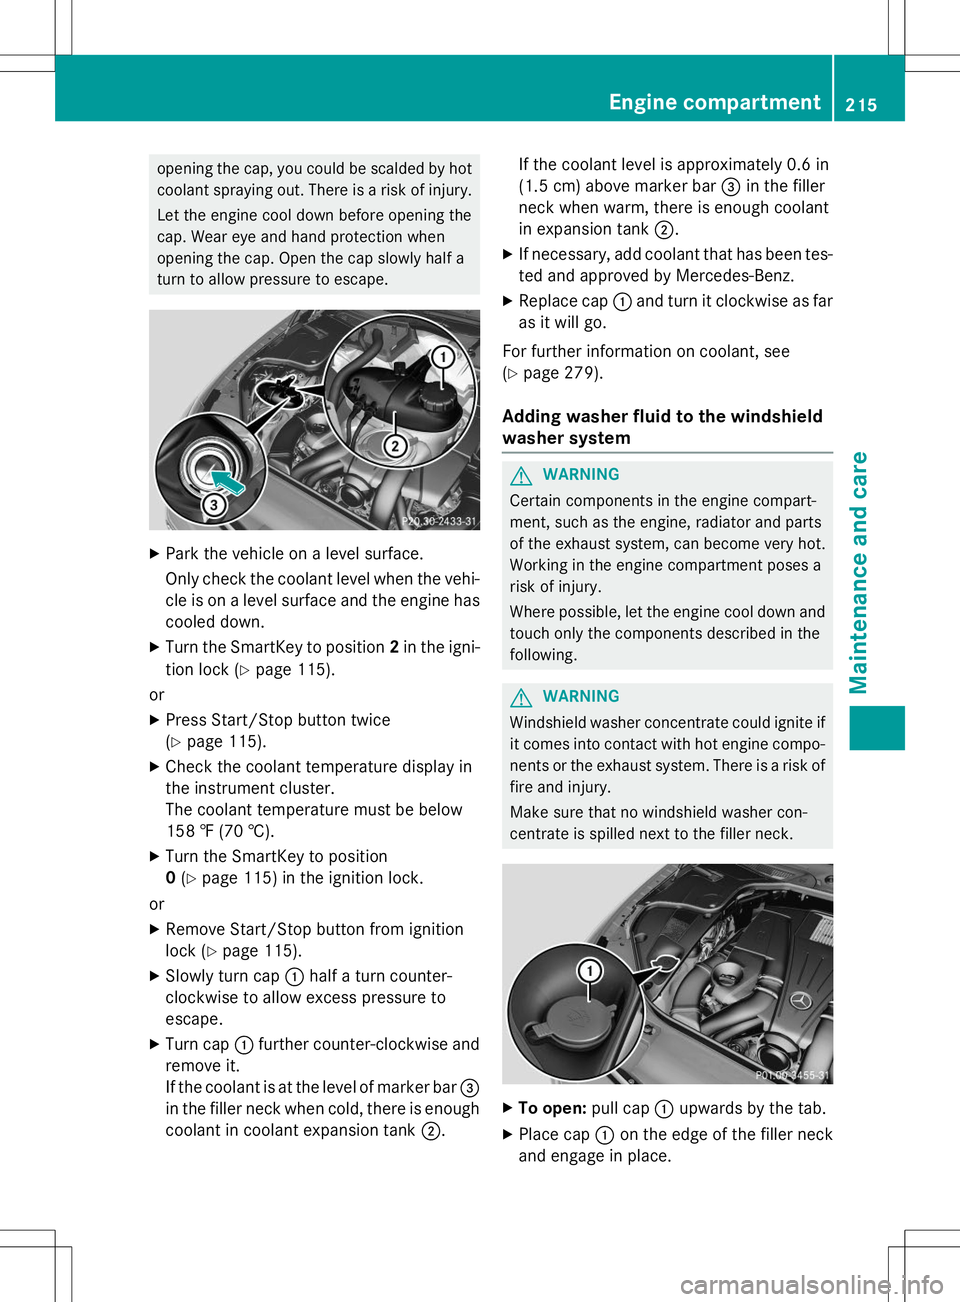
X Park the vehicle on a level surface.
Only check the coolant level when the vehi-
cle is on a level surface and the engine has
cooled down.
X Turn the SmartKey to position 2in the igni-
tion lock ( Ypage 115).
or
X Press Start/Stop button twice (Y page 115).
X Check the coolant temperature display in
the instrument cluster.
The coolant temperature must be below
158 ‡ (70 †).
X Turn the SmartKey to position0(Y page 115) in the ignition lock.
or
X Remove Start/Stop button from ignition
lock ( Ypage 115).
X Slowly turn cap :half a turn counter-
clockwise to allow excess pressure toescape.
X Turn cap :further counter-clockwise and
remove it.
If the coolant is at the level of marker bar =
in the filler neck when cold, there is enough coolant in coolant expansion tank ;. If the coolant level is approximately 0.6 in
(1.5 cm) above marker bar
=in the filler
neck when warm, there is enough coolant
in expansion tank ;.
X If necessary, add coolant that has been tes-
ted and approved by Mercedes-Benz.
X Replace cap :and turn it clockwise as far
as it will go.
For further information on coolant, see( Y page 279).
Adding washer fluid to the windshield
washer system
GWARNING
Certain components in the engine compart-
ment, such as the engine, radiator and parts
of the exhaust system, can become very hot.
Working in the engine compartment poses a
risk of injury.
Where possible, let the engine cool down and
touch only the components described in the following.
GWARNING
Windshield washer concentrate could ignite if it comes into contact with hot engine compo-
nents or the exhaust system. There is a risk of
fire and injury.
Make sure that no windshield washer con-
centrate is spilled next to the filler neck.
X To open: pull cap:upwards by the tab.
X Place cap :on the edge of the filler neck
and engage in place.
Engine compartment215
Maintenance and care
Z
Page 219 of 286
!If the SmartKey is within the rear detec-
tion range of KEYLESS-GO, the following
situations, for example, could lead to the
unintentional opening of the trunk:
R using a car wash
R using a power washer
Make sure that the SmartKey is at least
10 ft (3 m) away from the vehicle.
!Make sure that the automatic transmis-
sion is in neutral position Nwhen washing
your vehicle in a tow-through car wash. The
vehicle may otherwise be damaged.
R Operating with the SmartKey:
Do not remove the SmartKey from the
ignition lock. Do not open the driver's
door when the engine is switched off or
at very low speeds. Otherwise, when in
transmission position Dor Rthe auto-
matic transmission will automatically
switch to park position Pand block the
wheels.
R Operating with the Start/Stop button:
Do not open the driver's door when the
engine is switched off or at very low
speeds. Otherwise, when in transmission
position Dor Rthe automatic transmis-
sion will automatically switch to parkposition Pand block the wheels.
Observe the following to make sure that the
automatic transmission stays in position N
neutral:
Operating with the SmartKey:
X Make sure that the ignition is switched on.
X Make sure that the vehicle is stationary.
X Depress and hold the brake pedal.
X Shift to neutral N.
X Release the brake pedal.
X Release the electric parking brake, if nec- essary.
X Switch off the ignition and leave the Smart-
Key in the ignition lock. Operating with the Start/Stop button:
X Make sure that the ignition is switched on.
X Make sure that the vehicle is stationary.
X Depress and hold the brake pedal.
X Engage park position P.
X Release the brake pedal.
X Remove Start/Stop button from ignition
lock ( Ypage 115).
X Insert the SmartKey into the ignition lock.
X Switch on the ignition.
X Depress and hold the brake pedal.
X Shift to neutral N.
X Release the brake pedal.
X Release the electric parking brake, if nec-essary.
X Switch off the ignition and leave the Smart-
Key in the ignition lock.
You can wash the vehicle in an automatic car
wash from the very start.
If the vehicle is very dirty, pre-wash it before
cleaning it in an automatic car wash.
After using an automatic car wash, wipe off
wax from the windshield and the wiper
blades. This will prevent smears and reduce
wiping noises caused by residue on the wind- shield.
Information in the Digital Operator'sManual
In the Digital Operator's Manual you will find
information on the following topics: R Washing by hand
R Power washers
R Cleaning the paintwork
R Matte finish care
R Cleaning the wheels
R Cleaning the windows
R Cleaning wiper blades
R Cleaning the exterior lighting
R Cleaning the mirror turn signals
R Cleaning the sensors
R Cleaning the rear view camera
Care217
Maintenance and care
Z
Page 222 of 286
Useful information
iThis Operator's Manual describes all
models and all standard and optional equip- ment of your vehicle available at the time of
publication of the Operator's Manual.
Country-specific differences are possible.
Please note that your vehicle may not be
equipped with all features described. This
also applies to safety-related systems and
functions.
iRead the information on qualified special-
ist workshops ( Ypage 27).
Where will I find...?
Vehicle tool kit
General notes
The towing eye is located in the stowage well under the trunk floor.
iApart from certain country-specific varia-
tions, the vehicles are not equipped with a
tire-change tool kit. If the vehicle is equip-
ped with tire-changing tools, these are
located in the stowage well under the trunk floor. Some tools for changing a wheel are
specific to the vehicle. For more informa-
tion on which tire changing tools are
required and approved to perform a wheel
change on your vehicle, consult a qualifiedspecialist workshop.
Tools required for changing a wheel may
include, for example:
R Jack
R Wheel chock
R Lug wrench
R Ratchet wrench
R Alignment bolt
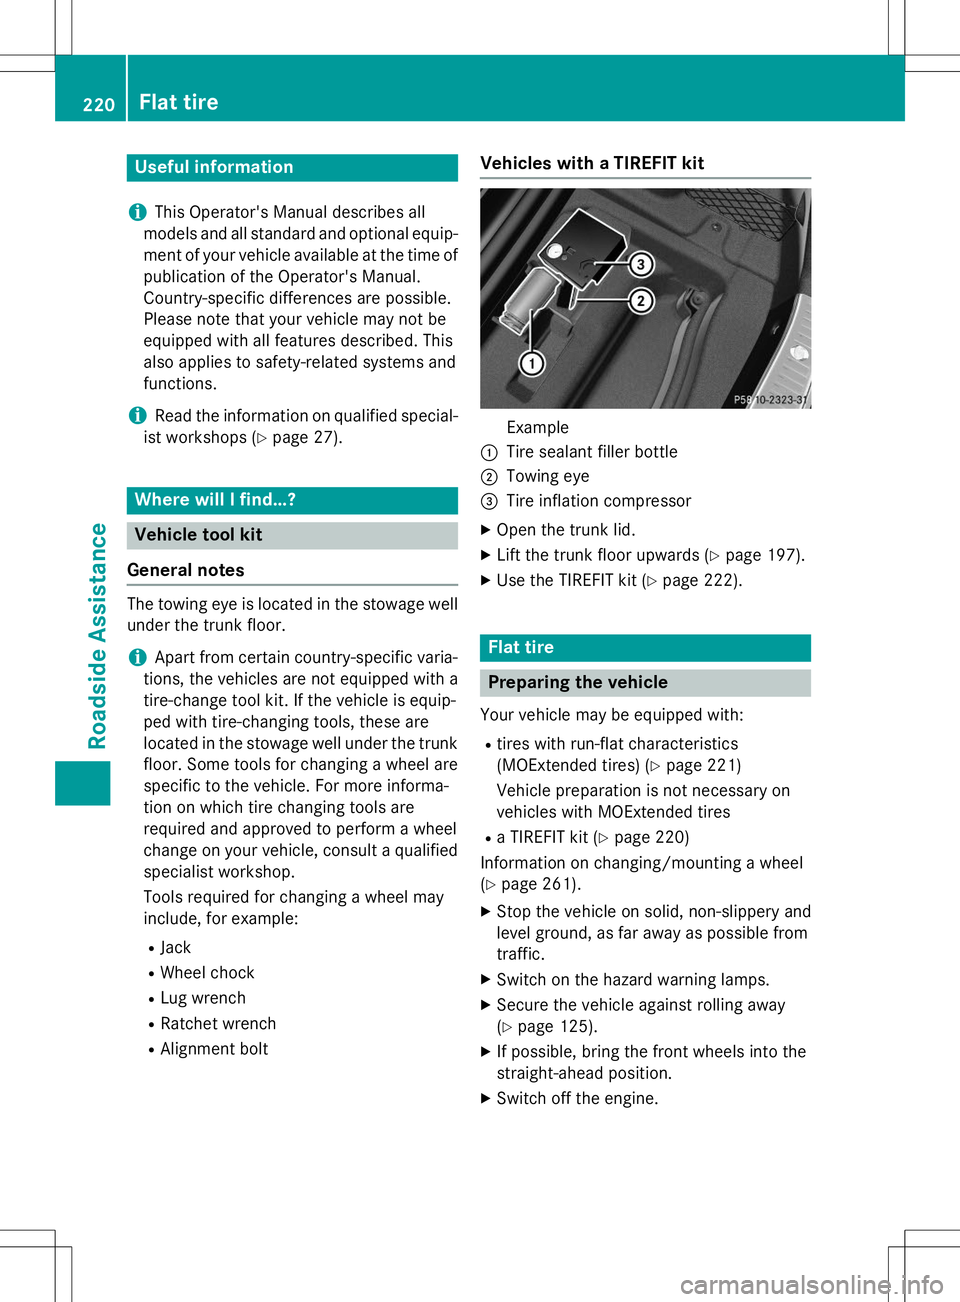
Vehicles with a TIREFIT kit
Example
:Tire sealant filler bottle
;Towing eye
=Tire inflation compressor
X Open the trunk lid.
X Lift the trunk floor upwards ( Ypage 197).
X Use the TIREFIT kit ( Ypage 222).
Flat tire
Preparing the vehicle
Your vehicle may be equipped with:
R tires with run-flat characteristics
(MOExtended tires) ( Ypage 221)
Vehicle preparation is not necessary on
vehicles with MOExtended tires
R a TIREFIT kit ( Ypage 220)
Information on changing/mounting a wheel( Y page 261).
X Stop the vehicle on solid, non-slippery and
level ground, as far away as possible from
traffic.
X Switch on the hazard warning lamps.
X Secure the vehicle against rolling away(Y page 125).
X If possible, bring the front wheels into the
straight-ahead position.
X Switch off the engine.
220Flat tire
Roadside Assistance
Page 228 of 286
RWhen jump-starting, make sure that the
battery poles with identical polarity are
connected.
R It is particularly important to observe the
described order when connecting and dis-
connecting the jumper cables.
R Never connect or disconnect the battery
terminals while the engine is running.
GWARNING
Battery acid is caustic. There is a risk of injury.
Avoid contact with skin, eyes or clothing. Do
not inhale any battery gases. Do not lean over
the battery. Keep children away from batter-
ies. Wash away battery acid immediately with
plenty of clean water and seek medical atten-tion.
All vehicles:
HEnvironmental note
Batteries contain dangerous
substances. It is against the
law to dispose of them with
the household rubbish. They
must be collected separately and recycled to protect the
environment.
Dispose of batteries in an
environmentally friendly
manner. Take discharged
batteries to a qualified spe-
cialist workshop or a special
collection point for used bat-teries.
!Have the battery checked regularly at a
qualified specialist workshop.
Observe the service intervals in the Main-
tenance Booklet or contact a qualified spe-
cialist workshop for more information.
!Always have work on the batteries carried
out at a qualified specialist workshop.
Should it, in exceptional circumstances, be absolutely necessary to disconnect the 12- volt battery yourself, please observe thefollowing:
R secure the vehicle to prevent it from roll-
ing away.
R you switch off the engine and remove the
SmartKey. Make sure the ignition is
switched off. Check that all the indicator lamps in the instrument cluster are off.
Otherwise, electronic components, such
as the alternator, may be damaged.
R you first remove the negative terminal
clamp and then the positive terminal
clamp. Never swap the terminal clamps.
Otherwise, the vehicle's electronic sys-
tem may be damaged.
R the transmission is locked in position P
after disconnecting the battery. The vehi-
cle is secured against rolling away. You
can then no longer move the vehicle.
The batteries and the covers of the positive
terminal clamps must always be installed
securely during operation.
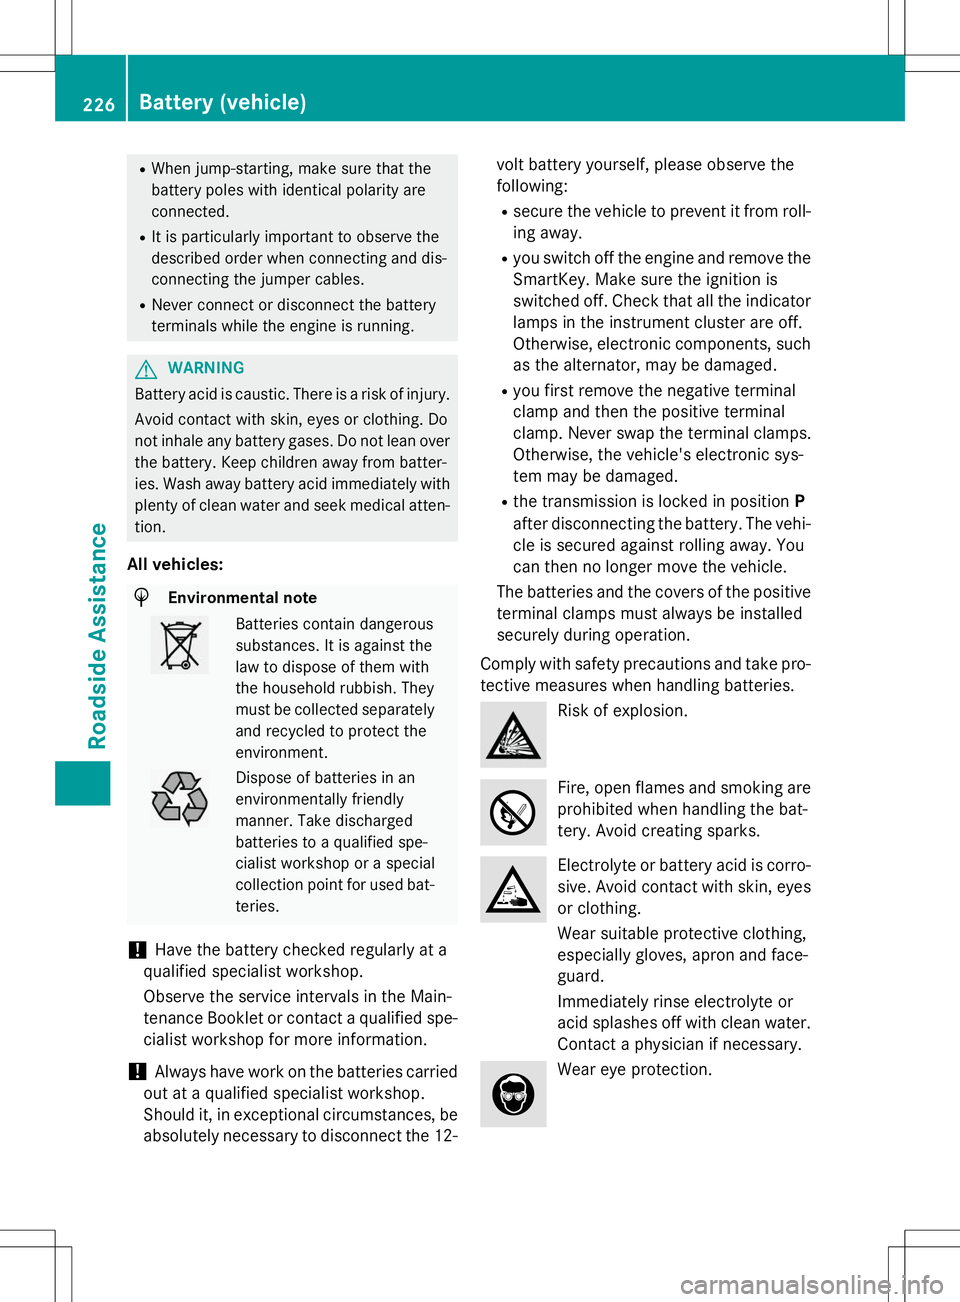
Comply with safety precautions and take pro-
tective measures when handling batteries.
Risk of explosion.
Fire, open flames and smoking are
prohibited when handling the bat-
tery. Avoid creating sparks.
Electrolyte or battery acid is corro-
sive. Avoid contact with skin, eyes
or clothing.
Wear suitable protective clothing,
especially gloves, apron and face-guard.
Immediately rinse electrolyte or
acid splashes off with clean water. Contact a physician if necessary.
Wear eye protection.
226Battery (vehicle)
Roadside Assistance
Page 229 of 286
Keep children away.
Observe this Operator's Manual.
For safety reasons, Mercedes-Benz recom-
mends that you only use batteries which have been tested and approved for your vehicle by
Mercedes-Benz. These batteries provide
increased impact protection to prevent vehi-
cle occupants from suffering acid burns
should the battery be damaged in the event of
an accident.
In order for the battery to achieve the maxi-
mum possible service life, it must always be
sufficiently charged.
Like other batteries, the vehicle battery may
discharge over time if you do not use the
vehicle. In this case, have the battery discon- nected at a qualified specialist workshop. You
can also charge the battery with a charger
recommended by Mercedes-Benz. Contact a
qualified specialist workshop for further infor- mation.
Have the battery condition of charge checked
more frequently if you use the vehicle mainly
for short trips or if you leave it standing idle
for a lengthy period. Consult a qualified spe-
cialist workshop if you wish to leave your
vehicle parked for a long period of time.
iRemove the SmartKey if you park the
vehicle and do not require any electrical
consumers. The vehicle will then use very
little energy, thus conserving battery
power.
Charging the battery
AMG vehicles:
!Only use battery chargers with a maxi-
mum charging voltage of 14.4 V.
All ot her vehicles
GWARNING
During charging and jump-starting, explosive
gases can escape from the battery. There is a
risk of an explosion.
Particularly avoid fire, open flames, creating
sparks and smoking. Ensure there is sufficient
ventilation while charging and jump-starting.
Do not lean over a battery.
GWARNING
Battery acid is caustic. There is a risk of injury.
Avoid contact with the skin, eyes or clothing.
Do not inhale any battery gases. Do not lean
over the battery. Keep children away from
batteries. Wash battery acid immediately with water and seek medical attention.
GWARNING
A discharged battery can freeze at tempera-
tures below freezing point. When jump-start-
ing the vehicle or charging the battery, gases can escape from the battery. There is a risk of
an explosion.
Allow the frozen battery to thaw out before
charging it or jump-starting.
!Only use battery chargers with a maxi-
mum charging voltage of 14.8 V.
All ve hicles:
!Only charge the battery using the jump-
starting connection point.
The jump-starting connection point is in the
engine compartment ( Ypage 229).
X Open the hood.
X Connect the battery charger to the positive
terminal and ground point in the same
order as when connecting the donor bat-
tery in the jump-starting procedure( Y page 229).
Keep away from fire and open flames. Do not
lean over a battery. Never charge the battery if it is still installed in the vehicle, unless you
use a battery charger which has been tested
and approved by Mercedes-Benz. A battery
charger unit specially adapted for Mercedes-
Battery (vehicle)227
Roadside Assistance
Z
Page 231 of 286
Jump-starting
For the jump-starting procedure, use only the jump-starting connection point, consisting of apositive terminal and a ground point, in the engine compartment.
All vehicles except AMG vehicles:
GWARNING
Battery acid is caustic. There is a risk of injury.
Avoid contact with skin, eyes or clothing. Do not inhale any battery gases. Do not lean over the
battery. Keep children away from batteries. Wash away battery acid immediately with plenty of
clean water and seek medical attention.
GWARNING
During charging and jump-starting, explosive gases can escape from the battery. There is a risk of an explosion.
Particularly avoid fire, open flames, creating sparks and smoking. Ensure there is sufficient ven-
tilation while charging and jump-starting. Do not lean over a battery.
GWARNING
During the charging process, a battery produces hydrogen gas. If a short circuit occurs or sparks
are created, the hydrogen gas can ignite. There is a risk of an explosion.
R Make sure that the positive terminal of a connected battery does not come into contact with
vehicle parts.
R Never place metal objects or tools on a battery.
R It is important that you observe the described order of the battery terminals when connecting
and disconnecting a battery.
R When jump-starting, make sure that the battery poles with identical polarity are connected.
R It is particularly important to observe the described order when connecting and disconnecting
the jumper cables.
R Never connect or disconnect the battery terminals while the engine is running.
GWARNING
A discharged battery can freeze at temperatures below freezing point. When jump-starting the
vehicle or charging the battery, gases can escape from the battery. There is a risk of an explosion.
Allow the frozen battery to thaw out before charging it or jump-starting.
!Avoid repeated and lengthy starting attempts. Otherwise, the catalytic converter could be
damaged by the non-combusted fuel.
If, at low temperatures, the indicator lamps/warning lamps in the instrument cluster do not
light up, it is highly likely that the discharged battery has frozen. In this case, you may neither
charge the battery nor jump-start the vehicle. The service life of a thawed-out battery may be
shorter. The starting characteristics can be impaired, particularly at low temperatures. Have
the thawed-out battery checked at a qualified specialist workshop.
All vehicles:
Jump-starting229
Roadside Assistance
Z