2015 MERCEDES-BENZ S-COUPE trunk release
[x] Cancel search: trunk releasePage 11 of 286
Break-in period .............................. 114
DISTRONIC PLUS ........................... 135
Downhill gradient ........................... 128
Drinking and driving ....................... 127
Driving abroad ............................... 102
Driving in winter ............................. 128
Driving on flooded roads ................ 128
Driving on wet roads ...................... 128
Exhaust check ............................... 127
Fuel ................................................ 127
General .......................................... 127
Hydroplaning ................................. 128
Icy road surfaces ........................... 128
Limited braking efficiency on sal-
ted roads ....................................... 128
Snow chains .................................. 242
Symmetrical low beam.................. 102
The first 1000 miles (1500 km) ..... 114
Wet road surface ........................... 128
DVD video
Operating (on-board computer) ..... 164
see also Digital Operator's Man-
ual .................................................. 188
E
EASY-ENTRY featureFunction/note s................................ 99
EASY-EXIT feature
Function/note s................................ 99
EBD (electronic brake force distri-
bution)
Display message ............................ 169
Function/note s................................ 73
ECO display
Function/note s............................. 128
ECO start/stop function
General information ....................... 119
Electronic Stability Program
see ESP ®
(Electronic Stability Program)
Emergency
Automatic measures after an acci-
dent ................................................. 60
Emergency release
Driver's door .................................... 83
Trunk ............................................... 89
Vehicle ............................................. 83 Emergency Tensioning Devices
Activation ......................................... 57
Emissions control
Service and warranty information .... 24
Engine
Check Engine warning lamp ........... 176
Display message ............................ 174
ECO start/stop function ................ 119
Engine number ............................... 275
Irregular running ............................ 119
Jump-starting ................................. 229
Starting problems .......................... 119
Starting the engine with the
SmartKey ....................................... 118
Starting with the Start/Stop but-
ton ................................................. 118
Switching off .................................. 126
Switching off with the Start/Stop
button ............................................ 126
Switching off with the vehicle key .. 126
Tow-starting (vehicle) ..................... 234
Engine electronics
Problem (malfunction) ................... 119
Engine emergency stop .................... 237
Engine oil
Adding ........................................... 213
Additives ........................................ 278
Checking the oil level ..................... 211
Checking the oil level using the
dipstick .......................................... 211
Checking the oil level using the
on-board computer ........................ 213
Display message ............................ 165
Filling capacity ............................... 278
Notes about oil grade s................... 277
Notes on oil level/consumption .... 211
Viscosity ........................................ 278
Entering an address
see also Digital Operator's Man-
ual .................................................. 188
ESP ®
(Electronic Stability Pro-
gram)
Characteristics ................................. 71
Deactivating/activating ................... 72
Display message ............................ 166
ETS/4ETS ........................................ 71
Function/note s................................ 71
General notes .................................. 71
Index9
Page 21 of 286
Tire tread ....................................... 241
Tire tread (definition) ..................... 261
Total load limit (definition)............. 261
Traction ......................................... 254
Traction (definition) ....................... 261
Tread wear ..................................... 254
Uniform Tire Quality Grading
Standards ...................................... 254
Uniform Tire Quality Grading
Standards (definition) .................... 259
Wear indicator (definition) ............. 261
Wheel and tire combination ........... 268
Wheel rim (definition) .................... 259
see Flat tire
Top Tether ............................................ 63
Tow-starting
Emergency engine starting ............ 234
Important safety notes .................. 232
Towing away
Important safety guidelines ........... 232
Installing the towing eye ................ 233
Notes for 4MATIC vehicles ............ 234
Removing the towing eye ............... 233
With both axles on the ground ....... 233
With the rear axle raised ................ 234
Towing eye ......................................... 220
Traffic reports
see also Digital Operator's Man-
ual .................................................. 188
Traffic Sign Assist
Activating/deactivating the warn-ing function .................................... 164
Display message ............................ 165
Transfer case ..................................... 122
Transmission
see Automatic transmission
Transporting the vehicle .................. 234
Trim pieces (cleaning instruc-
tions) .................................................. 218
Trip computer (on-board com-puter) .................................................. 164
Trip odometer
Calling up ....................................... 164
Trunk
Emergency release .......................... 88
Important safety notes .................... 84
Locking separately ........................... 88 Opening/closing (automatically
from inside) ...................................... 87
Opening/closing (automatically
from outside) ................................... 85
Opening/closing (from outside,
HANDS-FREE ACCESS) .................... 86
Power closing .................................. 82
Trunk lid
Display message ............................ 165
Obstacle recognition ........................ 84
Opening dimensions ...................... 281
Opening/closing .............................. 84
Trunk load (maximum) ...................... 281
Turn signals
Display message ............................ 165
Switching on/of f........................... 103
TV
see Separate operating instructions
Two-way radio
Windshield (infrared reflective) ...... 198
Type identification plate
see Vehicle identification plate
U
Unlocking Emergency unlocking ....................... 83
From inside the vehicle (central
unlocking button) ............................. 82
V
Vanity mirror (in the sun visor) ........ 199
Vehicle
Correct use ...................................... 28
Data acquisition ............................... 29
Display message ............................ 176
Equipment ....................................... 24
Limited Warranty ............................. 28
Loading .......................................... 249
Locking (in an emergency) ............... 83
Locking (SmartKey) .......................... 79
Lowering ........................................ 266
Maintenance .................................... 25
Operating safety .............................. 26
Parking for a long period ................ 126
Pulling away ................................... 118
Raising ........................................... 263
Reporting problems ......................... 28
Index19
Page 80 of 286
Useful information
iThis Operator's Manual describes all
models and all standard and optional equip- ment of your vehicle available at the time of
publication of the Operator's Manual.
Country-specific differences are possible.
Please note that your vehicle may not be
equipped with all features described. This
also applies to safety-related systems and
functions.
iRead the information on qualified special-
ist workshops ( Ypage 27).
SmartKey
Important safety notes
GWARNING
If children are left unsupervised in the vehicle,
they could:
R open the doors, thus endangering other
people or road users.
R get out and disrupt traffic.
R operate the vehicle's equipment.
Additionally, children could set the vehicle in
motion if, for example, they:
R release the parking brake.
R shifting the automatic transmission out of
park position P
R Start the engine.
There is a risk of an accident and injury.
When leaving the vehicle, always take the
SmartKey with you and lock the vehicle. Never
leave children or animals unattended in the
vehicle. Always keep the SmartKey out of
reach of children.
GWARNING
If you attach heavy or large objects to the
SmartKey, the SmartKey could be uninten-
tionally turned in the ignition lock. This could
cause the engine to be switched off. There is a risk of an accident.
Do not attach any heavy or large objects to the SmartKey. Remove any bulky key rings before
inserting the SmartKey into the ignition lock.
!Keep the SmartKey away from strong
magnetic fields. Otherwise, the remote
control function could be affected.
Strong magnetic fields can occur in the
vicinity of powerful electrical installations.
Do not keep the SmartKey: R with electronic devices, e.g. a mobile
phone or another SmartKey
R with metallic objects, e.g. coins or metalfoil
R inside metallic objects, e.g. a metal case
This can affect the functionality of the
SmartKey.
Vehicles with KEYLESS-GO start function: do not keep the SmartKey on the parcel shelf or in the trunk. Otherwise, the SmartKey maynot be detected, e.g. when starting the engine
using the Start/Stop button.
A check which periodically establishes a radio
connection between the vehicle and the
SmartKey determines whether a valid Smart- Key is in the vehicle. This occurs, for example:
R when starting the engine
R whilst driving
R when using HANDS-FREE ACCESS
R when the external door handles are
touched
R during convenience closing
78SmartKey
Opening and closing
Page 82 of 286
XTo unlock the vehicle: touch the inner
surface of the door handle.
X To lock the vehicle: touch sensor sur-
face :or; .
Make sure that you do not touch the inner
surface of the door handle.
X Convenience closing feature: touch
recessed sensor surface ;for an exten-
ded period.
Deactivating
If you do not intend to use the vehicle for a
longer period of time, you can deactivate KEY-
LESS-GO. The SmartKey will then use very lit-
tle power, thereby conserving battery power.
For the purposes of activation/deactivation,
the vehicle must not be nearby. X To deactivate: press the&button on
the SmartKey twice in rapid succession.
The battery check lamp of the SmartKey
lights up twice briefly and KEYLESS-GO is
deactivated.
X To activate: press any button on the
SmartKey or insert the SmartKey into the
ignition lock.
KEYLESS-GO and all of its associated fea-
tures are available again.
KEYLESS-GO start function
Bear in mind that the engine can be started by any of the vehicle occupants if there is a
SmartKey in the vehicle.
Changing the settings of the locking
system
You can find information about this in the
Digital Operator's Manual.
Mechanical key
General notes
If the vehicle can no longer be locked or
unlocked with the SmartKey or KEYLESS-GO, use the mechanical key.
If you use the mechanical key to unlock and
open the driver's door, the anti-theft alarm
system will be triggered. Switch off the alarm
( Y page 76).
If you unlock the vehicle using the mechanical key, the fuel filler flap will not be unlocked
automatically.
X To unlock the fuel filler flap: insert the
SmartKey into the ignition lock.
Removing the mechanical key
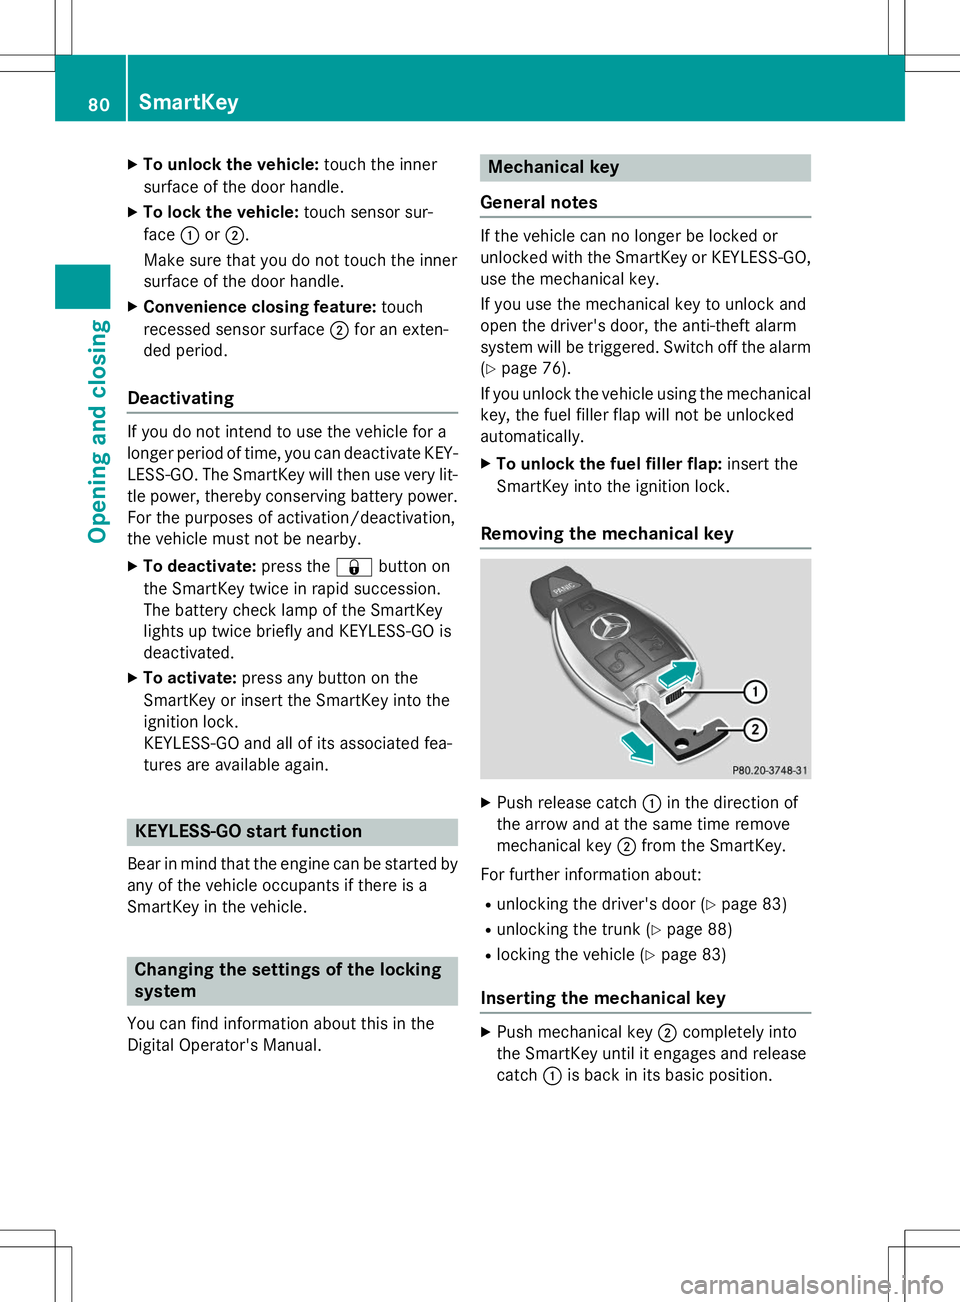
X Push release catch :in the direction of
the arrow and at the same time remove
mechanical key ;from the SmartKey.
For further information about: R unlocking the driver's door ( Ypage 83)
R unlocking the trunk ( Ypage 88)
R locking the vehicle ( Ypage 83)
Inserting the mechanical key
X
Push mechanical key ;completely into
the SmartKey until it engages and release catch :is back in its basic position.
80SmartKey
Opening and closing
Page 84 of 286
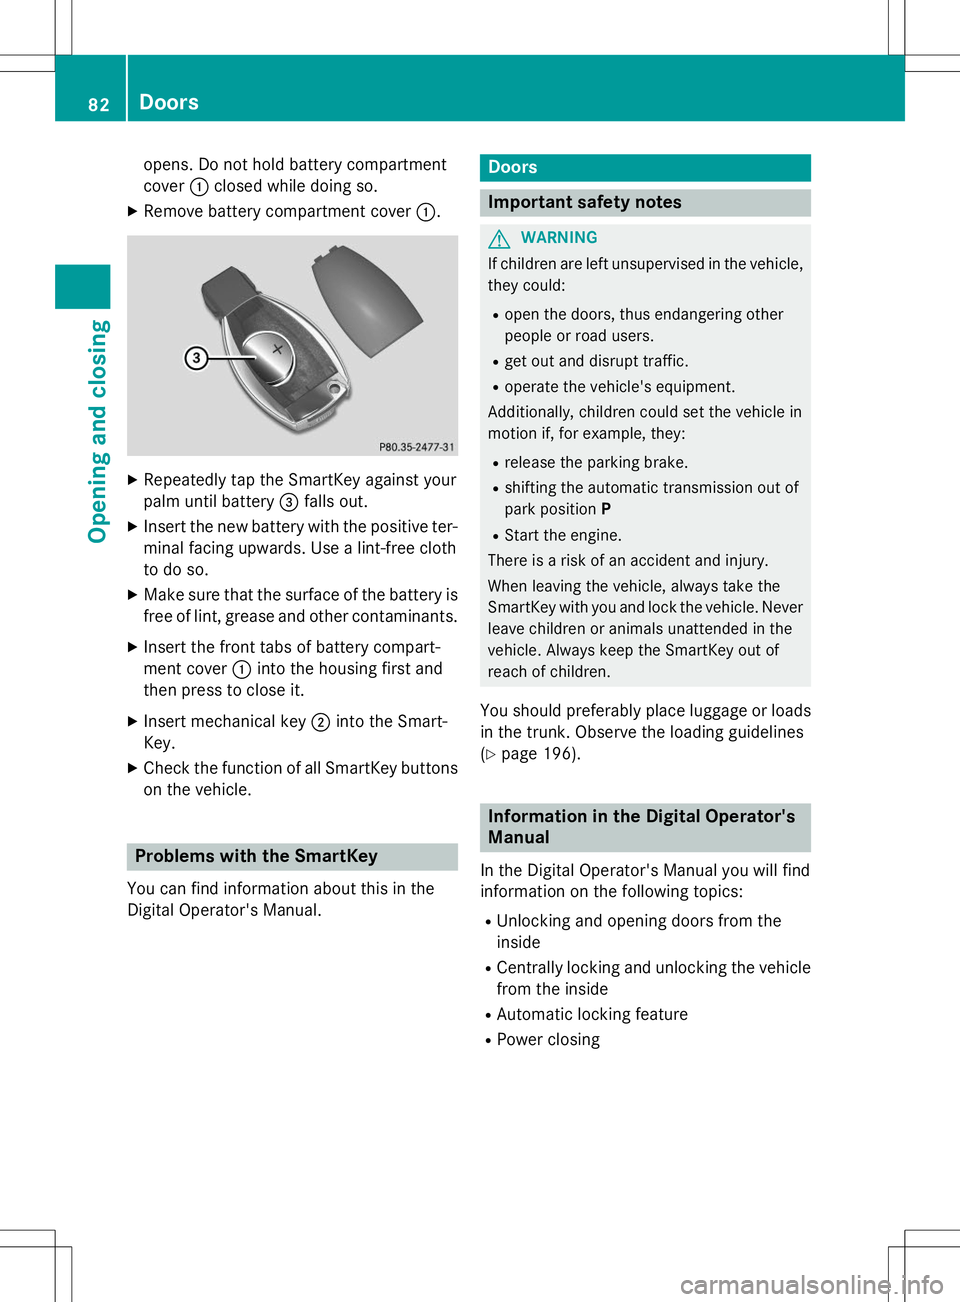
opens. Do not hold battery compartment cover:closed while doing so.
X Remove battery compartment cover :.
X
Repeatedly tap the SmartKey against your
palm until battery =falls out.
X Insert the new battery with the positive ter-
minal facing upwards. Use a lint-free cloth
to do so.
X Make sure that the surface of the battery is
free of lint, grease and other contaminants.
X Insert the front tabs of battery compart-
ment cover :into the housing first and
then press to close it.
X Insert mechanical key ;into the Smart-
Key.
X Check the function of all SmartKey buttons
on the vehicle.
Problems with the SmartKey
You can find information about this in the
Digital Operator's Manual.
Doors
Important safety notes
GWARNING
If children are left unsupervised in the vehicle, they could:
R open the doors, thus endangering other
people or road users.
R get out and disrupt traffic.
R operate the vehicle's equipment.
Additionally, children could set the vehicle in
motion if, for example, they:
R release the parking brake.
R shifting the automatic transmission out of
park position P
R Start the engine.
There is a risk of an accident and injury.
When leaving the vehicle, always take the
SmartKey with you and lock the vehicle. Never
leave children or animals unattended in the
vehicle. Always keep the SmartKey out of
reach of children.
You should preferably place luggage or loads in the trunk. Observe the loading guidelines( Y page 196).
Information in the Digital Operator's
Manual
In the Digital Operator's Manual you will find
information on the following topics: R
Unlocking and opening doors from the inside
R Centrally locking and unlocking the vehicle
from the inside
R Automatic locking feature
R Power closing
82Doors
Opening and closing
Page 85 of 286
Unlocking the driver's door (mechan-
ical key)
If the vehicle can no longer be locked or
unlocked with the SmartKey or KEYLESS-GO,
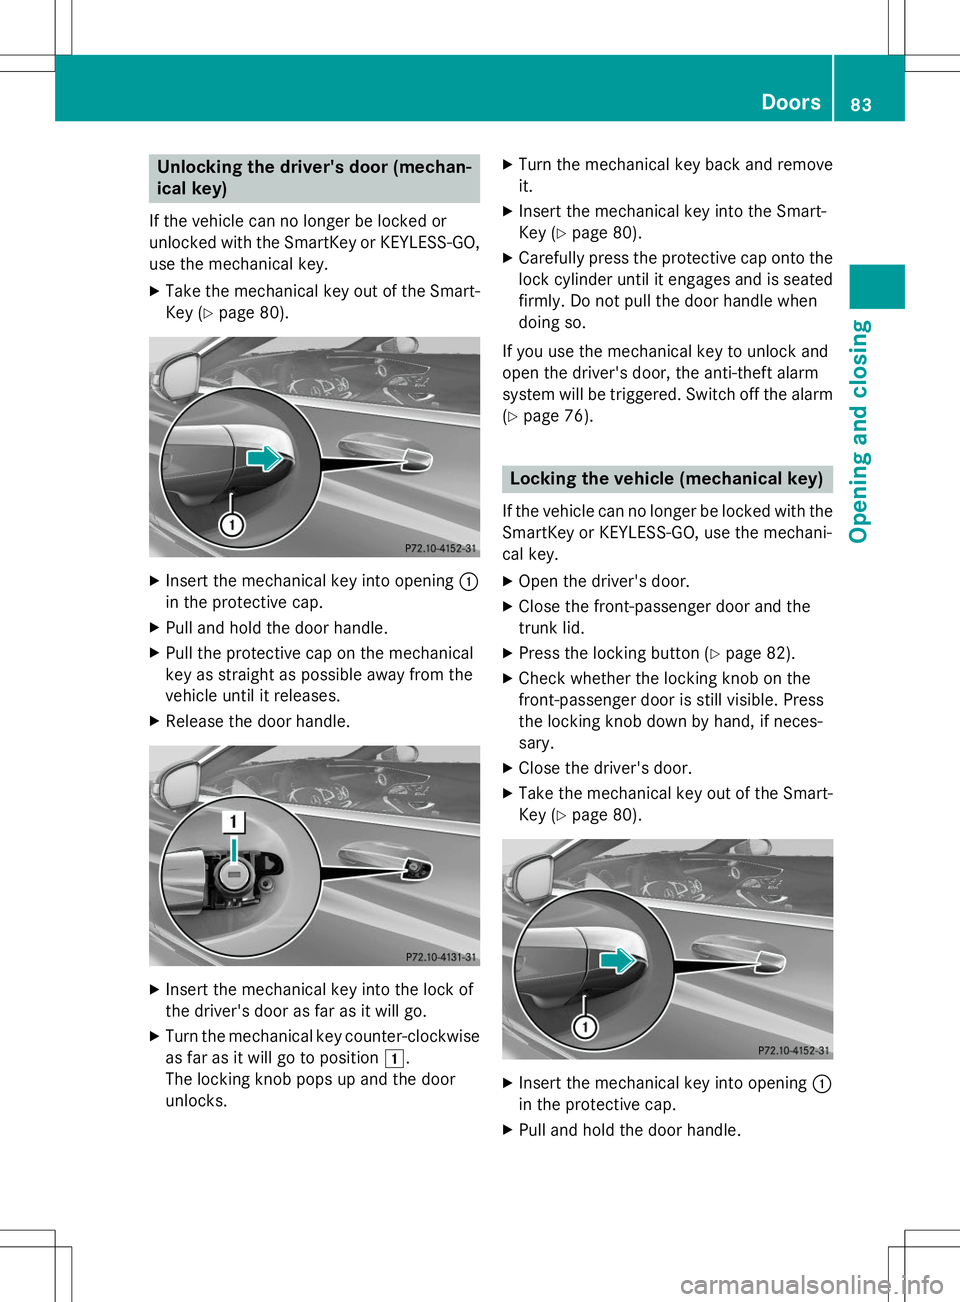
use the mechanical key. X Take the mechanical key out of the Smart-
Key ( Ypage 80).
X
Insert the mechanical key into opening :
in the protective cap.
X Pull and hold the door handle.
X Pull the protective cap on the mechanical
key as straight as possible away from the
vehicle until it releases.
X Release the door handle.
XInsert the mechanical key into the lock of
the driver's door as far as it will go.
X Turn the mechanical key counter-clockwise
as far as it will go to position 1.
The locking knob pops up and the door
unlocks. X
Turn the mechanical key back and removeit.
X Insert the mechanical key into the Smart-
Key ( Ypage 80).
X Carefully press the protective cap onto the
lock cylinder until it engages and is seated firmly. Do not pull the door handle when
doing so.
If you use the mechanical key to unlock and
open the driver's door, the anti-theft alarm
system will be triggered. Switch off the alarm
( Y page 76).
Locking the vehicle (mechanical key)
If the vehicle can no longer be locked with the
SmartKey or KEYLESS-GO, use the mechani-
cal key.
X Open the driver's door.
X Close the front-passenger door and the
trunk lid.
X Press the locking button ( Ypage 82).
X Check whether the locking knob on the
front-passenger door is still visible. Press
the locking knob down by hand, if neces-sary.
X Close the driver's door.
X Take the mechanical key out of the Smart-
Key ( Ypage 80).
X
Insert the mechanical key into opening :
in the protective cap.
X Pull and hold the door handle.
Doors83
Opening and closing
Z
Page 86 of 286
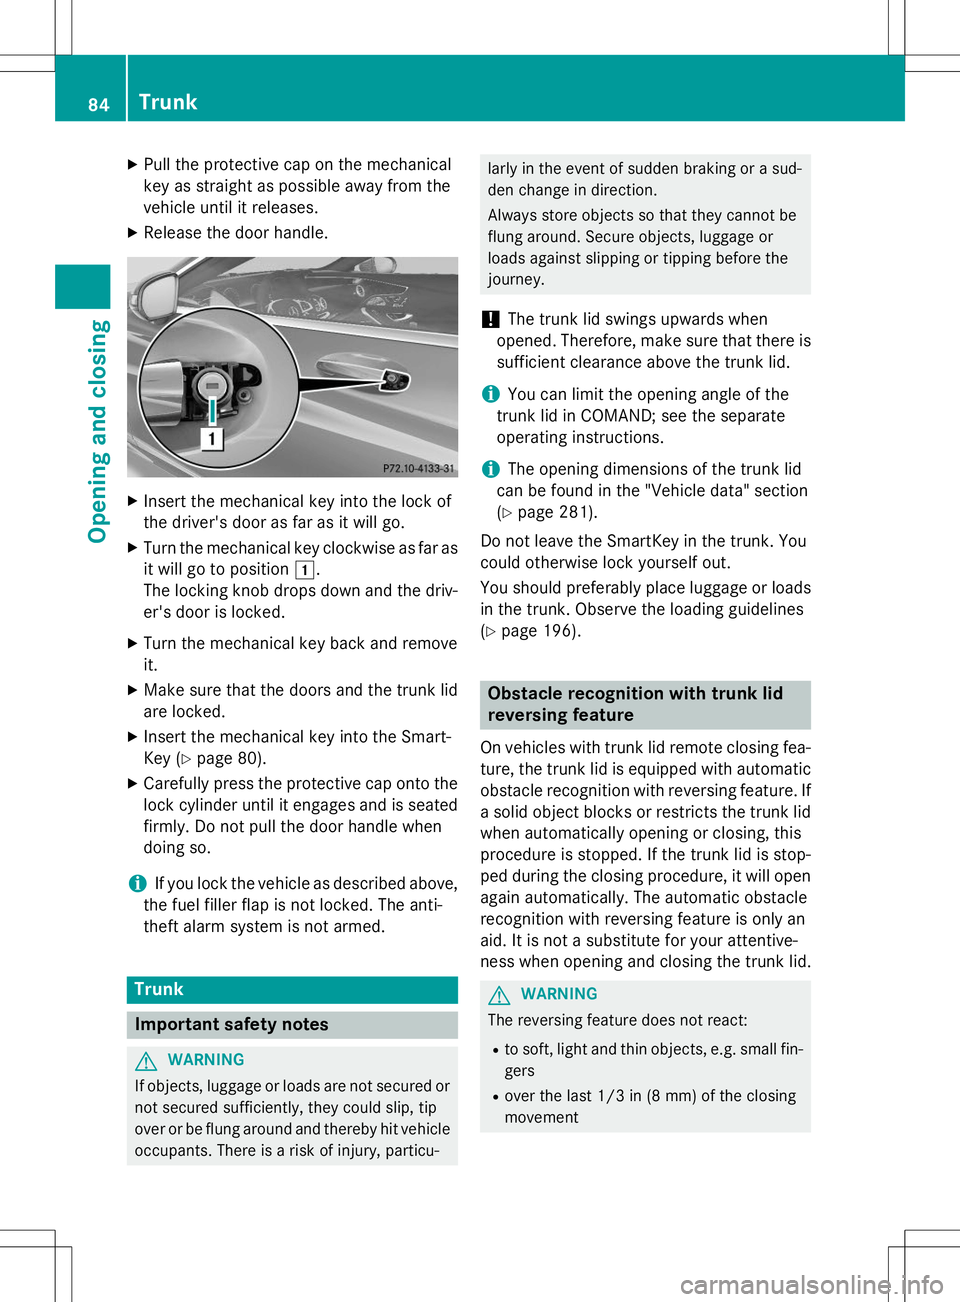
XPull the protective cap on the mechanical
key as straight as possible away from the
vehicle until it releases.
X Release the door handle.
XInsert the mechanical key into the lock of
the driver's door as far as it will go.
X Turn the mechanical key clockwise as far as
it will go to position 1.
The locking knob drops down and the driv- er's door is locked.
X Turn the mechanical key back and removeit.
X Make sure that the doors and the trunk lid
are locked.
X Insert the mechanical key into the Smart-
Key ( Ypage 80).
X Carefully press the protective cap onto the
lock cylinder until it engages and is seated
firmly. Do not pull the door handle when
doing so.
iIf you lock the vehicle as described above,
the fuel filler flap is not locked. The anti-
theft alarm system is not armed.
Trunk
Important safety notes
GWARNING
If objects, luggage or loads are not secured or not secured sufficiently, they could slip, tip
over or be flung around and thereby hit vehicle
occupants. There is a risk of injury, particu-
larly in the event of sudden braking or a sud-
den change in direction.
Always store objects so that they cannot be
flung around. Secure objects, luggage or
loads against slipping or tipping before the
journey.
!The trunk lid swings upwards when
opened. Therefore, make sure that there is
sufficient clearance above the trunk lid.
iYou can limit the opening angle of the
trunk lid in COMAND; see the separate
operating instructions.
iThe opening dimensions of the trunk lid
can be found in the "Vehicle data" section ( Y page 281).
Do not leave the SmartKey in the trunk. You
could otherwise lock yourself out.
You should preferably place luggage or loads
in the trunk. Observe the loading guidelines ( Y page 196).
Obstacle recognition with trunk lid
reversing feature
On vehicles with trunk lid remote closing fea-
ture, the trunk lid is equipped with automatic obstacle recognition with reversing feature. If a solid object blocks or restricts the trunk lid
when automatically opening or closing, this
procedure is stopped. If the trunk lid is stop-
ped during the closing procedure, it will open
again automatically. The automatic obstacle
recognition with reversing feature is only an
aid. It is not a substitute for your attentive-
ness when opening and closing the trunk lid.
GWARNING
The reversing feature does not react:
R to soft, light and thin objects, e.g. small fin-
gers
R over the last 1/3 in (8 mm) of the closing
movement
84Trunk
Opening and closing
Page 87 of 286
This means that the reversing feature cannot
prevent someone being trapped in these sit-
uations. There is a risk of injury.
Make sure that no body parts are in close
proximity during the closing procedure.
If somebody becomes trapped:R press the Fbutton on the SmartKey, or
R pull or press the remote operating switch
on the driver's door or
R press the closing or locking button on the
trunk lid
Opening/closing automatically from outside
Important safety notes
GWARNING
Parts of the body could become trapped dur-
ing automatic closing of the trunk lid. More-
over, people, e.g. children, may be standing in the closing area or may enter the closing area
during the closing process. There is a risk ofinjury.
Make sure that nobody is in the vicinity of theclosing area during the closing process.
Use one of the following options to stop the
closing process:
R press the Fbutton on the SmartKey.
R pull or press the remote operating switch
on the driver's door.
R press the closing or locking button on the
trunk lid.
GWARNING
Combustion engines emit poisonous exhaust
gases such as carbon monoxide. Exhaust
gases can enter the vehicle interior if the
trunk lid is open when the engine is running,
especially if the vehicle is in motion. There is a
risk of poisoning.
Always switch off the engine before opening
the trunk lid. Never drive with the trunk lidopen.
!The trunk lid swings upwards when
opened. Therefore, make sure that there is
sufficient clearance above the trunk lid.
iThe opening dimensions of the trunk lid
can be found in the "Vehicle data" section ( Y page 281).
Opening
You can open the trunk lid automatically
using the SmartKey. X
Press and hold the Fbutton on the
SmartKey until the trunk lid opens.
Closing
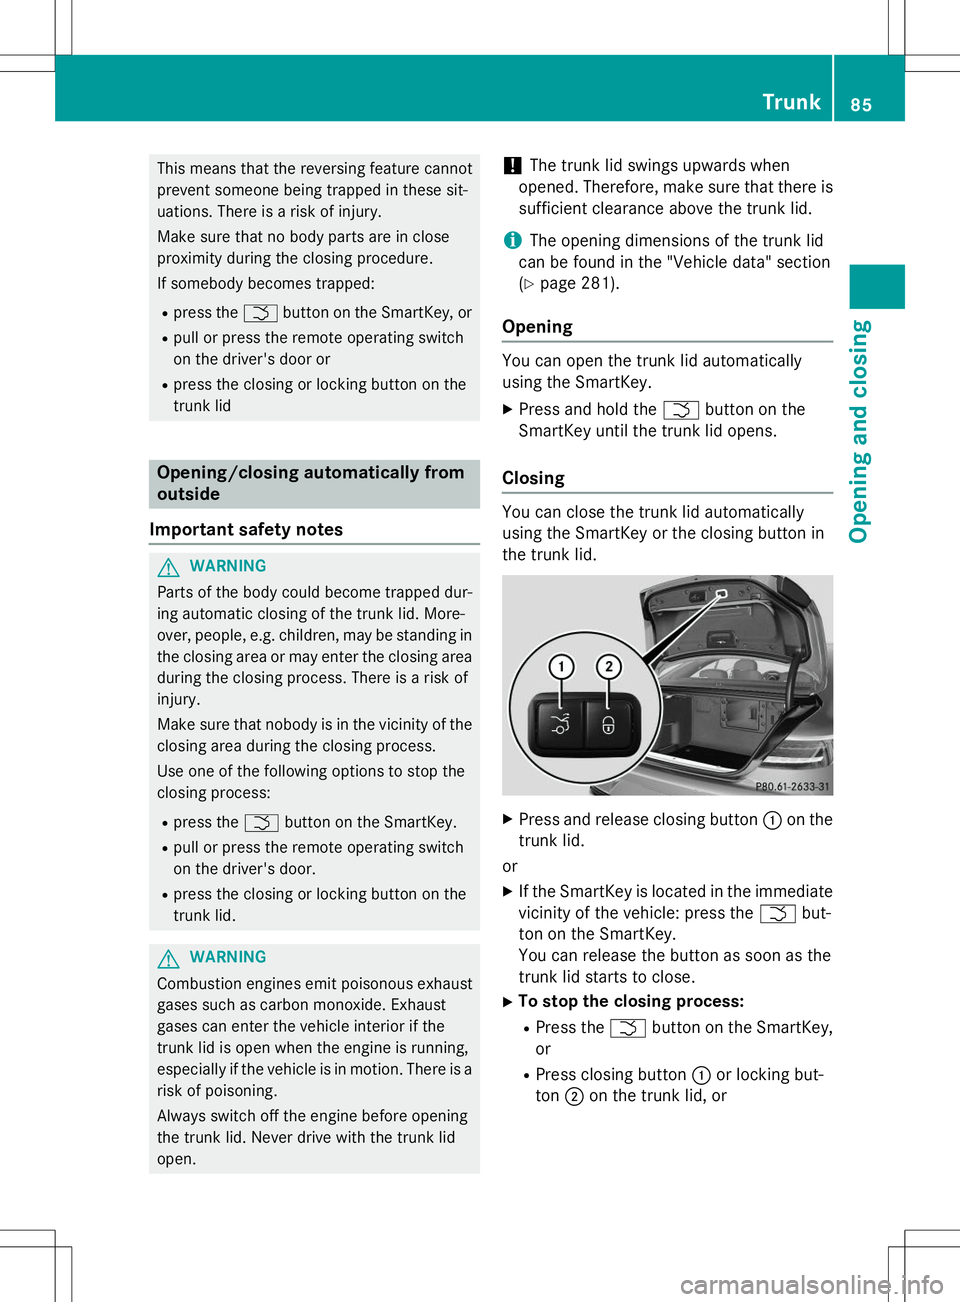
You can close the trunk lid automatically
using the SmartKey or the closing button in
the trunk lid.
X Press and release closing button :on the
trunk lid.
or X If the SmartKey is located in the immediate
vicinity of the vehicle: press the Fbut-
ton on the SmartKey.
You can release the button as soon as the
trunk lid starts to close.
X To stop the closing process:
R Press the Fbutton on the SmartKey,
or
R Press closing button :or locking but-
ton ;on the trunk lid, or
Trunk85
Opening and closing
Z